background image

6.

10

Printer Options

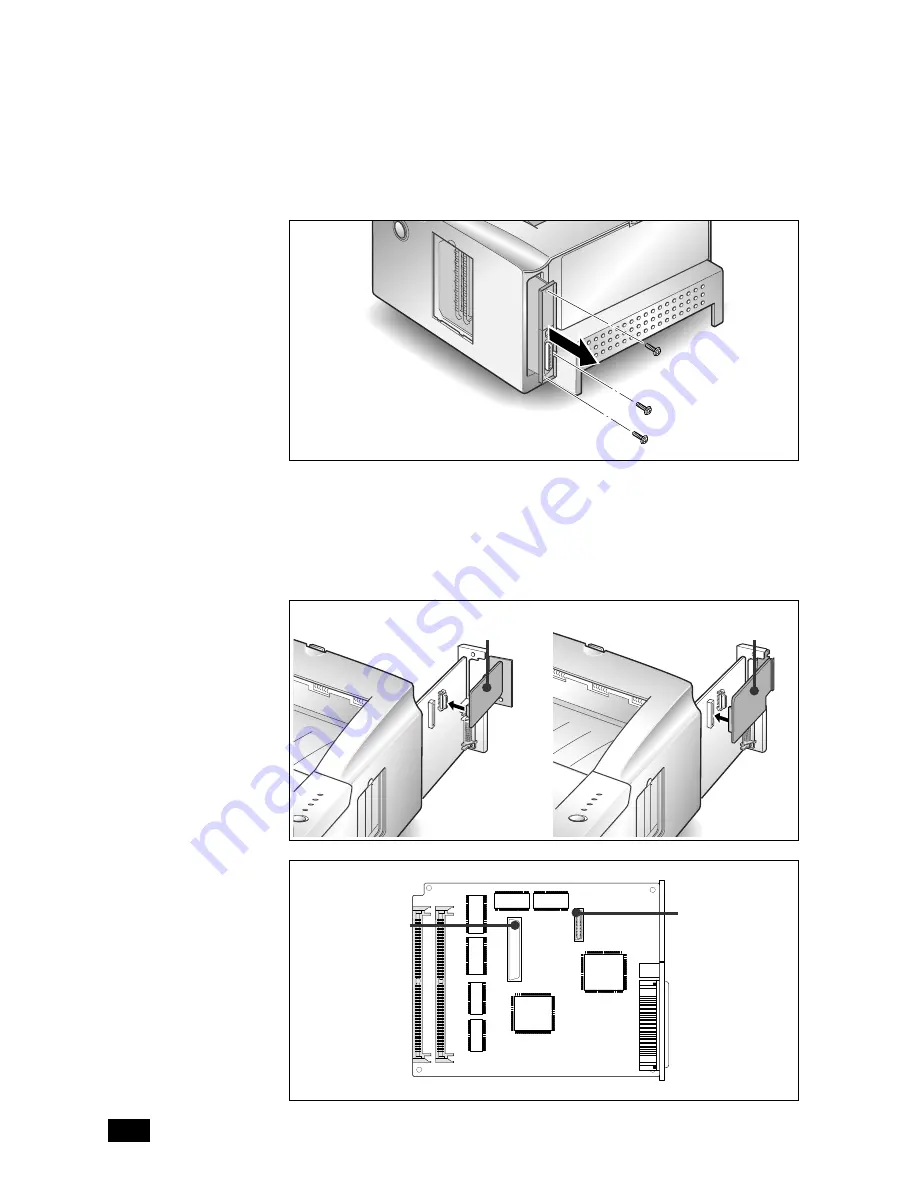
5. Remove the three screws securing the board and pull the board out

of the printer. Unpack the Serial/LocalTalk card or Network card.
Avoid touching its contact pins.

6. Align the connector on the Serial/LocalTalk card or Network card with

the connector on the control board.

Push the card firmly into the connector until it is completely inserted in
place. The two connectors should fit snugly together.

Serial/LocalTalk
card Connector

Network card

Connector

Network Card

Serial/LocalTalk Card

Summary of Contents for QL 6100

Page 1: ...Laser Printer User s Guide Q Qw wi ik kL La as se er r 6 61 10 00 0 S Se er ri ie es s ...

Page 2: ...ELECTRONICS P N JC68 00232A Rev 1 00 Visit us at http www samsungtelecom com If you have access to this online service you can download the User s Guide and drivers from Samsung Electronics ...

Page 3: ...s of Apple Computer Inc Microsoft MS Windows and MS DOS are registered trademarks of Microsoft Corporation PostScript is a registered trademarks of Adobe Systems Inc CompuServe is a registered trademark of CompuServe Inc All other brand or product names are trademarks or registered trademarks of their respective companies or organizations Copyright This manual is provided for information purposes ...

Page 4: ...ase the separation between the equipment and receiver Connect the equipment into an outlet on a circuit different from that to which the receiv er is connected Consult the dealer or an experienced radio TV technician for help Do not make any changes or modifications to the equipment unless otherwise specified in the manual If such changes or modifications should be made you could be required to st...

Page 5: ...netic Compatibility and Low Voltage Directive 73 23 EEC Compliance was demonstrated to the following specifications as listed in the official journal of the European Communities EN 50081 Emissions EN 55022 Radiated Class B EN 55022 Conducted Class B EN 61000 3 2 Power Harmonics EN 61000 3 3 Voltage Fluctuations and Flicker EN 50082 Immunity IEC 801 2 Electrostatic Discharge IEC 801 3 RF Radiated I...

Page 6: ... eyes CAUTION INVISIBLE LASER RADIATION WHEN THIS COVER IS OPEN DO NOT OPEN THIS COVER VORSICHT UNSICHTBARE LASERSTRAHLUNG WENN ABDECKUNG GEÖFFNET NICHT DEM STRAHL AUSSETZEN ATTENTION RAYONNEMENT LASER INVISIBLE EN CAS D OUVERTURE DANGEREUSE AU FAISCEAU ATTENZIONE RADIAZIONE LASER INVISIBILE IN CASO DIAPERTURA EVITARE L ESPOSIZIONE AL FASCIO PRECAUCION RADIACION LASER IVISIBLE CUANDO SE ABRE EVITA...

Page 7: ... printer contains advanced energy conservation technology that reduces power con sumption when it is not in active use When the printer does not receive data for an extended period of time power consump tion is automatically lowered For potentially faster printing of the first page you may turn the power save off from the Remote Control Panel setting The energy star emblem does not represent EPA e...

Page 8: ... Network Interface 2 9 Attaching the Power Cord and Testing the Printer 2 10 Printer Driver Installation 2 11 Windows 95 98 NT 4 0 2 11 Windows 3 1x 2 11 Printer Driver Features 2 12 Software Utilities Installation 2 13 Installing the USB Port Driver Windows 98 2 13 Installing the RCP and SM Windows 2 13 Installing Optional Software 2 14 Installing the PostScript PPD 2 14 Making Installation Diske...

Page 9: ...lex Printing 4 5 Booklet Printing 4 6 PostScript Driver Features 4 7 Using Printer Utilities 4 8 Remote Control Panel 4 8 Status Monitor 4 11 Requirements for Printing in Macintosh 4 12 Printing a Document 4 12 Chapter 4 Chapter 4 Printing Cleaning the Printer 5 1 Cleaning the Outside 5 1 Cleaning the Inside 5 1 Clearing Paper Jams 5 2 Paper Jam in Output Area 5 2 Paper Jam in Input Area 5 4 Paper...

Page 10: ...mory and PostScript SIMMs 6 2 Serial LocalTalk Card or Network Card 6 8 Option Cassette 6 14 Chapter 6 Chapter 6 Printer Options Printer Specification 7 1 Language Codes 7 2 Paper Size 7 3 Index 7 4 Chapter 7 Chapter 7 Printer Specifications ...

Page 11: ...Introduction 1 ...

Page 12: ...QwikLaser 6100N only QwikLaser 6100 CD ROM Note This CD ROM contains the software required to operate your printer along with useful printer utilities Should your computer not be equipped with a CD ROM drive please refer to Making Installation Diskettes page 2 17 for detailed instructions for creating installation diskettes If any items are missing or damaged notify your dealer immediately 3 Caref...

Page 13: ...Inside Front View Face down output stacker Paper support Cassette 250 sheet Option Cassette 250 sheet Multi Purpose Tray MP Tray Control panel Control board cover provides access to SIMM slots for adding removing additional memory Top cover Toner cartridge Top cover release button Paper level indicator Figure 1 1 Figure 1 2 ...

Page 14: ...1 3 Introduction Rear View Cooling vent Exhaust fan Power switch Power cord connector Rear cover with face up output stacker inside Printer cable connector Figure 1 3 ...

Page 15: ...about four seconds until all lights blink briefly then let go of button Self test Turn printer on line READY light on Press and hold button for about four seconds until all lights blink briefly then let go of button The configuration sheet will print Release unprinted data If READY light is blinking slowly and printer does not print press and hold button for about four seconds Adjust print quality...

Page 16: ...d blinking ERROR MANUAL PAPER READY Paper jam ERROR MANUAL PAPER READY Off line ERROR MANUAL PAPER READY Manual feed mode ERROR MANUAL PAPER READY Error Printer cover open or Toner cartridge not installed ERROR MANUAL PAPER READY Printing with Manual ERROR MANUAL PAPER READY Insufficient memory for the job ERROR MANUAL PAPER READY System error ERROR MANUAL PAPER READY Waiting for paper to be Manua...

Page 17: ... 2 Compatible Other options include a option cassette and a Serial LocalTalk interface board for Apple Macintosh compatibility Printer Documentation Your Qwik Laser 6100 is packaged with the following documentation and information This User Guide which shows you how to set your printer up and running and provides you with all of the information you will need to use maintain upgrade and troubleshoo...

Page 18: ...re used to emphasize useful important and critical information They are as follows This symbol indicates a caution against performing any action that may damage your printer or degrade performance This symbol indicates a warning against performing any action that may lead to physical injury ...

Page 19: ...Printer Setup 2 ...

Page 20: ...tup Installing the Toner Cartridge 1 Open the printer cover by pressing the cover release button 2 Raise the printer cover 3 Unpack the toner cartridge and carefully pull the sealing tape completely out of cartridge ...

Page 21: ... from side to side 5 or 6 times to distribute the toner evenly inside the cartridge 5 Find the cartridge slots inside the printer one on each side 6 Grasp the handle and slide the cartridge down between the cartridge slots until it drops into place ...

Page 22: ...room light To avoid damaging photo sensitive drum never open drum shutter To avoid damaging cartridge complete cartridge installation as quickly as possible If toner gets on your clothing wipe it off with a dry cloth and wash clothing in cold water When printing text at 5 coverage you can expect a toner cartridge life of approximately 6 000 pages ...

Page 23: ...sette see Option Cassette on page 6 14 you can also load paper in the option cassette The window on the front of the paper cassette shows the amount of paper currently left in the cassette When the cassette becomes empty the window turns into red To load a stack of paper 1 Remove the paper cassette by pulling it toward you Paper full Paper empty 2 Press the bottom plate until it locks into place ...

Page 24: ...XXXXXXXXXX If you are using a preprinted stock such as letterhead place the printed design side face down with the top edge of the page toward the front of the cassette 4 Make sure that the stack goes under the metal retaining clip and the plastic tabs on the end guides Paper overloading may cause paper jams Make sure that paper is under this metal clip A A ...

Page 25: ... side guide as shown below to adjust it to proper paper width The paper cassette is preset to load letter size paper If you want to load A4 or legal size paper adjust the cassette for the paper you want to load For details on how to adjust the paper cassette see How to Adjust Paper Guides on page 3 3 7 Insert the cassette back into the printer ...

Page 26: ...tion required Postscript Option Postscript Simm and 8 MB Ram Simm 3 Network Ethertalk interface Mininum System requirements for Macintosh Mac OS 7 0 or later LaserWriter 8 Macintosh System with Network Ethertalk port QwikLaser Option required Postscript Option Postscript Simm and 8 MB Ram Simm Network card Option If you do not have these option cards contact your authorized Samsung dealer For more...

Page 27: ... the cable to the parallel interface port on your computer See your computer documentation if you need help USB Interface 1 Make sure that both the printer and computer are turned off 2 Plug the USB interface cable into the connector on the back of the printer 3 Connect the other end of the cable to the USB port on your computer See your computer documentation if you need help Note To print using ...

Page 28: ...the printer LocalTalk Interface Requires option See page 6 8 1 Make sure that both the printer and computer are turned off 2 Plug the LocalTalk interface cable into the connector on the back of the printer Network Interface Requires option See page 6 8 1 Make sure that both the printer and computer are turned off 2 Plug the Network interface cable into the connector on the back of the printer ...

Page 29: ...rs up all operator panel lights turn on briefly When only the READY light is steadily on press and hold the operator panel button until all lights are blinking approximately four seconds then release the button A test page should print out If this does not happen re check the installation The test page lists your printer model and default settings along with the data streams available for your pri...

Page 30: ...INNING INSTALLATION A system reboot may be required after the software is installed Windows 95 98 NT 4 0 1 Insert the QwikLaser 6100 CD ROM into your CD ROM drive If Windows automatically runs the CD ROM skip to Step 4 2 Select Run from the Start menu 3 Type d setup exe on the command line where d is your CD ROM drive letter then click OK 4 Select the appropriate language 5 Select Printer Driver a...

Page 31: ...ng is not available in Macintosh Setting Number of copies Usage Description PCL6 PCL5e PS1 Select 1 99 copies Page orientation Select Portrait or Landscape Paper size Select from supported paper sizes see 7 3 Paper source Select printing from the cassette MP Tray or option cassette if installed Graphic quality Select enhancement for graphical and or text printing Graphic mode Select vector or rast...

Page 32: ...nel and the SM Status Monitor software are Windows based programs that allow the user to set default printer values as well as monitor the status of the printer These two utilities can be used when the printer is connected via the parallel and USB Windows 98 only interface 1 Insert the QwikLaser 6100 CD ROM into your CD ROM drive If Windows automatically runs the CD ROM skip to Step 3 2 For Window...

Page 33: ...use of the operating system files on the original CD ROM or diskettes that came with your system Using the PostScript printer driver requires installation of the PostScript option Installation instructions for this option are provided in Chapter 6 Printer Options Windows 95 98 and NT 4 0 Installation 1 Insert the QwikLaser 6100 CD ROM into your CD ROM drive 2 Select Run from the Start menu 3 Type ...

Page 34: ...xtensions folder 6 Open Chooser in the Apple menu 7 Click on LaserWriter8 provided with your Macintosh Then the name of your printer appears QwikLaser 6100 8 Click on the QwikLaser 6100 printer 9 Click on the Setup button Note If there is a Create button click on it The installation is completed and you do not need to proceed with the following steps 10 Click on the Auto Setup button Note The ML 6...

Page 35: ...folder 6 Open Desktop Printer Utility Its location is Macintosh HD Apple Extras Apple LaserWriter Software 7 Click on the Printer USB and OK button 8 Click on the Change button of USB Printer Selection section Then the name of your printer appears 6100 9 Click on the 6100 printer and OK button 10 Click on the Auto Setup button of PostScript Printer Description PPD file section The ML 6100 ppd file...

Page 36: ...d is the CD ROM drive letter XX is the language code1 i e EN for English and a is the floppy drive letter Windows NT 4 0 Copy d XX pcldrv pcl6 winNT a where d is the CD ROM drive letter XX is the language code1 i e EN for English and a is the floppy drive letter RCP SM 1 Windows 95 98 and 3 1x Label a new or freshly formatted diskette QwikLaser 6100 RCP SM and insert it into the floppy drive Windo...

Page 37: ...floppy drive letter Windows NT 4 0 Copy d XX pcldrv pcl5e winNT a where d is the CD ROM drive letter XX is the language code1 i e EN for English and a is the floppy drive letter USB Port Driver Windows 98 only 1 Label a new or freshly formatted diskette QwikLaser 6100 USB Port Driver and insert it into the drive 2 Copy d XX usb a where d is the CD ROM drive letter XX is the language code1 i e EN f...

Page 38: ...ect Samsung 6100 Series PCL6 Click Next 8 Select the port by default LPT1 Click Next 9 We recommend that the PCL6 driver be the default driver Click Next 10 Click Finish Windows NT 4 0 1 Insert the diskette QwikLaser 6100 PCL6 Driver 2 From the Start menu select Settings Printers 3 Double click Add Printer 4 Select My Computer Click Next 5 Select the port by default LPT1 Click Next 6 Click Have Di...

Page 39: ...river Highlight the driver and click Set as Default Printer 8 Click Close RCP and SM Windows 95 98 and NT 4 0 1 Insert the diskette QwikLaser 6100 RCP SM Note RCP only for Windows NT 4 0 2 From the Start menu select Run 3 Type a setup exe Click OK 4 Follow on screen instructions Windows 3 1x 1 Insert the diskette QwikLaser 6100 RCP SM 2 Open the Program Manager and select Run from the File menu 3 ...

Page 40: ... driver to enable you to remove the driver and all associated files from your hard disk if so required To uninstall the driver proceed as follows 1 Select Start Programs Samsung 6100 Series Uninstall 6100 Series Driver from the windows task bar 2 PLC6 and PCL5e drivers are removed from your hard disk ...

Page 41: ...Print Media Information 3 ...

Page 42: ...quantity Media Sizes and Capacities Table 3 1 shows the QwikLaser 6100 supported media sizes and input capacities Depending on paper thickness maximum capacity may be reduced If you are experiencing excessive jamming feed one sheet at a time Size Paper Letter 8 5 x 11 in Legal 8 5 x 14 in Executive 7 25 x 10 5 in Folio 8 5 x 13 in A4 210 x 297 mm ISO B5 176 x 250 mm A5 148 x 210 mm Envelopes Com 1...

Page 43: ...y paper The pigments must withstand the printer s fusing temperature of 400o F 205o C for 0 1 second without deterioration Do not use paper with a colored coating that was added after the paper was produced Preprinted forms must be printed with nonflammable heat resistant inks that do not melt vaporize or release hazardous emissions when subject to the printer s approximately 400o F 205o C fusing ...

Page 44: ...ner of the cassette with the appropriate main guide The cassette is preset to a letter size If you want to load legal A4 or folio size paper remove the auxiliary guide and place it in the side slot as shown Use for letter executive B5 size paper Use for A4 legal Folio size paper Auxiliary guide for letter size paper L T R E X E O J IS B 5 IS O B 5 L T R E X E O J IS B 5 IS O B 5 2 1 If the left ma...

Page 45: ...e guide as shown and slide the guide to the left until it lightly rests against the edge of the paper stack Note Do not push the width guide far enough to cause the paper to move up If you do not adjust the width guide it may cause paper jams L T R E X E O J IS B 5 IS O B 5 L T R E X E O J IS B 5 IS O B 5 1 2 Width guide Paper To adjust for letter LTR executive EXEC JIS B5 or ISO B5 size paper squ...

Page 46: ...Print material is loaded face up in the MP tray When you print from the MP tray you must select the paper source from your software application and then select the paper size and type from the software application for the print material you have loaded MP Tray Guidelines Load only one size of paper or envelopes at a time in the MP tray To achieve the best possible print quality use only high quali...

Page 47: ...e extender to extend the tray to its full length position to hold longer paper 3 Prepare the print material for loading For paper and envelopes Flex paper or fan envelopes back and forth Do not fold or crease the paper Straighten the edges on a level surface Note If envelopes jam while printing try reducing the number of envelopes in the MP tray ...

Page 48: ...hing the print side Fan the stack of transparencies to prevent feeding failures Be careful not to scratch or leave fingerprints on the print side 4 Notice the print materials stack height limit mark on the inner side of the paper guide Use it as a guide for stack height when loading print materials ...

Page 49: ...nt side face up Load envelopes with the flap side down The stamp area is on the left side The end of the envelope with the stamp area enters the MP tray first Note Do not feed stamped envelopes The stamp is shown for placement only Never use envelopes with clasps snaps windows coated lining or self stick adhesives These envelopes may severely damage the printer Load transparencies or label sheet w...

Page 50: ...r as it will go Do not force it Forcing causes buckling of the print material 7 Make sure you have not loaded too much print material The stack should be under the stack height limit mark The print material buckles if you load a stack that is too deep or push the stack in too far 8 Slide the paper width guide to the left until it lightly touches the stack of print material Do not bend the print ma...

Page 51: ...3 10 Print Media Information Closing the MP Tray If you want to close the MP tray push the extender straight back to collapse the MP tray to its short length position Then close the MP tray door ...

Page 52: ...inted side facing up If you experience paper jams especially when you load paper envelopes or other special media into the MP tray use the rear output tray 1 To use the rear output tray open the rear cover The cover functions as an output tray 2 Pull the extender to extend the output tray to its full length position to hold longer paper ...

Page 53: ...t side facing up S a m s u n g P r i n t e r Note The printed pages do not stack on the standard output bin located on top of the printer unless you close the rear output tray If you want to stack the printed pages on the standard output bin close the rear output tray ...

Page 54: ...3 13 Print Media Information Memo ...

Page 55: ...Printing 4 ...

Page 56: ... using to create the document and open the document you want to print 2 Select Print from the File menu The Print dialog box appears Note Most Windows applications allow you to make changes to the print settings such as number of copies sequence of the pages paper orientation and margins If you go to the File Print Properties dialog box In Windows 3 1x the equivalent command is File Print Setup Op...

Page 57: ...95 98 NT 4 0 1 Select Start Settings Printers 2 Double click Samsung 6100 Series PCL6 3 Select Set As Default from the Printer menu 4 To set the printer s properties select Properties from the Printer menu and change the settings as described in the section Setting Properties page 4 3 Windows 3 1x 1 Double click Main from the Program Manager Then double click Control Panel then Printers 2 Select S...

Page 58: ... with the printer driver The Samsung 6100 Series PCL6 Print Setup dialog box includes five tabs Paper Output Image Quality Overlays Watermarks About Note To use the PCL5e driver follow the same instructions Overlays and Watermarks are not available in the PCL5e driver for Windows 3 1x 95 98 and NT 4 0 The basic capabilities of the printer driver are described here For detailed explanations and ass...

Page 59: ... of the document The Images per Sheet feature will print multiple pages of an electronic document onto one physical sheet The driver has the following selections for this feature 1 Up 2 Up 4 Up 6 Up 9 Up 16 Up For example if you have a four page electronic document and you select Images per Sheet to be 2 Up each physical sheet printed will contain 2 electronic pages per sheet For more information ...

Page 60: ...ge For more detailed information refer to the on line help You can print the first side on paper loaded in either cassette or option cassette or the MP Tray stacked or manual feed but the reverse side must be fed from the MP Tray Figure 4 1 shows proper paper orientation and binding direction for duplex print jobs Orientation Portrait Binding Long Edge Orientation Landscape Binding Short Edge Orie...

Page 61: ...to the QwikLaser 6100 using the PCL6 driver 5 In the driver properties select Paper size to correspond to what was selected in Step 2 Output format to Booklet Printing For more assistance check Instruction Page under Manual 2 Sided Printing This will generate an instruction page to aid in printing the second side For more detailed information refer to the on line help Note Booklet Printing is a sp...

Page 62: ...Auto MP Cassette Option cassette Manual Win 95 98 Win NT 4 0 Auto MP Cassette Option cassette Manual Auto MP Cassette Option cassette Manual N up Yes 1 2 4 6 9 16 Yes 1 2 4 No Resolution 300 600 300 600 300 600 Image Enhancement Yes Yes Yes Toner Saver Miscellaneous Graphics Options No Yes Yes Print As Negative Image Yes Yes Yes Print as Mirror Image No Yes Yes No Yes Yes Scaling Yes Yes Yes ...

Page 63: ...t up your printer to work with DOS applications which run inside the Windows MS DOS Command Prompt window Note After you change RCP settings you must send it to the printer by pressing the Send button The screen includes the following tabs PRINTING Use this tab to control the following printer features Paper Size sets the paper size Paper Source sets the default paper source Copies sets the number...

Page 64: ...rinter does not reprint a page that has jammed When set to ON the printer keeps the image in memory for a printed page until the printer signals that the page has successfully printed The printer reprints all jammed pages Altitude helps the printer optimize its output depending on the air pressure of the region If you are close to sea level it should be set to Low If at a high elevation 1 500 m 5 ...

Page 65: ...features and specifications PCL5e These settings are used by DOS applications Be aware that Windows applications will override these settings Typeface allows you to select the desired typeface This setting is ignored when the software application specifies a font Symbol Set determines the symbol set A symbol set is a set of alphabetic and numeric characters punctuation and special symbols used whe...

Page 66: ... font list showing all the fonts available for PostScript ABOUT This tab shows the software version and copyright information Status Monitor Status Monitor is a program that runs in the background and automatically displays a message on your computer screen whenever the printer status changes This utility is available only in Windows 95 98 and 3 1x ...

Page 67: ...for Macintosh Mac OS 7 0 or later LaserWriter 8 Macintosh System with Network Ethertalk port QwikLaser 6100 Option required Postscript Option Postscript Simm and 8 MB Ram Simm Network card Option Printing a Document The following procedure describes general steps required for printing from various Macintosh applications The exact steps for printing a document may vary depending on the application ...

Page 68: ...4 13 Printing Memo ...

Page 69: ...Troubleshooting 5 ...

Page 70: ...ater but be careful not to let any water drip onto the printer or inside it Cleaning the Inside When paper jams occur unfused toner on the paper can fall off the paper and build up inside the printer 1 Unplug the power cord 2 Remove the toner cartridge 3 Use a soft cloth to wipe away any dust and spilled toner from the cartridge Note You can dampen the cloth slightly with water but be careful not ...

Page 71: ...OR indicator light both come on steadily on the operator panel Follow the steps below to clear jam To avoid tearing paper pull the jammed paper out gently and slowly Paper Jam in Output Area 1 If the paper jams as it exits to the output bin and a long portion of the paper is visible pull the paper straight out If there is resistance when you pull the paper and it does not move immediately when you...

Page 72: ...5 3 Troubleshooting 3 Loosen the paper if it is caught in the feed rollers Then pull the paper gently out 4 Close the rear cover 5 To resume printing open the printer cover then close the cover back ...

Page 73: ...per back out of the printer toward you 3 Slide the cassette back into the printer Note If a short piece is visible and you cannot grasp it or if you do not see the paper the jam has occurred inside the printer See the following page 4 After clearing the jam if the printer does not resume printing open the printer cover then close it again ...

Page 74: ... the printer cover by pressing the cover release button and raise the cover 2 Remove the toner cartridge 3 Gently pull the paper toward you 4 Check that there is no other paper in the printer 5 Reinstall the toner cartridge then close the printer cover ...

Page 75: ...alf way out of the printer 2 If you see the paper jammed pull the paper out 3 Slide the upper cassette back into the printer Note If a short piece is visible and you cannot grasp it or if you do not see the paper the jam has occurred inside the option cassette See the following page ...

Page 76: ...r paper cassette out of the printer 5 If you see the jammed paper pull the paper out 6 Slide the cassettes back into the printer 7 After clearing the jam if the printer does not resume printing open the printer cover then close it again ...

Page 77: ...rectly Do not overload the paper cassette Make sure the paper is under the paper capacity mark on the inside of the paper cassette Do not remove paper cassette while print jobs are in process Flex fan and straighten the paper before loading it Do not load stacks of labels or transparencies in the cassette Labels or transparencies must be fed using the MP tray Do not load wrinkled creased damp or h...

Page 78: ...e toner cartridge The printer may be configured incorrectly Check the application to make sure that all print settings are correct Paper has not been loaded correctly Remove the paper tray and reload the paper correctly The printer ejects blank pages The toner cartridge is out of toner Replace the toner cartridge There is too much paper in the paper tray Remove some of the paper from the tray The ...

Page 79: ...again The printer cable specifications may be incorrect Parallel connection Replace with an IEEE 1284 rated cable Serial connection Replace with standard 9 pin direct connection one to one cable USB connection Replace with a compliant cable rated USB Specification Revision 1 0 The printer cable specifications may be incorrect Parallel connection Replace with an IEEE 1284 rated cable Serial connect...

Page 80: ...ws 95 98 or NT 4 0 the spooling setting may be set incorrectly The computer may have insufficient random access memory RAM From the Start menu select Settings and Printers Click the Samsung 6100 Series PCL6 icon with the right mouse button select Properties click the Details tab and then click the Spool Settings button Select the desired spool setting from the available choices Install more random...

Page 81: ...the printer Black staining There is a paper quality problem Use only paper that meets printer specifications See the section Selecting Print Media page 3 1 Character voids The paper may be too dry Try printing with a different batch of paper A toner cartridge from another printer has been installed Always use the same toner cartridge with the same printer Using a cartridge that has already been us...

Page 82: ...r does not absorb too much moisture from the air Back of printout dirty The transfer roller may be dirty Print a few blank pages to clean the transfer roller Incorrect fonts TrueType fonts may be disabled Use the Fonts dialog box in the Remote Control Panel to enable TrueType fonts Faded graphics Toner may be low Remove the toner cartridge and shake it gently to evenly distribute the toner Then re...

Page 83: ... memory may be insufficient Error messages are printed i e This job contains binary data Open the Properties tab of the PostScript printer driver click on PostScript and click on the Advanced button The pure binary data option is not supported Choose another The pure binary data option is not supported by the PostScript driver The printer name does not appear in the Chooser Macintosh only Make sur...

Page 84: ... a power outage occurred in your area Is a toner cartridge installed in the printer Is the cover closed completely Once you ve checked all these things turn your printer off and back on again If your printer is still not operating properly call for service Notes If the READY light is on print out a configuration sheet by pressing and holding down the control panel button for about four seconds unt...

Page 85: ...Printer Options 6 ...

Page 86: ...dling capacity This chapter provides detailed installation instructions for each of these options Precautions DISCONNECT THE POWER CORD Never remove the printer control board while the printer is plugged in To avoid the possibility of electrical shock always disconnect the power cord when installing or removing ANY internal or external printer option DISCHARGE STATIC ELECTRICITY The control board ...

Page 87: ...her option Note Since PostScript requires 12 MB of printer memory and the QwikLaser 6100 comes with 4 MB standard installation of the PostScript SIMM requires installation of a memory SIMM as well Review the precautions on page 6 1 and then follow this procedure to install SIMMs in your printer 1 Turn the printer power off and disconnect the power cord 2 Remove the control board cover ...

Page 88: ...cate the PostScript SIMM slot the first slot on the left as shown and the memory SIMM slot the second slot on the right as shown on the control board They are not interchangeable To install a memory SIMM continue with Step 5 To install the PostScript SIMM go to Step 7 on page 6 5 OPEN CLOSE PS 2 DRAM ...

Page 89: ...6 4 Printer Options 5 Install the memory SIMM into the second slot labeled DRAM as shown slightly angled notch side up 6 Push back on the SIMM until it clicks into place ...

Page 90: ...6 5 Printer Options 7 Install the PostScript SIMM into the first slot labeled DRAM as shown slightly angled notch side up 8 Push back on the SIMM until it clicks into place ...

Page 91: ...6 6 Printer Options 9 Make sure the SIMM is secured in place by the metal clips 10 Reinsert the metal plate then tighten one screw OPEN CLOSE ...

Page 92: ...Note For PostScript driver installation and usage information refer to the sections Installing the PostScript PPD page 2 14 and PostScript Driver Features page 4 7 To print documents from a Macintosh you must install the Serial LocalTalk option See the section Serial LocalTalk Card or Network Card page 6 8 ...

Page 93: ... required One end has a 9 pin female connector and the other end has a 9 pin male connector Do not use a null modem cable which is a twisted pair cable To use the Network I F card a standard RJ45 cable is required Review the precautions on page 6 1 and then follow this procedure to install the Serial LocalTalk or Network card option in your printer 1 Turn the printer power off and disconnect the p...

Page 94: ...6 9 Printer Options 3 Remove one screw and remove the metal plate in the direction of the arrow OPEN CLOSE 4 Unplug the two connectors from the control board ...

Page 95: ...Avoid touching its contact pins 6 Align the connector on the Serial LocalTalk card or Network card with the connector on the control board Push the card firmly into the connector until it is completely inserted in place The two connectors should fit snugly together Serial LocalTalk card Connector Network card Connector Network Card Serial LocalTalk Card ...

Page 96: ...6 11 Printer Options 7 Slide the control board back into the printer 8 Insert the control board in place and tighten the two screws Network Card Serial LocalTalk Card ...

Page 97: ...6 12 Printer Options 9 Tighten the third screw as shown Reconnect the two connectors that were removed in Step 4 10 Reinsert the metal plate then tighten one screw OPEN CLOSE ...

Page 98: ...trol board cover 12 Reconnect the power cord printer cable and turn on the power Note To print documents from a Macintosh you must also install the PostScript option and additional memory See the section Memory and PostScript SIMMs page 6 2 ...

Page 99: ...aser 6100 by installing the option cassette which consists of two components as shown in Figure 6 1 Review the precautions on page 6 1 and then follow this procedure to install option cassette in your printer 1 Turn off the printer and disconnect the power cord Support unit Paper tray Figure 6 1 ...

Page 100: ...t unit and lower it into place on the tabs and connector 4 Load paper in the cassette 5 Reconnect the power cord then turn on the printer Note To verify proper installation print a configuration sheet To print from option cassette configure the printer driver from your application prior to printing See Configuring the PCL Drivers page 4 2 ...

Page 101: ...Printer Specifications 7 ...

Page 102: ...umidity 20 80 RH Weight 12 Kg 25 lb External Dimensions 360 W x 426 D x 220 H mm 14 2 W x 16 8 D x 8 7 H in Toner Cartridge Life Span 6 000 pages 5 area coverage Emulation PCL5e PCL6 optional PostScript Level 2 Compatible Fonts 1 bitmap 45 scalable 35 Intellifont 10 TrueType RAM Memory Interface Switching Standard 4 MB Expandable to 68 MB 72 pin EDO non parity 60ns 4 MB 8 MB 16 MB 32 MB or 64 MB C...

Page 103: ...l LocalTalk Interface Optional Serial RS 232C 300 600 1200 2400 4800 9600 19200 38400 57600 115 2Kbps XON XOFF DTR DST Protocol RobustXON for XON XOFF LocalTalk Macintosh Host Interface 230 4KBPS SDLC FMO Coding RS 232C Network Optional QwikLaser 6100N is default Ethernet 10 100M Base T Novell TCP IP and AppleTalk LPD Language Codes Code DE EN ES FR IT KR PT Language German English Spanish French ...

Page 104: ...16 330 8 5 13 216 356 8 5 14 184 267 7 25 10 5 140 216 5 5 8 5 176 250 182 257 148 5 210 16 24 lb 16 24 lb A6 105 148 5 ENVELOPE COM 10 MONARCH DL C5 C6 105 241 4 12 9 5 98 191 3 87 7 5 110 220 4 33 8 66 162 229 6 38 9 01 114 162 4 49 6 38 TRANSPARENCY A4 LETTER 210 297 216 279 8 5 11 LABEL A4 LETTER 210 297 216 279 8 5 11 16 43 lb PAPER WEIGHT CUT SHEET ENVELOPE 250 20 lb 250 20 lb 100 20 lb 10 2...

Page 105: ...Exhaust fan 1 3 F Face down output stacker 1 2 I Interfaces 7 2 LocalTalk 2 9 Network 2 9 Parallel 2 8 Serial 2 9 USB 2 8 L Labels Capacity 3 1 Language Codes 7 2 LocalTalk interface 2 7 2 9 LocalTalk option 6 1 6 8 M Macintosh Installing PostScript PPD 2 14 Interface 2 7 Media Selection guidelines 3 2 Sizes and Capacities 3 1 Memory 6 2 7 1 Multi Purpose Tray MP Tray 1 2 3 1 7 3 Using the MP Tray...

Page 106: ...20 Rear cover 1 3 Rear Output Tray 3 11 Remote Control Panel 4 8 ABOUT tab 4 11 CONFIG tab 4 9 INTERFACE tab 4 10 JOB tab 4 9 PCL5e tab 4 10 PRINTING tab 4 8 PS II tab 4 11 TEST tab 4 10 Resolution 7 1 S Serial interface 2 9 Serial option 6 1 Installing 6 8 Status Monitor 4 11 T Toner cartridge 1 2 Installing 2 1 Top cover 1 2 Top cover release button 1 2 Transparency film 3 1 7 3 Troubleshooting ...

Reviews: