background image

English - 

Using the Media Play Function

This function enables you to view and listen to photo, music and movie files saved on a USB Mass Storage Class (MSC) device.

Entering the Media Play Menu

1. 

Press the 

MENU

 button. Press the ▲ or ▼ button to select 

Application

, then 

press the 

ENTER

button.

Press the ▲ or ▼ button to select 

Media Play (USB & DLNA)

, then press the 

ENTER

button.

Press the 

MEDIA.P

 button on the remote control to display the 

Media Play


menu.

Press the 

SOURCE

 button on the remote control repeatedly to select 

USB

 or 

DLNA

, then press the 

ENTER

button.

Press the Red button, then press the ▲ or ▼ button to select the corresponding 

USB Memory Device (i.e. if connected through a hub). Press the 

ENTER

button.

This function differs depending on the USB Memory Device/ DLNA device  

connected to TV. 

The selected USB device name appears at the bottom left of the screen.

4.

  Press the ◄ or ► button to select an icon (

Photo, Music, Movie, Setup

), then 

press the 

ENTER

button. 

To exit 

Media Play

 mode, press the 

MEDIA.P

 button on the remote control.

In this mode, you can enjoy movie clips contained on a Game, but you cannot 

play the Game itself. 

Removing a USB Memory Device Safely

You can remove the device safely from the TV.

1. 

Press the 

TOOLS

 button in the Media Play file list screen, or while a Slide Show, 

music, or movie file is being played.

Press the ▲ or ▼ button to select 

Safe Remove 

, then press the 

ENTER

button.

Remove the USB device from the TV.

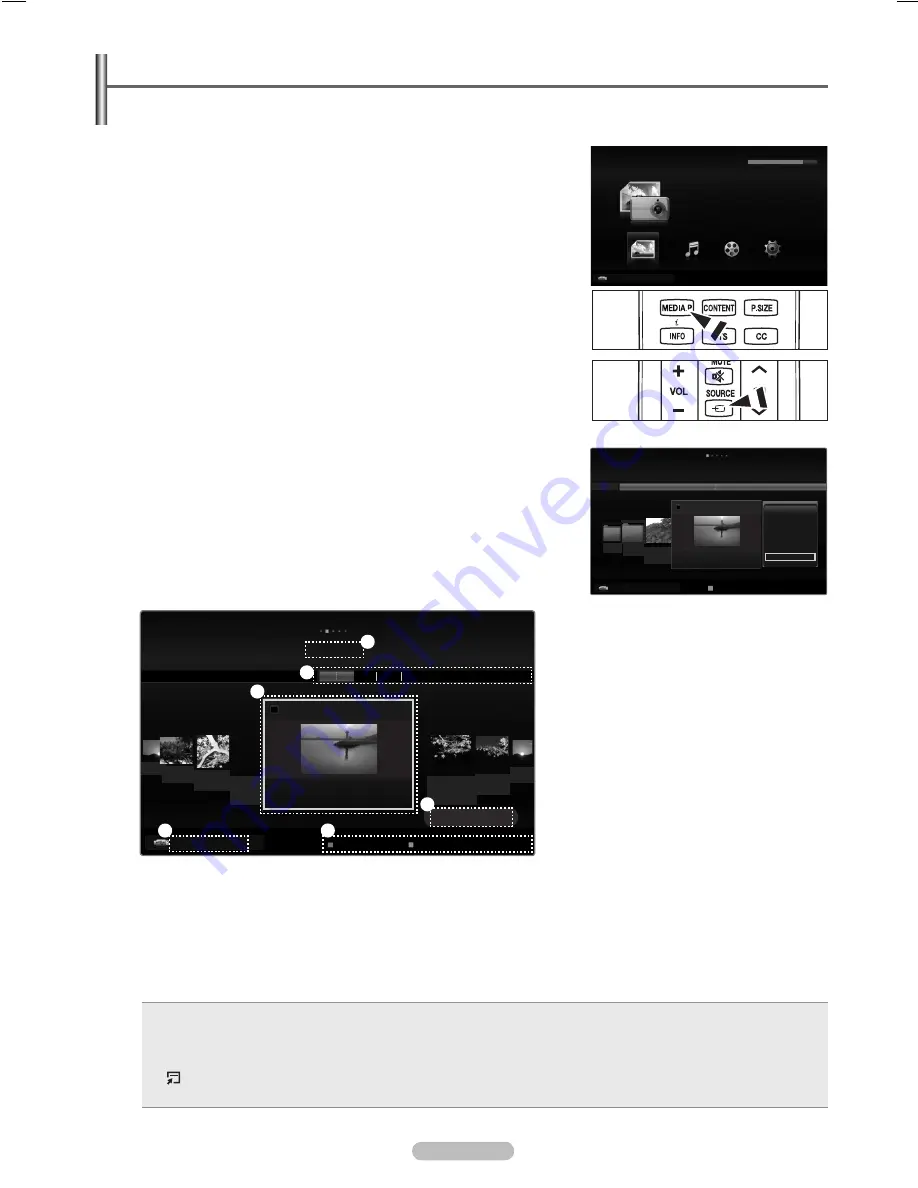
Screen Display

1. 

Current Sort Standard: This field shows the current standard for sorting files.

View Groups: The sorting group including the currently selected photo is highlighted.


Currently selected file: The currently selected file is highlighted. 

4. 

Item Selection Information: Shows the number of photos that are selected by pressing the Yellow button.

5. 

Current Device: Shows the currently selected device name.

Red

 (Device) button: Selects a connected device.

Help Items 

Green

 (Favorites Setting

) button: Changes the Favorites Setting for the selected file. Press this button repeatedly until the 

desired value appears.

Yellow

 (Select

) button: Selects file from the file list. Selected files are marked with a symbol 

c

. Press the yellow button again 

to cancel a file selection.


TOOLS

 (Tools)


button: Displays the option menus. (The Tools menu changes according to the current status.)

R

 RETURN 

(Return)


button: Return to previous menu. 

O

O

N

N

N
N

N

Media Play

Photo

Music

Setup

PHOTO

USB : USB

148.48MB/149.00MB 

Movie

R


Return

USB    

 Device

Timeline

Preference

Basic View

Color

Folder

IMG_0335.JPG

4/6

IMG_0349.

JPG

Folder 2

1

Folder 1

1

Slide Show
Copy
Play Current Group
Copy Current Group
Information
Safe Remove 

../ folder name/ 

Photo

USB    

 Device

 Select


Tools 

R

 Upper Folder

Color

Basic

 View

Timeline

Folder

Preference

Mar.01.2009

IMG_0343 

.JPG

IMG_03496 

.JPG

IMG_03496 

.JPG

Mar Apr

Jun

Nov

IMG_0335.JPG

1/67

2009

IMG_03496 

.JPG

1

1File(s) Selected

5

Photo

USB    

 Device

 Favorites Setting   


 Select 


Tools   

R

 Return

c

BN68-02269B.indb   39

2009-03-31   오후 5:07:53

Summary of Contents for PN58B650

Page 1: ...00 SAMSUNG 726 7864 www samsung com us Samsung Electronics America Inc 105 Challenger Road Ridgefield Park NJ 07660 0511 CANADA 1 800 SAMSUNG 726 7864 www samsung com ca Samsung Electronics Canada Inc Customer Service 55 Standish Court Mississauga Ontario L5R 4B2 Canada Samsung Electronique Canada Inc Service à la Clientèle 55 Standish Court Mississauga Ontario L5R 4B2 Canada BN68 02269B Thank you...

Page 2: ...ntellectual property rights of certain third parties In particular this product is licensed under the following US patents 5 991 715 5 740 317 4 972 484 5 214 678 5 323 396 5 539 829 5 606 618 5 530 655 5 777 992 6 289 308 5 610 985 5 481 643 5 544 247 5 960 037 6 023 490 5 878 080 and under US Published Patent Application No 2001 44713 A1 This license is limited to private non commercial use by e...

Page 3: ...rature or humidity This is normal and not a defect of the unit Cell Defects The PDP uses a panel consisting of 2 360 000 HD level to 6 221 000 FHD level pixels which require sophisticated technology to produce However there may be a few bright or dark pixels on the screen These pixels will have no impact on the performance of the product Avoid operating the TV at temperatures below 41 F 5 C A stil...

Page 4: ...34 Source List Edit Name 35 Support 36 Media Play Connecting a USB Device 38 Using the Media Play Function 39 Using and Sorting Photo List 40 Viewing a Photo or Slide Show 41 Using and Sorting the Music List 43 Playing a Music 44 Using and Sorting the Movie List 45 Playing a Movie File 46 Picture Music Settings Using Media Play 48 Using the Setup Menu 49 Media Play DLNA Setting the DLNA Network 50...

Page 5: ...cluded with your TV If any items are missing contact your dealer The items color and shape may vary depending on the model Remote Control BN59 00854A AAA Batteries 4301 000103 Power Cord 3903 000144 Owner s Instructions Quick Setup Guide BN68 01923A Warranty Card Safety Guide Manual Not available in all locations Cleaning Cloth BN63 01798B Holder Wire Cable TV Holder Screw BN96 10788A Refer to pag...

Page 6: ... In the on screen menu use this button as you use the ENTERE button on the remote control 2 MENU Press to see an on screen menu of your TV s features 3 VOL Press to increase or decrease the volume In the on screen menu use the VOL buttons as you would use the and buttons on the remote control 4 CH Press to change channels In the on screen menu use the CH buttons as you would use the and buttons on...

Page 7: ...t is HDMI HDMI High Definition Multimedia Interface is an interface that enables the transmission of digital audio and video signals using a single cable The difference between HDMI and DVI is that the HDMI device is smaller in size and has the HDCP High Bandwidth Digital Copy Protection coding feature installed We recommend that 14 4mm is proper for cable size This is smaller than standard N N N ...

Page 8: ...the Anynet feature ON OFF Press to backlight the buttons on the remote This function is convenient for using at night or when the room is dark Using the remote control with the ON OFF light button set to On will reduce the battery usage time PRE CH Tunes to the previous channel CH Press to change channels MENU Displays the on screen menu FAV CH Press to switch to your favorite channels a RETURN Re...

Page 9: ...eparate antennas for your TV one VHF and one UHF you must combine the two antenna signals before connecting the antennas to the TV This procedure requires an optional combiner adaptor available at most electronics shops 1 Connect both antenna leads to the combiner 2 Plug the combiner into the ANT IN terminal on the bottom of the back panel Connecting Cable TV To connect to a cable TV system follow...

Page 10: ...ble box and the B IN terminal on the RF A B switch 5 Connect another cable between the other OUT terminal on the splitter and the A IN terminal on the RF A B switch 6 Connect the last Antenna cable between the OUT terminal on the RF A B switch and the ANT IN terminal on the rear of the TV After you have made this connection set the A B switch to the A position for normal viewing Set the A B switch...

Page 11: ...the DVI AUDIO IN R AUDIO L jacks on the back of the TV If this happens contact the company that provided the DVD Blu ray Player or Cable Box Satellite receiver to confirm the HDMI version then request an upgrade HDMI cables that are not 1 3 may cause annoying flicker or no screen display Connecting a DVD Blu ray Player or Cable Box Satellite receiver Set Top Box via DVI This connection can only be...

Page 12: ... IN 1 connect the audio cable to COMPONENT IN 1 also Each DVD Blu ray Player or Cable Box Satellite receiver Set Top Box has a different back panel configuration When connecting a DVD Blu ray Player or Cable Box Satellite receiver Set Top Box match the color of the connection terminal to the cable N N N Connecting a Camcorder The side and rear panel jacks on your TV make it easy to connect a camco...

Page 13: ...IO OUT jacks on the VCR If you have a mono non stereo VCR use a Y connector not supplied to connect to the right and left audio input jacks of the TV Alternatively connect the cable to the R jack If your VCR is stereo you must connect two cables Each VCR has a different back panel configuration When connecting a VCR match the color of the connection terminal to the cable When connecting to AV IN 1...

Page 14: ...r receiver When the source is a digital component such as a DVD and is connected to the TV via HDMI only 2 channel sound will be heard from the Home Theater receiver If you want to hear 5 1 channel audio connect the DIGITAL AUDIO OUT OPTICAL jack on the DVD Blu ray player or Cable Satellite Box directly to an Amplifier or Home Theater not the TV Connecting an Amplifier DVD Home Theater 1 Connect A...

Page 15: ... jack on your computer 2 Connect a 3 5 mm Stereo plug to 2RCA cable between the DVI AUDIO IN R AUDIO L jack on the TV and the Audio Out jack of the sound card on your computer Each PC has a different back panel configuration When connecting a PC match the color of the connection terminal to the cable When using an HDMI DVI cable connection you must use the HDMI IN 2 DVI terminal N N N English 15 T...

Page 16: ...he button is used to select stations that broadcast a digital signal For example for Channel 7 1 press 7 then then 1 For quick channel change press the number buttons then press the ENTERE button Using the PRE CH Button to select the Previous Channel Use the number buttons to quickly tune to any channel Press the PRE CH button The TV will switch to the last channel viewed To quickly switch between...

Page 17: ...ay the channel the type of sound and the status of certain picture and sound settings Press the INFO button once more or wait approximately 10 seconds and it disappears automatically O Using the Remote Control Backlight Buttons Use this feature in dark surroundings and when you are unable to see the remote control buttons clearly 1 Press the ON OFF light button When ON the button backlight is turn...

Page 18: ...and select an item RETURN Return to the previous menu ENTERE Choose the currently selected item Confirm the setting EXIT Exit the on screen menu Example Setting the TV s Brightness in the Picture Menu Adjusting the Brightness to 80 1 Press the MENU button to display the menu 2 Press the ENTERE button to select Picture 3 Press the or button to select Brightness 4 Press the ENTERE button 5 Press the...

Page 19: ... finished press the ENTERE button with Stop selected After all the available channels are stored it starts to remove scrambled channels The Auto program menu then reappears Press the ENTERE button when channel memorization is complete 5 The message Set the Clock Mode is displayed Press the ENTERE button Press the or button to select Auto then Press the ENTERE button The message Set to daylight sav...

Page 20: ...utton then press the ENTERE button Clearing Scrambled Channel Digital channels only The Clear Scrambled Channel function is used to filter out scrambled channels after Auto Program is completed This process may take up to 20 30 minutes To stop searching scrambled channels Press the ENTERE button to select Stop Press the button to select Yes then press the ENTERE button This function is only availa...

Page 21: ...nels or Favorite menu in the same manner Add to Favorite Delete from Favorite You can set channels you watch frequently as favorites Press the TOOLS button to display Tools menu You can also set the favorite channel by selecting Tools Add to Favorite or Delete from Favorite T The symbol will be displayed and the channel will be set as a favorite All favorite channels will be shown on Favorite menu...

Page 22: ... the left of the selected channels You can only select Deselect All when there is a selected channel Auto Program For further details on setting up options refer to page 20 Channel List Tools Menu in Programmed You can view modify or delete a reservation Press the TOOLS button to use the tools menu Change Info Select to change a viewing reservation Cancel Schedules Select to cancel a viewing reser...

Page 23: ...ding to its input mode This TV includes the Cell Light function to adjust the panel brightness The energy consumed during use can be significantly reduced if the brightness level is lowered which will reduce the overall running cost Advanced Settings You can adjust the detailed settings for your screen including the color and contrast Advanced Settings is available in Standard or Movie mode In PC ...

Page 24: ...r Component mode Picture Options You can customize the additional picture settings to suit your preference In PC mode you can only make changes to the Color Tone Size and Screen Burn Protection from among the items in Picture Options Color Tone Cool Normal Warm1 Warm2 Warm3 You can select the most comfortable color tone for viewing Warm1 Warm2 or Warm3 is only activated when the picture mode is Mo...

Page 25: ... 480i 480p 16 9 Zoom1 Zoom2 4 3 DTV 720p Component 720p 16 9 Wide Fit 4 3 DTV 1080i Component 1080i 1080p HDMI 720p 1080i 1080p 16 9 4 3 Wide Fit Screen Fit PC 16 9 4 3 Digital NR If the broadcast signal received by your TV is weak you can activate the Digital Noise Reduction feature to help reduce any static and ghosting that may appear on the screen Off Turns the Digital NR function off Low Sets...

Page 26: ... Pixel Shift value may differ depending on the monitor size inches and mode Side Gray When you watch TV with the screen ratio of 4 3 the screen is prevented from any damage by adjusting the white balance on both extreme left and right sides To prevent the screen burn from happening select Dark or Light Light When you set the screen ratio to 4 3 it brightens the left and right sides Dark When you s...

Page 27: ...Sub and HDMI DVI Input Mode Resolution Horizontal Frequency kHz Vertical Frequency Hz Pixel Clock Frequency MHz Sync Polarity H V IBM 640 x 350 720 x 400 31 469 31 469 70 086 70 087 25 175 28 322 MAC 640 x 480 832 x 624 1152 x 870 35 000 49 726 68 681 66 667 74 551 75 062 30 240 57 284 100 000 VESA CVT 720 x 576 1152 x 864 1280 x 720 1280 x 720 1280 x 960 35 910 53 783 44 772 56 456 75 231 59 950 ...

Page 28: ...ng alone then make the vertical frequency adjustments on your PC and fine tune again After the noise has been reduced re adjust the picture so that it is aligned on the center of the screen Coarse Adjusts the frequency when vertical noise appears on the screen Fine Adjusts the screen to be clearer PC Position Adjust the PC s screen positioning if it does not fit the TV screen Press the or button t...

Page 29: ...ou can also set the SRS TruSurround HD by selecting Tools SRS TS HD T TruSurround HD SRS and the symbol are trademarks of SRS Labs Inc TruSurround HD technology is incorporated under license from SRS Labs Inc Preferred Language Digital channels only Digital TV broadcasts are capable of simultaneous transmission of many audio tracks for example simultaneous translations of the program into foreign ...

Page 30: ...ll Reset Sound Mode Cancel You can restore the Sound settings to the factory defaults N N N Configuring the Setup Menu Language You can set the menu language Game Mode Off On When connecting to a game console such as PlayStationTM or XboxTM you can enjoy a more realistic gaming experience by selecting the game menu When the Game Mode is On Picture mode is automatically changed to Standard and cann...

Page 31: ...will automatically block certain categories that are more restrictive For example if you block TV Y category then TV Y7 will automatically be blocked Similarly if you block the TV G category then all the categories in the young adult group will be blocked TV G TV PG TV 14 and TVMA The sub ratings D L S V work together similarly MPAA Rating You can block movies depending on their MPAA rating The MP...

Page 32: ... block it The screen will go blank and the following message will appear 1 Enter your PIN To resume normal viewing tune to a different channel using CH or CH button Under certain conditions depending on the rating of the local TV programs the V Chip might lock out all the channels In this case use the V Chip function for an emergency escape If you forget the PIN press the remote control buttons in...

Page 33: ...ng Off PIP Viewing the Picture in Picture PIP You can use the PIP feature to simultaneously watch the TV tuner and one external video source This product has one built in tuner which does not allow PIP to function in the same mode While V Chip or Internet TV is in operation the PIP function cannot be used If you turn the TV off while watching in PIP mode and turn it on again the PIP window will di...

Page 34: ... the TV TV Memory or USB device content to be played when the TV turns on automatically Select TV TV Memory or USB Make sure that an USB device is connected to your TV When you select the TV you can set the Antenna and Channel Antenna Selects Air or Cable Channel Selects the desired channel When you select the TV Memory or USB you can set the Contents Contents Selects the desired contents on the T...

Page 35: ... remote with the Source list Red Refresh Refreshes the connected external devices Press this if your Source is on and connected but does not appear in the list T TOOLS Tools Displays the Edit Name and Information menus Press the SOURCE button on the remote control to view an external signal source Edit Name You can name the device connected to the input jacks to make your input source selection ea...

Page 36: ...ll persists refer to the external device s user manual Sound Test If you think you have a sound problem please perform the sound test You can check the sound by playing a built in melody sound through the TV Does the problem still exist with this sound test appears on the screen If during the sound test you can hear sound only from one speaker or not at all select Yes If you can hear sound from th...

Page 37: ...rade By Online Upgrades the software using the Internet First configure your network For detailed procedures on using the Network Setting refer to the Setting the Network instructions If the internet connection doesn t operate properly connection can be broken Please retry downloading If the problem still happens download by USB and upgrade Alternative Software Backup If there is an issue with the...

Page 38: ...000 JPEG XR format system is not supported Photo and audio files must be named in English French or Spanish If not the files can not be played Change the file names to English French or Spanish if necessary The higher the resolution of the image the longer it takes to display on the screen The maximum supported JPEG resolution is 15360X8640 pixels For unsupported or corrupted files the Not Support...

Page 39: ...move then press the ENTERE button 3 Remove the USB device from the TV Screen Display 1 Current Sort Standard This field shows the current standard for sorting files 2 View Groups The sorting group including the currently selected photo is highlighted 3 Currently selected file The currently selected file is highlighted 4 Item Selection Information Shows the number of photos that are selected by pre...

Page 40: ... Blue Magenta Black Gray Unclassified Folder It sorts photos by folder The photo file in the root folder is shown first and the others are shown in alphabetical order by name Preference Sorts photos by preference Favorites You can change the photo preferences Changing the Favorites Settings Select the desired photo in the Photo list then press the Green button repeatedly until the desired setting ...

Page 41: ...oto list will be used for the Slide Show During the slide show files are displayed in order from the currently shown file The Slide Show progresses in the order sorted in the Photo list Music files can be automatically played during the Slide Show if the Background Music is set to On Refer to page 42 While a photo list is displayed press the Play ENTERE button on the remote control to start slide ...

Page 42: ...ress the ENTERE button then press the buttons Note that when the enlarged picture is smaller than the original screen size the location change function doesn t work The enlarged file is not saved Background Music You can set and select background music when watching a Slide Show To use this feature there must be music on the USB device Loading music files is needed to change BGM mode Play music fi...

Page 43: ...c files preferences Changing the Favorites Settings Select the desired music file in the Music list then press the Green button repeatedly until the desired setting appears Favorites options The stars are for grouping purposes only For example the 3 star setting does not have any priority over the one star setting Music List Tools Menu Play Current Group You can only play music files in the curren...

Page 44: ...on icon When all music files in the folder or the selected file are repeated Repeat Mode is On When all music files in the folder or the selected file are played once Repeat Mode is Off Playing the music group 1 Press the or button to select a sorting standard Basic View Title Artist Mood Genre Folder Preference 2 Press the REW or FF button to select the desired group 3 Press the button twice then...

Page 45: ... by year and month from the earliest movie Title Sorts and displays the Movie titles in symbol number alphabet special order Folder If there are many folders in USB the movies files are shown in order in each folder The movie file in the root folder is shown first and the others are shown in alphabetical order by name Preference Sorts movies by preference Favorites You can change the movie prefere...

Page 46: ...P3 AC3 LPCM ADPCM MULAW ALAW Divx 4 x Divx 5 1 Divx 6 0 XviD H 264 BP H 264 MP H 264 HP MPEG4 SP MPEG4 ASP Motion JPEG mkv MKV Divx 3 11 MP3 AC3 LPCM ADPCM MULAW ALAW AAC Divx 4 x Divx 5 1 Divx 6 0 XviD H 264 BP H 264 MP H 264 HP MPEG 4 SP MPEG 4 ASP Motion JPEG asf ASF Divx 3 11 WMA MP3 AC3 LPCM ADPCM MULAW ALAW AAC Divx 4 x Divx 5 1 Divx 6 0 XviD H 264 BP H 264 MP H 264 HP MPEG 4 SP MPEG 4 ASP w...

Page 47: ...desired group 3 Press the button twice then press the TOOLS button 4 Press the or button to select Play Current Group then press the ENTERE button Playing the selected movie files 1 Press the or button to select the desired movie file in the movie list 2 Press the yellow button Repeat the above operation to select multiple movie files The cmark appears to the left of the selected movie file To des...

Page 48: ...Picture Mode Dynamic Standard Eco or Movie 4 Press the or button to move to an item Contrast Brightness Color Dynamic Contrast Black Tone or Reset Select Reset to initialize the picture settings 5 Press the or button to adjust the settings Sound Setting 1 Press the TOOLS button during a Slide Show or while music is playing 2 Press the or button to select Sound Setting then press the ENTERE button ...

Page 49: ...nect to the DivX web site and register the registration code with a personal account you can download VOD registration file If you play the VOD registration using Media Play the registration is completed For more information on DivX VOD visit www DivX com Get the DivX VOD deactivation code When DivX VOD is not registered the registration deactivation code is displayed If you execute this function ...

Page 50: ...e set up the network on the TV A Wireless Internet connection does not support DLNA Three parts subnet address before the TV and PC IP addresses should be same The last part host address should be changed e g IP Address 123 456 789 2 Run a Network Test to check the network settings Installing the DLNA Application To play content on the PC on the TV you have to first install the application System ...

Page 51: ...D supplied with the product Alternatively you can download the file from www samsung com 2 Install the SAMSUNG PC Share Manager as shown in the figures 3 When the installation is complete the PC Share Manager icon appears on your PC Double click the icon to run the programme N N ...

Page 52: ...ile or folder Method 1 Select a file or folder and select the File menu and then select the Property sub menu Method 2 Select a file or folder right click over the selected file or folder and then select Property from the pop up menu Method 1 Method 2 Name Modified Name Name Name Yes No Name Modified Name Name Name Yes No Name Modified Name Name Name Yes No Exit Exits the DLNA application If you s...

Page 53: ...Unshare Folder Method 2 Select a folder from the Shared Folder pane right click over the selected folder and then select Unshare Folder from the pop up menu Method 3 Locate the mouse pointer over a folder in the Shared Folder pane and drag drop the folder into the My Computer pane If a message appears asking you to confirm the cancelation select Yes Method 1 Method 2 Method 3 Applying the Current ...

Page 54: ... change the access permissions by using the Allow Accept Deny button To delete an item select the item and select Delete Item Server Server You can run or stop using your PC as a server Start Server at Windows start You can determine whether to start the PC server automatically when Windows starts Change server name You can rename the PC server Enter a new name and click OK The new name will appea...

Page 55: ...ton 3 Press the or button to select an icon Photo Music Movie Setup then press the ENTERE button DLNA does not support the following functions The Background Music and Background Music Setting functions Sorting files by preference in the Photo Music and Movie folders The Change Group Info function The Copy Delete function The Safe Remove function The REW FF button functions while a movie is playin...

Page 56: ...dio Input on the Home Theater When following the connection above the Optical jack only outputs 2 channel audio You will only hear sound from the Home Theater s Front Left and Right speakers and the subwoofer If you want to hear 5 1 channel audio connect the DIGITAL AUDIO OUT OPTICAL jack on the DVD Blu ray Player or Cable Satellite Box ie Anynet Device 1 or 2 directly to the Amplifier or Home The...

Page 57: ...evice list when the TV is turned on via the power button devices connected to the TV may not always be automatically displayed in the device list Press the red button to search for the connected device If you have selected external input mode by pressing the SOURCE button you cannot use the Anynet function Make sure to switch to an Anynet device by using the TOOLS button Anynet Menu The Anynet men...

Page 58: ...s reselect the Anynet device The Anynet functions do not operate with other manufacturers products The operations may differ depending on the device N N N N N Recording You can make a recording of a TV programme using a Samsung recorder 1 Press the TOOLS button Press the ENTERE button to select Anynet HDMI CEC 2 Press the or button to select Recording recorder then press the ENTERE button Recordin...

Page 59: ...l Anynet doesn t work in certain situations Searching channels Plug Play etc When connecting or removing the HDMI 1 3 cable please make sure to search devices again or turn your TV off and on again Check if the Anynet Function of Anynet device is set on I want to start Anynet Check if the Anynet device is properly connected to the TV and check if the Anynet HDMI CEC is set to On in the Anynet Setu...

Page 60: ...the Volume or MMUTE button no OSD is displayed but the function operates accordingly To return to TV mode press the CH button on the remote control CONTENTS LIBRARY CONTAINS TEXT GRAPHICS IMAGES MULTIMEDIA AND OTHER MATERIALS FOR INFORMATIONAL AND PROMOTIONAL PURPOSES ONLY MATERIALS IN CONTENTS LIBRARY HAS BEEN MODIFIED AND KEEPS BEING REVISED AND UPDATED THE MATERIALS IN THE CONTENTS LIBRARY MAY ...

Page 61: ...nnect to the internet via a LAN cable you can directly download the contents provided by Samsung Electronics Select a content item and press the ENTERE button You can download content or view detailed content information USB You can check the content saved on the USB device for each sub item of the Content Library Select a content item and press the ENTERE button Then you can view the menu If you ...

Page 62: ...anufacturer If the IP address allocation by the DHCP server has failed turn the external modem off turn it on again after at least 10 seconds and then try again For the connections between the external modem and the Sharer Router refer to the owner s manual of the corresponding product You can connect the TV to the LAN directly without connecting it through a Sharer Router You cannot use a manual ...

Page 63: ...P address subnet mask gateway and DNS You must enter these values to complete the network settings If you do not know the values ask your network administrator For the information on how to configure and connect a Sharer Router refer to the owner s manual for the corresponding product You can connect the TV to the LAN directly without connecting it through a Sharer Router If you use an IP Sharer I...

Page 64: ...it on Select a channel for the wireless IP sharer that is not currently being used If the channel set for the wireless IP sharer is currently being used by another device nearby this will result in interference and communications may fail If you apply a security system other than the systems listed below it will not work with the TV When applying the security key for the AP wireless IP sharer only...

Page 65: ...gs are automatically configured 1 Set Network Type to Cable 2 Select Cable Network Setup 3 Set Internet Protocol Setup to Auto Setup The Internet Protocol is set automatically 4 Select Network Test to check the network connectivity Cable Network Setup Manual Setup To connect the TV to the LAN using a static IP address you must set up the Internet Protocol IP Please check if the LAN cable is connec...

Page 66: ...d wait for connection Try again if connecting operation doesn t work When the connection is not established although tried again reset the access point Please refer to a manual of each access point Connecting by using Security Key When selecting Security Key the input window is displayed Input the security key and press Blue button Try again if connecting operation doesn t work If Security Key is ...

Page 67: ...me SSID and Security Key again If the Security Key is incorrect it may be the reason for the malfunction Wireless Network Setup Auto Setup If you want to connect AP AP should support DHCP Only devices which support Ad hoc mode can be connected without DHCP 1 Set Network Type to Wireless 2 Select Wireless Network Setup 3 Set Internet Protocol Setup to Auto Setup The Internet Protocol is set automat...

Page 68: ...RY QUALITY FITNESS FOR A PARTICULAR PURPOSE OF ACCURACY OF QUIET ENJOYMENT AND NON INFRINGEMENT OF THIRD PARTY RIGHTS SAMSUNG DOES NOT GUARANTEE THE ACCURACY VALIDITY TIMELINESS LEGALITY OR COMPLETENESS OF ANY CONTENT OR SERVICE MADE AVAILABLE THROUGH THIS DEVICE AND DOES NOT WARRANT THAT THE DEVICE CONTENT OR SERVICES WILL MEET YOUR REQUIREMENTS OR THAT OPERATION OF THE DEVICE OR SERVICES WILL BE...

Page 69: ...tton on the remote control to display the Internet TV user interface N O N N N N N N N N N N N N N áëí space a b c d e f g h i j k l m n o p q r s t u v w x y z 0 1 2 3 4 5 6 7 8 9 Getting Started with Internet TV Internet TV provides an integrated Internet and television experience powered by the Yahoo Widget Engine You can monitor financial stocks share photos with friends and family and track n...

Page 70: ...y pressing the ENTERE button on the remote control when its snippet is in focus When you add snippets they form a stack which you can navigate by pressing the or buttons Two special TV Widgets appear in the dock the Profile Widget and the Gallery Widget These cannot be deleted The dock will slide off screen after a timeout period Sidebar mode 1 Focus on a snippet and press the ENTERE button to lau...

Page 71: ...o switch to a different user profile At least two profiles must be registered If you want to add a profile refer to Administrative Controls The Profile Settings menu allows you to customize and protect your profile User profiles can be customized with a unique Name and an Avatar a picture used to represent your profile Your profile s Name and Avatar are displayed in the profile snippet in the dock...

Page 72: ...can be configured with a different set of widgets Delete an existing profile From the Profile Widget you can Sign in to Yahoo using your Yahoo ID If you have a Yahoo ID you can access your personalized content using the Yahoo TV Widgets All Yahoo TV Widgets that are installed are automatically signed in with your profile s Yahoo ID If you have no Yahoo account visit www yahoo com and create an acc...

Page 73: ...widgets by category To install a widget navigate to the detail screen and select Add Widget to My Profile and press the ENTERE button The widget is installed and becomes available in the dock Widget Gallery Settings Press the green button About Yahoo Widget Gallery You can view brief information for the Widget Gallery Copyright Policy Terms of Service and Privacy Policy In the Developer Settings m...

Page 74: ...rm the deletion Changing the Temperature Indication Mode You can change the temperature indication mode to Imperial or Metric For example Imperial will show temperatures in Fahrenheit and Metric in Celsius Create a snippet for a favorite city Select the city from the Yahoo Weather Widget s home page and view the detailed weather information Press the yellow button Select the Add Snippet menu and p...

Page 75: ...slideshow control is displayed you can Pause Play and Stop the slideshow If you select the menu and press ENTERE you can view information for the selected photo The Your Sets menu allows you to view photos you have classified in Flickr The Explore menu allows you to explore photos featured by the Flickr website You can view the photos updated daily The Mark as Favorite or Remove From Favorite menu...

Page 76: ...on Select the Add Snippet menu and press ENTERE to add the stock as a snippet Delete a snippet Launch the snippet from the dock Press the yellow button Select the Delete Snippet menu and press ENTERE to remove the snippet N Troubleshooting for internet TV Problem Possible Solution Some widget services do not work Check with that service provider In the widget press the green button and get contact...

Page 77: ...2 0 Internet TV Canada English www samsung com TV medi 2 0 Internet TV Mexico Spanish www samsung com televisores medi 2 0 Internet TV TV USA English www samsung com Television medi 2 0 Internet TV Approaching step may be changed later on It can be different links for special countrie N N ...

Page 78: ...c network 1 Connect the Samsung Wireless LAN Adapter to the USB1 HDD or USB2 port of the TV 2 For more information on how to configure Ad hoc network refer to Setting the Network For information on configuring the mobile phone s network settings refer to the mobile phone manual 3 Set up the IP address SSID and password for the mobile phone in the Ad hoc Settings of the mobile phone using the Netwo...

Page 79: ...rom the list This function just deletes the corresponding name on the list If the deleted mobile device turns on or tries to connect to the TV it may be shown on the list Setup Message On Off You can determine whether to use the message function the call arrivals text message contents and schedules set on the mobile phone Media On Off You can select whether to use the Media function that plays the...

Page 80: ...he alarm window appears up to three times at 5 minute intervals You can configure the viewing settings for the text message SMS contents on the mobile phone For the procedures refer to the mobile phone manual Some special characters may be displayed as blank or broken characters Call Arrival Alarm If a call arrives while you are watching TV the alarm window appears If you select the OK button the ...

Page 81: ...e TV depending on their resolution and format Media play control buttons Button Operations Move the cursor and select an item While playing a movie file Skip forwards or backwards through the movie file ENTER Pressing the ENTERE button during play pauses the play Pressing the ENTERE button during pause resumes the play RETURN Return to the previous menu TOOLS Run various functions from the Photo M...

Page 82: ...the screen is originally an analog program which has been converted to digital The visual quality is of an SD Standard Definition grade Screen is black and power indicator light blinks steadily On your computer check the Power and Signal Cable The TV is using its power management system Move the computer s mouse or press any key on the keyboard On your equipment check STB DVD etc Power and Signal ...

Page 83: ... the stand to the TV before moving it as the stand may fall and could cause serious injury Two or more people should carry the TV Never lay the TV on the floor because of possible damage to the screen Always store the TV upright N Using the screws for securing the stand base and the TV firmly attach the TV to the stand base The exterior of the set may be different from the picture When mounting yo...

Page 84: ...is to be installed Tie the TV Holder attached to the TV and the screws fastened on the wall or cabinet so that the TV is fixed Purchase the screws to be used on the wall or cabinet separately Install the TV close to the wall so that it does not fall When attaching the TV to the wall tie the cord level with the ground or slanted downwards for safety purposes Confi rm that the cord or link does not ...

Page 85: ...use damage to the inside of the TV set For wall mounts that do not comply with the VESA standard screw specifications the length of the screws may differ depending on their specifications Do not use screws that do not comply with the VESA standard screw specifications Do not use fasten the screws too strongly this may damage the product or cause the product to fall leading to personal injury Samsu...

Page 86: ...35 mm Weight Body With stand 73 2 lbs 33 2 kg 84 2 lbs 38 2 kg 85 7 lbs 38 9 kg 100 9 lbs 45 8 kg Environmental Considerations Operating Temperature Operating Humidity Storage Temperature Storage Humidity 50 F to 104 F 10 C to 40 C 10 to 80 non condensing 4 F to 113 F 20 C to 45 C 5 to 95 non condensing 50 F to 104 F 10 C to 40 C 10 to 80 non condensing 4 F to 113 F 20 C to 45 C 5 to 95 non conden...

Page 87: ...ensions are subject to change without prior notice Refer to dimensions on each unit prior to performing any carpentry Not responsible for typographical or printed errors 2009 Samsung Electronics America Inc TOP VIEW FRONT VIEW JACK PANEL DETAIL SIDE VIEW REAR VIEW English 87 ...

Page 88: ...ensions are subject to change without prior notice Refer to dimensions on each unit prior to performing any carpentry Not responsible for typographical or printed errors 2009 Samsung Electronics America Inc TOP VIEW FRONT VIEW JACK PANEL DETAIL SIDE VIEW REAR VIEW English 88 ...

Page 89: ...e GPL assures that patents cannot be used to render the program non free The precise terms and conditions for copying distribution and modification follow TERMS AND CONDITIONS 0 Definitions This License refers to version 3 of the GNU General Public License Copyright also means copyright like laws that apply to other kinds of works such as semiconductor masks The Program refers to any copyrightable...

Page 90: ...ulting copyright are not used to limit the access or legal rights of the compilation s users beyond what the individual works permit Inclusion of a covered work in an aggregate does not cause this License to apply to the other parts of the aggregate 6 Conveying Non Source Forms You may convey a covered work in object code form under the terms of sections 4 and 5 provided that you also convey the m...

Page 91: ...ly written license or stated as exceptions the above requirements apply either way 8 Termination You may not propagate or modify a covered work except as expressly provided under this License Any attempt otherwise to propagate or modify it is void and will automatically terminate your rights under this License including any patent licenses granted under the third paragraph of section 11 However if...

Page 92: ...l Public License section 13 concerning interaction through a network will apply to the combination as such 14 Revised Versions of this License The Free Software Foundation may publish revised and or new versions of the GNU General Public License from time to time Such new versions will be similar in spirit to the present version but may differ in detail to address new problems or concerns Each ver...

Page 93: ... The systematic pattern of such abuse occurs in the area of products for individuals to use which is precisely where it is most unacceptable Therefore we have designed this version of the GPL to prohibit the practice for those products If such problems arise substantially in other domains we stand ready to extend this provision to those domains in future versions of the GPL as needed to protect th...

Page 94: ...al Notices however if the Program has interactive interfaces that do not display Appropriate Legal Notices your work need not make them do so A compilation of a covered work with other separate and independent works which are not by their nature extensions of the covered work and which are not combined with it such as to form a larger program in or on a volume of a storage or distribution medium i...

Page 95: ...ms Additional terms permissive or non permissive may be stated in the form of a separately written license or stated as exceptions the above requirements apply either way 8 Termination You may not propagate or modify a covered work except as expressly provided under this License Any attempt otherwise to propagate or modify it is void and will automatically terminate your rights under this License ...

Page 96: ...cial requirements of the GNU Affero General Public License section 13 concerning interaction through a network will apply to the combination as such 14 Revised Versions of this License The Free Software Foundation may publish revised and or new versions of the GNU General Public License from time to time Such new versions will be similar in spirit to the present version but may differ in detail to...

Page 97: ... PURPOSE ARE DISCLAIMED IN NO EVENT SHALL THE OpenSSL PROJECT OR ITS CONTRIBUTORS BE LIABLE FOR ANY DIRECT INDIRECT INCIDENTAL SPECIAL EXEMPLARY OR CONSEQUENTIAL DAMAGES INCLUDING BUT NOT LIMITED TO PROCUREMENT OF SUBSTITUTE GOODS OR SERVICES LOSS OF USE DATA OR PROFITS OR BUSINESS INTERRUPTION HOWEVER CAUSED AND ON ANY THEORY OF LIABILITY WHETHER IN CONTRACT STRICT LIABILITY OR TORT INCLUDING NEG...

Page 98: ...écran à plasma Guide de l utilisateur Merci d avoir acheté ce produit Samsung Pour obtenir un service complet veuillez enregistrer votre produit à www samsung com register Modèle N de série Imaginez les possibilités ...

Page 99: ...pair avec ce produit La licence ne couvre que l utilisation de cet appareil à des fins d encodage ou de décodage de fichiers audio conformément à la norme ISO IEC 11172 3 ou ISO IEC 13818 3 Elle n octroie aucun droit en ce qui a trait aux caractéristiques ou fonctions du produit non conformes à la norme ISO IEC 11172 3 ou ISO IEC 13818 3 Autres pays L appareil qui accompagne ce guide de l utilisat...

Page 100: ...Ce phénomène est normal il ne s agit pas d une défectuosité de l appareil Défaillance de cellules L écran à plasma fait appel à un panneau comportant entre 1 230 000 pixels définition standard et 3 150 000 pixels haute définition produits par une technologie de pointe Il se peut toutefois que certains pixels s assombrissent ou soient plus lumineux à l écran Ce phénomène n a aucune incidence sur la...

Page 101: ...f USB 38 Utilisation de la fonction Media Play 39 Utilisation et classement de la liste de photos 40 Affichage d une photo ou lecture d un diaporama 41 Utilisation et classement de la liste des fichiers musicaux 43 Lecture d un fichier musical 44 Utilisation et classement de la liste des fichiers de film 45 Lecture d un fichier film 46 Réglage de l image et de la musique 48 Utilisation du menu de ...

Page 102: ...éviseur S il en manque communiquez avec votre détaillant La forme et la couleur des articles peuvent varier selon le modèle N Branchement et préparation de votre téléviseur Assemblage des câbles Faites passer les câbles dans le câble portefi l pour ne pas les voir au travers du support transparent Télécommande BN59 00854A Piles AAA 4301 000103 Cordon d alimentation 3903 000144 Mode d emploi Guide ...

Page 103: ... ENTEREde la télécommande 2 MENU Appuyez sur cette touche pour afficher le menu des fonctions de votre téléviseur 3 VOL Appuyez sur ces touches pour augmenter ou baisser le volume Dans le menu à l écran les touches VOL fonctionnent comme les touches et de la télécommande 4 CH Appuyez sur ces touches pour changer de canal Dans le menu à l écran les touches CH fonctionnent comme les touches et de la...

Page 104: ...ace permettant la transmission de signaux numériques audio et vidéo par un seul câble La différence entre les interfaces HDMI et DVI réside dans le fait que les appareils HDMI sont plus petits et qu ils sont dotés de la fonction de codage HDCP protection contre la copie numérique à large bande passante Nous recommandons d utiliser un câble de 14 4 mm Ce diamètre est inférieur au diamètre standard ...

Page 105: ...e la fonction Anynet ON OFF Appuyez sur cette touche pour rétroéclairer les touches de la télécommande Cette fonction est pratique lorsque vous souhaitez utiliser la télécommande le soir ou dans une pièce sombre L utilisation de la télécommande alors que la touche d éclairage ON OFF est réglée à On réduit le temps d utilisation des piles PRE CH Appuyez sur cette touche pour revenir au canal précéd...

Page 106: ...istinctes Si vous avez deux antennes de téléviseur distinctes VHF et UHF vous devez combiner les deux signaux d antenne avant de brancher les antennes au téléviseur Pour cette opération vous aurez besoin d un multiplexeur adaptateur en option en vente dans la plupart des magasins d électronique 1 Branchez les pattes de branchement des deux antennes au multiplexeur 2 Branchez le multiplexeur dans l...

Page 107: ...la borne B IN du commutateur RF A B 5 Branchez un autre câble entre borne OUT du répartiteur et la borne A IN du commutateur RF A B 6 Branchez le dernier câble d antenne entre la borne OUT du commutateur RF A B et la borne ANT IN située à l arrière du téléviseur Après ce branchement réglez l interrupteur A B à la position A pour le visionnement normal Réglez le commutateur A B à la position B pour...

Page 108: ...l arrière du téléviseur Dans ce cas contactez le fournisseur du lecteur DVD Blu ray du câblosélecteur ou du récepteur satellite afin de confirmer la version de HDMI et pour demander une mise à jour Les câbles HDMI de versions autres que 1 3 peuvent provoquer un papillotement ou l absence de l image Branchement d un lecteur DVD Blu ray d un câblosélecteur ou d un récepteur satellite boîtier décodeu...

Page 109: ...COMPONENT IN 1 le câble audio doit également être branché à la prise COMPONENT IN 1 La configuration du panneau arrière de chaque lecteur DVD Blu ray câblosélecteur ou récepteur satellite boîtier décodeur varie Au moment du branchement d un lecteur DVD Blu ray d un câblosélecteur ou d un récepteur satellite boîtier décodeur faites correspondre les couleurs du câble et de la borne de branchement N ...

Page 110: ...modèle mono non stéréo branchez les prises d entrée audio droite et gauche du téléviseur à l aide d un connecteur en Y non compris Il est également possible de brancher le câble à la prise R Si le magnétoscope fonctionne en stéréo vous devez brancher deux câbles La configuration du panneau arrière de chaque magnétoscope varie Lorsque vous branchez un magnétoscope faites correspondre la couleur de ...

Page 111: ...le est branchée au téléviseur à l aide d un câble HDMI le récepteur du cinéma maison ne peut émettre qu un son à 2 canaux Pour entendre le son en 5 1 canaux reliez directement la prise DIGITAL AUDIO OUT OPTICAL du lecteur DVD Blu ray du câblosélecteur ou du récepteur satellite à un amplificateur ou à un cinéma maison et non pas au téléviseur Branchement d un amplificateur d un cinéma maison ou d u...

Page 112: ...ateur 2 Branchez un câble stéréo à fiche de 3 5 mm 2RCA entre les prises droite et gauche DVI AUDIO IN R AUDIO L du téléviseur et la prise Audio Out de la carte son de votre ordinateur La configuration du panneau arrière de chaque ordinateur varie Lorsque vous branchez un ordinateur faites correspondre la couleur de la borne et du câble Utilisez la borne HDMI IN 2 DVI pour le branchement à l aide ...

Page 113: ...puis sur la touche ENTERE À l aide de la touche La touche permet de choisir les stations qui diffusent un signal numérique Par exemple pour sélectionner le canal 7 1 appuyez sur 7 puis sur et enfin sur 1 Pour changer rapidement de canal appuyez sur la touche ENTERE Revenir au canal précédent à l aide de la touche PRE CH Appuyez sur les touches numériques pour accéder rapidement à un canal Appuyez ...

Page 114: ...touches s active pendant un instant La touche de rétroéclairage ne fonctionne pas si la télécommande est désactivée N N N TV 1 Ven déc 19 2 05 am M Spillane s Mike Hammer Bonocrunch DTVAir 13 1 Dolby Digital 1080i 16 9 Français 1 55 am 2 55 am Programme suivant 2 55 am 3 55 am Prison Break La touche TOOLS La touche TOOLS facilite la sélection rapide des fonctions courantes Le menu Outils varie sel...

Page 115: ...t choisir un élément RETURN Revenir au menu précédent ENTERE Sélectionnez l élément en surbrillance Confirmer le réglage EXIT Quitter le menu à l écran Exemple Réglage de la luminosité du téléviseur dans le menu Image Réglage de la luminosité à 80 1 Appuyez sur la touche MENU pour afficher le menu 2 Appuyez sur la touche ENTERE pour sélectionner Image 3 Appuyez sur la touche ou pour sélectionner L...

Page 116: ...che ENTERE lorsque Arrêt est sélectionné Une fois tous les canaux mémorisés le téléviseur commence à éliminer les canaux brouillés Le menu de programmation automatique s affiche alors de nouveau Appuyez sur la touche ENTERE une fois la mémorisation des canaux terminée 5 Le message Régler le mode horloge s affiche Appuyez sur la touche ENTERE Appuyez sur la touche ou pour sélectionner Auto puis sur...

Page 117: ...puyant sur la touche ou puis sur ENTERE Effacer les canaux brouillés Numérique Digital channels only La fonction Effacer les canaux brouillés permet d éliminer les canaux brouillés une fois la Prog auto terminée Cette procédure peut prendre de 20 à 30 minutes Pour arrêter la recherche des canaux brouillés Appuyez sur ENTERE pour sélectionner Arrêt Appuyez sur la touche pour sélectionner Oui puis s...

Page 118: ...le de supprimer un canal du menu Canaux ajoutés ou Favori Ajouter aux favoris Effacer des favoris Vous pouvez établir comme favoris les canaux souvent visionnés Appuyez sur la touche TOOLS pour afficher le menu Outils Vous pouvez également établir un canal comme favori en choisissant Outils Ajouter aux favoris ou Effacer des favoris T Le symbole s affiche et le canal est enregistré comme canal fav...

Page 119: ...est sélectionné Prog auto Pour obtenir de plus amples détails sur le réglage des options consultez la page 20 Listes des canaux menu Outils sous Enregistrement par minuterie Il est possible d afficher de modifier ou de supprimer une réservation Appuyez sur la touche TOOLS pour utiliser le menu Outils Information modification Choisissez cette option pour modifier une réservation d émission Annuler ...

Page 120: ...ntrée Ce téléviseur est doté de la fonction Luminosité des cellules servant à régler la luminosité de l écran La consommation d énergie peut être réduite de manière considérable en diminuant le niveau de luminosité de l image ce qui diminue également l ensemble des coûts de fonctionnement Réglages avancés Vous pouvez paramétrer les réglages avancés de l écran notamment la couleur et le contraste L...

Page 121: ...nnement de films provenant d un appareil externe c à d un lecteur DVD branché à la prise HDMI ou Component IN xvYCC est accessible en mode d image Film et l entrée externe est en mode HDMI ou Composant Options d image En mode PC vous ne pouvez modifier que les Options d image Nuance coul Format et Protection grillage écran Nuance coul Froide Normal Chaude1 Chaude2 Vous pouvez choisir la nuance cou...

Page 122: ...ante 1080i 1080p HDMI 720p 1080i 1080p 16 9 4 3 Format large Plein écran PC 16 9 4 3 Réduct bruit num Si le signal de diffusion capté par votre téléviseur est faible vous pouvez activer la fonction de réduction des bruits numériques pour tenter d éliminer les parasites et les images fantômes de l écran Off Désactiver la fonction Réduct bruit num Basse Régler la réduction de bruit numérique au nive...

Page 123: ...rizontal 0 2 2 Vertical 0 4 4 Délai min 1 4min 2 min La valeur paramétrée pour le déplacement des points à l écran diffère selon le mode et les dimensions en pouces du moniteur Bords gris Le visionnement du téléviseur en format 4 3 l équilibrage du blanc de l extrême gauche et de l extrême droite permet d éviter d endommager l écran Pour éviter la brûlure d écran sélectionner Foncé ou Clair Clair ...

Page 124: ...les modes d affichage ci dessous Entrée de câble secondaire D et HDMI DVI Mode Résolution Fréquence horizontale kHz Fréquence verticale Hz Fréquence d horloge des pixels MHz Polarité synchronisée H V IBM 640 x 350 720 x 400 31 469 31 469 70 086 70 087 25 175 28 322 MAC 640 x 480 832 x 624 1152 x 870 35 000 49 726 68 681 66 667 74 551 75 062 30 240 57 284 100 000 VESA CVT 720 x 576 1152 x 864 1280 ...

Page 125: ...ntonisation de précision réglez la fréquence verticale de votre ordinateur et procédez à une nouvelle syntonisation de précision Une fois le bruit réduit recentrez l image à l écran Grain Régler la fréquence lorsque du bruit vertical apparaît à l écran Affiné Régler l écran afin qu il soit plus clair Position de l ordinateur Régler la position de l écran de l ordinateur s il ne correspond pas à ce...

Page 126: ...e menu Outils Vous pouvez également sélectionner la fonction SRS TruSurround HD avec Outils SRS TS HD T TruSurround HD SRS et le symbole sont des marques de commerce de SRS Labs Inc La technologie TruSurround HD est intégrée sous licence de SRS Labs Inc Langue privilégiée canaux numériques seulement La télédiffusion numérique assure la transmission simultanée de plusieurs pistes de son par exemple...

Page 127: ...amètres audio par défaut Réinitial tout Tous les paramètres audio par défaut sont rétablis Réinit mode son Les paramètres sonores par défaut des valeurs actuelles sont rétablis Effacer Choisir les options de réinitialisation du son N N N Réglage du menu Configuration Langue Vous pouvez régler la langue de menu Mode Jeu Off On Lorsqu une console de jeu comme PlayStationMC ou XboxMC est branchée la ...

Page 128: ...upplémentaires Voir l étape suivante pour changer les sous classifications ci dessous La fonction V Chip permet de bloquer automatiquement certaines classifications plus restrictives Par exemple si vous bloquez la catégorie TV Y la catégorie TV Y7 sera automatiquement bloquée De la même façon si vous bloquez la catégorie TV G toutes les catégories du groupe jeunes adultes seront bloquées TV G TV P...

Page 129: ...choisissez un autre canal à l aide des touches CH ou CH Dans certains cas selon la classification des émissions locales la fonction V Chip pourrait bloquer tous les canaux Dans un tel cas utilisez la fonction V Chip en guise de solution d urgence Si vous avez oublié le NIP appuyez sur les touches de la télécommande dans l ordre suivant pour rétablir le code 0 0 0 0 POWER hors tension MMUTE 8 2 4 P...

Page 130: ...er simultanément le syntoniseur télé et une source vidéo externe Cet appareil est doté d un syntoniseur intégré qui ne permet pas la fonction ISI dans le même mode La fonction ISI ne peut pas être utilisée lorsque le mode V Chip ou Internet TV sont activés Si vous mettez le téléviseur hors tension alors en mode ISI la fenêtre ISI sera disparue lorsque vous le remettrez sous tension Il est possible...

Page 131: ...us tension ou hors tension au moment désiré Trois moments de mise sous tension et hors tension distincts peuvent être réglés Vous devez d abord régler l horloge Mise en marche Régler les paramètres Heure Minute am pm et Activer Désactiver Pour activer la minuterie avec le réglage choisi réglez à Activer Arrêt Régler les paramètres Heure Minute am pm et Activer Désactiver Pour activer la minuterie ...

Page 132: ...nction permet de choisir la source d entrée désirée TV AV1 AV2 Composante1 Composante2 PC HDMI1 HDMI2 DVI HDMI3 HDMI4 USB Seuls les appareils externes branchés au téléviseur peuvent être sélectionnés Dans l option Liste source les entrées branchées sont en surbrillance et figurent en haut de la liste Les entrées non branchées figurent au bas de la liste Le cas échéant les dispositifs branchés aux ...

Page 133: ...nchement Si le problème persiste consultez le guide d utilisation de l appareil externe Essai de son Si vous croyez qu il y a un problème de son effectuez un essai de son Pour vérifier le son vous pouvez faire jouer une mélodie préenregistrée dans le téléviseur Le message Le problème persiste t il après cet essai de son apparaît à l écran Si pendant l essai de son un seul haut parleur émet du son ...

Page 134: ...niveau du micrologiciel grâce à Internet Configurez d abord votre réseau Pour les procédures détaillées concernant les paramètres du réseau veuillez consulter les instructions Configuration du réseau Si la connexion Internet fonctionne mal il est possible que le lien soit brisé Veuillez recommencer le téléchargement Si le problème persiste téléchargez la mise à jour par USB et appliquez la Autre l...

Page 135: ...rançais ou en espagnol Dans le cas contraire il est impossible de les lire Remplacez le nom des fichiers par un nom anglais français ou espagnol au besoin Plus la résolution de l image est élevée plus elle prend du temps à s afficher à l écran La résolution JPEG maximale prise en charge est 15 360 X 8 640 pixels Dans le cas des fichiers incompatibles ou corrompus le message Format fichier non comp...

Page 136: ...upp sécurité puis appuyez sur ENTERE 3 Retirez le dispositif USB du téléviseur Page écran 1 Critère de classement actuel Ce champ indique le critère de classement actuel des fichiers 2 Affichage des groupes Le groupe de classement incluant le film actuellement sélectionné est mis en évidence 3 Fichier actuellement sélectionné Le fichier actuellement sélectionné est mis en surbrillance 4 Informatio...

Page 137: ... menu Configuration à On Choix de couleurs rouge jaune vert bleu magenta noir gris et non classé Dossier Les photos sont classées par dossier Le fichier photos dans le dossier source est affiché en premier et les autres en ordre alphabétique par nom P préf Les photos sont classées par préférence Favoris Vous pouvez modifier les préférences en matière de photos Modification des réglages favoris Sél...

Page 138: ...otos feront partie du diaporama Pendant le diaporama les fichiers s affichent dans l ordre à partir du fichier actuellement affiché Le diaporama se déroule dans l ordre de classement de la liste des photos Il est possible de lire les fichiers musicaux automatiquement au cours du diaporama si la fonction Musique de fond est réglée à On Pendant l affichage d une photo appuyez sur la touche Lecture E...

Page 139: ... Prendre note que lorsque l image agrandie est plus petite que le format d écran d origine la fonction de repositionnement ne fonctionne pas Le fichier agrandi n est pas sauvegardé Musique de fond Vous pouvez régler et sélectionner la musique de fond pendant la lecture d un diaporama Pour utiliser cette fonction de la musique doit être sauvegardée sur le dispositif USB Le chargement des fichiers m...

Page 140: ...férences en matière de fichiers musicaux Modification des réglages favoris Choisissez le fichier musical désiré dans la liste puis appuyez à répétition sur la touche verte jusqu à l affichage du réglage désiré Options des favoris Les étoiles ne servent qu à des fins de groupement Par exemple le réglage trois étoiles n a aucune priorité sur le réglage une étoile Menu des outils de la liste des fich...

Page 141: ...du fichier sélectionné est répétée Mode de répétition réglé à On Tous les fichiers musicaux dans le dossier ou du fichier sélectionné sont lus une fois Mode de répétition réglé à Off Lecture du groupe musical 1 Appuyez sur la touche ou pour sélectionner un critère de classement Aff de base Titre P artis Ambiance Genre Dossier P préf 2 Appuyez sur la touche REW ou FF pour sélectionner le groupe dés...

Page 142: ...fication des réglages favoris Choisissez le fichier film désiré dans la liste puis appuyez à répétition sur la touche verte jusqu à l affichage du réglage désiré Options des favoris Les étoiles ne servent qu à des fins de groupement Par exemple le réglage trois étoiles n a aucune priorité sur le réglage une étoile Menu des outils de la liste des films Lire groupe courant Vous ne pouvez lire que le...

Page 143: ...tenant Décodeur vidéo Compression décompression audio avi AVI Divx 3 11 MP3 AC3 LPCM ADPCM MULAW ALAW Divx 4 x Divx 5 1 Divx 6 0 XviD H 264 BP H 264 MP H 264 HP MPEG4 SP MPEG4 ASP Motion JPEG mkv MKV Divx 3 11 MP3 AC3 LPCM ADPCM MULAW ALAW AAC Divx 4 x Divx 5 1 Divx 6 0 XviD H 264 BP H 264 MP H 264 HP MPEG 4 SP MPEG 4 ASP Motion JPEG asf ASF Divx 3 11 WMA MP3 AC3 LPCM ADPCM MULAW ALAW AAC Divx 4 x...

Page 144: ...z à deux reprises sur la touche puis appuyez sur la touche TOOLS 4 Appuyez sur la touche ou pour sélectionner Lire groupe courant puis sur ENTERE Lecture des fichiers films sélectionnés 1 Appuyez sur la touche ou pour sélectionner le fichier film désiré dans la liste 2 Appuyez sur la touche jaune Répétez la procédure ci dessus pour sélectionner plusieurs fichiers films Le symbole c s affiche à la ...

Page 145: ...ectionner Réglage de l image puis sur ENTERE 3 Appuyez sur la touche ou pour sélectionner Image Mode Dynamique Standard Eco ou Cinéma 4 Appuyez sur la touche ou pour aller à une option Contraste Luminosité Couleur Contraste dynam Tonalité noire ou Rétablir Sélectionnez Régler pour initialiser les réglages d image 5 Appuyez sur la touche ou pour ajuster ces paramètres Réglage du son 1 Appuyez sur l...

Page 146: ...ur Si vous vous branchez au site Web DivX et que vous associez ce code à un compte personnel vous pourrez télécharger un fichier d enregistrement de vidéo sur demande L enregistrement se confirme lorsque vous lisez l enregistrement de vidéo sur demande à l aide de la fonction Media Play Pour de plus amples renseignements sur vidéo sur demande DivX R visitez www DivX com Obtenir code désact vidéo s...

Page 147: ...ous réseau avant les adresse IP du téléviseur et de l ordinateur doivent être identiques Le dernier élément adresse hôte doit être modifié Ex adresse IP 123 456 789 2 Exécutez un test du réseau pour vérifier la configuration du réseau Installation de l application DLNA Pour pouvoir lire le contenu enregistré dans l ordinateur sur le téléviseur il faut d abord installer l application Configuration ...

Page 148: ...r Vous pouvez aussi télécharger le fichier à partir du site www samsung com 2 Installez le gestionnaire de partage SAMSUNG PC Share Manager conformément aux illustrations 3 Lorsque l installation est terminée l icône PC Share Manager s affiche sur le bureau Double cliquez sur l icône pour exécuter le programme N N ...

Page 149: ...ectionné Méthode n 1 Sélectionner un dossier ou un fichier et sélectionner le menu File et ensuite le sous menu Property Méthode n 2 Sélectionner un dossier ou un fichier cliquer à droite sur le dossier ou le fichier sélectionné et ensuite sélectionner Property dans le menu qui s affiche Méthode n 1 Méthode n 2 Name Modified Name Name Name Yes No Name Modified Name Name Name Yes No Name Modified N...

Page 150: ... un dossier dans My Computer cliquer à droite sur le dossier sélectionné et sélectionner Share Folder dans le menu qui apparaît Méthode n 3 Placer le pointeur de la souris sur un dossier dans la liste de dossiers sous My Computer dans la sous fenêtre de gauche et glisser et déplacer le dossier dans la sous fenêtre Shared Folders Si un message apparaît demandant de confirmer le dossier partagé séle...

Page 151: ...z changer les permissions d accès à l aide de la touche Allow Accept Deny Pour effacer un élément le sélectionner et sélectionner Delete Item Server Server Vous pouvez utiliser l ordinateur comme un serveur Start Server at Windows start Vous pouvez déterminer que le serveur démarre automatiquement au démarrage de Windows Change server name Vous pouvez renommer le serveur Entrez un nouveau nom et c...

Page 152: ... sur ENTERE 3 Appuyer sur la touche ou pour sélectionner une icône Photo Music Movie Setup puis sur ENTERE DLNA ne prend pas en charge les fonctions suivantes La musique de fond et le réglage de la musique de fond Le classement des fichiers par préférence dans les dossiers Photo Musique et Film La modification de l information du groupe Copier Supprimer Le retrait sûr Les fonctions des touches REW...

Page 153: ...deux canaux audio Vous entendrez du son uniquement au niveau des haut parleurs gauche et droit frontaux de votre cinéma maison et du caisson d extrêmes graves Pour avoir le son en 5 1 canaux branchez la prise de sortie DIGITAL AUDIO OUT OPTICAL du lecteur DVD Blu Ray câblosélecteur ou récepteur satellite c à d l appareil Anynet 1 ou 2 directement sur l amplificateur ou sur le cinéma maison et non ...

Page 154: ...automatiquement la liste des appareils à sa mise sous tension à l aide la touche d alimentation les appareils qui y sont branchés n apparaissent pas toujours automatiquement dans la liste Appuyez sur le bouton rouge pour rechercher les appareils branchés Si vous avez sélectionné un appareil externe en appuyant sur la touche SOURCE il est impossible d utiliser la fonction Anynet Veillez à permuter ...

Page 155: ...de du téléviseur en mode Anynet Type d appareil État de fonctionnement Touches Appareil Anynet Après une permutation vers l appareil lorsque le menu de l appareil correspondant s affiche à l écran Touches numériques touches ENTERE touches de couleur touche EXIT Après la permutation vers l appareil pendant la lecture d un fichier Recherche vers l arrière Recherche vers l avant Arrêt Lecture Pause A...

Page 156: ...s situations recherche de canaux utilisation du mode Media Play USB DLNA Prêt à l emploi etc Au moment du branchement ou du débranchement du câble HDMI 1 3 effectuez une nouvelle recherche des appareils Vérifiez si la fonction Anynet de l appareil Anynet est réglée sur On Je souhaite lancer Anynet Vérifiez si l appareil Anynet est correctement branché au téléviseur et si l option Anynet HDMICEC es...

Page 157: ... la touche MMUTE rien ne s affiche mais la fonction s active normalement Pour retourner au mode TV appuyez sur la touche CH de la télécommande LA BIBLIOTHÈQUE DE CONTENUS CONTIENT DES TEXTES DES GRAPHIQUES DES IMAGES DES SUPPORTS MULTIMÉDIAS ET AUTRES MATÉRIAUX DESTINÉS EXCLUSIVEMENT À DES FINS PROMOTIONNELLES OU INFORMATIVES TOUS LES ÉLÉMENTS DE LA BIBLIOTHÈQUE DE CONTENUS FONT L OBJET DE MODIFIC...

Page 158: ...e LAN il est possible de télécharger le contenu fourni par Samsung Electronics Sélectionnez un élément de contenu puis appuyez sur ENTERE Il est possible de lire ou de copier l élément de contenu sélectionné dans la mémoire du téléviseur USB Vous pouvez télécharger un contenu dans un dispositif USB et le faire lire sur votre téléviseur Sélectionnez un élément de contenu puis appuyez sur la touche ...

Page 159: ...l adresse IP par le serveur DHCP échoue mettez le modem hors tension puis remettez le sous tension après un délai de 10 secondes minimum puis ressayez de nouveau Pour les connexions entre le modem externe et le routeur consultez le guide d utilisation du produit correspondant Vous pouvez brancher le téléviseur au LAN directement sans avoir à le connecter par le biais d un routeur Vous ne pouvez pa...

Page 160: ...r la configuration du réseau Si vous ne connaissez pas ces valeurs informez vous auprès de l administrateur du réseau Pour toute information sur la manière de configurer et de connecter un routeur reportez vous au mode d emploi du produit correspondant Vous pouvez brancher le téléviseur au réseau LAN directement sans avoir à le connecter par le biais d un routeur Si vous utilisez un routeur IP qui...

Page 161: ...l activer et la désactiver Pour le routeur IP sans fil sélectionnez un canal qui n est pas en cours d utilisation Si ce canal est utilisé par un autre appareil à proximité il y aura des interférences et la communication peut échouer Si un autre système de sécurité que ceux indiqués ci dessous est appliqué il ne fonctionnera pas sur le téléviseur L application de la clé de sécurité pour le routeur ...

Page 162: ...e câble LAN est connecté 1 Réglez Type de réseau à Câble 2 Sélectionnez Configuration du réseau câblé 3 Réglez Réglage pr Internet à Réglage autom Le protocole Internet est réglé automatiquement 4 Sélectionnez Test du réseau pour vérifier la connectivité du réseau Configuration du réseau câblé Réglage manuel Pour connecter le téléviseur au câble LAN à l aide d une adresse IP statique vous devez co...

Page 163: ...de nouveau si la connexion ne fonctionne pas Lorsqu il est impossible d établir la connexion après plusieurs tentatives réinitialisez le point d accès Veuillez consulter le guide pertinent pour chaque point d accès Branchement à l aide de la clé de sécurité Lorsque vous choisissez Clé de sécurité la fenêtre de saisie s affiche Saisissez la clé de sécurité et appuyez sur la touche Terminé Essayez d...

Page 164: ...nne pas Configuration du réseau sans fil Réglage autom Si vous désirez brancher un point d accès le point d accès doit prendre en charge le protocole de configuration de l hôte dynamique DHCP Seuls les appareils prenant en charge le mode Ad hoc peuvent être branchés sans DHCP 1 Réglez Type de réseau à Sans fil 2 Sélectionnez Configuration du réseau sans fil 3 Réglez Réglage pr Internet à Réglage a...

Page 165: ...AUX CONTENUS ET AUX SERVICES FOURNIS PAR DES TIERCES PARTIES Y COMPRIS MAIS DE FAÇON NON LIMITATIVE TOUTE GARANTIE ET TOUTE CONDITION RELATIVES À LA QUALITÉ MARCHANDE OU À LA CONVENANCE À UN USAGE PARTICULIER SAMSUNG N OFFRE AUCUNE REPRÉSENTATION NI AUCUNE GARANTIE QUANT À L EXACTITUDE À LA VALIDITÉ AUX DÉLAIS DE PRÉSENTATION À LA LÉGALITÉ ET À LA COMPLÉTUDE DE TOUT CONTENU OU SERVICE RENDU ACCESS...

Page 166: ...les et la météo grâce au service Internet TV sur votre téléviseur Les conditions du réseau peuvent avoir une incidence sur la vitesse d opération ou l hésitation éprouvée pendant l utilisation de cette fonction La première fois qu Internet TV s exécute les réglages de base se font automatiquement Vous devez d abord configurer le réseau Pour de plus amples renseignements sur la configuration du rés...

Page 167: ...e pile dans laquelle vous pouvez vous déplacer en appuyant sur la touche ou Deux objets fenêtre de téléviseur spéciaux apparaissent dans le port d attache l objet fenêtre Profile et l objet fenêtre Gallery Ces derniers ne peuvent pas être supprimés Le port d attache disparaîtra de l écran après un délai d innactivité Sidebar mode 1 Placez un entrefilet sous la zone active puis appuyez sur la touch...

Page 168: ...ls Pour ajouter un profil reportez vous à la section Administrative Controls Le menu Profile Settings vous permet de personnaliser et de protéger votre profil Vous pouvez personnaliser les profils utilisateurs en choisissant un Nom et un avatar image utilisée pour représenter votre profil uniques Le nNom et l avatar de votre profil sont affichés dans l entrefilet de votre profil dans le port d att...

Page 169: ...scrire à Yahoo à l aide de votre ID Yahoo Si vous possédez une ID Yahoo vous pouvez accéder à votre contenu personnalisé à l aide des objets fenêtre de téléviseur Yahoo Tous les objets fenêtre de téléviseur Yahoo installés sont automatiquement inscrits dans votre profil ID Yahoo Si vous n avez pas de compte Yahoo visitez le site www yahoo com pour en créer un Vous ne pourrez peut être pas ouvrir u...

Page 170: ...t sélectionnez l option Install Widget puis appuyez sur la touche ENTERE L objet fenêtre est installé et est disponible dans le port d attache Configuration de Galerie d objets fenêtre Appuyez sur la touche verte À propos de Yahoo Galerie d objets fenêtre Vous pouvez afficher une courte description de l objet fenêtre Galerie de Widgets Politique sur le droit d auteur Conditions d utilisation et Do...

Page 171: ...d affichage de la température Vous pouvez modifier le mode d affichage de la température de Impérial à Métrique Par exemple Impérial affiche la température en Fahrenheit et Métrique en Celsius Créer un entrefilet pour une ville favorite Sélectionnez la ville à partir de la page d accueil de l objet fenêtre Yahoo Weather et affichez l information météorologique détaillée Appuyez sur la touche jaune...

Page 172: ...s pouvez lire mettre en pause ou arrêter la lecture du diaporama Si vous sélectionnez le menu et que vous appuyez sur la touche ENTERE vous pouvez afficher l information de la photo sélectionnée Le menu Your Sets vous permet d afficher les photos que vous avez enregistrées dans Flickr Le menu Explore vous permet de naviguer dans les photos enregistrées sur le site Web de Flickr Vous pouvez affiche...

Page 173: ...u Delete Snippet et appuyez sur la touche ENTERE pour supprimer l entrefilet N Dépannage de la fonction Internet TV Problème Solution possible Certain services d objet fenêtre ne fonctionnent pas Vérifiez auprès du fournisseur de service Dans l objet fenêtre appuyez sur la touche verte pour obtenir les coordonnées ou reportez vous à l aide sur le site Web pour obtenir les renseignements sur le fou...

Page 174: ...ada English www samsung com TV medi 2 0 Internet TV Mexico Spanish www samsung com televisores medi 2 0 Internet TV TV USA English www samsung com Television medi 2 0 Internet TV L étape d approche pourrait être changée ultérieurement Il peut s afir de différents liens pour certains pays N N Français 77 ...

Page 175: ... réseau Ad hoc sans fil 1 Branchez l adaptateur sans fil LAN Samsung au port USB1 HDD ou USB2 du téléviseur 2 Pour de plus amples renseignements sur la configuration du réseau Ad hoc reportez vous à la section Configuration du réseau Pour obtenir des renseignements sur la configuration des paramètres du réseau du téléphone cellulaire reportez vous au manuel du téléphone cellulaire 3 Configurez l a...

Page 176: ...one cellulaire de la liste Cette fonction supprime simplement le nom correspondant de la liste Si le téléphone cellulaire est mis sous tension ou qu il tente de se connecter au téléviseur il peut apparaître dans la liste Configuration Message Activé Désact Vous pouvez choisir d utiliser ou non la fonction de message l arrivée des appels le contenu des messages texte et les rendez vous fixés à l ai...

Page 177: ...z la touche Effacer la fenêtre d avertissement apparaîtra jusqu à trois fois à des intervalles de 5 minutes Vous pouvez configurer les réglages pour l affichage du contenu des messages texte SMS sur le téléphone cellulaire Reportez vous au manuel du téléphone cellulaire pour obtenir les étapes à suivre Certains caractères spéciaux pourraient apparaître sous la forme de blancs ou de caractères bris...

Page 178: ...re lu sur le téléviseur Touches de contrôle de lecture du média Touche Fonctions Permet de déplacer le curseur et de choisir un élément Pendant la lecture d un fichier film permet d effectuer des sauts vers l avant ou l arrière ENTER Appuyer sur la touche ENTERE pendant la lecture la met en pause Appuyer sur la touche ENTERE pendant la pause reprend la lecture RETURN Permet de retourner au menu pr...

Page 179: ...l écran était une émission analogue à l origine convertie au format numérique La qualité visuelle est de calibre SD définition standard L écran est noir et le témoin d alimentation clignote régulièrement Sur l ordinateur vérifiez l alimentation et le câble de signal Le téléviseur est en mode d économie d énergie Déplacez la souris de l ordinateur ou appuyez sur une touche du clavier Sur votre équi...

Page 180: ...éléviseur avant de le déplacer car le support risque de tomber et de causer des blessures sérieuses Deux personnes ou plus devraient porter le téléviseur Ne déposez jamais le téléviseur sur le sol afin d éviter d endommager l écran Rangez toujours le téléviseur en position verticale N À l aide des vis servant à immobiliser le socle et le téléviseur fixez fermement le téléviseur au socle L aspect e...

Page 181: ...armoire où le téléviseur doit être installé Pour immobiliser le téléviseur fixez le cordon relié au téléviseur aux vis vissées dans le mur ou sur l armoire Achetez séparément les vis de fixation au mur ou sur l armoire Installez le téléviseur à proximité du mur de manière qu il ne se renverse pas Lorsque vous attachez le téléviseur au mur fixez le cordon de manière qu il soit parallèle au sol ou i...

Page 182: ...l intérieur du téléviseur En ce qui a trait aux supports muraux non conformes aux spécifications de vis de la norme VESA la longueur des vis peut varier selon leurs spécifications N utilisez pas de vis non conformes aux spécifications de vis de la norme VESA Ne serrez pas trop les vis cela pourrait endommager le produit ou en provoquer la chute et causer des blessures Samsung décline toute respons...

Page 183: ...ort 73 2 lb 33 2 kg 84 2 lb 38 2 kg 85 7 lb 38 9 kg 100 9 lb 45 8 kg Facteurs environnementaux Température de fonctionnement Niveau d humidité pour le fonctionnement Température pour l entreposage Niveau d humidité pour l entreposage 50 F à 104 F 10 C à 40 C 10 à 80 sans condensation 4 F à 113 F 20 C à 45 C 5 à 95 sans condensation 50 F à 104 F 10 C à 40 C 10 à 80 sans condensation 4 F à 113 F 20 ...

Page 184: ...ont susceptibles de changer sans préavis Vérifiez les dimensions de chaque unité avant de procéder à des travaux de menuiserie Nous ne sommes pas responsa bles des erreurs de typographie ou d impression 2009 Samsung Electronics America Inc VUE EN PLONGÉE VUE AVANT DÉTAILS DU PANNEAU DES PRISES VUE LATÉRALE VUE ARRIÈRE Français 87 ...

Page 185: ...ont susceptibles de changer sans préavis Vérifiez les dimensions de chaque unité avant de procéder à des travaux de menuiserie Nous ne sommes pas responsa bles des erreurs de typographie ou d impression 2009 Samsung Electronics America Inc VUE EN PLONGÉE VUE AVANT DÉTAILS DU PANNEAU DES PRISES VUE LATÉRALE VUE ARRIÈRE Français 88 ...

Reviews: