background image

17

Connecting the Power
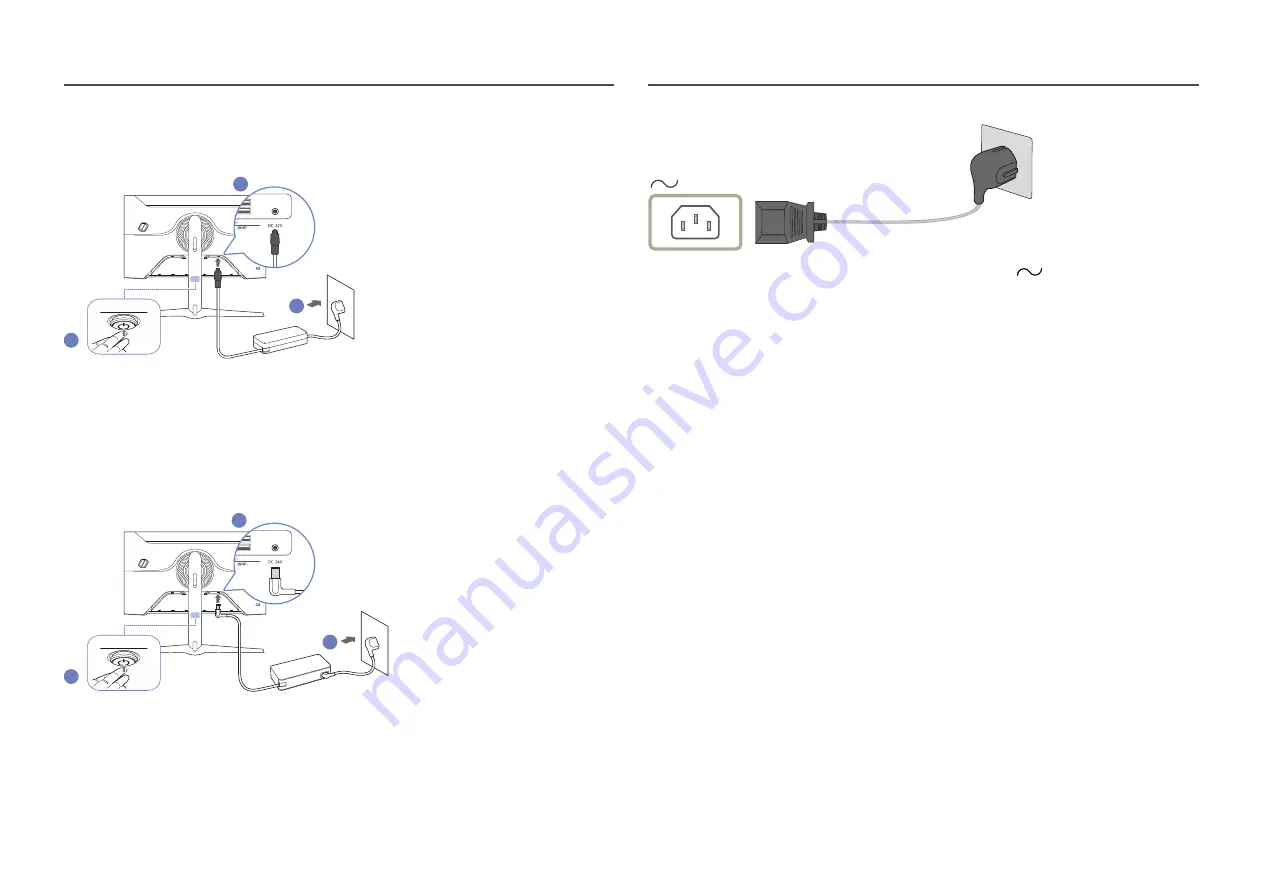
C27G7*T*

1 (SERVICE)

2

2

1

2

3

Connect the power cable to the AC/DC adapter. Then, connect the AC/DC adapter to the 

DC 22V

 port 

on the back of the product.

Next, connect the power cable to the power outlet.

Press the JOG button at the bottom of the product to turn it on.


The input voltage is switched automatically.

C32G7*T*

1 (SERVICE)

2

2

2

1

3

Connect the power cable to the AC/DC adapter. Then, connect the AC/DC adapter to the 

DC 24V

 port 

on the back of the product.

Next, connect the power cable to the power outlet.

Press the JOG button at the bottom of the product to turn it on.


The input voltage is switched automatically.

C49G9*T*

To use the product, connect the power cable to a power outlet and the 

 (POWER IN) port on the 

product.


The input voltage is switched automatically.

Summary of Contents for Odyssey G7 Series

Page 1: ...copyright for this manual Use or reproduction of this manual in parts or entirety without the authorization of Samsung is prohibited Trademarks other than that of Samsung are owned by their respective owners An administration fee may be charged in the following situations a An engineer is called out at your request but it is found that the product has no defect i e where the user manual has not be...

Page 2: ...tings PIP PBP Mode 30 Mode Type 30 Screen Size 30 Screen Position 30 Source 31 Sound Source 31 Screen Ratio 31 Contrast 31 Connecting and Using a Source Device Read below before connecting the product 14 Ports 15 Connecting and Using a PC 16 Connection Using the HDMI Cable 16 Connection Using an HDMI DVI Cable 16 Connection Using an DP Cable 16 Connecting to headphones or earphones 16 Connecting t...

Page 3: ...Problems with the Installation 38 System Requirements 38 DriverInstallation 38 Troubleshooting Guide Requirements Before Contacting Samsung CustomerService Centre 39 Product diagnosis Screen issue 39 Checking the Resolution and Frequency 39 Check the following 39 Q A 41 OnScreen Display Language 32 Display Time 32 System Infinity Core Lighting 33 Local Dimming 33 Â Volume 33 Dynamic Contrast 33 Of...

Page 4: ...to protective earth ground Caution Consult instructions for use This symbol instructs the user to consult the user manual for further safety related information Electricity and Safety Warning Do not use a damaged power cord or plug or a loose power socket Do not use multiple products with a single power socket Do not touch the power plug with wet hands Insert the power plug all the way in so it is...

Page 5: ...ge or deform the product Do not install the product in a kitchen or near a kitchen counter Caution Do not drop the product while moving Do not set down the product on its front When installing the product on a cabinet or shelf make sure that the bottom edge of the front of the product is not protruding The product may fall and become damaged and or cause an injury Install the product only on cabin...

Page 6: ...rm power off the product and remove the power cable Do not drop objects on the product or apply impact Do not move the product by pulling the power cord or any cable If a gas leakage is found do not touch the product or power plug Also ventilate the area immediately Do not lift or move the product by pulling the power cord or any cable Do not use or keep combustible spray or an inflammable substan...

Page 7: ... DC adapter in a well ventilated area If you place the AC DC power adapter hanging with the cord input facing upwards water or other foreign substances could enter the Adapter and cause the Adapter to malfunction Make sure to rest the AC DC power adapter flat on a table or the floor Do not hold the product upside down or move it by holding the stand The product may fall and become damaged or cause...

Page 8: ...se the cloth to wipe the exterior of the product clean Do not apply a cleaning agent that contains alcohol solvent or surfactant to the product Do not spray water or detergent directly on the product 4 Connect the power cord to the product when cleaning is finished 5 Power on the product and PC Correct posture to use the product Use the product in the correct posture as follows Straighten your bac...

Page 9: ...ion when placing the product An internal temperature rise may cause fire and damage the product Maintain enough space around the product as shown in the diagram when installing the product The exterior may differ depending on the product C27G7 T C32G7 T 10 cm 10 cm 10 cm 10 cm 10 cm C49G9 T 10 cm 10 cm 10 cm 10 cm 10 cm ...

Page 10: ...eight hold both sides of the product and avoid using excessive force to prevent damage When adjusting the stand height you may hear a noise This noise is generated because the ball inside the stand slides when the stand height is adjusted It is a normal noise and not a product malfunction C27G7 T C32G7 T 15 0 2 0 15 0 2 0 9 0 2 0 13 0 2 0 0 120 0 mm 5 0 mm 2 0 2 0 92 0 2 0 C49G9 T 15 0 2 0 15 0 2 ...

Page 11: ...and Anti theft Lock C27G7 T C32G7 T model only An anti theft lock allows you to use the product securely even in public places The locking device shape and locking method depend on the manufacturer Refer to the manuals provided with your anti theft locking device for details To lock an anti theft locking device 1 Fix the cable of your anti theft locking device to a heavy object such as a desk 2 Pu...

Page 12: ...onal injury Samsung shall not be held liable for any damage or injury caused by using improper screws or attaching the wall mount kit or desktop stand using excessive force Samsung shall not be held liable for any product damage or personal injury caused by using a wall mount kit other than the one specified or from an attempt to install the wall mount kit on your own To mount the product on a wal...

Page 13: ... menu screen System Power LED On Function Key Guide To use the Function Key Guide press the JOG button when the screen is turned on When the product not displays the OSD menu the JOG Button could be used as below Up Change the settings for Brightness Contrast and Sharpness Down Change the Volume setting Left or Right Change the Source setting PRESS ENTER The selected item will be applied Source Ch...

Page 14: ...ables from both the product and the external device to prevent damage to the product due to a short circuit or over current 3 After all signal cables have been properly connected connect the power cables back to the product and the external device 4 After connecting is completed make sure you read the manuals to acquaint yourself with the product functions precautions and other information require...

Page 15: ...cts to a source device using an HDMI cable or HDMI DVI cable DP IN1 DP IN 2 Connects to a PC using a DP cable Connects to a PC using a USB cable Compatible with a USB cable version 3 0 or lower This port can only connect to a PC 2 Connect to a USB device C27G7 T C32G7 T model only Super charging is possible using the 2 port only This port charges devices faster than typical USB port The speed depe...

Page 16: ...t be available with an HDMI DVI cable Connection Using an DP Cable DP IN 1 DP IN 2 Using the DP cable that came with the product is recommended Use a VESA certified DP1 4 cable or higher and its gender Connecting to headphones or earphones Use headphones or earphones when activating sound with an HDMI HDMI or DP cable The headphones or earphones jack supports only the 3 conductor tip ring sleeve T...

Page 17: ...put voltage is switched automatically C32G7 T 1 SERVICE 2 2 2 1 3 1 Connect the power cable to the AC DC adapter Then connect the AC DC adapter to the DC 24V port on the back of the product 2 Next connect the power cable to the power outlet 3 Press the JOG button at the bottom of the product to turn it on The input voltage is switched automatically C49G9 T To use the product connect the power cabl...

Page 18: ...n only be provided through port 2 According to the USB battery charging specification 2 can support a maximum current of 1 5A The actual current value depends on the device to be charged If the current is too high or an exception occurs the over current protection will be triggered This is a normal setting of the product USB devices requiring high current may not be supported 1 SERVICE SERVICE can...

Page 19: ...gain If you want to set the optimum resolution foryour computer please refer to Q A How can I change the resolution You can adjust the refresh rate according to the screen resolution by selecting Game Refresh Rate in the OSD menu To enable the maximum refresh rate set Adaptive Sync FreeSync to On or set Refresh Rate to HDMI 144 Hz C27G7 T C32G7 T DisplayPort1 DisplayPort2 240 Hz The C27G7 T and C3...

Page 20: ...kering depending on the PC s graphics card The function is available in a PC equipped with the graphics card that can change the refresh rate It is unavailable in the devices e g AV devices with fixed refresh rates If the function is applied the screen may have malfunction If the Refresh Rate function is in use and the text displayed on the PC screen looks blurry or corrupted resolve the issue by ...

Page 21: ...ome darker and the contrast increases This menu is not available when Eye Saver Mode is enabled This menu is not available when Picture Mode is set to Cinema mode This menu is not available when PIP PBP is enabled Response Time Accelerate the panel response rate to make video appear more vivid and natural It is best to set Response Time to Standard or Faster when you are not viewing a movie or gam...

Page 22: ...NVIDIA graphics card If the function is applied the screen may have malfunction Depending on the source device 4K output from an AV device is supported only when the Adaptive Sync is Off C27G7 T C32G7 T model only Use the DisplayPort cable provided by the manufacturerwhen using Adaptive Sync Install the latest NVIDIA graphics card driver to enable Adaptive Sync Use Window10 or higher to enable Ada...

Page 23: ... the AMD website to check your graphics driver s version and update it with the latest one While you are using the FreeSync function the screen may flicker due to variation of the output frequency from the graphics card The response rate during the game may fluctuate depending on the resolution A higher resolution generally decreases the response rate The sound quality of the monitor may be degrad...

Page 24: ... Virtual Aim Point is not available while Off is selected Select the preferred aim point style Reset Position Restore the aim point position to the default This menu is not available when PIP PBP is enabled Move the aim point using the jog button and press Enter to confirm the moved position To restore the default position select Reset Position from the menu 1 The aim point is displayed in the mid...

Page 25: ... button Move the aim point using the jog button and press Enter to confirm the moved position To restore the default position select Reset Position from the menu 3 After configuring settings is completed press the Enter key of the JOG button The aim point is fixed to the specified position and the settings screen disappears 4 Position is resetted to centre when select Game Virtual Aim Point Reset ...

Page 26: ...io of 16 9 21 9 Display the picture with an aspect ratio of 21 9 C49G9 T model only 32 9 Display the picture with an aspect ratio of 32 9 C49G9 T model only Screen Fit Display the picture with the original aspect ratio without cutting off 17 4 3 Use a 4 3 aspect ratio on a 17 inch screen Pictures with a different aspect ratio will not be displayed 19 4 3 Use a 4 3 aspect ratio on a 19 inch wide sc...

Page 27: ...reen and minimap RPG This mode is optimised for 3D graphics and instant messaging on the RPG Role Playing Game game screen AOS Increase the contrast ratio to obtain a picture quality optimised for the AOS Aeon Of Strife game screen sRGB Adjust the colour system to sRGB mode This is the standard mode of this monitor Cinema Obtain the brightness and sharpness of monitors suitable for enjoying video ...

Page 28: ...of the screen This menu is not available when Eye Saver Mode is enabled This menu is not available when Picture Mode is set to Cinema sRGB mode This menu is not available when PIP PBP is enabled Color Tone Select a colour tone that best suits yourviewing needs Cool 2 Set the colour temperature to be cooler than Cool1 Cool1 Set the colour temperature to be cooler than Normal mode Normal Display the...

Page 29: ...quality suitable for eye relaxation TÜV Rheinland Low Blue Light Content is a certification for products which meet requirements for lower blue light levels When Eye Saver Mode is On the blue light that wavelength is around 400nm will decrease and it will provide an optimum picture quality suitable for eye relaxation At the same time the blue light level is lower than in the default settings and i...

Page 30: ...Mode Turn PIP PBP Mode on or off If the source device does not send a video signal at an appropriate resolution for display in PIP PBP mode a blank screen may appearwhen the PIP PBP function is turned on 4K output from an AV device is not supported when PIP PBP Mode is On C27G7 T C32G7 T model only Mode Type Select the size and aspect ratio of the sub screen PBP PIP C27G7 T C32G7 T model only C49G...

Page 31: ... 9 21 9 Display the picture with an aspect ratio of 21 9 C49G9 T model only Screen Fit Display the picture with the original aspect ratio without cutting off The function may not be supported depending on the ports provided with the product Changing the Screen Ratio is available when the following conditions are satisfied The input source is 480p 576p 720p or1080p and product can display normally ...

Page 32: ...bject to change without notice to improve quality Language Set the menu language A change to the language setting will only be applied to the onscreen menu display It will not be applied to other functions on your PC Display Time The OSD menu will automatically disappear if the menu is not used for a specified period of time Display Time is a function to specify the time which you want the OSD men...

Page 33: ...mation On Activate the Local Dimming function C27G7 T C32G7 T model only This menu is not available when Eye Saver Mode is enabled Use Off or Auto mode when not playing a video or game Otherwise screen flickering may occur This menu is not available when PIP PBP is enabled  Volume Adjust the Volume controlling the JOG button LEFT RIGHT To activate the Mute function access the Volume control scree...

Page 34: ... button to display the Function Key Guide screen and then select System PC AV Mode HDMI DisplayPort1 DisplayPort2 PC or AV This menu is not available when PIP PBP is enabled C27G7 T C32G7 T model only USB Super Charging C27G7 T C32G7 T model only Charge the battery of a connected source device quickly using the 2 port on the product Off Disable USB Super Charging On Enable the function to quickly ...

Page 35: ...n may blink If you set the HDMI Mode to 1 4 some high resolutions may not be supported because of bandwidth limitation of the HDMI 1 4 protocol When the setting is not appropriate a blank screen may appear In this case check the specifications of the device Set HDMI Mode to 1 4 if the monitor is connected to an HDMI device and the monitor does not display the screen properly displays a blank scree...

Page 36: ...rom the power outlet and then reconnect the cord after turning off To perform software update by using a USB memory first format the USB memory to FAT32 When updating by a USB device be sure to use the device whose version of USB 3 0 or lower Upon updates save only either the bin or image file downloaded from the Samsung website to the root directory bin file C27G7 T C32G7 T img file C49G9 T Do no...

Page 37: ...37 Information View the current software information Refer to the actual monitor screen Reset All Return all the settings for the product to the default factory settings ...

Page 38: ...shortcut icon does not appear press the F5 key Restrictions and Problems with the Installation The Easy Setting Box installation may be affected by the Graphics Card Motherboard and the Networking Environment System Requirements OS Hardware Windows 7 32Bit 64Bit Windows 8 32Bit 64Bit Windows 8 1 32Bit 64Bit Windows 10 32Bit 64Bit At least 32MB of memory At least 60MB of free space on the hard disk...

Page 39: ...ound may be caused by contraction or expansion from temperature change of external components or internal circuit of the product This is NOT a product failure and does not affect the life of the product Installation issue PC mode The screen keeps switching on and off Check the cable connection between the product and PC and ensure the connectors are locked Blank spaces are found on all four sides ...

Page 40: ...l Mode Table P 43 in this manual and the Information menu on the product The screen is too bright The screen is too dark Adjust Brightness and Contrast Screen colour is inconsistent Change the Color settings The colours on the screen have a shadow and are distorted Change the Color settings White does not really look white Change the Color settings There is no image on the screen and the power LED...

Page 41: ...es Monitor and adjust Screen refresh rate under Monitor settings How can I change the resolution Windows 7 Go to Control Panel Appearance and Personalization Display Screen Resolution Adjust Resolution Windows 8 Windows 8 1 Go to Settings Control Panel Appearance and Personalization Display Adjust Resolution and adjust the resolution Windows 10 Go to Settings System Display Advanced display settin...

Page 42: ... HDMI DisplayPort Environmental conditions Operating Temperature 10 C 40 C 50 F 104 F Humidity 10 80 non condensing Storage Temperature 20 C 45 C 4 F 113 F Humidity 5 95 non condensing Plug and Play This product can be installed and used with any Plug and Play compatible systems Two way data exchange between the product and PC system optimises the product settings Product installation takes place ...

Page 43: ...s is transmitted from your PC the screen will automatically be adjusted If the signal transmitted from the PC does not belong to the standard signal modes the screen may be blank even though the power LED turns on In such a case change the settings according to the following table by referring to the graphics card user manual C27G7 T C32G7 T Resolution Horizontal Frequency kHz Vertical Frequency H...

Page 44: ...00 49 702 59 810 83 500 O O VESA 1280 x1024 63 981 60 020 108 000 O O VESA 1280 x1024 79 976 75 025 135 000 O O VESA 1440 x 900 55 935 59 887 106 500 O O VESA 1600 x 900 60 000 60 000 108 000 O O VESA 1680 x1050 65 290 59 954 146 250 O O VESA 1920 x1080 67 500 60 000 148 500 O O VESA 2560 x1440 88 787 59 951 241 500 O O VESA 2560 x1440 150 919 99 946 140 500 O O VESA 2560 x1440 182 996 119 998 497...

Page 45: ...2 809 31 500 O O VESA 640 x 480 37 500 75 000 31 500 O O VESA 800 x 600 35 156 56 250 36 000 O O VESA 800 x 600 37 879 60 317 40 000 O O VESA 800 x 600 48 077 72 188 50 000 O O VESA 800 x 600 46 875 75 000 49 500 O O VESA 1024 x 768 48 363 60 004 65 000 O O VESA 1024 x 768 56 476 70 069 75 000 O O VESA 1024 x 768 60 023 75 029 78 750 O O VESA 1152 x 864 67 500 75 000 108 000 O O VESA 1280 x 720 45...

Page 46: ...Frequency The time required to scan a single line from the left to the right side of the screen is called a horizontal cycle The reciprocal number of a horizontal cycle is called horizontal frequency Horizontal frequency is measured in kHz Vertical Frequency Repeating the same picture dozens of times per second allows you to view natural pictures The repeat frequency is called vertical frequency o...

Page 47: ...ogramme If customer requests software installation and setup for the product If a service technician removes cleans dusts or foreign materials inside of the product If customer requests an installation additionally after purchasing a product through home shopping or online A Product damage caused by customer s fault Product damage caused by customer s mishandling orwrong repair If a product damage...

Reviews: