background image

   English - 12

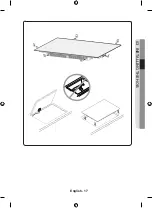
Installing the hob

SAFETY INSTRUCTIONS FOR THE INSTALLER

WARNING

Be sure the new appliance is installed and grounded only by 

qualified personnel.

Please observe this instruction. The warranty will not cover 

any damage that may occur as a result of improper installa-

tion. Technical data is provided at the end of this manual.

•     A device must be provided in the electrical installation that 

allows the appliance to be disconnected from the mains at all 

poles with a contact opening width of at least 3 mm. Suitable 

isolation devices include line protecting cut - outs, fuses 

(screw type fuses are to be removed from the holder), earth 

leakage trips and contactors.

•     With respect to fire protection, this appliance corresponds to 

EN 60335-2-6. This type of appliance may be installed with a 

high cupboard or wall on one side.

•     Drawers may not be fitted underneath the hob.

•     The installation must guarantee shock protection.

•     The kitchen unit in which the appliance is fitted must satisfy 

the stability requirements of DIN 68930.

•     For protection against moisture, all cut surfaces are to be 

sealed with a suitable sealant.

•     On tiled work surfaces, the joints in the area where the hob 

sits must be completely filled with grout.

•     Ensure that the seal is correctly seated against the work 

surface without any gaps. Additional silicon sealant must not 

be applied; this would make removal more difficult when 

servicing.

•     The hob must be pressed out from below when removed.

•     A board is to be installed underneath the hob.

•     The ventilation gap between the worktop and front of the unit 

underneath it must not be covered.

Summary of Contents for NZ84F7NB Series

Page 1: ...PN 16161000A16357 P yta indukcyjna Instrukcja obs ugi niezliczone mo liwo ci Dzi kujemy za nabycie produktu rmy Samsung Seria NZ84F7NB...

Page 2: ...owe usuwanie produktu zu yty sprz t elektryczny i elektroniczny MONTA P YTY GRZEJNEJ 12 12 Instrukcje bezpiecze stwa dla instalatora 13 Pod czanie zasilania sieciowego 15 Monta w blacie CZ CI I W A C...

Page 3: ...Korzystanie z zabezpieczenia przed dzie mi Timer U ywanie funkcji booster Zarz dzanie energi Utrzymywanie ciep a Przycisk pauzy Wy czanie d wi k w Sugerowane ustawienia do gotowania konkretnych potraw...

Page 4: ...obs ugi Nazwa modelu Numer seryjny Zagro enia lub niebezpieczne czynno ci kt re mog prowadzi do powa nego kalectwa lub mierci Zagro enia lub niebezpieczne czynno ci kt re mog prowadzi do drobnych obra...

Page 5: ...z dzeniem Urz dzenie mo e by obs ugiwane przez dzieci od 8 roku ycia i osoby o ograniczonych zdolno ciach zycznych sensorycznych i psychicznych a tak e z niewystarczaj c wiedz i lub do wiadczeniem o i...

Page 6: ...iot w takich jak no e widelce y ki i pokrywki poniewa mo e to doprowadzi do ich silnego rozgrzania Po u yciu nale y wy czy p yt grzejn za pomoc jej przycisku nie nale y polega wy cznie na czujniku wyk...

Page 7: ...ych przez producenta w instrukcji obs ugi jako odpowiednich albo os on b d cych cz ci urz dzenia U ycie niew a ciwych os on mo e doprowadzi do wypadku W czasie pracy urz dzenia dost pne powierzchnie m...

Page 8: ...imi standardami Zapewnia to w a ciw ochron przed kontaktem z podzespo ami elektrycznymi zgodnie z podstawowymi normami bezpiec ze stwa W przypadku nieprawid owego dzia ania urz dzenia b d pojawienia s...

Page 9: ...y nie nale y pozostawia naczy bez nadzoru podczas przygotowywania potraw z u yciem t uszczu lub oleju np podczas sma enia frytek Po zako czeniu gotowania nale y wy czy p yty grzejne Panele sterowania...

Page 10: ...wardej pianki zosta y odpowiednio oznaczone Opakowania i starsze urz dzenia nale y utylizowa z uwzgl dnieniem kwestii bezpiecze stwa i ochrony rodowiska Przed utylizacj zu ytych urz dze nale y uniemo...

Page 11: ...owarki zestawu s uchawkowego przewodu USB wyrzuca wraz ze zwyk ymi odpada mi gospodarstwa domowego Aby unikn szkodli wego wp ywu na rodowisko naturalne i zdrowie ludzi wskutek niekontrolowanego usuwan...

Page 12: ...ednej stronie Monta musi zapewnia ochron p yty przed wstrz sami Zabudowa w kt rej zamontowane jest urz dzenie musi spe nia wymagania normy DIN 68930 w zakresie stabilno ci Aby zapewni ochron przed wil...

Page 13: ...przy u yciu urz dzenia kt re umo liwi jej od czenie od zasilania na wszyst kich biegunach z szeroko ci otwarcia styk w co najmniej 3 mm np automatyczny przerywacz do ochrony linii wy cznik pr du up y...

Page 14: ...1 L2 220 240V 380 415V 220 240V 2X1N 2x1N Oddziel przewody przed pod czeniem 32A 16A 16A N1 L1 L2 N2 220 240V 220 240V Br zowy Br zowy Br zowy Czarny Czarny Czarny Zielony ty Zielony ty Niebieski Nieb...

Page 15: ...wzywania serwisu a po zamontowaniu nie b dzie do niego dost pu poniewa znajduje si pod spodem Zwr specjaln uwag na spe nienie wymog w utrzymania minimum wolnej przestrzeni z boku i nad urz dzeniem Urz...

Page 16: ...Polski 16 min 550 min 35 min 20 min 2 min 15 min 100 min 65 min 5 min 40 min 40 min 50 min 60 474 23 23 520...

Page 17: ...Polski 17 03 MONTA P YTY GRZEJNEJ...

Page 18: ...booster 3600 W Strefa gotowania indukcyjnego 1200 W z funkcj booster 2000 W Panel sterowania 2 3 4 5 PANEL STEROWANIA 1 Przyciski dotykowe wyboru strefy gotowania Przyciski dotykowe ustawiania mocy P...

Page 19: ...ndukcyjnego Po umieszczeniu naczynia na polu grzewczym i w czeniu tego pola obwody elektroniczne p yty generuj pr d wzbudzony na dnie garnka kt ry podnosi temperatur garnka Pr d wzbudzony W ownica ind...

Page 20: ...czenia czasowego zapewnia automatyczne wy czenie p l grzewczych po okre lonym czasie chyba e zmieniono ustawienia Wska nik ciep a resztkowego Ta ikona pojawia si na wy wietlaczu je li dane pole grzewc...

Page 21: ...a Na wy wietlaczu pojawia si Je li pole grzewcze nie zostanie wy czone albo jego grzanie nie zostanie ustawione przez d u szy okres czasu to takie pole zostanie automatycznie wy czone O obecno ci ciep...

Page 22: ...ola grzewcze s wy czone wska nik ciep a resztkowego nie ga nie tak d ugo a nie ostygn Mo esz wykorzysta ciep o resztkowe do rozmra ania albo do utrzymania ciep a potraw Tak d ugo jak wieci si wska nik...

Page 23: ...eczka ze srodkiem do czyszczenia powierzchni szklanych Nie stosuj rodk w r cych ani ciernych bo mog yby to uszkodzi powierzchni Naczynia nadaj ce si do indukcji s odpowiednio znakowane przez producent...

Page 24: ...cz dna naczynia musi mie minimaln rednic zale nie od rednicy pola grzewczego ky Minimalna srednica dna naczynia rednica pola grzewczego Mozesz us yszec Odg os p kania ze wzgl du na r norodno materia...

Page 25: ...ierzchni p yty to mo e si pojawi trwa a rysa Zimne dno naczy jest zazwyczaj lekko wygi te do rodka wkl s e Nie powinno by nigdy wygi te na zewn trz wypuk e Je li chcesz korzysta z naczy specjalnych np...

Page 26: ...ozp aszczysz palec to mo e si uruchomi s siedni panel Nast pnie urz dzenie w cza si za pomoc przycisku dotykowego w cz wy cz Dotknij przycisku w cz wy cz przez 1 2 sekundy Na cyfrowym wy wietlaczu poj...

Page 27: ...a lub ca ej p yty obecno ciep a resztkowego wskazywana jest za pomoc oznaczenia lub ang hot gor cy na wy wietlaczu cyfrowym poszczeg lnych stref Aby wy czy stref gotowania dotknij przycisk i ustaw poz...

Page 28: ...orzysta na dwa sposoby Automatyczne wy czanie strefy gotowania za pomoc timera Je li dla strefy gotowania zosta ustawiony okre lony czas strefa gotowania wy czy si sama gdy tylko ten czas up ynie Funk...

Page 29: ...raz aktywne Aby wy wietli czas pozosta y dla danej strefy gotowania nale y dotkn przycisk ustawiania timera Wskazanie odpowiedniej strefy gotowania zaczyna powoli miga Aby zresetowa ustawienia nale y...

Page 30: ...nych p yty grzewczej Dla ka dych dw ch stref gotowania istnieje maksymalna wsp lna moc kt rej normalnie nie mo na przekroczy Je li ten zakres mocy zostanie przekroczony poprzez aktywacj funkcji booste...

Page 31: ...stkie aktualnie w czone strefy gotowania zostaj jednocze nie ustawione na niski poziom mocy Po wy czeniu funkcji pauzy strefy gotowania prze czaj si z powrotem na uprzednio ustawiony poziom mocy Za po...

Page 32: ...etlaczu pojawi si W ci gu 10 sekund po w czeniu dotknij przycisk PAUZA przez 4 sekundy Sygna d wi kowy jest dezaktywowany i pojawia si na wy wietlaczu Aby zmieni ustawienia sygna u d wi kowego powt rz...

Page 33: ...ie Sma enie Gotowanie Parowanie Duszenie Gotowanie Topienie Ogrzewanie du ych ilo ci p ynu gotowanie makaronu obsmazanie mi sa rumienienie gulaszu duszenie mi sa Stek befsztyk z pol dwiczki babka ziem...

Page 34: ...a Dzi ki temu rozlane produkty nie przywr do powierzchni Usuwaj osady lady z wody krople t uszczu i przebarwienia metalu przy pomocy dost pnych w handlu rodk w do mycia szk a ceramicznego albo stali n...

Page 35: ...h sklepach OSTRZE ENIE Przypalony cukier roztopione tworzywo foli aluminiow i inne materia y usuwaj skrobakiem do szk a natychmiast p ki s jeszcze gor ce Uwa aj mo esz si poparzy przy operowaniu skrob...

Page 36: ...a je uszkodzi bardzo ostrym lub twardym przedmiotem zrzuconym na p yt Nigdy nie k ad garnk w na ramie bo mo e si to sko czy porysowaniem lub uszkodzeniem wyko czenia Unikaj rozlewania p yn w kwa nych...

Page 37: ...ruszony jesli kilkukrotnie wybije bezpiecznik to wezwij elektryka Czy urz dzenie zasta o prawid owo w czone Czy pal si wska niki na panelu sterowania Czy dane pole grzewcze zosta o w czone Czy pola gr...

Page 38: ...j przycisk w wy Co nale y zrobi je li wy wietlone jest oznaczenie Mo liwe przyczyny P yta przegrza a si ze wzgl du na niepoprawn obs ug urz dzenia Po sch odzeniu p yty dotknij przycisk w wy aby zreset...

Page 39: ...Kiedy masz dzwoni przygotuj sobie model i numer seryjny urzadzenia Ta informacja znajduje si na tablicy znamionowej w nast puj cej kolejno ci Opis modelu Numer seryjny 15 cyfr Zalecamy by te informac...

Page 40: ...dzenia Rozmiar wyci cia blatu Napiecie przy czeniowe Moc przy czeniowa przy maksymalnym obci eniu Waga Szeroko G boko Wysoko Szeroko G boko Wysoko Promie naro nika Netto Brutto Po o enie rednica Moc P...

Page 41: ...ogia grzejna Nieokr g e pola lub strefa d ugo i szeroko powierzchni u ytkowej na ogrzewane elektrycznie pole lub stref d szer Nazwa dostawcy Liczba p l i lub stref Okr g e pola lub strefa rednica powi...

Page 42: ...Notatki...

Page 43: ...Notatki...

Page 44: ...free www samsung com gr support GREECE 80111 SAMSUNG 80111 726 7864 only from land line 30 210 6897691 from mobile and land line www samsung com gr support LUXEMBURG 261 03 710 www samsung com be_fr s...

Page 45: ...Induction Hob User manual Imagine the possibilities Thank you for purchasing this Samsung product Series NZ84F7NB...

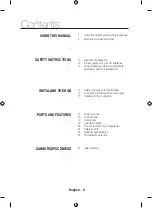
Page 46: ...is product Waste electrical electronic equipment INSTALLING THE HOB 12 12 Safety instructions for the installer 13 Connecting to the mains power supply 15 Installing to the countertop PARTS AND FEATUR...

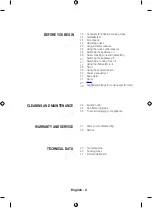
Page 47: ...Switching a cooking zone o Using the child safety lock Timer Using the booster function Power management Keep warm Pause Mute Suggested settings for cooking speci c foods 24 24 24 25 26 26 26 27 27 27...

Page 48: ...name Serial number Hazards or unsafe practices that may result in severe personal injury or death Hazards or unsafe practices that may result in minor personal injury or property damage To reduce the...

Page 49: ...by children from 8 years of age and people with limited physical sensory and mental abilities as well as with insu cient knowledge and or experience as long as they are cared for or have been trained...

Page 50: ...s forks spoons and lids should not be placed on the hob surface since they can get hot After use switch o the hob element by its control and do not rely on the pan detector The appliance is not intend...

Page 51: ...e instructions for use as suitable or hob guards incorporated in the appliance The use of inappropriate guards can cause accidents During operation the accessible surfaces may be hot Children over 8 y...

Page 52: ...res su cient protection against contact for electrical units as required by the essential safety standards If your appliance malfunctions or damage breakage cracks switch o all cooking zones disconnec...

Page 53: ...attended when preparing foods in fat or oil for example when cooking chips Turn the cooking zones o after use Always keep the control panels clean and dry Never place combustible items on the hob it m...

Page 54: ...le Sheet and hard foam parts are appropriately marked Please dispose of packaging materials and old appliances with due regard to safety and the environment Before disposing of your old appliance make...

Page 55: ...not be disposed of with other household waste at the end of their working life To prevent possible harm to the environment or human health from uncontrolled waste disposal please separate these items...

Page 56: ...ion this appliance corresponds to EN 60335 2 6 This type of appliance may be installed with a high cupboard or wall on one side Drawers may not be tted underneath the hob The installation must guarant...

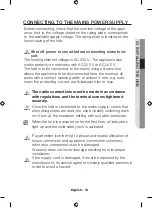
Page 57: ...s using a device that allows the appliance to be disconnected from the mains at all poles with a contact opening width of at least 3 mm e g auto matic line protecting cut out earth leakage trips or fu...

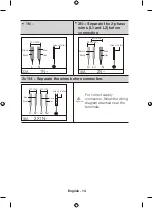
Page 58: ...1N N 2N L1 L2 220 240V 380 415V 220 240V 2X1N 2x1N Separate the wires before connection 32A 16A 16A N1 L1 L2 N2 220 240V 220 240V Brown Brown Brown Black Black Black Green Yellow Green Yellow Blue Bl...

Page 59: ...will be required in the case of requests for service and is no longer accessible after installation as it is on the original rating plate on the underside of the appliance Pay special attention to th...

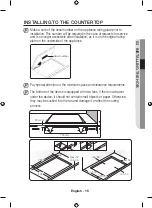
Page 60: ...English 16 min 550 min 35 min 20 min 2 min 15 min 100 min 65 min 5 min 40 min 40 min 50 min 60 474 23 23 520...

Page 61: ...English 17 03 INSTALLING THE HOB...

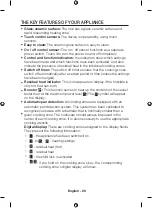
Page 62: ...on cooking zone 2400W with Booster 3600W Induction cooking zone 1200W with Booster 2000W Control panel 2 3 4 5 CONTROL PANEL 1 Cooking zone touch buttons Power setting touch buttons Child lock touch b...

Page 63: ...on a cooking zone and you turn it on the electronic circuits in your induction hob produce induced currents in the bottom of the cookware which instantly raise cookware s temperature Induced currents...

Page 64: ...have been changed Residual heat indicator This icon appears on display if the hotplate is very hot that can burn Booster This function serves to heat up the contents of the vessel faster than at the...

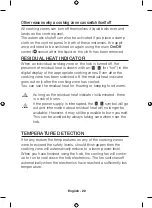
Page 65: ...ne of the cooking zones is not switched o or the heat setting is not adjusted after an extended period of time that particular cooking zone will automatically switch itself o Any residual warmth will...

Page 66: ...ne has been switched o the residual heat indicator goes out only after the cooking zone has cooled You can use the residual heat for thawing or keeping food warm As long as the residual heat indicator...

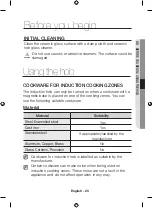
Page 67: ...glass cleaner Do not use caustic or abrasive cleaners The surface could be damaged Cookware for induction hob is labelled as suitable by the manufacturer Certain cookware can make noise when being use...

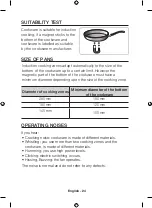
Page 68: ...are up to a certain limit However the magnetic part of the bottom of the cookware must have a minimum diameter depending upon the size of the cooking zone Minimum diameter of the bottom of the cookwar...

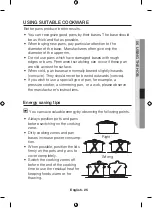
Page 69: ...rface When cold pan bases are normally bowed slightly inwards concave They should never be bowed outwards convex If you wish to use a special type of pan for example a pressure cooker a simmering pan...

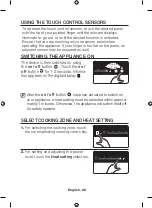
Page 70: ...your nger is too at on the panel an adjacent sensor may be actuated as well The device is then switched on using the on off button Touch the on off button for 1 2 seconds Informa tion appears on the...

Page 71: ...king surface the presence of residual heat will be indicated in the digital displays of the corresponding cooking zones in the form of a for hot To switch o a cooking zone use the sensor button to set...

Page 72: ...the timer as a safety shutoff If a speci c time has been set for a cooking zone the cooking zone will switch itself o as soon as that time has elapsed This function can also be used for several cooki...

Page 73: ...is now activated To view the time remaining for a given cooking zone touch the timer setting button The display of the corresponding cooking zone starts ashing slowly To reset the settings use the tim...

Page 74: ...ectronic components of the hob The cooking zones have a maximum power available to them If this power range is exceeded by switching on the Booster function Power Management automatically reduced the...

Page 75: ...n simultaneously switches all cooking zones currently switched on to the low power setting and then back to the previously set temperature setting This function can be used to interrupt and then conti...

Page 76: ...appear on the display Within 10 seconds after switching on touch the PAUSE button for 4 seconds The acoustic signal is deactivated and appears on the display To change the beep settings repeat steps 1...

Page 77: ...g up Saut Frying Intense Frying Frying Boil Steam Simmer Boil Melt Heating a large amount of liquid cooking pasta searing meat frying goulash stewing meat Steak beef tenderloin potato pancakes and pan...

Page 78: ...e when it is still warm to the touch This will prevent spillage from becoming burnt onto the surface Remove scales watermarks fat drippings and metallic discolouration with the use of a com mercially...

Page 79: ...NING Remove burnt on sugar melted plastic aluminum foil or other materials with a glass scraper immediately and while still hot There is a risk of burning yourself when the glass scraper issued on a h...

Page 80: ...sharp or hard object dropping onto the hob Do not place pans on the hob frame Scratching and damage to the nish may occur Avoid spilling acidic liquids for example vinegar lemon juice and descaling a...

Page 81: ...fuse box is intact If the fuses trip a number of times call an authorized electrician The appliance is properly switched on The control indicators in the control panel are illuminated The cooking zone...

Page 82: ...h the on o button What should I do if is displayed Possible reasons The hob has overheated due to incorrect operation of the unit After the hob has cooled down touch the on o button to reset the unit...

Page 83: ...occur When calling please know the model and serial number of your appliance This information is provided on the rating plate as follows Model description S N code 15 digits We recommend that you reco...

Page 84: ...ppliance dimensions Worktop cut out dimensions Connection voltage Maximum connected load power Weight Width Depth Height Width Depth Height Corner radius Net Gross Position Diameter Power Right rear C...

Page 85: ...For non circular cooking zones or area length and width of useful surface area per electric heated cooking zone or area L x W Supplier s name Number of cooking zones and or area For circular cooking z...

Page 86: ...Memo...

Page 87: ...Memo...

Page 88: ...ee www samsung com gr support GREECE 80111 SAMSUNG 80111 726 7864 only from land line 30 210 6897691 from mobile and land line www samsung com gr support LUXEMBURG 261 03 710 www samsung com be_fr sup...

Reviews: