background image

English - 54

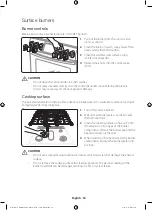
Surface burners

Burner controls

Make sure all surface burner knobs are in the OFF position.

1. 

Pull out the knobs from the control valve 
stems as shown.

2. 

Clean the knobs in warm, soapy water. Then, 
rinse and dry them thoroughly.

3. 

Clean the stainless steel surfaces using 
stainless steel cleaner.

4. 

Reinsert the knobs into the control valve 
stems.

CAUTION

•  Do not clean the control knobs in a dish washer. 
•  Do not spray cleansers directly onto the control panel. Moisture entering the electric 

circuits may cause electric shock or product damage. 

Cooktop surface

The porcelain-enameled cooktop surface needs to be kept clean. It is advisable to remove food spills 
immediately after they took place.

1. 

Turn off all surface burners.

2. 

Wait until all burner grates cool down, and 
then remove them.

3. 

Clean the cooktop surface using a soft cloth. 
If food spills run into gaps of the burner 
components, remove the burner cap and the 
head, and wipe out the spills.

4. 

When cleaning is finished, reinsert the burner 
components, and put the burner grates into 
position.

CAUTION

•  Do not use a steel-wool pad or abrasive cleaner, which can scratch or damage the enamel 

surface.

•  Do not remove the cooktop surface for cleaning purposes. The gas lines leading to the 

burner manifolds can be damaged, resulting in a fire or system failure.

Manual User_NX58H9500WS_DG68-00566A-01_EN_NonPF.indd   54

2014-07-30     1:02:05

Summary of Contents for NX58H9950WS

Page 1: ...NX58H9500WS NX58H9950WS Slide In Gas Range User manual imagine the possibilities Thank you for purchasing this Samsung product Manual User_NX58H9500WS_DG68 00566A 01_EN_NonPF indd 1 2014 07 30 1 01 25 ...

Page 2: ...l the fire department Installation and service must be performed by a qualified installer service agency or the gas supplier Anti tip device WARNING ALL RANGES CAN TIP RESULTING IN PERSONAL INJURY TIPPING RANGES CAN CAUSE BURNS FROM SPILLS PERSONAL INJURY AND OR DEATH INSTALL AND CHECK THE ANTI TIP BRACKET USING THE INSTRUCTIONS AND TEMPLATE SUPPLIED WITH THE BRACKET To prevent accidental tipping ...

Page 3: ...fers more space than many other leading brands in the United States and Canadian markets The enhanced capacity means a better cooking experience A cooktop with 5 burners Power burners simmer burners as well as a center oval burner provide flexible cooktop heat for a variety of cookware The center oval burner delivers heat evenly over a large area and provides the optimum temperatures for griddle c...

Page 4: ...10 Location safety 10 Cooktop safety 12 Oven safety 13 Warming drawer lower drawer safety 13 Self cleaning oven safety Before you start 17 17 Display mode 18 Clock 19 Kitchen timer 19 Oven vent cooling vent Gas range 20 21 Cookware 22 Wok grate 23 Griddle 24 Gas burners 25 Ignition Gas oven 26 27 Cooking mode 32 Recipe guide 34 Racks 36 Cooking options 38 Special features 43 Changing option settin...

Page 5: ...are here to prevent injury to you and others Please follow them explicitly After reading this section keep it in a safe place for future reference State of California Propositoin 65 Warning This product contains chemicals known to the State of California to cause cancer and reproductive toxicity Gas appliances can cause low level exposure to Proposition 65 listed substances including but not limit...

Page 6: ...tion of these materials Keep all packaging materials out of children s reach Properly dispose the packaging materials after the range is unpacked Do not store any object of interest to children on the cooktop or backguard of the range Children climbing on the range to reach items could be killed or seriously injured Do not operate the range if the range or any part of the range is damaged malfunct...

Page 7: ...ultipurpose dry chemical or foam type fire extinguisher Do not heat unopened food containers buildup of pressure may cause container to burst and result in injury Gas safety WARNING To reduce the risk of fire electric shock personal injuries and or death obey the following precautions If you smell gas Close the valve and do not use the range Do not light a match candle or cigarette Do not turn on ...

Page 8: ...k by providing a path for the electric current This range is equipped with a cord having a grounding plug The plug must be firmly plugged into an outlet that is properly installed and grounded in accordance with the local codes and ordinances If you are unsure whether your electrical outlet is properly grounded have it checked by a licensed electrician The range is supplied with a 3 pronged ground...

Page 9: ...se caution when handling them Make sure no parts came loose during shipping Make sure your range is correctly installed and adjusted by a qualified service technician or installer for the type of gas natural or LP you will use For your range to utilize LP gas the installer must replace the 5 surface burner orifices and 2 oven orifices with the provided LP orifice set and reverse the GPR adapter Th...

Page 10: ...neath the range The vents allow the necessary exhaust for the range to operate properly with correct combustion Make sure the wall coverings around the range can withstand heat up to 200 F 93 C generated by the range Cabinet storage above the surface of the range should be avoided If cabinet storage above the range is necessary allow a minimum clearance of 40 inches 102 cm between the cooking surf...

Page 11: ...ure cookware handles are turned to the side or rear of the cooktop but not over other surface burners Stand away from the range while frying Always heat frying oils slowly and watch as they heat If you are frying foods at high heat carefully watch during the cooking process If a combination of fats or oils is to be used during frying mix them together before heating Use a deep fryer thermometer wh...

Page 12: ...ff Do not use aluminium foil or foil liners anywhere in the oven Do not use aluminium foil or like material to cover any holes or passages in the oven bottom or to cover an oven rack Stand away from the oven when opening the oven door Keep the oven free from grease buildup When repositioning the oven racks make sure the oven is completely cool Only use cookware that is recommended for use in gas o...

Page 13: ...ers of fat drippings in or near the drawer Self cleaning oven safety WARNING To reduce the risk of fire electric shock personal injuries and or death obey the following precautions The self cleaning feature operates the oven at temperatures high enough to burn away food soils in the oven The range is extremely hot during a self cleaning cycle Do not touch any surfaces of the range during a self cl...

Page 14: ...e burner knobs 5 pcs 9 Broil oven burner 3 Warming drawer knob 1 pc 10 Oven light 4 Surface burners 11 Convection fan Convection heater 5 Oven vent 12 Oven rack system 6 Cooling vent 13 Bake oven burner 7 Removable oven door Manual User_NX58H9500WS_DG68 00566A 01_EN_NonPF indd 14 2014 07 30 1 01 28 ...

Page 15: ...s 5 Flat rack 2 Temp probe 1 Griddle 1 Wok grate 1 Gliding rack 1 NX58H9950WS Only Split rack 1 NX58H9500WS Only If you need an accessory marked with a you can buy it from the Samsung Contact Center 1 800 726 7864 Manual User_NX58H9500WS_DG68 00566A 01_EN_NonPF indd 15 2014 07 30 1 01 30 ...

Page 16: ...ratures between 150 F and 200 F 66 C and 93 C 8 Self Clean Burn off food residues at very high temperatures 9 Touch to Wake Up Activate the control panel display 10 Delay Start Set the oven to start at a certain time 11 Cooking Time Set the cooking time 12 Temp Probe Activate the temperature probe mode 13 Numbers Use to set the time temperature or preset 14 Clock Set the clock time 15 Options Disp...

Page 17: ...e when the oven is in standby mode the control panel enters Sleep mode In Sleep mode the control panel stays inactive with just the time display until it is reactivated by the user Wake Up 1 To activate the control panel press Touch to Wake Up User preferences are available in this mode including the timer oven light and or control lock Manual User_NX58H9500WS_DG68 00566A 01_EN_NonPF indd 17 2014 ...

Page 18: ...confirm the settings To change the time format 2 3 1 1 1 Press the Options button and then 5 on the number pad 2 Press 1 for the 12 hour format or 2 for the 24 hour format 3 Press the START SET button You can set change the clock or the kitchen timer before you start a cooking mode or while most cooking modes are operating However you cannot set or change the time if a time based function is opera...

Page 19: ...l the Timer settings press the Timer button again 4 When the set time elapses the oven beeps and displays the End message Press the Timer button to delete the message Oven vent cooling vent Cooling vent Oven vent Both the oven vent and the cooling vent are located at the back of the oven range Proper air circulation prevents combustion problems and ensures good performance Do not block the vent or...

Page 20: ...e Step 1 Step 2 Step 3 Put all ingredients into a cooking container pan pot etc Place the container on a surface burner Ignite the surface burner Manual User_NX58H9500WS_DG68 00566A 01_EN_NonPF indd 20 2014 07 30 1 01 33 ...

Page 21: ...eel A slow heat conductor with uneven cooking performance but is durable easy to clean and resists staining Cast Iron A poor conductor but retains heat very well Enamelware Heating characteristics depend on the base material Glass A slow heat conductor Use only glass cookware that is specified for top of range cooking or oven use Size limitations 6 inches or less CAUTION Do not place a small pan o...

Page 22: ...s appropriate CAUTION Do not remove the wok grate until the cooktop grates surfaces and wok grate completely cool down When using the cooktop or oven the wok grate on the cooktop may become very hot Use oven gloves when placing or removing the wok grate Do not use utensils with a flat bottom or with a diameter less than the wok ring diameter The utensil may tip over Do not use an oversized utensil...

Page 23: ...ddle until the cooktop grates surfaces and griddle itself cool down The griddle on the cooktop may become very hot when you use the cooktop or oven Use oven gloves when placing or removing the griddle The griddle is quite heavy because it is made of cast iron Use both hands when placing or removing the griddle Do not overheat the griddle This can damage the coating of the griddle Do not use metal ...

Page 24: ...ristics Right Front RF 18 000 BTU NX58H9950WS 19 000 BTU Power heating Low simmering Boiling food tomato sauce Maximum output Right Rear RR 5 000 BTU Low simmering Chocolate casseroles sauces Delicate food that requires low heat for a long time Center C 9 500 BTU Grilling Griddling Pancakes hamburgers fried eggs hot sandwiches General purpose cooking Left Front LF 15 000 BTU Quick heating General ...

Page 25: ...an ignite the burner manually in case of a power failure Use caution when doing this 1 Hold a long gas grill lighter to the surface burner you want to light 2 Push in and turn the control knob for that burner to the LITE position Turn on the grill lighter to ignite the burner 3 After the burner is lit turn the control knob to adjust the flame level Flame level The flames on the burners should alwa...

Page 26: ... 2 Step 4 Put all ingredients in a heat safe container Place the container on a rack Select a cooking mode and then start preheating Close the door and start cooking Manual User_NX58H9500WS_DG68 00566A 01_EN_NonPF indd 26 2014 07 30 1 01 38 ...

Page 27: ... Bake button 2 If necessary use the number pad to change the default temperature 350 F You can set the oven to any temperature from 175 F to 550 F 3 Press the START SET button The gas oven preheats until it reaches the temperature you set When preheating is complete place the food in the gas oven and then close the door 4 When cooking is complete press the OFF CLEAR button and then take out the fo...

Page 28: ...ffs sweet rolls angel food cake and bread Cookies bake best when cooked on flat cookie sheets When convection baking using a single rack place the rack in rack position 3 or 4 When convection baking using multiple racks place the racks in positions 3 and 5 for Cake 2 and 5 for Cookie The oven automatically adjusts the temperature for convection baking Convection roasting Good for larger tender cut...

Page 29: ...oiling or twice for low 3 Press the START SET button to start cooking 4 When one side of the food is browned turn it over and start cooking the other side 5 When broiling on both sides is complete press the OFF CLEAR button Use the low temperature setting for poultry or thick cuts of meat to prevent overbroiling In general to prevent overbroiling press the Broil button to switch from High to Low U...

Page 30: ... contact bone fat or gristle For bone in meats insert the probe into the center of the lowest and thickest portion of the piece For whole poultry turkey large chickens etc insert the probe into the thickest part of the inner thigh parallel to the leg If you activate Keep Warm after cooking is complete using the temperature probe the meat s internal temperature will exceed your initial settings If ...

Page 31: ...ernal temperature F Beef Lamb Rare 140 150 Medium 160 170 Well done 175 185 Pork 175 185 Poultry 185 195 CAUTION To protect the temperature probe be careful not to insert the probe so that it comes out of the meat Make sure that the probe is inserted around the center of the meat Do not store the probe in the oven Do not leave the probe inside the oven during the Self Cleaning or Broiling cycle Th...

Page 32: ...75 191 Turkey Whole Unstuffed 10 16 10 16 325 163 Turkey Whole Unstuffed 18 24 8 15 325 163 Turkey Breasts 4 6 18 23 325 163 Cornish Hen 1 1 5 50 75 total 325 163 Lamb Half Leg 3 4 Medium 25 30 325 163 Well Done 30 35 325 163 Whole Leg 6 7 Medium 25 30 325 163 Well Done 30 35 325 163 Stuffed turkey requires additional roasting time The minimum safe temperature for stuffing in poultry is 165 F 74 C...

Page 33: ...Chicken pieces 2 5lbs Hi 4 18 20 12 15 Broil skin side down first Spread open Brush with melted butter before and halfway through broiling Fish Fish Fillets 0 25 to 0 5 in thick Hi 5 or 4 6 10 3 4 0 5 in thick Hi 5 or 4 7 10 5 6 Handle and turn very carefully Brush with lemon butter before and during cooking if desired Ham Ham Slices precooked 0 5 in thick Hi 5 or 4 7 10 5 6 Increase time 5 to 10 ...

Page 34: ...he oven is cool When placing an oven rack in the topmost rack position position 7 make sure the rack is situated stably on the embossed stop Multi rack Baking 3 5 When baking cakes on two racks place the racks in position 3 and 5 for the best performance When baking cookies on two racks place the oven racks in position 2 and 5 For 4 baking pans on two racks Place two pans in the rear of the upper ...

Page 35: ...f the rack on a rack guide 2 Slide the rack into the rack guide while holding the front end of the rack To remove an oven rack 1 Pull out the rack until it stops 2 Pull up the front end of the rack and remove it from the rack guide Manual User_NX58H9500WS_DG68 00566A 01_EN_NonPF indd 35 2014 07 30 1 01 46 ...

Page 36: ...the button corresponding to a desired cooking mode such as Bake 3 If necessary change the temperature using the number pad 4 Press the Cooking Time button 5 Set the cooking time between 1 minute and 9 hours and 99 minutes 9 99 using the number pad 6 Press the START SET button The oven will automatically light and start preheating The temperature will increase until it reaches the temperature you s...

Page 37: ...the Cooking Time button 5 Set the cooking time between 1 minute and 9 hours and 99 minutes 9 99 using the number pad 6 Press the Delay Start button 7 Set the starting time using the number pad 8 Press the START SET button The gas oven starts cooking at the set time and turns off automatically when it completes cooking To change the starting time press the Delay Start button and enter a new startin...

Page 38: ...e the table below 1 2 3 4 5 6 Dehydrate Baked potato Grilled chicken Salmon steak White fish fillet Bread proof 3 Set the temperature between 100 F and 550 F using the number pad See pages 39 and 40 for more information 4 Press the START SET button to start cooking 5 When the cooking is complete press the OFF CLEAR button Preheating is not necessary An error beep sounds if the temperature setting ...

Page 39: ...s specially designed to cook salmon steaks 5 White fish fillet White fish fillet is specially designed to cook white fish fillets 6 Bread proof Bread proof provides an optimal temperature for the bread proofing process and therefore does not require a temperature adjustment For the best results always start the Bread proof option with a cool oven CAUTION Do not use Bread proof when the oven temper...

Page 40: ...en Chicken pieces 1000 g 1200 g 2 375 425 40 50 Put the chicken pieces on a tray or baking dish Season the chicken after cooking if desired Salmon Steak 3 pieces 19 5 oz 550 g 2 Hi Lo 10 15 Put the salmon steaks on a tray or baking dish Season the salmon after cooking if desired White Fish Fillet 3 fillets 520 g 3 or 4 400 425 10 15 Put the fish fillets on a broiler pan or baking dish Season the f...

Page 41: ... information visit the website at http www star k org With the Sabbath option The oven temperature can be set higher or lower after you have set this option The display doesn t change and no beep sounds when you change the temperature Once the oven is properly set for baking with the Sabbath option active the oven will remain continuously on until the Sabbath feature is cancelled This will overrid...

Page 42: ...or 3 seconds You can set the cooking time before activating the Sabbath option After a power failure the oven will not resume operation automatically SAb will appear in the control panel but the oven will not go back on Food can be safely removed from the oven but you should not turn off the Sabbath option and turn the oven back on until after the Sabbath Holidays After the Sabbath observance turn...

Page 43: ...the oven control to display temperatures in Fahrenheit or Centigrade 4 Auto Conversion Converts regular baking temperatures to convection baking temperatures 5 Time date 12hr 24hr Set the clock to display the time in the 12 hour or 24 hour format 6 Energy saving Automatically turns off the oven 12 hours after baking starts or 3 hours after broiling starts 7 Language Select a preferred language fro...

Page 44: ... Press the Options button and then 1 on the number pad 6 See the table below and then press a number on the number pad that corresponds to the location in which you want to store the recipe You can select 1 2 or 3 1 2 3 Recipe 1 Recipe 2 Recipe 3 7 Press the START SET button to save the changes To use or recall a favorite cook mode 2 3 4 1 1 1 Press the Options button and then 1 on the number pad ...

Page 45: ...Press the Options button and then 2 on the number pad 2 Press the Options button to select a higher or lower temperature 3 Enter an adjusting temperature value 0 35 using the number pad 4 Press the START SET button to save the changes This adjustment does not affect the broiling or the self cleaning temperature and is retained in memory after a power failure Temp Unit F C Change the temperature fo...

Page 46: ... the changes Time date 12hr 24hr Set the clock to display the time in the 12 hour or 24 hour format 1 1 2 3 1 Press the Options button and then 5 on the number pad 2 Press 1 12hr or 2 24hr on the number pad Default setting is 12 hour 3 Press the START SET button to save the changes Energy saving This will automatically turn off the oven 12 hours after baking starts or 3 hours after broiling starts...

Page 47: ...Press the Options button and then 8 on the number pad 2 Press 1 unmute or 2 mute on the number pad 3 Press the START SET button to save the changes Demo mode This is used by retailers for display purposes only In this mode the heating element does not operate 1 1 2 3 1 Press the Options button and then 9 on the number pad 2 Press 1 Off or 2 On on the number pad 3 Press the START SET button to save...

Page 48: ...to lock or unlock both the control panel and the door When the Oven Lock is on the oven panel does not operate and the oven door is locked and cannot be opened Conv Convert Switch between baking and convection baking modes In baking mode press the Conv Convert button to switch to convection baking mode When you press the Conv Convert button in the Bake mode the cooking mode will be changed to Conv...

Page 49: ...ER Warming drawer Step 1 Step 2 Put the cooked food in its container into the warming drawer Close the warming drawer and set the Warming level Lo Med Hi Manual User_NX58H9500WS_DG68 00566A 01_EN_NonPF indd 49 2014 07 30 1 01 58 ...

Page 50: ... eggs pastries biscuits hard rolls gravies High Poultry pork chops hamburgers pizza bacon fried foods For best performance do not keep food in the warming drawer for longer than 1 hour Do not keep small quantities of food or heat sensitive food eggs for example in the warming drawer longer than 30 minutes CAUTION Do not use plastic containers or plastic wraps Do not cover the inner area of the war...

Page 51: ...s steel surface 1 Remove any spills spots and grease stains using a soft wet cloth 2 Apply an approved stainless steel cleanser to a cloth or paper towel 3 Clean one small area at a time rubbing with the grain of the stainless steel if applicable 4 When done dry the surface using a soft dry cloth 5 Repeat steps 2 through 4 as many times as necessary CAUTION Do not use a steel wool pad or abrasive ...

Page 52: ...graphite lubricant according to the instructions below To apply the graphite lubricant 1 Shake the graphite lubricant before opening it 2 Apply 4 drops of lubricant to the inner side of the left sliding track and 4 drops to the outer side of the left sliding track 3 Repeat step 2 above on the right sliding track 4 Extend and collapse the gliding rack several times to distribute the lubricant Manua...

Page 53: ...ectly onto the gliding rack Door Do not remove the inner gasket of the oven door for cleaning Inner side Inner surface Clean the inner side of the door manually using a soapy plastic scouring pad and then wipe with a dry cloth Take care not to get the gasket wet or allow moisture into the door Inner glass The inner glass is cleaned automatically during the self cleaning cycle Outer side Outer surf...

Page 54: ...op surface needs to be kept clean It is advisable to remove food spills immediately after they took place 1 Turn off all surface burners 2 Wait until all burner grates cool down and then remove them 3 Clean the cooktop surface using a soft cloth If food spills run into gaps of the burner components remove the burner cap and the head and wipe out the spills 4 When cleaning is finished reinsert the ...

Page 55: ...ed through the hole in each burner head 7 Return the burner caps to their positions on top of burner heads To ensure proper and safe operation make sure the burner caps lie flat on top of the burner heads 8 Reinstall the burner gates in their respective positions 9 Turn on each burner and check if it operates properly After verifying that a burner operates normally turn it off The precise simmer b...

Page 56: ...ocked until the cycle is cancelled and the oven temperature is below 392 F Use caution when opening the oven door after the self cleaning cycle The gas oven will still be VERY HOT and hot air and steam might escape when the door is open To perform the self cleaning cycle Make sure the door lock is released Remove all racks from the oven cavity 2 3 5 1 Make sure the oven door is unlocked and closed...

Page 57: ...ks until the oven temperature falls below 392 F 200 C After self cleaning The door stays locked until the internal oven temperature falls below 392 F When the oven has cooled down wipe the oven surfaces with a cloth to remove ash residue Stubborn stains can be removed using a steel wool pad Lime deposits can be removed using a vinegar soaking cloth If you are not satisfied with the cleaning result...

Page 58: ...ocket by turning it counterclockwise 5 Insert a new 40 watt appliance bulb into the socket and then turn it clockwise to tighten 6 Reinsert the glass cover and then turn it clockwise to tighten CAUTION To prevent electric shock make sure the gas oven is turned off and cool before replacing the oven light The oven light does not operate during the self cleaning cycle Remove the racks if they are in...

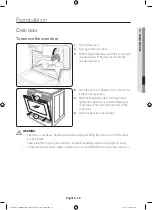
Page 59: ...h sides of the oven door tightly lift it up and out until the hinge arms come clear of the slots at the bottom of the oven door 6 Place the door in a safe location WARNING The door is very heavy Be careful when removing and lifting the door Do not lift the door by the handle Take care when moving the oven door Improper handling could result in physical injury To prevent electric shock make sure th...

Page 60: ...hing them up against the front frame of the oven 5 Close the door and make sure it opens and closes normally Warming drawer 1 Slide open the drawer until it stops 2 Locate the roller guide clips on either side Take the drawer by both hands Pull down the left clip while lifting up the right clip to remove the drawer 3 Clean the drawer in warm soapy water using a cloth or soft brush Then rinse and d...

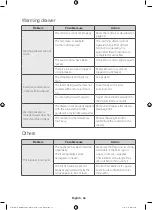
Page 61: ...s not plugged into the electrical outlet Make sure the electrical plug is plugged into a live properly grounded outlet A fuse in your home may be blown or the circuit breaker tripped Replace the fuse or reset the circuit breaker The gas supply is not properly connected or turned on See the Installation Instructions that came with your range Surface burners do not light The control knob is not set ...

Page 62: ...urn off Gas Pressure Regulator shut off switch is in the off position Call a qualified service technician Oven Problem Possible cause Action The oven control beeps and displays an error code You have a function error code See the Information codes chart on page 67 Press the OFF CLEAR button and restart the oven If the problem persists disconnect all power to the range for at least 30 seconds and t...

Page 63: ...nd press the START SET button for 3 seconds The oven will beep and the Lock icon will turn off The Sabbath function has been activated SAb and the time of day will show in the display All other controls and signals will be deactivated To cancel the Sabbath function and reactivate the light switch and other controls press and hold the Bake and Touch to Wake Up buttons simultaneously for 3 seconds L...

Page 64: ...cleaning oven controls See page 56 Crackling or popping sound This is normal This is the sound of the metal heating and cooling during any cooking or cleaning function Excessive smoking during a self cleaning cycle This is the first time the oven has been cleaned This is normal The oven will always smoke more the first time it is cleaned Wipe up all excessive soiling before starting the self clean...

Page 65: ...e items at the same time Burning or oily odor coming from the vent This is normal for a new oven and will disappear within 1 2 hour of the first bake cycle To speed the process set a self cleaning cycle for a minimum of 3 hours See page 56 Strong odor This is temporary The insulation around the inside of the oven emits an odor the first few times the oven is used Oven racks are difficult to slide ...

Page 66: ...g to warm liquids Liquid should not be warmed in the drawer Remove liquids Warming drawer or storage drawer does not slide smoothly or drags The drawer is not properly aligned with the full extension roller guide rails or nylon drawer guides Remove and replace the drawer See page 60 The contents in the drawer are too heavy Reduce the weight and or redistribute the contents in the drawer Others Pro...

Page 67: ...oil on racks and or oven bottom Remove foil Clock or timers not set correctly See pages 18 and 19 Food does not broil properly in the oven Oven controls not set properly See page 29 Oven door was not closed during broiling See page 27 The rack has not been properly positioned See broiling guide on page 34 Information codes Code symbol Meaning Solution Shorted Key Press the OFF CLEAR button and res...

Page 68: ...vice is not available in all areas To receive in home service product must be unobstructed and accessible to the service agent If service is not available Samsung may elect to provide transportation of the product to and from an authorized service center SAMSUNG will repair or replace this product at our option and at no charge as stipulated herein with new or reconditioned parts or products if fo...

Page 69: ...WARRANTY SHALL NOT EXTEND TO ANYONE OTHER THAN THE ORIGINAL PURCHASER OF THIS PRODUCT IS NONTRANSFERABLE AND STATES YOUR EXCLUSIVE REMEDY Some states or provinces do not allow limitations on how long an implied warranty lasts or the exclusion or limitation of incidental or consequential damages so the above limitations or exclusions may not apply to you This warranty gives you specific legal right...

Page 70: ...Memo Manual User_NX58H9500WS_DG68 00566A 01_EN_NonPF indd 70 2014 07 30 1 02 21 ...

Page 71: ...Memo Manual User_NX58H9500WS_DG68 00566A 01_EN_NonPF indd 71 2014 07 30 1 02 21 ...

Page 72: ...rm normal cleaning or maintenance CANADA 1 800 SAMSUNG 726 7864 U S A Consumer Electronics 1 800 SAMSUNG 726 7864 U S A Mobile Phones 1 800 SAMSUNG 726 7864 www samsung com ca support English www samsung com ca_fr support French www samsung com us support www samsung com us support Manual User_NX58H9500WS_DG68 00566A 01_EN_NonPF indd 72 2014 07 30 1 02 23 ...

Page 73: ...X58H9950WS Cuisinière à gaz encastrable Manuel d utilisation un monde de possibilités Nous vous remercions d avoir choisi ce produit Samsung Manual User_NX58H9500WS_DG68 00566A 01_CFR_NonPF indd 1 2014 07 30 1 01 35 ...

Page 74: ...de gaz à partir du téléphone d un voisin Suivez les instructions de votre fournisseur de gaz Si vous ne parvenez pas à joindre votre fournisseur de gaz appelez les pompiers L installation et l entretien doivent être effectués par un installateur qualifié une agence de maintenance ou votre fournisseur de gaz Dispositif anti basculement AVERTISSEMENT TOUTES LES CUISINIÈRES SONT SUSCEPTIBLES DE BASCU...

Page 75: ... asseyez pas ne vous appuyez pas sur la porte ou le tiroir Fonctions clés Plus d espace Dotée d une capacité de 5 8 pieds cubes cette cuisinière à gaz Samsung dispose d un espace bien plus important que toutes les marques concurrentes présentes sur les marchés américain et canadien La capacité accrue signifie une meilleure qualité de cuisson Table de cuisson à 5 brûleurs Des brûleurs haute puissan...

Page 76: ...placement 10 Sécurité liée à la table de cuisson 12 Sécurité liée au four 13 Sécurité liée au tiroir chauffe plat tiroir inférieur 13 Sécurité liée à l auto nettoyage du four Avant de commencer 17 17 Mode d affichage 18 Horloge 19 Minuterie de cuisine 19 Ventilation du four orifice de refroidissement Cuisinière à gaz 20 21 Récipient 22 Grille duWok 23 Gril 24 Brûleurs à gaz 25 Allumage Four à gaz ...

Page 77: ...de blessure veillez à bien les respecter Après lecture de cette rubrique conservez le manuel dans un endroit sûr afin de pouvoir le consulter ultérieurement Avertissement de la Proposition 65 adoptée par l État de la Californie Ce produit contient des substances chimiques reconnues par l État de la Californie comme étant des substances toxiques pour la reproduction et provoquant des cancers Des ap...

Page 78: ...ents Gardez tous les éléments d emballage hors de la portée des enfants Jetez correctement les matériaux d emballage une fois la cuisinière déballée N entreposez pas d objets susceptibles d éveiller l intérêt des enfants sur la table de cuisson ou sur le dosseret de la cuisinière Les enfants risquent en grimpant sur la cuisinière de se blesser gravement voire mortellement Ne faites pas fonctionner...

Page 79: ...isez un extincteur multifonction à poudre ou à mousse Ne faites pas chauffer des aliments contenus dans des récipients fermés L accumulation de pression pourrait entraîner l explosion du récipient et provoquer des blessures Sécurité liée au gaz AVERTISSEMENT Pour réduire le risque d incendie de choc électrique de blessures et ou de mort respectez les précautions suivantes Si vous sentez une odeur ...

Page 80: ...urant un chemin de sortie en cas de dysfonctionnement ou de panne Cette cuisinière est équipée d un cordon disposant d une prise de mise à la terre La fiche doit être branchée sur une prise secteur posée et mise à la terre conformément à la législation en vigueur Si vous n êtes pas sûr que la prise soit correctement mise à la terre consultez un électricien qualifié afin qu il vérifie Cette cuisini...

Page 81: ...manipulez Assurez vousqu aucune pièce ne se soit desserrée durant l expédition Assurez vous que votre cuisinière est correctement installée et réglée pour le type de gaz que vous allez utiliser naturel ou GPL par un installateur qualifié ou un technicien qualifié Pour que votre cuisinière puisse fonctionner au GPL l installateur doit remplacer les 5 orifices des brûleurs de surface et les 2 orific...

Page 82: ... la cuisinière Les orifices de ventilation permettent l échappement nécessaire à un fonctionnement et à une combustion corrects Assurez vous que les revêtements muraux situés à proximité de la cuisinière peuvent résister à la chaleur générée par celui ci pouvant aller jusqu à 200 F 93 C Un placard de rangement est à éviter au dessus de la surface de la cuisinière Si un placard de rangement est néc...

Page 83: ...ours que les manches d ustensiles sont dirigées vers les côtés ou l arrière de la table de cuisson et non au dessus des autres brûleurs de surface Tenez vous éloigné de la cuisinière lorsque vous faites de la friture Chauffez toujours lentement les huiles de friture et observez les lorsqu elles chauffent Si vous faites frire des aliments à température élevée observez attentivement le processus de ...

Page 84: ...ium ou de barquettes en aluminium dans le four N utilisez pas de feuille d aluminium ou de matériau semblable pour couvrir des orifices ou des passages au bas du four ou pour couvrir une grille du four Eloignez vous du four lorsque vous en ouvrez la porte Évitez l accumulation de graisses dans le four Pour repositionner les grilles du four assurez vous que le four est complètement refroidi Utilise...

Page 85: ...rs de graisse s égoutter dans ou à proximité du tiroir Sécurité liée à l auto nettoyage du four AVERTISSEMENT Pour réduire le risque d incendie de choc électrique de blessures et ou de mort respectez les précautions suivantes La fonctionnalité d auto nettoyage porte le four à des températures suffisamment élevées pour brûler les résidus alimentaires dans le four La cuisinière est extrêmement chaud...

Page 86: ... de four pour gril 3 Bouton du tiroir chauffe plat 1 pièce 10 Éclairage du four 4 Brûleurs de surface 11 Ventilateur de convection Résistance de convection 5 Ventilation du four 12 Système de grille du four 6 Orifice de refroidissement 13 Brûleur de four pour cuisson 7 Porte du four amovible Manual User_NX58H9500WS_DG68 00566A 01_CFR_NonPF indd 14 2014 07 30 1 01 40 ...

Page 87: ...onde thermique 1 Grille coulissante 1 NX58H9500WS uniquement Grille en deux pièces 1 NX58H9500WS uniquement Gril 1 Sonde thermique Si vous souhaitez acheter un accessoire repéré par un astérisque vous pouvez le commander auprès du Centre d assistance Samsung 1 800 726 7864 Manual User_NX58H9500WS_DG68 00566A 01_CFR_NonPF indd 15 2014 07 30 1 01 42 ...

Page 88: ...chaud Maintient les aliments cuits au chaud à basse température entre 150 F et 200 F 66 C et 93 C 8 Auto nettoyage Brûle les résidus d aliments à très haute température 9 Touche de réveil Active l affichage du tableau de commande 10 Départ différé Réglez le four pour qu il démarre à une certaine heure 11 Temps de cuisson Règle le temps de cuisson 12 Sonde thermique Active le mode de sonde thermiqu...

Page 89: ...le le tableau de commande passe en mode Veille En mode Veille le tableau de commande reste inactif avec seulement l heure affichée jusqu à ce qu il soit réactivé par l utilisateur Réveil 1 Pour activer le tableau de commande appuyez sur Touch to Wake Up Touche de réveil Les préférences de l utilisateur sont disponibles dans ce mode ainsi que la minuterie l éclairage du four et ou le verrouillage d...

Page 90: ...er les réglages Pour changer le format de l heure 2 3 1 1 1 Appuyez sur le bouton Options puis 5 sur le pavé numérique 2 Appuyez sur 1 pour le format 12 heures ou 2 pour le format 24 heures 3 Appuyez sur le bouton START SET DÉMARRAGE RÉGLAGE Vous pouvez régler changer l horloge ou la minuterie de cuisine avant de démarrer un mode de cuisson ou lorsque la plupart des modes de cuisson sont en foncti...

Page 91: ...de minuterie appuyez à nouveau sur le bouton Timer Minuterie 4 Lorsque la durée réglée est écoulée le four sonne et affiche le message End Fin Appuyez sur le bouton Timer Minuterie pour supprimer le message Ventilation du four orifice de refroidissement Orifice de refroidissement Ventilation du four Les ventilations du four et de refroidissement sont situées à l arrière de la cuisinière Une circul...

Page 92: ...1 Étape 2 Étape 3 Placez tous les ingrédients dans un récipient de cuisson casserole poêle etc Placez le récipient sur un brûleur de surface Allumez le brûleur de surface Manual User_NX58H9500WS_DG68 00566A 01_CFR_NonPF indd 20 2014 07 30 1 01 47 ...

Page 93: ...cuisson inégale mais il est durable facile à nettoyer et résistant aux taches Fonte un mauvais conducteur mais elle conserve très bien la chaleur Casserole émaillée les caractéristiques de chauffage varient en fonction du matériau de base Verre un conducteur thermique lent Utilisez uniquement des ustensiles en verre qui sont spécifiés pour une utilisation sur la table de cuisson et dans le four Li...

Page 94: ...eau de flamme approprié ATTENTION Ne retirez pas la grille du wok avant qu elle même les autres grilles et la table de cuisson n aient totalement refroidies La grille du wok peut devenir très chaude lorsque vous utilisez la table de cuisson ou le four Portez toujours des maniques lorsque vous devez la manipuler N utilisez pas d ustensiles à fond plat ou d un diamètre inférieur au diamètre de l ann...

Page 95: ...squ à ce que les autres grilles et la table de cuisson et le gril lui même n aient totalement refroidis Le gril sur la table de cuisson peut devenir très chaud lorsque vous utilisez la table de cuisson ou le four Portez toujours des maniques lorsque vous devez le manipuler Le gril est lourd car il est réalisé en fonte Utilisez les deux mains lorsque vous devez le manipuler Ne faites pas surchauffe...

Page 96: ...X58H9950WS 19000 BTU Chauffage Mijotage à basse température Aliment bouilli sauce tomate Puissance maximale Right Rear Arrière droit RR ArD 18 méga joules 5000 BTU Mijotage à basse température Chocolat casseroles sauces Aliments délicats qui nécessitent une faible température pendant une longue durée Center Centre C C 18 méga joules 9500 BTU Grillades Crêpes hamburgers œufs sur le plat sandwichs c...

Page 97: ...ement le brûleur en cas de coupure d alimentation électrique Dans ce cas soyez prudent 1 Approchez un allume gaz du brûleur de surface que vous souhaitez allumer 2 Réglez le bouton de commande de ce brûleur sur la position LITE ALLUMAGE en poussant dessus et en le faisant tourner Approchez un allume gaz du brûleur pour l allumer 3 Lorsque le brûleur est allumé tournez le bouton de commande pour aj...

Page 98: ...tous les ingrédients dans un récipient résistant à la chaleur Placez le récipient sur une grille Sélectionnez un mode de cuisson puis démarrez le préchauffage Fermez la porte et démarrez la cuisson Manual User_NX58H9500WS_DG68 00566A 01_CFR_NonPF indd 26 2014 07 30 1 01 54 ...

Page 99: ... Si nécessaire utilisez le pavé numérique pour modifier la température par défaut 350 F Vous pouvez régler le four sur une température comprise entre 175 F et 550 F 3 Appuyez sur le bouton START SET DÉMARRAGE RÉGLAGE Le four à gaz est en préchauffage jusqu à ce qu il atteigne la température réglée Lorsque le préchauffage est terminé placez les aliments dans le four et fermez la porte 4 Lorsque la ...

Page 100: ...ème les viennoiseries les gâteaux des anges et le pain Les cookies cuisent mieux sur des feuilles à cookies plates Lors de la cuisson par convection sur une seule grille placez la sur la position 3 ou 4 Si vous utilisez plusieurs grilles avec la cuisson à convection positionnez les aux hauteurs 3 et 5 pour les pâtisseries 2 et 5 pour les cookies Le four ajuste automatiquement la température pour l...

Page 101: ...ur le bouton START SET DÉMARRAGE RÉGLAGE pour démarrer la cuisson 4 Lorsque les aliments sont dorés d un côté retournez les et démarrez la cuisson de l autre côté 5 Lorsque les aliments sont grillés des deux côtés appuyez sur le bouton OFF CLEAR ARRÊT EFFACER Utilisez le réglage de faible température pour la volaille ou les tranches épaisses pour éviter la surcuisson Pour modifier le réglage pour ...

Page 102: ...tact avec les os le gras ou les cartilages Pour la viande non désossée insérez la sonde au centre de la partie la plus basse et la plus épaisse du morceau Pour toute la volaille dinde gros poulets etc insérez la sonde dans la partie la plus épaisse de l intérieur des cuisses parallèlement à la patte Si vous activez Keep Warm Maintien au chaud lorsque la cuisson est terminée en utilisant la sonde t...

Page 103: ... des températures Type d aliment Température interne F Bœuf Agneau Saignant 140 150 À point 160 170 Bien cuit 175 185 Porc 175 185 Volaille 185 195 ATTENTION Pour protéger la sonde thermique soyez attentif à ne pas insérer la sonde de façon à ce qu elle sorte des aliments Assurez vous que la sonde est insérée près du centre de la viande N entreposez pas la sonde dans le four Ne laissez pas la sond...

Page 104: ... 191 Dinde entière non farcie 10 16 10 16 325 163 Dinde entière non farcie 18 24 8 15 325 163 Blancs de dinde 4 6 18 23 325 163 Poulet de Cornouailles 1 1 5 50 à 75 min au total 325 163 Agneau Demi gigot 3 4 À point 25 30 325 163 Bien cuit 30 35 325 163 Gigot entier 6 7 À point 25 30 325 163 Bien cuit 30 35 325 163 Une dinde farcie nécessite un temps de cuisson supplémentaire La température minima...

Page 105: ...Élevé 4 18 20 12 15 Grillez d abord le côté peau vers le bas Ouvrez en écartant Badigeonnez de beurre fondu avant de griller et à mi cuisson Poisson Filets de poisson 0 25 à 0 5 po d épaisseur Élevé 5 ou 4 6 10 3 4 0 5 po d épaisseur Élevé 5 ou 4 7 10 5 6 Manipulez et retournez avec précaution Selon vos goûts vous pouvez badigeonner de beurre citronné avant et pendant la cuisson Jambon Tranches de...

Page 106: ... vous posez la grille sur la position la plus haute position 7 veillez à ce qu elle soit placée de façon stable sur la butée en relief Cuisson à grilles multiples 3 5 Lors de la cuisson de gâteaux sur deux grilles placez les grilles dans la position 3 et 5 pour une meilleure efficacité Si vous faites cuire des cookies sur deux grilles positionnez les aux niveaux 2 et 5 Pour 4 moules sur deux grill...

Page 107: ...lle dans un guide de grille 2 Glissez la grille dans son guide en maintenant l extrémité avant de la grille Pour retirer une grille du four 1 Tirez le grille vers vous jusqu à ce qu elle arrive en butée 2 Soulevez l extrémité avant de la grille et retirez la de son guide Manual User_NX58H9500WS_DG68 00566A 01_CFR_NonPF indd 35 2014 07 30 1 01 59 ...

Page 108: ...puyez sur le bouton correspondant au mode de cuisson désiré tel que Bake Cuisson 3 Si nécessaire modifiez la température à l aide du pavé numérique 4 Appuyez sur le bouton Cooking Time Temps de cuisson 5 Réglez le temps de cuisson entre 1 minute et 9 heures et 99 minutes 9 99 à l aide du pavé numérique 6 Appuyez sur le bouton START SET DÉMARRAGE RÉGLAGE Le four s allume automatiquement et le préch...

Page 109: ...s de cuisson entre 1 minute et 9 heures et 99 minutes 9 99 à l aide du pavé numérique 6 Appuyez sur le bouton Delay Start Départ différé 7 Saisissez l heure de départ à l aide du pavé numérique 8 Appuyez sur le bouton START SET DÉMARRAGE RÉGLAGE Le four démarre la cuisson à l heure réglée et s arrête automatiquement lorsque la cuisson est terminée Pour modifier l heure de départ appuyez sur le bou...

Page 110: ...2 3 4 5 6 Déshydratation des aliments Pommes de terre au four Poulet grillé Steak de saumon Filet de poisson blanc Pain précuit 3 Réglez la température entre 100 F et 550 F à l aide du pavé numérique Reportez vous aux pages 39 et 40 pour plus d informations 4 Appuyez sur le bouton START SET DÉMARRAGE RÉGLAGE pour démarrer la cuisson 5 Lorsque la cuisson est terminée appuyez sur le bouton OFF CLEAR...

Page 111: ...t spécialement conçu pour cuire les steaks de saumon 5 Filet de poisson blanc Le mode White fish fillet Filet de poisson blanc est spécialement conçu pour cuire les filets de poisson blanc 6 Pain précuit Le mode Bread proof Pain précuit procure une température optimale pour le procédé de précuisson du pain et ne nécessite donc pas de réglage de la température Pour de meilleurs résultats démarrez t...

Page 112: ... Morceaux de poulet 1000 à 1200 g 2 375 425 40 50 Placez les morceaux de poulet sur un plateau ou un plat Assaisonnez le poulet après cuisson si vous le souhaitez Steak de saumon 3 portions 19 5 oz 550 g 2 Hi Lo Élevée Faible 10 15 Placez les steaks de saumon sur un plateau ou un plat Assaisonnez le saumon après cuisson si vous le souhaitez Filet de poisson blanc 3 filets 520 g 3 ou 4 400 425 10 1...

Page 113: ...tte option pour la cuisson lors des fêtes et du Shabbat juifs Pour de plus amples informations visitez le site Web à l adresse http www star k org Avec l option Shabbat La température du four peut être réglée plus ou moins élevée après l activation de cette option L affichage ne change pas et aucune sonnerie ne retentit lorsque vous changez la température Une fois l option Sabbath Shabbat correcte...

Page 114: ...uch to Wake Up Touche de réveil pendant 3 secondes Vous pouvez régler le temps de cuisson avant d activer la fonction Shabbat Après une coupure d alimentation le four ne reprend pas le fonctionnement automatiquement SAb apparaît sur le tableau de commande mais le four ne redémarre pas Les aliments peuvent être retirés du four en toute sécurité mais vous ne devez pas désactiver l option Shabbat et ...

Page 115: ...r la température en degrés Fahrenheit ou Celsius 4 Conversion automatique Convertit les températures de cuisson classique en températures de cuisson par convection 5 Heure jour 12 heures 24 heures Permet de régler l horloge pour afficher l heure au format 12 heures ou 24 heures 6 Économie d énergie Éteint automatiquement le four 12 heures après le démarrage de la cuisson ou 3 heures après le démar...

Page 116: ...souhaitée à l aide du pavé numérique 5 Appuyez sur le bouton Options puis 1 sur le pavé numérique 6 Consultez le tableau ci dessous et sélectionnez un nombre dont vous souhaitez conserver la recette 1 2 3 Recette 1 Recette 2 Recette 3 7 Appuyez sur START SET DÉMARRAGE RÉGLAGE pour enregistrer les modifications Pour utiliser ou rappeler un mode de cuisson favori 2 3 4 1 1 1 Appuyez sur le bouton Op...

Page 117: ...outon Options pour sélectionner une température supérieure ou inférieure Le réglage par défaut est Off Désactivé 3 Entrez une valeur d ajustement de la température 0 à 35 à l aide du pavé numérique 4 Appuyez sur START SET DÉMARRAGE REGLAGE pour enregistrer les modifications Cet ajustement n affecte pas la température du gril ou de l auto nettoyage il est mémorisé après une coupure d alimentation U...

Page 118: ...ications Heure jour 12 heures 24 heures Permet de régler l horloge pour afficher l heure au format 12 heures ou 24 heures 1 1 2 3 1 Appuyez sur le bouton Options puis 5 sur le pavé numérique 2 Appuyez sur 1 12 heures ou 2 24 heures sur le pavé numérique 3 Appuyez sur START SET DÉMARRAGE REGLAGE pour enregistrer les modifications Économie d énergie Éteint automatiquement le four 12 heures après le ...

Page 119: ... Options puis 8 sur le pavé numérique 2 Appuyez sur 1 son rétabli ou 2 son coupé sur le pavé numérique 3 Appuyez sur START SET DÉMARRAGE REGLAGE pour enregistrer les modifications Mode Démo Utilisé par les points de vente au détail à des fins d affichage uniquement Dans ce mode l élément chauffant ne fonctionne pas 1 1 2 3 1 Appuyez sur le bouton Options puis 9 sur le pavé numérique 2 Appuyez sur ...

Page 120: ...er ou déverrouiller simultanément le tableau de commande et la porte Lorsque Oven lock Verrouillage du four est activé le tableau du four ne fonctionne pas et la porte du four est verrouillée et ne peut pas être ouverte Conv Convert Bascule entre le mode de cuisson et le mode de cuisson par convection En mode de cuisson appuyez sur le bouton Conv Convert pour basculer en mode de cuisson par convec...

Page 121: ...e plat Étape 1 Étape 2 Placez les aliments cuits dans leur récipient dans le tiroir chauffe plat Fermez le tiroir chauffe plat et réglez le niveau de chauffage Faible Moyen Élevé Manual User_NX58H9500WS_DG68 00566A 01_CFR_NonPF indd 49 2014 07 30 1 02 09 ...

Page 122: ...ns durs sauces High Élevée Volaille côtelettes de porc hamburgers pizza bacon aliments fris Pour de meilleurs résultats ne laissez pas les aliments pendant plus d une heure dans le tiroir chauffe plat Ne laissez pas de petites quantités d aliments ou des aliments délicats des œufs par exemple dans le tiroir chauffe plat pendant une durée supérieure à 30 minutes ATTENTION N utilisez pas de récipien...

Page 123: ... Surface en acier inoxydable 1 Retirez toutes les traces de projections les taches et la graisse à l aide d un chiffon doux humide 2 Appliquez un nettoyant adapté à l acier inoxydable sur un chiffon ou une serviette en papier 3 Nettoyez une petite zone à la fois en frottant si possible l inox dans le sens du grain 4 Une fois terminé séchez la surface à l aide d un chiffon doux et sec 5 Répétez les...

Page 124: ...er Appliquez à nouveau le lubrifiant au graphite en respectant les consignes ci dessous Pour appliquer le lubrifiant au graphite 1 Secouez le lubrifiant au graphite avant de l ouvrir 2 Appliquez 4 gouttes de lubrifiant sur le côté intérieur de la piste de glissement gauche et 4 gouttes sur le côté extérieur 3 Répétez l étape 2 ci dessus sur la piste de glissement droite 4 Déployez et rentrez la gr...

Page 125: ...grille coulissante Porte Ne retirez pas le joint intérieur de la porte du four pour le nettoyage Côté intérieur Surface intérieure Nettoyez le côté intérieur de la porte manuellement en utilisant une éponge à récurer en plastique et de l eau savonneuse puis essuyez le avec un chiffon sec Veillez à ne pas mouiller le joint ni laisser de l humidité dans la porte Vitre intérieure La vitre intérieure ...

Page 126: ... émail vitrifié doit être maintenue propre Il est conseillé de retirer immédiatement les aliments renversés 1 Eteignez tous les brûleurs de surface 2 Patientez jusqu à ce que toutes les grilles des brûleurs soient refroidies avant de les retirer 3 Nettoyez la surface de la table de cuisson à l aide d un chiffon doux Si des aliments renversés s écoulent dans les fentes des composants d un brûleur r...

Page 127: ... 7 Repositionnez les chapeaux des brûleurs au dessus des têtes de brûleurs Pour garantir un fonctionnement correct et en toute sécurité assurez vous que les chapeaux des brûleurs portent à plat au dessus des têtes de brûleurs 8 Repositionnez les grilles des brûleurs sur leur emplacement respectif 9 Allumez chaque brûleur et vérifiez qu il fonctionne correctement Après avoir vérifié qu un brûleur f...

Page 128: ...ende en dessous de 392 F Soyez vigilant lorsque vous ouvrez la porte du four après le cycle d auto nettoyage Le four à gaz reste TRÈS CHAUD et de l air chaud ainsi que de la vapeur peuvent s échapper à l ouverture de la porte Pour effectuer le cycle d auto nettoyage Assurez vous que le verrouillage de la porte est relâché Retirez toutes les grilles de la cavité du four 2 3 5 1 Assurez vous que la ...

Page 129: ...empérature du four chute en dessous de 392 F 200 C Après l auto nettoyage La porte reste verrouillée jusqu à ce que la température interne du four chute en dessous de 392 F Une fois le four refroidi essuyez les surfaces du four avec un chiffon pour retirer toutes les cendres résiduelles Les taches tenaces peuvent être retirées à l aide d un tampon à récurer métallique Les dépôts de tartre peuvent ...

Page 130: ...urnant dans le sens antihoraire 5 Insérez une ampoule neuve de 40 watts dans la douille puis tournez la dans le sens horaire pour la serrer 6 Réinsérez le cache en verre puis tournez le dans le sens horaire pour le serrer ATTENTION Pour éviter un choc électrique assurez vous que le four à gaz est éteint et froid avant de procéder au remplacement de son éclairage L éclairage est désactivé durant le...

Page 131: ...fermement les deux côtés de la porte du four soulevez la vers vous jusqu à ce que les bras de la charnière situés en bas de la porte soient délogés 6 Placez la porte dans un lieu sûr AVERTISSEMENT La porte est très lourde Soyez prudent lorsque vous retirez et soulevez la porte Ne soulevez pas la porte par la poignée Soyez prudent lorsque vous déplacez la porte du four Une manipulation inappropriée...

Page 132: ...ras de charnière en les poussant vers le haut contre l encadrement avant du four 5 Fermez la porte et assurez vous qu elle s ouvre et se ferme normalement Tiroir chauffe plat 1 Faites glisser le tiroir pour l ouvrir jusqu à ce qu il arrive en butée 2 Repérez les clips de guidage à rouleaux de chaque côté Saisissez le tiroir à deux mains Abaissez le clip gauche tout en soulevant le clip droit pour ...

Page 133: ...urface Problème Cause possible Action Tous les brûleurs ne s allument pas Le cordon d alimentation n est pas correctement branché sur la prise murale Assurez vous que la cuisinière est branchée sur une prise en état de marche et correctement mise à la terre Un fusible de votre habitation est peut être grillé ou le disjoncteur peut être déclenché Remplacez le fusible concerné ou réenclenchez le dis...

Page 134: ...te du four ouverte et appuyez sur le bouton START SET DÉMARRAGE RÉGLAGE pendant 3 secondes Un signal sonore retentit et le symbole de verrouillage disparaît de l écran Le commutateur pour désactiver le régulateur de pression de gaz se trouve sur la position off désactivé Contactez un technicien de maintenance qualifié Four Problème Cause possible Action La commande du four émet un signal sonore et...

Page 135: ...t 3 secondes Un signal sonore retentit et le symbole de verrouillage disparaît de l écran La fonction Sabbath Shabbat a été activée SAb et l heure actuelle s affichent Toutes les commandes et tous les signaux seront désactivés Pour annuler la fonction Sabbath Shabbat et réactiver le commutateur d éclairage et les autres commandes appuyez et maintenez les boutons Bake Cuisson et Touch to Wake Up To...

Page 136: ...ommandes de l auto nettoyage du four Voir page 56 Bruit de craquement ou de crépitement Ceci est tout à fait normal Ce bruit provient du métal lorsqu il chauffe et qu il refroidit pendant les fonctions de cuisson et de nettoyage Fumée excessive durant un cycle d auto nettoyage Le four a été nettoyé pour la première fois Ceci est tout à fait normal Lors du premier nettoyage du four la fumée dégagée...

Page 137: ... ou d huile provenant de la ventilation Ceci est normal pour un four neuf et l odeur disparaîtra dans les 30 minutes après le démarrage du premier cycle de cuisson Pour accélérer la disparition de ce phénomène programmez un cycle d auto nettoyage d une durée minimale de 3 heures Voir page 56 Odeur forte Cette odeur est provisoire Il est normal de constater une odeur provenant de l isolation de la ...

Page 138: ...roir chauffe plat ou le tiroir de rangement ne glisse pas correctement ou se bloque Le tiroir n est pas correctement aligné avec les rails du plateau tournant à extension complète ou avec ses guides en nylon Retirez et remplacez le tiroir Voir page 60 Le contenu dans le tiroir est trop lourd Réduisez le poids et ou redistribuez le contenu dans le tiroir Autres Problème Cause possible Action L appa...

Page 139: ...19 Les aliments ne grillent pas correctement au four Les commandes du four n ont pas été correctement réglées Voir page 29 La porte du four n a pas été fermée pendant la cuisson au gril Voir page 27 La grille n a pas été positionnée correctement Reportez vous au guide de cuisson au gril page 34 Codes d erreur Code Signification Solution Touche court circuitée Appuyez sur le bouton OFF CLEAR ARRÊT ...

Page 140: ...cier vous devez veiller à ce que le produit soit accessible pour l agent de maintenance En cas d indisponibilité de ce service Samsung pourra choisir le moyen de transport adéquat pour acheminer ou renvoyer l appareil vers et depuis un centre de service agréé La société SAMSUNG prendra en charge à sa convenance la réparation ou le remplacement du produit à ses frais tel que stipulé dans les présen...

Page 141: ... CE PRODUIT CETTE GARANTIE LIMITÉE N EST VALABLE POUR PERSONNE D AUTRE QUE L ACHETEUR INITIAL DU PRODUIT N EST PAS TRANSFÉRABLE ET ÉNONCE VOTRE RECOURS EXCLUSIF Certains États ou provinces n autorisent pas de limitations quant à la durée des garanties implicites ni l exclusion ou la limitation de dommages accessoires ou indirects il se peut par conséquent que les limitations et exclusions énoncées...

Page 142: ...Notes Manual User_NX58H9500WS_DG68 00566A 01_CFR_NonPF indd 70 2014 07 30 1 02 29 ...

Page 143: ...Notes Manual User_NX58H9500WS_DG68 00566A 01_CFR_NonPF indd 71 2014 07 30 1 02 29 ...

Page 144: ... des travaux de nettoyage ou d entretien réguliers CANADA 1 800 SAMSUNG 726 7864 U S A Consumer Electronics 1 800 SAMSUNG 726 7864 U S A Mobile Phones 1 800 SAMSUNG 726 7864 www samsung com ca support English www samsung com ca_fr support French www samsung com us support www samsung com us support DG68 00566A 01 Manual User_NX58H9500WS_DG68 00566A 01_CFR_NonPF indd 72 2014 07 30 1 02 30 ...

Reviews: