background image

17

English

17

Se

rvic
e Mode

Wired Remote Controller Installation/Service Mode

Additional Functions of Your Wired Remote Controller

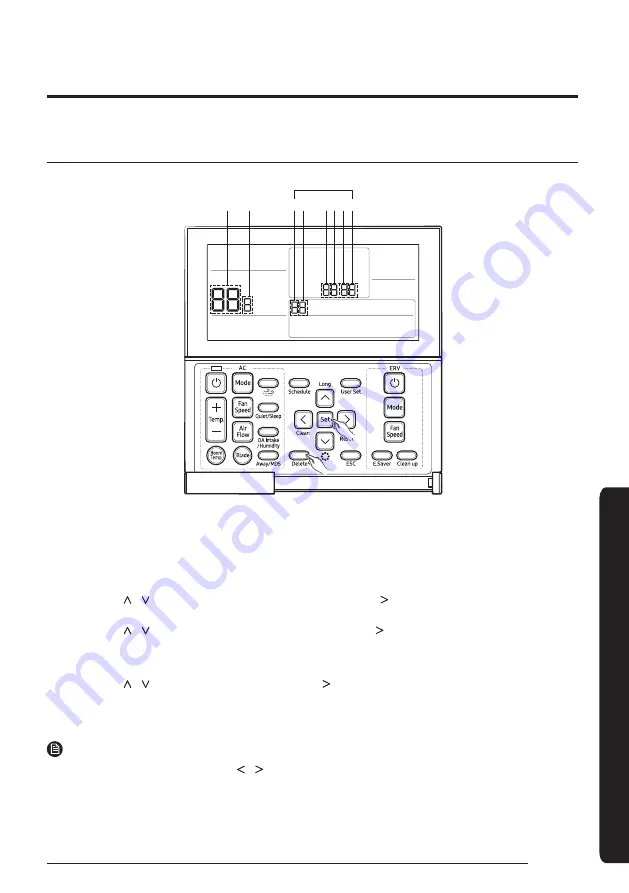
5 6

1 2 3 4

Main Menu Sub-menu

Data bit

If you want to use the various additional functions for your Wired Remote Controller, press the 

Delete

 and 

Set

 buttons 

at the same time for more than three seconds.


• You will enter the additional function settings, and the [main menu] will be displayed.

Refer to the list of additional functions for your Wired Remote Controller on the next page, and select the desired 
menu.


•  Using  the  [ ]/[ ] buttons, select a main menu number and press the [ ] button to enter the sub-menu setting 

screen. 


• Using the [ ]/[ ] buttons, select a sub-menu number and press the [ ] button to enter data setting screen. 


• When you enter the setting stage, the current setting will be displayed. 


• Refer to the chart for data settings. 


• Using the [ ]/[ ] buttons, select the settings. Press the [ ] button to move to the next setting. 


• Press  the 

Set

 button to save the settings and exit to the sub-menu setting screen. 


• Press  the 

ESC

 button to exit to normal mode.

 NOTE


• While setting the data, you can use the [ ]/[ ] buttons to set the range of Data bit.


• While configuring the setting, press the 

ESC

 button to exit to the setting sub-menu without saving your changes.

Summary of Contents for MWR-WE13

Page 1: ...nstallation manual Wired remote controllerMWR WE13 Thank you forpurchasing this Samsung Product Before operating this unit please read this installation manual carefully and retain it forfuture reference DB68 07634A 00 ...

Page 2: ...ller Individual Control with YourWired Remote Controller Group Control with YourWired Remote Controller Controlling 2 Remote controller Initializing YourWired Remote ControllerCommunication Errors Displayed on YourWired Remote Controller Service Mode 17 Wired Remote ControllerInstallation Service Mode 17 Additional Functions of YourWired Remote Controller Installation Service Mode The example of W...

Page 3: ...down and it may cause product damage Do not move orreinstall the product onyourdiscretion Potential risk of electric shock orfire Check if the installationwork is done correctlyaccording to the installation manual Incorrect installation may cause electric shock orfire Whenyouwant to disposeyourWired Remote Controller ask the service center CAUTION Do not install the productwhere there s combustibl...

Page 4: ...e CAUTION The Wired Remote Controllershould be installed by an installation expert Check and confirm the poweris off before installing yourWired Remote Controller Install the Wired Remote Controllercables in accordance with the electrical wiring rules and allow it to pass through the innerarea of the wall so that otherpeople can t reach it External Dimensions 120 0 4 72 124 0 4 88 63 8 2 51 19 5 0...

Page 5: ...ťЇϑ ϩ ʪ ϩиͱ ͱͱ ϑ ɇϩ ϩ ʪ ϑɇ ʪ ϩ ʪࢋ NOTE Insert a flat head screwdriverinto the square groove in the upperarea of the hook to disassemble it easily 2 Arrange the powercable and the communication cable so that they fit in the housing along the edges of the rearcover When the cable is not concealed When the cable is concealed 15 cm 6 inch 10 cm 4 inch If you need more space forthe wiring work you can ...

Page 6: ...ontroller NOTE Align the controllerwith the uppergroove first and insert it by turning it downward as shown in the figure Afterassembly check and confirm that no wires are stuck in the gap between the rearand front cover CAUTION When installing a Wired Remote Controllerby using a cable longerthan10 m 32 80 ft you must install the communication cable and the powercable separately Electrical interfe...

Page 7: ...king in progress Displays the total numberof units searched 1 Tracking of yourWired Remote Controllerwill automatically start when you turn on the powerafterinstallation 2 If you want to perform tracking again afterinstallation then press the Delete and ESC buttons at the same time for more than five seconds The system will reset and tracking will start again 3 During tracking the total numberof c...

Page 8: ...ndoorUnit IndoorUnit Wired Remote Controller Wired Remote Controller Wired Remote Controller When Connected to anventilator ERV Only COM1 F1 F2 COM1 F1 F2 COM2 F3 F4 COM2 F3 F4 COM2 F3 F4 Ventilator ERV Ventilator ERV Ventilator ERV Wired Remote Controller Wired Remote Controller Wired Remote Controller Masterventilator ERV NOTE Regardless of the indoorgroup address RMC address orthe ventilator ER...

Page 9: ...trollerto control indoorunits connected to different outdoorunit COM1 F1 F2 COM2 F3 F4 COM2 F3 F4 COM1 F1 F2 OutdoorUnit IndoorUnit Wired Remote Controller OutdoorUnit IndoorUnit NOTE Regardless of the indoorunit s group address RMC address only the indoorunits connected to COM2 are controlled in group The powercable V1 V2 is not connected between indoorunits The powercable foryourWired Remote Con...

Page 10: ...COM1 F1 F2 COM1 F1 F2 COM2 F3 F4 COM2 F3 F4 Wired Remote Controller Ventilator ERV Ventilator ERV Ventilator ERV NOTE Regardless of the ventilator ERV s group address RMC address only the ventilator ERV connected to COM2 controlled in group The powercable V1 V2 is not connected between ventilators ERV The powercable foryourWired Remote Controller V1 V2 should be connected to only one ventilator ER...

Page 11: ...M2 F3 F4 COM2 F3 F4 OutdoorUnit IndoorUnit Wired Remote Controller OutdoorUnit IndoorUnit Ventilator ERV NOTE Regardless of the indoorunit s group address RMC address only the indoorunits and ventilator ERV connected to COM2 are controlled in group When controlling indoorunits and ventilator ERV togetherin group you can control maximum of16 indoorunits and ventilator ERV If you want to use the pow...

Page 12: ...oorUnit Only COM1 F1 F2 COM2 F3 F4 OutdoorUnit IndoorUnit Wired Remote Controller Master Wired Remote Controller Slave When Connected to anventilator ERV Only COM1 F1 F2 COM2 F3 F4 Wired Remote Controller Master Masterventilator ERV Ventilator ERV Wired Remote Controller Slave NOTE Forthe slave Wired Remote Controllersettings please referto the sections about the additional functions of the Wired ...

Page 13: ...er Master Wired Remote Controller Slave Ventilator ERV NOTE Regardless of the indoorunit group address RMC address only the indoorunits connected to COM2 are controlled by 2 remote controller Forthe slave Wired Remote Controllersettings please referto the sections about the additional functions of the Wired Remote Controller Referto page18 0 Master Main 1 Slave Sub ...

Page 14: ...must be initialized if installation status changes Changing numberof ventilator ERV indoorunit ortheiraddress 1 Press the Delete and ESC buttons at the same time formore than five seconds YourWired Remote Controllerwill be initialized and the device will search forthe indoorunits ventilator ERV connected to yourWired Remote Controlleragain ...

Page 15: ...address forthe errorwill be displayed followed by the errorcode Example Error101 occurs forIndoorUnit No 28 IndoorUnit When an ErrorOccurs in YourVentilator ERV Product Group Display B The product address forthe errorwill be displayed followed by the errorcode Example Error121 has occurred at ventilator ERV No 28 Ventilator ERV When an ErrorOccurs in YourWired Remote Controller Only an errorcode w...

Page 16: ...or unit installed for interlocking function Over16 indoor ERV indoor units installed Indoor units of different temperature setting C F connected to same wired remote controller Wired remote controller s has different temperature unit setting with indoor unit s Slave Sub wired remote controller has different option setting with Master Main Two or more wired remote controllers set as Slave Sub No By...

Page 17: ... the desired menu Using the buttons select a main menu numberand press the button to enterthe sub menu setting screen Using the buttons select a sub menu numberand press the button to enterdata setting screen When you enterthe setting stage the current setting will be displayed Referto the chart fordata settings Using the buttons select the settings Press the button to move to the next setting Pre...

Page 18: ...e Temperature display 4 0 0 Set temperature 1 Room temperature AC On Off button function 5 0 0 Indoorunit ERV 1 Indoorunit only 2 ERVonly PriorityDisplay AirPurityLevel 6 1 0 No use 1 Use 3 Blade setting checking Lock of Blade1 1 0 0 Unlock 1 lock Lock of Blade2 2 0 0 Unlock 1 lock Lock of Blade3 3 0 0 Unlock 1 lock Lock of Blade4 4 0 0 Unlock 1 lock 4 ERVoption Setting checking Use of By Pass mod...

Page 19: ...000 hours Heating temperature compensation 4 0 No use 2 C 1 Use 5 C EEVstop step in heating 5 0 1 80 steps 1 80 4 1 Indoorunit main address checking 1 2 Main address 0 63 Indoorunit main address setting 3 4 Main address 0 63 outdoorunit reset is needed to set Indoorunit RMC address setting checking 5 6 RMC address 00H 2FH 2 Indoorunit option code setting checking 1 Indoorunit option code 3 Indooru...

Page 20: ...hecking Set temperature 1 2 25 15 30 C 1 C Set temperature difference 3 4 10 5 15 C 1 C 4 Setting checking the compensating temperature A underthe Heating EEV control forERV Plus 1 2 8 0 10 C 1 C Checking the compensating temperature B underthe Heating EEV control forERV Plus 3 0 0 No use of humidifier 0 C 1 Use humidifier 10 C 5 ERV Plus fan RPM setting checking Airsupply RPM 1 2 10 27 Step 1 Ste...

Page 21: ...ࡡ ϑʪθЭ ʀʪ ͱʒʪ ϑʪϩϩ ϑ ɇЭɇ ɇɵ ʪ ͱ ц и ϩ Aʪ ϑ Їϑࢋ NOTE Address is displayed in hexadecimal Please referto the following table Hexadecimal Decimal Hexadecimal Decimal Hexadecimal Decimal Hexadecimal Decimal Hexadecimal Decimal 00 0 10 16 20 32 30 48 40 64 01 1 11 17 21 33 31 49 41 65 02 2 12 18 22 34 32 50 42 66 03 3 13 19 23 35 33 51 43 67 04 4 14 20 24 36 34 52 44 68 05 5 15 21 25 37 35 53 45 69 06 ...

Page 22: ...ting stage When you enterthe setting stage the current setting value will be displayed 1234 Data1 Both cooling and heating of an indoorunit Data2 Use wireless remote controller Data3 Masterwired remote controller Data4 Temperature display Celsius C Data bit Example of data setting stage display 4 Press button to select the desired Data1 Press button to select no 1 The wired remote controlleroption...

Page 23: ...23 English 23 Service Mode MEMO ...

Page 24: ......

Reviews: