background image

ENGLISH-18

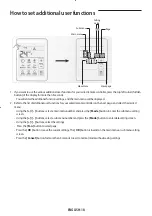
How to set additional user functions

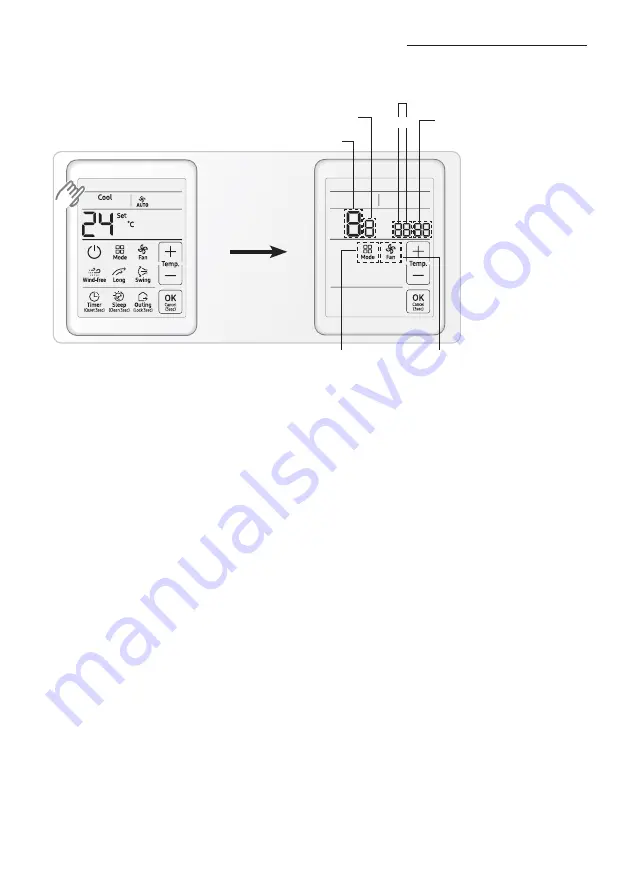
Main menu

Sub menu

ʒ

Setting 

value

ʓ

Page

Move menu

Move page

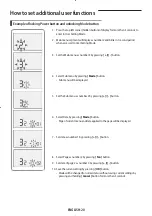
1.  If you want to use the various additional user functions for your wired remote controller, press the top left corner (hidden 

button) of the display for more than 3 seconds.


- You will enter the additional function settings, and the main menu will be displayed.

2.  Refer to the list of additional user functions for your wired remote controller on the next page, and select the desired 

menu.


- Using the 

[ + ]/[ - ]

 buttons, select a main menu number and press the 

[ Mode ]

 button to enter the sub menu setting 

screen.


- Using the 

[ + ]/[ - ]

 buttons, select a sub menu number and press the 

[ Mode ]

 button to enter data setting screen.


- Using the 

[ + ]/[ - ] 

buttons, select the settings.


-  Press the 

[ Fan ]

 button to select page.


- Press the 

[ OK ]

 button to save the current settings. The 

[ OK ]

 button is invalid on the main menu or sub manu setting 

screen.


- Press the 

[ Cancel ]

 button for more than 3 seconds to exit to normal mode without saving settings.

Summary of Contents for MWR-SH11UN

Page 1: ...ioner Usermanual Wired remote controllerMWR SH11UN Thank you for purchasing this Samsung Product Before operating this unit please read this user manual carefully and retain it forfuture reference DB68 08198A 01 ...

Page 2: ...ion of air conditioner 9 Advanced function Selecting the air flow direction 11 Selecting quiet operation 11 Wind Free Cooling 12 Long reach 13 Clean 13 Resetting filter cleaning alarm 14 On timer 14 Off timer 15 Sleep 15 Lock 16 S Plasma Ion 16 Outing 17 Others How to set additional user functions 18 ...

Page 3: ...ING The installation of this appliance must be performed by a qualified technician or service company fFailing to do so may result in electric shock fire explosion problems with the product or injury You must connect the product with rated power upon installation fFailing to do so may result in problems with the product electric shock or fire Do not install this appliance near a heater inflammable...

Page 4: ...r leakage electric shock or fire fA delivery service for the product is not provided If you reinstall the product in another location additional construction expenses and an installation fee will be charged If the malfunction diagnosis indicator appears or abnormal operation occurs stop operation immediately fIf you detect any burning smells from the product or abnormal operation occurs then immed...

Page 5: ... or problems with the product Do not apply a strong impact to the remote controller and do not disassemble the remote controller Do not use this product for other purposes fThis product is designed to only be used for a system air conditioner Do not press the buttons with any sharp objects fThis may result in electric shock or part damage FOR CLEANING WARNING Do not clean the appliance by spraying...

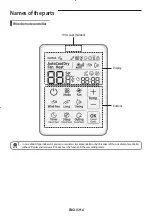
Page 6: ...ler IR receiver hidden Display Buttons t In case of duct type indoor unit you can use wireless remote controller using IR receiver of this wired remote controller without Display and receiver kit You can set this function in the user setting mode NOTE ...

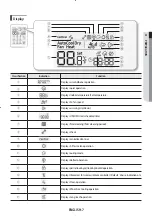
Page 7: ...ays ON OFF time scheduled time Displays filter cleaning filter cleaning period Displays check Displays centralized control Displays S Plasma Ion operation Displays outing mode Displays defrost operation Displays partial locking all locking invaild operation Displays IR receiver for wireless remote controller Default disuse indication on Displays Clean operation DisplaysWind Free Cooling operation ...

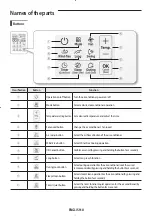
Page 8: ...he air conditioner Wind Free button SelectWind Free Cooling operation OK Cancel button Confirmorcancel bypressingandholdingthebuttonfor3seconds Long button Select Long reach function Outing Lock button Select outing operation for the air conditioner Lock the wired remote controller bypressingandholdingthebuttonfor3seconds Sleep Clean button Select sleep Clean operation for the air conditioner bypr...

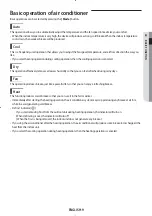
Page 9: ...hat you can feel refreshed during rainy days Fan This operation produces breeze just like a powerful fan so that you can enjoy a refreshing breeze Heat This function produces warm breeze so that you can use it in the fall or winter t Immediately after starting the heating operation the air conditioner system may stop producing any breeze at all for a while to avoid generating cold breeze t Defrost...

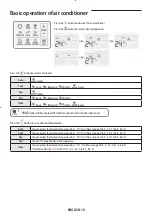
Page 10: ...on the indoor unit NOTE Press the button to set a desired temperature Auto You can adjust the desired temperature by 1 C 1 F within a range of 18 C 30 C 65 F 86 F Cool You can adjust the desired temperature by 1 C 1 F within a range of 18 C 30 C 65 F 86 F Dry You can adjust the desired temperature by 1 C 1 F within a range of 18 C 30 C 65 F 86 F Fan You can t change the desired temperature Heat Yo...

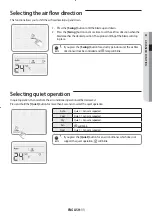
Page 11: ...ss the Swing button for a duct type indoor unit the air flow direction will not be controlled and lamp will blink NOTE Selecting quiet operation In quiet operation the noise from the air conditioner operation will be decreased Press and hold the Quiet button for more than 3 seconds to select the quiet operation Auto Quiet p Cancel is repeated Cool Quiet p Cancel is repeated Dry Quiet p Cancel is r...

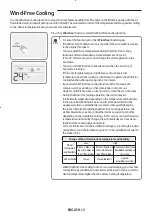
Page 12: ...come out However mild breeze comes out and starts to clean the air in the room t During theWind Free Cooling operation the cold air may be intermittently weakened depending on the temperature and humidity in the room But theWind Free air currents are maintained and the weakened cold air is immediately recovered consequently keeping the room comfortable During theWind Free Cooling operation the air...

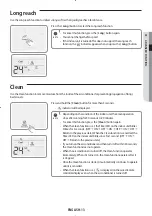
Page 13: ...on stops after running for 30 seconds to 20 minutes t To cancel this function press the Clean button again t When the Clean function is set theTimer LED on the indoor unit blinks 3times for 3 seconds OFF J ON J OFF J ON J OFF J ON J OFF J Return to the previous state When the Clean function is cancelled the Timer LED on the indoor unit blinks once for 1 second OFF J ON J OFF J Return to the previo...

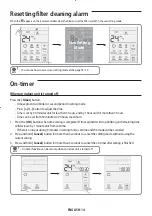
Page 14: ...han 3 hours and by 1 hour unit for more than 3 hours Time can be set from 30 minutes to 24 hours maximum 1 Press the OK button when time setting is completed Time segment will stop blinking and remaining time will decrease by 1 minute unit from set time If there is no input during 3 minutes in setting mode set time and the mode will be canceled 2 Press and hold Cancel button for more than 3 second...

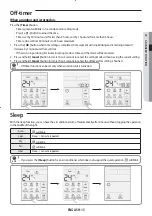
Page 15: ...ng mode set time and the mode will be canceled 2 Press and hold Cancel button for more than 3 seconds to cancel the setting mode without saving the current setting 3 Press and hold Cancel button for more than 3 seconds to cancel the off timer after setting is finished t Off timer function can be set only when an indoor unit is turned on NOTE Sleep With the sleep function you can have the air condi...

Page 16: ...ess and hold the Lock button for more than 3 seconds again this function will be canceled S Plasma Ion Eliminate dangerous airborne contaminants and allergens as well as bacteria and virus You can set or cancel the S Plasma Ion function in the user setting mode If the S Plasma Ion function is not supported will blink when you set the S Plasma Ion function t You can see how to access user setting m...

Page 17: ...outing function will be active when wired remote controller is turned off The outing function operates with low fan speed If there is any input button on your wired remote controller outing function will be canceled If your indoor unit s status is changed outing function will be canceled You can set the desired outing temperature on the user setting mode Temperature setting range Cool mode 25 30 C...

Page 18: ...itional user functions for your wired remote controller on the next page and select the desired menu Using the buttons select a main menu number and press the Mode button to enter the sub menu setting screen Using the buttons select a sub menu number and press the Mode button to enter data setting screen Using the buttons select the settings Press the Fan button to select page Press the OK button ...

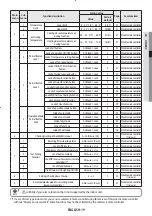
Page 19: ...nfunction 0 Unlock 1 Lock 0 09 Wiredremotecontroller 4 OperationMode PartialButton Lock Lockofoperationmodebutton 0 Unlock 1 Lock 0 01 Wiredremotecontroller Hideofautomode 0 Unlock 1 Lock 0 02 Wiredremotecontroller Hideofcoolmode 0 Unlock 1 Lock 0 03 Wiredremotecontroller Hideofdrymode 0 Unlock 1 Lock 0 04 Wiredremotecontroller Hideoffanmode 0 Unlock 1 Lock 0 05 Wiredremotecontroller Hideofheatmod...

Page 20: ...ssing button 4 Select Sub menu by pressing Mode button Sub menu will be displayed 5 Set the Sub menu as number 2 by pressing button 6 Select Data by pressing Mode button Page of current menu and data applied to the page will be displayed 7 Set data as number 1 by pressing button 8 Select Page as number 2 by pressing Fan button 9 Set data of page 2 as number 0 by pressing button 10 Save the current...

Page 21: ...ENGLISH 21 Memo ...

Page 22: ......

Reviews: