background image

Safety information

10

1. Introduction

Installation / Moving

 Warning

 Caution

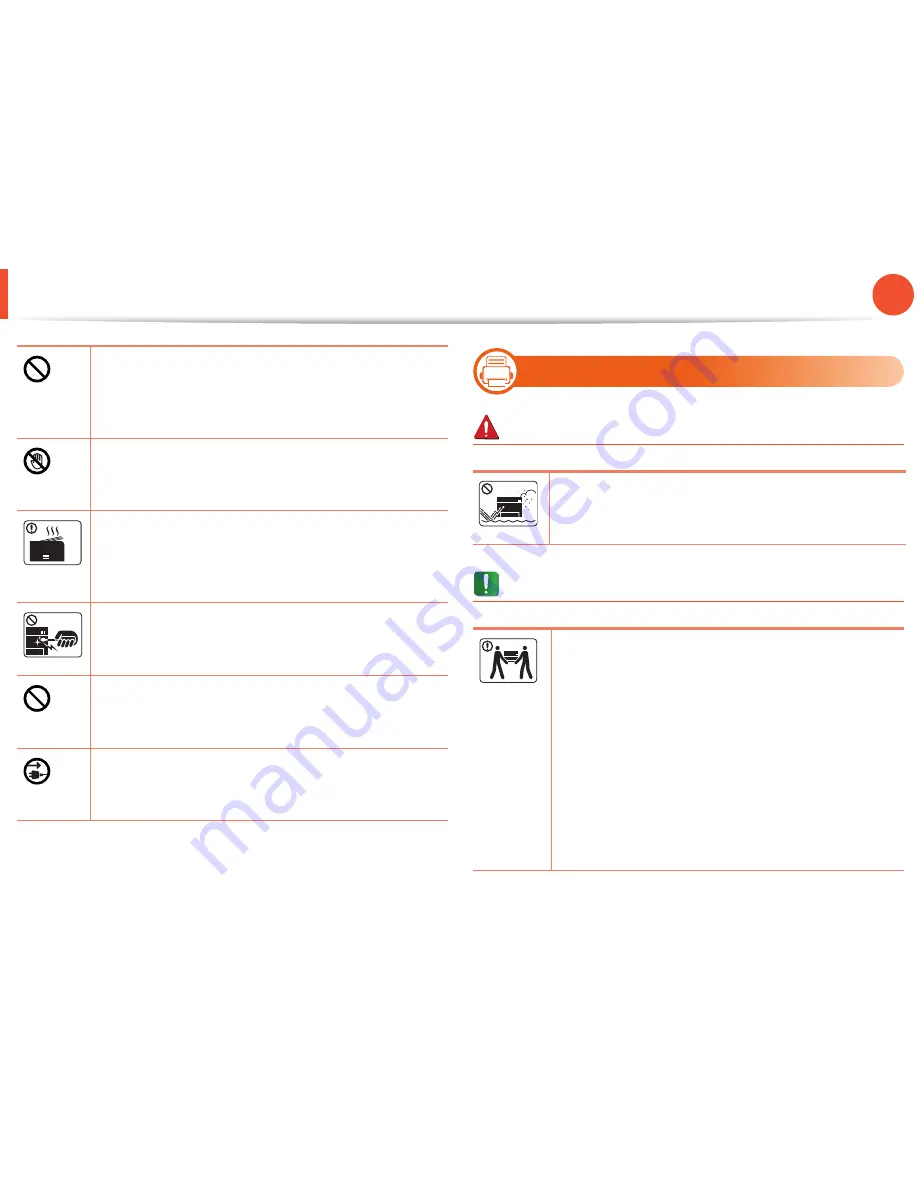
Do not block or push objects into the ventilation 
opening.

This could result in elevated component temperatures 
which can cause damage or fire.

Be care when replacing paper or removing jammed 
paper. 

New paper has sharp edges and can cause painful cuts.

When printing large quantities, the bottom part of the 
paper output area may get hot. Do not allow children to 
touch. 

Burns can occur.

When removing jammed paper, do not use tweezers or 
sharp metal objects. 

It can damage the machine.

Do not allow too many papers to stack up in the paper 
output tray.

It can damage the machine. 

This machine's power reception device is the power cord. 

To switch off the power supply, remove the power cord 
from the electrical outlet. 

Do not place the machine in an area with dust, humidity, 
or water leaks. 

This could result in electric shock or fire. 

Before moving the machine, turn the power off and 
disconnect all cords.

Then lift the machine:

•  If the machine weighs under 20 kg (44.09 lbs), lift with 

1 person.

•  If the machine weighs 20 kg (44.09 lbs) - 40kg (88.18 

lbs), lift with 2 people.

•  If the machine weighs more than 40 kg (88.18 lbs), lift 

with 4 or more people.

The machine could fall, causing injury or machine 
damage.

Summary of Contents for ML-3750ND

Page 1: ...ML 375x Series User s Guide Basic imagine the possibilities This guide provides information concerning installation basic operation and troubleshooting on windows...

Page 2: ...know before using the machine Key benefits 3 Features by models 5 Useful to know 6 About this user s guide 7 Safety information 8 Machine overview 14 Control panel overview 17 Turning on the machine 1...

Page 3: ...ppm A4 or 18 ppm Letter Convenience SamsungEasyPrinterManagerandSamsungPrinterStatus orSmart Panel are a program that monitors and informs you of the machine s status and allows you to customize the m...

Page 4: ...ts on page 82 Your machine is equipped with a USB interface and or a network interface Expand your machine s capacity This machine has an extra memory slot for adding more memory see Available accesso...

Page 5: ...le Features ML 3750ND ML 3753ND Hi Speed USB 2 0 port 1 Hi Speed USB 2 0 port 2 IEEE 1284 parallel connector Network Interface Ethernet 10 100 1000 Base TX wired LAN IPv6 Eco printing Duplex 2 sided p...

Page 6: ...atus LED flashes or remains constantly on Turn the product off and on again Check the meanings of LED indications in this manual and troubleshoot accordingly see Understanding the status LED on page 6...

Page 7: ...g on its options or model you purchased The screenshots in this user s guide may differ from your machine depending on the machine s firmware driver version The procedures in this user s guide are mai...

Page 8: ...y or property damage Do not attempt Do not use if the power cord is damaged or if the electrical outlet is not grounded This could result in electric shock or fire Do not place anything on top of the...

Page 9: ...ise this could result in electric shock or fire If the plug does not easily enter the electrical outlet do not attempt to force it in Call an electrician to change the electrical outlet or this could...

Page 10: ...It can damage the machine Do not allow too many papers to stack up in the paper output tray It can damage the machine Thismachine spowerreception device is the power cord To switch off the power supp...

Page 11: ...ded electrical outlet Otherwise this could result in electric shock or fire Do not overload wall outlets and extension cords This can diminish performance and could result in electric shock or fire Us...

Page 12: ...ed technician when the machine needs repairing To clean and operate the machine strictly follow the user s guide provided with the machine Otherwise you could damage the machine Do not disassemble the...

Page 13: ...Safety information 13 1 Introduction When toner gets on your clothing do not use hot water to wash it Hot water sets toner into fabric Use cold water...

Page 14: ...sories Power cord Quick installation guide Software CDa a The software CD contains the printer driver and applications Misc accessoriesb b Miscellaneous accessories included with your machine may vary...

Page 15: ...Output tray 4 Front cover 7 Tray 1 10 Paper width guides on a multi purpose tray 2 Control panel 5 Paper level indicator 8 Multi purpose tray 11 Output support 3 Control board cover 6 Tray 2 9 Multi p...

Page 16: ...ctor power supply jack 7 Duplex unit 2 USB port 1 5 Power switch 8 Rear cover 3 USB port 2a ML 3753ND only a Two USB ports allow you to connect a printer to two separate computers Printer drivers need...

Page 17: ...eypad Use the keypad to enter numbers and characters It is useful for entering IP addresses see Entering characters using the number keypad on page 24 6 Cancel Stops an operation at any time 7 Power Y...

Page 18: ...18 1 Introduction Turning on the machine 1 Connect the machine to the electricity supply first Turn on the power switch 2 If it is turned off press the Power button then release...

Page 19: ...interface in use Selecting Custom Installation allows you to choose which programs to install Only use a USB cable no longer than 3 meters 118 inches 12 Windows 1 Make sure that the machine is connect...

Page 20: ...e sure that the machine is connected to your computer and powered on 2 From the Start menu select Programs or All Programs Samsung Printers your printer driver name Uninstall 3 Follow the instructions...

Page 21: ...to the next section if you would like to set or change values This chapter provides information about the overall menu structure and the basic setup options Menu overview 22 Entering characters using...

Page 22: ...pears next to the currently selected menu Somemenusmaynotappearonthedisplaydependingon options or models If so it is not applicable to your machine Some menu names may differ from your machine dependi...

Page 23: ...aintenance Toner Save Eco Setup Clear Setting Emulation Emulation Type Setup Items Options Network TCP IP IPv4 TCP IP IPv6 Ethernet Speed 802 1x Clear Setting Network Conf Net Activate Http Activate C...

Page 24: ...ss 6 the display shows a different letter M N O m n o and finally 6 2 To enter additional letters repeat step 1 If the next letter is printed on the same button move the cursor by pressing the left ri...

Page 25: ...ic usage Printing a demo page Print a demo page to make sure that the machine is operating correctly 1 Press Menu button on the control panel 2 Press Information OK Demo Page OK 3 Press Print Yes OK A...

Page 26: ...Changing the display language To change the language that is displayed on the control panel follow these steps 1 Press Menu button on the control panel 2 Press System Setup OK Language OK 3 Press OK t...

Page 27: ...d cause damage to the machine Using inflammable print media can cause a fire Use designated print media see Print media specifications on page 79 The use of inflammable media or foreign materials left...

Page 28: ...28 2 Learning the basic usage If you do not adjust the guide it may cause paper registration image skew or jamming of the paper Paper quantity indicator shows the amount of paper in the tray 1 Full 2...

Page 29: ...fan the edge of the paper stack to separate the pages before loading papers 3 Place paper with the side you want to print on facing down 4 Slide the paper length guide until it lightly touches the end...

Page 30: ...application and start the print menu b Open Printing Preferences see Opening printing preferences on page 41 c PressthePapertabin PrintingPreferences andselectan appropriate paper type 3 Loading in m...

Page 31: ...hen printing using the multi purpose tray open tray 1 and remove the overlapping papers then try printing again When paper does not feed well while printing push the paper in manually until it starts...

Page 32: ...lication open an application and start the print menu b Open Printing Preferences see Opening printing preferences on page 41 c Press the Paper tab in Printing Preferences and select an appropriate pa...

Page 33: ...d lines open the rear cover and pull down the pressure lever as shown below and try printing again Keep the rear cover opened during printing To see for paper weights for each sheet refer to Print med...

Page 34: ...printing When selecting envelopes consider the following factors Weight should not exceed 90 g m2 otherwise jams may occur Construction should lie flat with less than 6 mm curl and should not contain...

Page 35: ...sition margins no closer than 15 mm from the edges of the envelope Avoid printing over the area where the envelope s seams meet Transparency To avoid damaging the machine use only transparencies desig...

Page 36: ...labels with no exposed backing between them Labels can peel off sheets that have spaces between the labels causing serious jams Curl Must lie flat with no more than 13 mm of curl in any direction Cond...

Page 37: ...problems with paper feeding turn the paper around Note that print quality is not guaranteed Must be printed with heat resistant ink that will not melt vaporize or release hazardous emissions when sub...

Page 38: ...have the display screen on the control panel this feature is not applicable 1 Press Menu button on the control panel 2 Press Paper OK Select the tray you want OK 3 Press Paper Size OK Select the opti...

Page 39: ...ent you want to print 2 Select Print from the File menu 3 Select your machine from the Select Printer list 4 The basic print settings including the number of copies and print range are selected within...

Page 40: ...job If the print job is waiting in the print queue or print spooler cancel the job as follows You can access this window by simply double clicking the machine icon in the Windows task bar You can als...

Page 41: ...n mark means you cannot select that option due to the machine s setting or environment 1 Open the document you want to print 2 Select Print from the file menu 3 Select your machine from the Select Pri...

Page 42: ...down list and click Delete You can also restore the printer driver s default settings by selecting Default Preset from the Presets drop down list 9 Using help Click the option you want to know on the...

Page 43: ...set eco mode When you see the eco image that means the eco mode is currently enabled Eco options Printer Default Follows the settings from the machine s control panel None Disables eco mode Eco Printi...

Page 44: ...4 2 Learning the basic usage The actual saved or reduced amount may differ depending on the operating system used computing performance application software connection method media type media size job...

Page 45: ...ilable for your machine Ordering supplies and accessories 46 Available supplies 47 Available accessories 48 Available maintenance parts 49 Redistributing toner 50 Replacing the toner cartridge 52 Upgr...

Page 46: ...to obtain the list of available supplies and maintenance parts To order Samsung authorized supplies accessories and maintenance parts contact your local Samsung dealer or the retailer where you purcha...

Page 47: ...ill be incompatible with your machine due to different configurations of toner cartridges and other supplies according to the specific country conditions Samsungdoesnotrecommendusingnon genuineSamsung...

Page 48: ...ML 3753ND only Tray 2 If you are experiencing frequent paper supply problems you can attach an additional tray ML S3710A IEEE 1284 parallel connector Allows you to use various interface When installin...

Page 49: ...aced at specific intervals to avoid print quality and paper feed problems resulting from worn parts see table below The purpose of which is to maintain your machine in top working condition The mainte...

Page 50: ...ill occur even after you have redistributed the toner 1 Open the front cover and pull the toner cartridge out 2 Thoroughly roll the cartridge five or six times to distribute the toner evenly inside th...

Page 51: ...Redistributing toner 51 3 Maintenance 4 Close the front cover Ensure that the cover is securely closed...

Page 52: ...Open the front cover and pull the toner cartridge out 2 Remove the new toner cartridge from its bag 3 Remove the label from the toner cartridge as shown below 4 Thoroughly shake side to side the cartr...

Page 53: ...n underside of the toner cartridge Use the handle on the cartridge to avoid touching this area 5 Hold the toner cartridge by the handle and slowly insert the cartridge into the opening in the machine...

Page 54: ...e control board cover and remove it 3 Remove the memory module from the slot ML 3750ND only 4 Remove the new memory module from its bag 5 Holding the memory module by the edges align the memory module...

Page 55: ...e memory module strongly or the module may be damaged If the module does not seem to fit into the slot properly carefully try the previous procedure again 7 Replace the control board cover 8 Reconnect...

Page 56: ...toring the supplies life To view the supply life indicators follow the steps below 1 Press Menu on the control panel 2 Press System Setup OK Maintenance OK 3 Press Supplies Info OK 4 Press OK to selec...

Page 57: ...ow a message or LED informing the user to change the toner cartridge appears You can set the option for whether or not this message or LED appears 1 Press Menu on the control panel 2 Press System Setu...

Page 58: ...ith water to clean it If you use a vacuum cleaner toner blows in the air and might be harmful to you 2 Cleaning the outside Clean the machine cabinet with a soft lint free cloth Dampen the cloth sligh...

Page 59: ...he handle on the cartridge to avoid touching this area 3 With a dry lint free cloth wipe away any dust and spilled toner from the toner cartridge area While cleaning the inside of the machine be caref...

Page 60: ...enance 4 Cleaning the pickup roller 1 Turn the machine off and unplug the power cord Wait for the machine to cool down 2 Pull out tray 1 3 Clean the pickup roller with a soft lint free cloth 4 Insert...

Page 61: ...tanding display messages 71 This chapter gives helpful information for what to do if you encounter an error Check the message on the display screen first to solve the error If you cannot find a soluti...

Page 62: ...ed correctly see Tray overview on page 27 Do not overload the tray Ensure that the paper level is below the paper capacity mark on the inside of the tray Do not remove paper from the tray while your m...

Page 63: ...ull the jammed paper out slowly and gently 1 In tray 1 Click this link to open an animation about clearing a jam 1 Open and close the front cover The jammed paper is automatically ejected from the mac...

Page 64: ...d the toner cartridge see Inside the machine on page 65 4 Insert tray 1 back into the machine until it snaps into place Printing automatically resumes 2 In optional tray2 Click this link to open an an...

Page 65: ...resumes 3 In the multi purpose tray Click this link to open an animation about clearing a jam 1 If the paper is not feeding properly pull the paper out of the machine 2 Open and close the front cover...

Page 66: ...Replace the toner cartridge and close the front cover Printing automatically resumes 5 In the exit area Click this link to open an animation about clearing a jam 1 Open and close the front cover The...

Page 67: ...o the next step 3 Open the rear cover 4 Remove the jammed paper as shown in the following figure 5 Close the rear cover Printing automatically resumes 6 In the duplex unit area Click this link to open...

Page 68: ...t remove the paper from the bottom of the machine If you still do not see the paper go to the next step 3 Insert the duplex unit into the machine 4 Open the rear cover 5 Remove the jammed paper as sho...

Page 69: ...not be available depending on model or country To resolve the error look at the error message and its instructions from the troubleshooting part You also can resolve the error with the guideline from...

Page 70: ...printing quality by redistributing the toner see Redistributing toner on page 50 On A toner cartridge has almost reached its estimated cartridge lifea It is recommended to replace the toner cartridge...

Page 71: ...mber indicates the error number Paper Jam related messages Message Meaning Suggested solutions Paper Jam in Tray 1 Paper has jammed in the paper feed area Clearthejam see Intray 1 on page 63 Paper Jam...

Page 72: ...Message Meaning Suggested solutions Install Toner A toner cartridge is not installed Install a toner cartridge Not Compatible Toner cartridge The toner cartridge you have installed is not for your ma...

Page 73: ...ct Continue the printer keeps printing but the printing quality cannot be guaranteed Replace the toner cartridge for the best print quality when this message appears Using a cartridge beyond this stag...

Page 74: ...full Remove paper The output tray is full Remove papers from the output tray the printer resumes printing Message Meaning Suggested solutions Network Problem IP Conflict The network IP address you ha...

Page 75: ...s 75 4 Troubleshooting Error error number Turn off then on The machine unit cannot be controlled Reboot the power and try the printing job again If the problem persists please call for service Message...

Page 76: ...5 Appendix This chapter provides product specifications and information concerning applicable regulations Specifications 77 Regulatory information 87 Copyright 95...

Page 77: ...ension Width x Length x Height 366 x 368 x 272 9mm 14 40 x 14 48 x 10 74 inches without optional tray Weight Machine with consumables 10 28 kg 22 66 lbs Noise Levela Ready mode 26 dB A Print mode 52 d...

Page 78: ...save mode Less than 1 9 W Normal 1 4 W EEE Power off mode Less than 0 1 W a Sound Pressure Level ISO 7779 Configuration tested basic machine installation A4 paper simplex printing b See the rating la...

Page 79: ...ts of 80 g m2 20 lbs bond for optional tray 70 to 90 g m2 19 to 24 lbs bond 50 sheets of 80 g m2 20 lb bond Legal 216 x 356 mm 8 5 x 14 inches US Folio 216 x 330 mm 8 5 x 13 inches A4 210 x 297 mm 8 2...

Page 80: ...paper section 91 to 105 g m2 24 to 28 lbs bond 91 to 105 g m2 24 to 28 lbs bond Thicker paper Refer to the Plain paper section Refer to the Plain paper section Not available in tray1 optional tray 16...

Page 81: ...the Plain paper section 106 to 120 g m2 28 to 32 lbs bond 106 to 120 g m2 28 to 32 lbs bond Minimum size custom Multi purposetray 76x127 mm 3 x 5 inches Tray 1 98 x 148 5 mm 3 86 x 5 85 inches 60 to...

Page 82: ...Intel Pentium III 933 MHz Pentium IV 1 GHz 128 MB 256 MB 1 5 GB Windows Server 2003 Intel Pentium III 933 MHz Pentium IV 1 GHz 128 MB 512 MB 1 25 GB to 2 GB Windows Server 2008 Intel Pentium IV 1 GHz...

Page 83: ...ating system Requirements Recommended CPU RAM Free HDD space Mac OS X 10 3 10 4 Intel processors PowerPC G4 G5 128 MB for a powerPC based Mac 512 MB 512 MB for an Intel based Mac 1 GB 1 GB Mac OS X 10...

Page 84: ...9 04 9 10 10 04 32 64 bit Mandriva 2007 2008 2009 2009 1 2010 32 64 bit Debian 4 0 5 0 32 64 bit Redhat Enterprise Linux WS 4 5 32 64 bit SuSE Linux Enterprise Desktop 10 11 32 64 bit CPU Pentium IV...

Page 85: ...ne to use it as your network machine The following table shows the network environments supported by the machine Free HDD space Up to 100 MB Items Specifications Network interface Ethernet 10 100 1000...

Page 86: ...86 5 Appendix Network protocols TCP IPv4 DHCP BOOTP DNS WINS Bonjour SLP UPnP Standard TCP IP Printing RAW LPR IPP WSD SNMPv 1 2 3 HTTP S IPSec TCP IPv6 DHCP DNS RAW LPR SNMPv 1 2 3 HTTP S IPSec Items...

Page 87: ...IEC 60825 1 2007 Class I laser products are not considered to be hazardous The laser system and printer are designed so there is never any human access to laser radiation above a Class I level during...

Page 88: ...vanced energy conservation technology that reduces power consumption when it is not in active use When the printer does not receive data for an extended period of time power consumption is automatical...

Page 89: ...ay cause undesired operation This marking on the product accessories or literature indicates that the product and its electronic accessories e g charger headset USB cable should not be disposed of wit...

Page 90: ...e of the following measures Reorient or relocate the receiving antenna Increase the separation between the equipment and receiver Connect the equipment into an outlet on a circuit different from that...

Page 91: ...e the fuse cover If you have lost the fuse cover do not use the plug until you have another fuse cover Contact the people from you purchased the machine The 13 amp plug is the most widely used type in...

Page 92: ...voltage equipment January 1 1996 Council Directive 2004 108 EC approximation of the laws of the Member States related to electromagnetic compatibility March 9 1999 Council Directive 1999 5 EC on radio...

Page 93: ...PBXs of the European countries In the event of problems you should contact the Euro QA Lab of Samsung Electronics Co Ltd in the first instance The product has been tested against TBR21 To assist in th...

Page 94: ...Regulatory information 94 5 Appendix 20 China only...

Page 95: ...e of this user s guide Samsung and the Samsung logo are trademarks of Samsung Electronics Co Ltd Microsoft Windows Windows Vista Windows 7 and Windows Server 2008 R2 are either registered trademarks o...

Page 96: ...dvanced imagine the possibilities This guide provides information about installation advanced configuration operation and troubleshooting on various OS environments Some features may not be available...

Page 97: ...r using the cable If your machine is attached to a network skip the following steps below and go on to installing a network connected machine s driver see Installing driver over the network15 Installa...

Page 98: ...ions will be installed If you select Custom Install you can choose individual components to install 10 When the message that warns that all applications will close on your computer appears click Conti...

Page 99: ...e name in Model Name For Mac OS X 10 4 if Auto Select does not work properly select Samsung in Print Using and your machine name in Model For Mac OS X 10 5 10 7 if Auto Select does not work properly s...

Page 100: ...ars on your Macintosh desktop 4 Double click the MAC_Installer folder Installer OS X icon 5 Enter the password and click OK 6 Click Continue 7 Read the license agreement and click Continue 8 Click Agr...

Page 101: ...Double click cdroot autorun 6 When the welcome screen appears click Next 7 When the installation is complete click Finish The installation program added the Unified Driver Configurator desktop icon a...

Page 102: ...ter and powered on 2 When the Administrator Login window appears type root in the Login field and enter the system password You must log in as a super user root to install the machine software If you...

Page 103: ...n window appears type root in the Login field and enter the system password You must log in as a super user root to uninstall the printer driver If you are not a super user ask your system administrat...

Page 104: ...ed machine This chapter gives you step by step instructions for setting up a network connected machine and software Useful network programs 10 Wired network setup 11 Installing driver over the network...

Page 105: ...ll be sent to a certain person s email automatically Configure the network parameters necessary for the machine to connect to various network environments 2 SyncThru Web Admin Service Web based machin...

Page 106: ...has the display screen Press the Menu button on the control panel and select Network Network Config Network Configuration Yes The machine does not have the display screen Press the Cancel or Stop Cle...

Page 107: ...he Network Configuration Report see Printing a network configuration report on page 11 and enter it without the colons For example 00 15 99 29 51 A8 becomes 0015992951A8 8 Click Apply andthen click OK...

Page 108: ...r it without the colons For example 00 15 99 29 51 A8 becomes 0015992951A8 6 Select Apply then OK and OK again 7 Quit Safari IPv4 configuation using SetIP Linux Before using the SetIP program disable...

Page 109: ...Wired network setup 14 2 Using a network connected machine 5 The machine will automatically print the Network Configuration Report...

Page 110: ...w the instructions on the window 4 Read License Agreement and select I accept the terms of the License Agreement Then click Next The program searches for the machine If your machine is not found on th...

Page 111: ...munity Name If your system administrator set the new SNMP Community Name on the machine you can find the machine in the network Contact your system administrator for new SNMP Community Name 5 The sear...

Page 112: ...tinue on the Read me window 15 After the installation is finished click OK 16 Open the Applications folder Utilities Print Setup Utility For Mac OS X 10 5 10 7 open the Applications folder System Pref...

Page 113: ...printer software http www samsung com printer To install other software See Installing the Smart Panel on page 6 See Installing the Printer Settings Utility on page 7 Install the Linux driver and add...

Page 114: ...ion and click Next 8 After the machine is added click Finish 9 UNIX Make sure your machine supports the UNIX operating system before installing the UNIX printer driver see basic guide The commands are...

Page 115: ...8 Run installprinter fromthecommandline Thiswillbringup the Add Printer Wizard window Setup the printer in this window referring to the following procedures On some UNIX OS for example on Solaris 10 j...

Page 116: ...ional 4 Specify any printer description in the Description field This is optional 5 Specify the printer location in the Location field 6 Type the IP address or DNS name of the printer in the Device te...

Page 117: ...n Report that will check IPv6 addresses see Printing a network configuration report on page 11 4 Select Start Control Panel Printers and Faxes 5 Click Add a printer in the left pane of the Printers an...

Page 118: ...the Menu button on the control panel 2 Press Network OK TCP IP IPv6 OK DHCPv6 Config 3 Press OK to select the required value you want DHCPv6 Addr Always use DHCPv6 regardless of router request DHCPv6...

Page 119: ...rer that supports IPv6 addressing as a URL 2 Select one of the IPv6 addresses Link local Address Stateless Address Stateful Address Manual Address from Network Configuration Report see Printing a netw...

Page 120: ...ns how to browse the current status of your machine and the method of setting for advanced machine setup Before you begin reading a chapter 26 Information 27 Layout 28 Paper 30 Graphic 31 System setup...

Page 121: ...tips for using this chapter The control panel provides access to various menus to set up the machine or use the machine s functions These menus can be accessed by pressing Menu Some menus may not app...

Page 122: ...Font PCLFont List Prints the PCL font list PS Font PS Font List Prints the PS font list EPSON Font EPSON Font List Prints the EPSON font list KSC5843 Font List Prints the KS font list KSC5895 List Pri...

Page 123: ...he binding Likewise the sides margins farthest from the binding will be the same MP Tray Sets the paper margins in multi purpose tray Simplex Sets the margin for one sided printing Duplex Sets the mar...

Page 124: ...Layout 29 3 Useful setting menus Landscape Stapling Position Selects the location of the staple Item Description...

Page 125: ...tly loaded in the tray Paper Source Sets from which tray to use paper Tray Chaining Auto Tray Switch When you select any other value except Auto from Paper Source and the selected tray is empty you ca...

Page 126: ...cription Resolution Specifies the number of dots printed per inch dpi The higher the setting the sharper printed characters and graphics Darken Text Clear Text Prints text darker than on a normal docu...

Page 127: ...You can set the default paper size to use Power Save Sets how long the machinewaitsbeforegoingto power save mode When the machine does not receive data for an extended period of time power consumptio...

Page 128: ...Multi Bin Mode Selects the mult bin mode you want to use Default Bin Selects the bin to use as a default Item Description Maintenance Clean Drum Cleans the OPC drum of the cartridge by printing a she...

Page 129: ...the printing noise by turning this menu on However the printing speed and quality may be declined Eco Setup Allows you to save print resources and enables eco friendly printing Default Mode Select whe...

Page 130: ...in the display depending on options or models If so it is not applicable to your machine Item Description Emulation Type The machine language defines how the computer communicates with the machine Set...

Page 131: ...ption to use the network environment through IPv6 see IPv6 configuration on page 22 Ethernet Speed Configure the network transmission speed 802 1x You can selects the user authentication for network c...

Page 132: ...rinted sheet has toner debris on it CLR Empty Msg Prevents the TonerLow Alert message from appearing on the display Supplies Info Allows you to check how many pages are printed and how much toner is l...

Page 133: ...djustment 39 Changing the font setting 40 Changing the default print settings 41 Setting your machine as a default machine 42 Using advanced print features 43 Macintosh printing 50 Linux printing 53 U...

Page 134: ...ude value determine the altitude where you are For Windows user see Device Settings on page 66 For Macintosh Linux or Unix OS user see Using Smart Panel Macintosh and Linux only on page 68 If your mac...

Page 135: ...user see Using Smart Panel Macintosh and Linux only on page 68 If your machine is connected to the network you can set the font setting via SyncThru Web Service You can also change the font setting in...

Page 136: ...nd Printers For Windows Server 2008 R2 select Control Panel Hardware Devices and Printers 3 Right click on your machine 4 For Windows XP Server 2003 Server 2008 Vista select Printing Preferences For W...

Page 137: ...008 Vista select Control Panel Hardware and Sound Printers For Windows 7 select Control Panel Devices and Printers For Windows Server 2008 R2 select Control Panel Hardware Devices and Printers 3 Selec...

Page 138: ...Click Print 3 Type in the destination path and the file name and then click OK For example c Temp file name If you type in only the file name the file is automatically saved in My Documents Documents...

Page 139: ...value Specify Poster Overlap in millimeters or inches by selecting the radio button on the upper right of Basic tab to make it easier to paste the sheets together Booklet Printing Prints your documen...

Page 140: ...ect the duplex option Double sided Printing Option Printer Default If you select this option this feature is determined by the settings you have selected on the control panel of the machine This optio...

Page 141: ...e preview window Watermark Editing a watermark a To change the print settings from your software application access Printing Preferences b Click the Advanced tab select Edit from the Watermark drop do...

Page 142: ...a new page overlay containing your logo or image The overlay document size must be the same as the document you print with the overlay Do not create an overlay with a watermark The resolution of the o...

Page 143: ...the Overlay List box d If necessary check Confirm Page Overlay When Printing box If this box is checked a message window appears each time you submit a document for printing asking you to confirm prin...

Page 144: ...rint one copy first to check then print the rest of the copies later Confidential This mode is used for printing confidential documents You need to enter a password to print Store Select this setting...

Page 145: ...k the printer driver settings in each application you use Follow the steps below to print from a Macintosh 1 Open the document to print 2 Open the File menu and click Page Setup Document Setup in some...

Page 146: ...the number of pages you want to print on one sheet of paper 3 Select the other options to use 4 Click Print The machine prints the selected number of pages to print on one sheet of paper 6 Printing o...

Page 147: ...on the same sheet of paper Avoid printing on both sides of paper when you are printing more than 1 copy 7 Using help Clickthequestionmarkonthebottom leftcornerofthewindowand click on the topic you wa...

Page 148: ...ng four tabs displayed at the top of the window General Changes the paper size the paper type and the orientation of the documents It enables the duplex feature adds start and end banners and changes...

Page 149: ...from the list and change the print job properties 3 Click OK to start printing 10 Configuring Printer Properties Using the Printer Properties window provided by the Printers configuration you can chan...

Page 150: ...Show completed jobs check box to see previous jobs on the job list Classes Shows the class that your machine is in Click Add to Class to add your machine to a specific class or click Remove from Clas...

Page 151: ...Selection 4 Select how many copies are needed in Number of Copies To take advantage of the printer features provided by your printer driver press Properties see Changing printer settings on page 51 5...

Page 152: ...ine hairline Image tab In this tab you can change the brightness resolution or image position of your document Text tab Set the character margin line space or the columns of the actual print output Ma...

Page 153: ...ces management tools provided to help you make full use of your machine It also provides information for maintaining the toner cartridge Storing the toner cartridge 59 Tips for moving storing your mac...

Page 154: ...e toner cartridge properly Store the cartridge inside the protective bag from the original package Store lying flat not standing on end with the same side facing up as if it were installed in the mach...

Page 155: ...life Estimated cartridge life the life of the toner cartridge yield depends on the amount of toner that print jobs require The actual print yield may vary depending on the print density of the pages...

Page 156: ...ng the machine do not tilt or turn it upside down Otherwise the inside of the machine may be contaminated by toner which can cause damage to the machine or reduce print quality When moving the machine...

Page 157: ...y differ from your machine depending on its options or models Network model only Accessing SyncThru Web Service 1 Access a web browser such as Internet Explorer from Windows Enter the machine IP addre...

Page 158: ...to set configurations provided by your machine and network You need to log in as an administrator to view this tab Machine Settings tab Sets options provided by your machine Network Settings tab Shows...

Page 159: ...Settings E mail Notification If you have not configured outgoing server environment go to Settings Network Settings Outgoing Mail Server SMTP to configure network environment before setting e mail no...

Page 160: ...sung Easy Printer Manager provides two different user interfaces for the user to choose from the basic user interface and the advanced user interface Switching between the two interfaces is easy just...

Page 161: ...a gives you general information about your machine You can check information such as the machine s model name IP address or Port name and machine status User s Guide button This button opens Troublesh...

Page 162: ...urs while operating you can check the error from the Samsung Printer Status Samsung Printer Status is installed automatically when you install the machine software You can also launch Samsung Printer...

Page 163: ...Panel overview If an error occurs while operating you can check the error from the Smart Panel You can also launch Smart Panel manually 2 Alert Settings Select the settings you want from the options...

Page 164: ...cally be created on your desktop Opening Unified Driver Configurator 1 Double click the Unified Driver Configurator on the desktop You can also click the Startup Menu icon and select Samsung Unified D...

Page 165: ...system s printer configuration by clicking on the machine icon button on the left side of the Unified Driver Configurator window The printer control buttons are as follows Refresh Renews the availabl...

Page 166: ...Classes tab shows a list of available machine classes Refresh Renews the classes list Add Class Allows you to add a new machine class Remove Class Removes the selected machine class Ports configuratio...

Page 167: ...5 Maintenance Refresh Renews the available ports list Release port Releases the selected port 1 Switches to Ports configuration 2 Shows all of the available ports 3 Shows the port type device connect...

Page 168: ...s chapter gives helpful information for what to do if you encounter an error Paper feeding problems 74 Power and cable connecting problems 75 Printing problems 76 Printing quality problems 80 Operatin...

Page 169: ...and reload it correctly There is too much paper in the tray Remove excess paper from the tray The paper is too thick Use only paper that meets the specifications required by the machine The paper keep...

Page 170: ...Condition Suggested solutions The machine is not receiving power ortheconnectioncable between the computer and the machine is not connected properly Connect the machine to the electricity supply firs...

Page 171: ...If a system error occurs contact your service representative The connection cable between the computer and the machine is not connected properly Disconnect the machine cable and reconnect it The conne...

Page 172: ...ion that was selected in the Printing Preferences may be incorrect For many software applications the paper source selection is found under the Paper tab within the Printing Preferences Select the cor...

Page 173: ...ware application is malfunctioning Try printing a job from another application The operating system is malfunctioning Exit Windows and reboot the computer Turn the machine off and back on again If you...

Page 174: ...very low Reduce the photo size If you increase the photo size in the software application the resolution will be reduced Before printing the machine emits vapor near the output tray Usingdamppapercanc...

Page 175: ...ting is too low or the toner save mode is on Adjust the print resolution and turn the toner save mode off See the help screen of the printer driver A combination of faded or smeared defects may indica...

Page 176: ...s to reject toner Try a different kind or brand of paper Change the printer option and try again Go to Printing Preferences click the Paper tab and set type to Thick or Thicker see Basic Guide for pap...

Page 177: ...inside of your machine If these steps do not correct the problem contact a service representative Black background If the amount of background shading becomes unacceptable Change to a lighter weight...

Page 178: ...ture If background scatter occurs on an envelope change the printing layout to avoid printing over areas that have overlapping seams on the reverse side Printing on seams can cause problems If backgro...

Page 179: ...that the paper is loaded properly Check the paper type and quality Ensure that the guides are not too tight or too loose against the paper stack Curl or wave Ensure that the paper is loaded properly C...

Page 180: ...paper 180 in the tray Back of printouts are dirty Check for leaking toner Clean the inside of the machine Solid color or black pages The toner cartridge may not be installed properly Remove the cartri...

Page 181: ...other type of transparency Because of the composition of transparencies some character voids are normal You may be printing on the wrong surface of the paper Remove the paper and turn it around The pa...

Page 182: ...again Go to Printing Preferences click the Paper tab and set type to Thin An unknown image repetitively appears on a few sheets Loose toner Light print or contamination occurs Your machine is probably...

Page 183: ...move all software from the startup group then restart Windows Reinstall the printer driver General Protection Fault Exception OE Spool 32 or Illegal Operation messages appear Close all other applicati...

Page 184: ...robat printing options It will take longer to print when you print a PDF file as an image The document has printed but the printjobhasnotdisappearedfrom the spooler in Mac OS X10 3 2 Update your MAC O...

Page 185: ...For Gimp front end select print Setup printer and edit the command line parameter in the command item The machine does not print whole pages and output is printed on half the page It is a known proble...

Page 186: ...page and verify that the PS version is available for printing If the problem persists contact a service representative Limit Check Error report prints The print job was too complex You might need to r...

Page 187: ...amsung com BULGARIA 07001 33 11 www samsung com CANADA 1 800 SAMSUNG 726 7864 www samsung com CHILE 800 SAMSUNG 726 7864 www samsung com CHINA 400 810 5858 www samsung com COLOMBIA 01 8000112112 www s...

Page 188: ...0 SAMSUNG 726 7864 www samsung com Country Region Customer Care Center Web Site INDIA 3030 8282 1800 3000 8282 www samsung com INDONESIA 0800 112 8888 021 5699 7777 www samsung com IRAN 021 8255 www s...

Page 189: ...sung com PERU 0 800 777 08 www samsung com Country Region Customer Care Center Web Site PHILIPPINES 1800 10 SAMSUNG 726 7864 1 800 3 SAMSUNG 726 7864 1 800 8 SAMSUNG 726 7864 02 5805777 www samsung co...

Page 190: ...msung com TAIWAN 0800 329 999 www samsung com THAILAND 1800 29 3232 02 689 3232 www samsung com TRINIDAD TOBAGO 1 800 SAMSUNG 726 7864 www samsung com TURKEY 444 77 11 www samsung com U A E 800 SAMSUN...

Page 191: ...s as a central transmitter and receiver of WLAN radio signals ADF An Automatic Document Feeder ADF is a scanning unit that will automatically feed an original sheet of paper so that the machine can sc...

Page 192: ...cally vertical area where control or monitoring instruments are displayed They are typically found in front of the machine Coverage It is the printing term used for a toner usage measurement on printi...

Page 193: ...sociated with domain names in a distributed database on networks such as the Internet Dot Matrix Printer A dot matrix printer refers to a type of computer printer with a print head that runs back and...

Page 194: ...havior which is in contrast to simulation which concerns an abstract model of the system being simulated often considering its internal state Ethernet Ethernet is a frame based computer networking tec...

Page 195: ...areas consist of a large number of dots while lighter areas consist of a smaller number of dots HDD Hard Disk Drive HDD commonly referred to as a hard drive or hard disk is a non volatile storage devi...

Page 196: ...nge It is a networking protocol used by the Novell NetWare operating systems IPX and SPX both provide connection services similar to TCP IP with the IPX protocol having similarities to IP and SPX havi...

Page 197: ...ry Access Protocol LDAP is a networking protocol for querying and modifying directory services running over TCP IP LED A Light Emitting Diode LED is a semiconductor device that indicates the status of...

Page 198: ...first the differences determined and then the differences are encoded and transmitted NetWare AnetworkoperatingsystemdevelopedbyNovell Inc Itinitiallyused cooperative multitasking to run various serv...

Page 199: ...y HP as a printer protocol and has become an industry standard Originally developed for early inkjet printers PCL has been released in varying levels for thermal dot matrix printer and laser printers...

Page 200: ...ld s public circuit switched telephone networks which on industrial premises is usually routed through the switchboard RADIUS Remote Authentication Dial In User Service RADIUS is a protocol for remote...

Page 201: ...part of the address is the network address and which part is the host address TCP IP The Transmission Control Protocol TCP and the Internet Protocol IP the set of communications protocols that impleme...

Page 202: ...cts The format of a UNC path is servername sharename Additional directory URL Uniform Resource Locator URL is the global address of documents and resources on the Internet The first part of the addres...

Page 203: ...EP WPA PSK WPA PSK WPA Pre Shared Key is special mode of WPA for small business or home users A shared key or password is configured in the wireless access point WAP and any wireless laptop or desktop...

Reviews: