background image

English - 9

02  

ins
talla

tion / 

M

aintenance

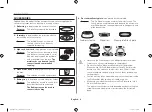
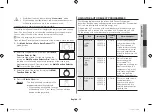
10 cm 

behind

20 cm 

above

10 cm on 

the side

85 cm of 

the floor

INSTALLATION SITE

• 

Select a flat, level surface approx. 85 cm above the 

floor. The surface must support the weight of the 

oven.

• 

Secure room for ventilation, at least 10 cm from the 

rear wall and both sides, and 20 cm from above.

• 

Do not install the oven in hot or damp surroundings, such as next to 

other microwave ovens or radiators.

• 

Conform to the power supply specifications of this oven. Use only 

approved extension cables if you need to use.

• 

Wipe the interior and the door seal with a damp cloth before using your 

oven for the first time.

TURNTABLE

Remove all packing materials inside the oven. Install the 

roller ring and turntable. Check that the turntable rotates 

freely.

maintenance

CLEANING

Clean the oven regularly to prevent impurities from building up on or inside 

the oven. Also pay special attention to the door, door sealing, and turntable 

and roller ring (applicable models only).

If the door won’t open or close smoothly, first check if the door seals have 

built up impurities. Use a soft cloth in soapy water to clean both the inner 

and outer sides of the oven. Rinse and dry well.

to remove stubborn impurities with bad smells from inside the oven

1. 

With an empty oven, put a cup of diluted lemon juice on the centre of 

the turntable.

2. 

Heat the oven for 10 minutes at max power.

3. 

When the cycle is complete, wait until the oven cools down. Then, open 

the door and clean the cooking chamber.

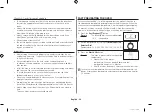
to clean inside swing-heater models

To clean the upper area of the cooking chamber, lower 

the top heating element by 45° as shown. This will help 

clean the upper area. When done, reposition the top 

heating element.


CAUTION

• 

Keep the door and door sealing clean and ensure the door opens and 

closes smoothly. Otherwise, the oven’s lifecycle may be shortened.

• 

Take caution not to spill water into the oven vents.

• 

Do not use any abrasive or chemical substances for cleaning.

• 

After each use of the oven, use a mild detergent to clean the cooking 

chamber after waiting for the oven to cool down.

MC455THRCSR_SA_DE68-04172A-01_EN.indd   9

1/30/2018   3:23:04 PM

Summary of Contents for MC455THRC Series

Page 1: ...Oven Owner s instructions Cooking guide MC455THRC Please be advised that the Samsung warranty does NOT cover service calls to explain product operation correct improper installation or perform normal cleaning or maintenance MC455THRCSR_SA_DE68 04172A 01_EN indd 1 1 30 2018 3 23 00 PM ...

Page 2: ...ications 43 Safety instructions 3 Installation 8 Accessories 8 Installation site 9 Turntable 9 Maintenance 9 Cleaning 9 Oven features 10 Oven 10 Replacement repair 10 Care against an extended period of disuse 10 Control panel 11 Oven use 11 How a microwave oven works 11 Checking that your oven is operating correctly 12 Setting the time 12 Cooking Reheating 13 Power levels and time variations 13 St...

Page 3: ...ffices and other working environments farm houses by clients in hotels motels and other residential environments bed and breakfast type environments Only use utensils that are suitable for use in microwave ovens When heating food in plastic or paper containers keep an eye on the oven due to the possibility of ignition The microwave oven is intended for heating food and beverages Drying of food or ...

Page 4: ...rning use of the appliance by a person responsible for their safety Children should be supervised to ensure that they do not play with the appliance This appliance can be used by children aged from 8 years and above and persons with reduced physical sensory or mental capabilities or lack of experience and knowledge if they have been given supervision or instruction concerning use of the appliance ...

Page 5: ...d touching heating elements Children less than 8 years of age shall be kept away unless continuously supervised CAUTION The cooking process has to be supervised A short term cooking process has to be supervised continuously The door or the outer surface may get hot when the appliance is operating The temperature of accessible surfaces may be high when the appliance is operating The surfaces are li...

Page 6: ...icide on the oven Do not store flammable materials in the oven Because alcohol vapours can contact hot parts of the oven use caution when heating food or drinks containing alcohol Children may bump themselves or catch their fingers on the door When opening closing the door keep children away Microwave warning Microwave heating of beverages may result in delayed eruptive boiling always use caution ...

Page 7: ...r seals and sealing surfaces must not be damaged All adjustments or repairs must be done by a qualified technician Limited warranty Samsung will charge a repair fee for replacing an accessory or repairing a cosmetic defect if the damage to the unit or accessory was caused by the customer Items this stipulation covers include Door handles out panel or control panel that are dented scratched or brok...

Page 8: ...ies and others The Baking tray can be used in convection cooking 6 Pro steamer Crusty plate to be placed on the turntable Purpose The Pro Steamer can be used to steam crusty cook The Crusty plate is used to brown food better in the microwave or grill combination cooking modes and to keep pastry and pizza dough crisp Stainless steel lid Steam tray Steam plate Crusty plate Never use this Pro Steamer...

Page 9: ...cable models only If the door won t open or close smoothly first check if the door seals have built up impurities Use a soft cloth in soapy water to clean both the inner and outer sides of the oven Rinse and dry well To remove stubborn impurities with bad smells from inside the oven 1 With an empty oven put a cup of diluted lemon juice on the centre of the turntable 2 Heat the oven for 10 minutes ...

Page 10: ...the power cord from the power source and then contact a local Samsung service centre CARE AGAINST AN EXTENDED PERIOD OF DISUSE If you don t use the oven for an extended period of time unplug the power cord and move the oven to a dry dust free location Dust and moisture that builds up inside the oven may affect the performance of the oven oven features OVEN 8 10 9 11 12 13 14 7 1 2 3 4 5 6 1 DOOR H...

Page 11: ...en to Defrost Reheat Cook Cooking principle 1 The microwaves generated by the magnetron reflected at cavity and are distributed uniformly as the food rotates on the turntable The food is thus cooked evenly 2 The microwaves are absorbed by the food up to a depth of about 1 inch 2 5 cm Cooking then continues as the heat is dissipated within the food 3 Cooking times vary according to the container us...

Page 12: ...t the current time The time can be displayed in either the 24 hour or 12 hour notation You must set the clock When you first install your microwave oven After a power failure Do not forget to reset the clock when you switch to and from summer and winter time Auto Energy Saving Function Only for applicable models If you do not select any function when appliance is in the middle of setting or operat...

Page 13: ...beep one time per minute If you would like to know the current Power Level of the oven cavity press Multi Function Selector Dial once If you would like to change the power level during cooking turn the Multi Function Selector Dial Quick Start If you wish to heat a dish for a short period of time at maximum power 900 W you can also simply press the Start 30s button once for each 30 seconds of cooki...

Page 14: ... minutes press the Start 30s button six times Just turning Multi Function Selector Dial to adjust cooking time To increase cooking time turn to right and to decrease cooking time turn to left USING THE STEAM CLEANING The steam provided by steam clean system will soak the cavity surface After using steam clean function you can easily clean the cavity of oven Use this function only after the oven ha...

Page 15: ...inished the oven will beep and flash 0 four times The oven will then beep one time per minute USING THE AUTO REHEAT PROGRAMMES The following table presents the various Auto Reheat Programmes quantities standing times and appropriate recommendations Programmes no 1 to 6 are running with microwave energy only Programmes no 7 is running with a combination of microwaves and grill Programme no 8 is run...

Page 16: ... g grated cheddar cheese and spices on top Place on turntable Code Food Serving size Standing time Recommendations 7 Frozen Chicken Wings 200 250 g 300 350 g 400 450 g 2 min Put the frozen ready chicken wings or small drumsticks pre cooked and spiced on the high metal rack with the skin side down Put them in a circle and leave the centre clear Turnover as soon as the oven beeps 8 Frozen Oven Chips...

Page 17: ... oven heat Put frozen pasta gratin on the low rack After cooking stand for 2 3 minutes USING THE AUTO COOK FEATURE The seventeen Auto Cook features include provide pre programmed cooking times You do not need to set either the cooking times or the power level You can adjust the size of the serving by turning the Dial knob Use only recipients that are microwave safe Open the door Place the food in ...

Page 18: ... 750 g Stir after cooking When cooking higher quantities stir once during cooking Code Food Serving size Standing time Recommendations 3 Frozen Vegetables 100 150 g 200 250 g 300 350 g 400 450 g 500 550 g 3 min Put frozen vegetables into a glass bowl with lid Add 15 30 ml of water 1 2 tablespoons Stir after cooking When cooking higher quantities stir once during cooking 4 Jacket Potatoes 200 g 400...

Page 19: ... of spices and olive oil Put on enamelled baking tray Insert in shelf level 12 Quiche 400 g 500 g 600 g Prepare quiche in a round ovenproof dish Put dish on the low rack 13 Sponge Cake 450 550 g 10 min Put dough into a round black metal baking tin using baking paper on bottom diameter 26 cm Put tin on the low rack Code Food Serving size Standing time Recommendations 14 Muffins 500 600 g Pour dough...

Page 20: ...occoli as well as sliced courgette egg plant pumpkin or pepper USING THE SENSOR COOK FEATURE The six Sensor Cook features include provide pre programmed cooking times You do not need to set either the cooking times or the power level You can adjust the Sensor Cook category by turning the dial knob First place the food in the center of the turntable and close the door Use only dishes that are micro...

Page 21: ... food eliminating the need to set the cooking time and power level When you cover a container with its lid or plastic wrap during Sensor Cooking the Auto Sensor will detect the gases generated after the container has been saturated with steam Shortly before cooking ends the remaining cooking time will begin its count down This will be a good time for you to rotate or stir the food for even cooking...

Page 22: ...h or too low Do not use volatile detergent to clean your oven Gas resulting from this detergent may affect the sensor Avoid placing the oven near high moisture or gas emitting appliances since this will interfere with the proper performance of the Auto Sensor Always keep the inside of the oven clean Wipe all spills with a damp cloth This oven is designed for household use only FAST PREHEATING THE ...

Page 23: ...lace meat poultry and fish on a flat glass plate or on a ceramic plate arrange bread and cake on kitchen paper Code Food Serving size g Standing time min Recommendations 1 Meat 200 2000 20 90 Shield the edges with aluminium foil Turn the meat over when the oven beeps This programme is suitable for beef lamb pork steaks chops minced meat 2 Poultry 200 2000 20 90 Shield the leg and wing tips with al...

Page 24: ...turntable starts rotating 1 Cooking starts and when it has finished the oven beeps four times 2 The end reminder signal will beep 3 times once every minute 3 The current time is displayed again Never use this Pro Steamer with a different product or model It may cause a fire or fatal damage to the product Do not use the Pro Steamer without water or food inside When you use this Pro Steamer pour at ...

Page 25: ... W 10 15 Rinse courgettes and cut them into similar slices Distribute evenly on steam tray Frozen mixed vegetables 400 g 500 900 W 18 23 Distribute frozen mixed vegetables 18 ºC e g broccoli cauliflower sliced carrots evenly on steam tray Potatoes small 500 g 500 900 W 25 30 Rinse and clean potatoes and pierce skin with a fork Set whole potatoes evenly on steam tray Fresh food Portion Cold water m...

Page 26: ...cooking in microwave oven using grill or microwave mode in grill convection ovens foods like pastries and pizza become soggy from button side Using the Samsung Crusty plate helps to gain a crispy cooked result of your food The crusty plate can also be used for bacon eggs sausages etc or Steam plate Crusty plate Low rack High rack 1 Preheat the crusty plate as described above Before using the crust...

Page 27: ...safe COOKING BY CONVECTION The convection mode enables you to cook food in the same way as in a traditional oven The microwave mode is not used You can set the temperature as required in a range varying from 40 C to 220 C in seven preset levels The maximum cooking time is 90 minutes If you wish to Fast preheating the oven see page 22 Always use oven gloves when touching the recipients in the oven ...

Page 28: ...s on suitable fermentation proof guide refer to the Guide for fermentation proof mode on page 38 1 Turn Mode Selector Dial to Fermentation Proof mode position Result The following indications are displayed Fermentation Proof mode 2 Set the cooking time by turning the Multi Function Selector Dial ex h mm 3 Press the Start 30s button Result Cooking starts When cooking has finished the oven will beep...

Page 29: ...en beep one time per minute COMBINING MICROWAVES AND CONVECTION Combination cooking uses both microwave energy and convection heating No preheating is required as the microwave energy is immediately available Many foods can be cooked in combination mode particularly Roast meats and poultry Pies and cakes Egg and cheese dishes ALWAYS use microwave safe and oven proof cookware Glass or ceramic dishe...

Page 30: ...Press the Clock and Stop Eco button at the same time about three second Result The oven is locked The follow indication is display 2 To unlock the oven press the Clock and Stop Eco button again at the same time about three second Result The oven can be used normally SWITCHING THE BEEPER OFF You can switch the beeper off whenever you want 1 Press the Start 30s and Stop Eco button at the same time a...

Page 31: ...m food Overheating may cause the polystyrene to melt Paper bags or newspaper May catch fire Recycled paper or metal trims May cause arcing Glassware Oven to tableware Can be used unless decorated with a metal trim Fine glassware Can be used to warm foods or liquids Delicate glass may break or crack if heated suddenly Glass jars Must remove the lid Suitable for warming only Cookware Microwave Safe ...

Page 32: ... contributes to cooking process Food can be covered in different ways e g with a ceramic plate plastic cover or microwave suitable cling film Standing times After cooking is over food the standing time is important to allow the temperature to even out within the food Cooking Guide for fresh vegetables Use a suitable glass pyrex bowl with lid Add 30 45 ml cold water 2 3 tbsp for every 250 g unless ...

Page 33: ... pieces will be more successful Power levels and stirring Some foods can be reheated using 900 W power while others should be reheated using 600 W 450 W or even 300 W Check the tables for guidance In general it is better to reheat food using a lower power level if the food is delicate in large quantities or if it is likely to heat up very quickly mince pies for example Stir well or turn food over ...

Page 34: ...p chilled 250 ml 450 ml 900 W 2 2 3 4 2 3 Pour into a deep ceramic plate or deep ceramic bowl Cover with plastic lid Stir well after reheating Stir again before serving Stew chilled 350 g 600 W 4 5 2 3 Put stew in a deep ceramic plate Cover with plastic lid Stir occasionally during reheating and again before standing and serving Food Portion Power Time min Standing time min Instructions Pasta with...

Page 35: ... halves Put some cheese on top Arrange in a circle in a flat glass pyrex dish Place it on the high rack Stand for 2 3 minutes Tomato Cheese Toast 4 pcs 300 g 300 W Grill 4 5 Toast the bread slices first Put the toast with topping on the high rack Stand for 2 3 minutes Fresh food Portion Power 1st side time min 2nd side time min Instructions Baked Potatoes 500 g 450 W Grill 15 16 We recommend to pr...

Page 36: ...d of cooking food in a traditional oven with hot air The heating element and the fan are situated on the back wall so that the hot air is circulated Cookware for convection cooking All conventional ovenproof cookware baking tins and sheets anything you would normally use in a traditional convection oven can be used Food suitable for convection cooking All biscuits individual scones rolls and cakes...

Page 37: ... with convection is the traditional and well known method of cooking food in an oven with hot air circulated by a fan on the back wall Cookware for cooking with microwaves convection Should be able to let the microwaves pass through Should be ovenproof like glass pottery or china without metal trims similar to the cookware described under MW Grill Food suitable for microwave convection cooking All...

Page 38: ...TION PROOF MODE This mode can be used for rising yeast dough as well as preparing yoghurt Refer to table and guide how to use the mode on this page Put dough into heat resistant bowl and cover with cling film When preparing yoghurt pour 1 litre long life milk room temperature into shallow glass bowl or 6 7 ceramic dishes Distribute 100 g yogurt evenly into cups stir well and cover with cling film ...

Page 39: ...with twist off lids Stand on lid for 5 minutes Cooking pudding custard Mix pudding powder with sugar and milk 500 ml by following the manufacturer instructions and stir well Use a suitable sized glass pyrex bowl with lid Cook covered for 6 to 7 minutes using 900 W Stir several times well during cooking troubleshooting TROUBLESHOOTING If you have any of the problems listed below try the solutions g...

Page 40: ... to restart operation The oven is not level The oven is installed on an uneven surface Make sure the oven is installed on flat stable surface Problem Cause Action The power turns off during operation The oven has been cooking for an extended period of time After cooking for an extended period of time let the oven cool The cooling fan is not working Listen for the sound of the cooling fan Trying to...

Page 41: ... after cooking is complete This is not an oven malfunction Problem Cause Action Turntable While turning the turntable comes out of place or stops turning There is no roller ring or the roller ring is not properly in place Install the roller ring and then try again The turn table drags while turning The roller ring is not properly in place there is too much food or the container is too large and to...

Page 42: ...nterior temperature will be lowered and this may affect the results of your cooking The oven controls are not correctly set Correctly set the oven controls and try again The grill or other accessories are not correctly inserted Correctly insert the accessories The wrong type or size of cookware is used Use suitable cookware with flat bottoms E 24 message indicates The E 24 message is automatically...

Page 43: ...THRC Power source 240 V 50 Hz AC Power consumption Maximum power Microwave Grill heating element Convection heating element 1650 W 1450 W 1650 W 1650 W Output power 100 W 900 W 6 levels IEC 705 Operating frequency 2450 MHz Dimensions W x H x D Outside Include handle Oven cavity 600 x 350 x 584 mm 418 8 x 261 x 414 5 mm Volume 45 L 1 6 Cubic feet Weight Net 23 5 kg approx MC455THRCSR_SA_DE68 04172A...

Page 44: ...xymobile jp jp support MALAYSIA 1800 88 9999 603 7713 7420 Overseas contact www samsung com my support PHILIPPINES 1 800 10 726 7864 PLDT Toll Free 1 800 8 726 7864 Globe Landline and Mobile 02 422 2111 Standard Landline www samsung com ph support SINGAPORE 1800 7267864 1800 SAMSUNG www samsung com sg support THAILAND 0 2689 3232 1800 29 3232 Toll free www samsung com th support TAIWAN 0800 32 999...

Reviews: