background image

GB

29

B

28

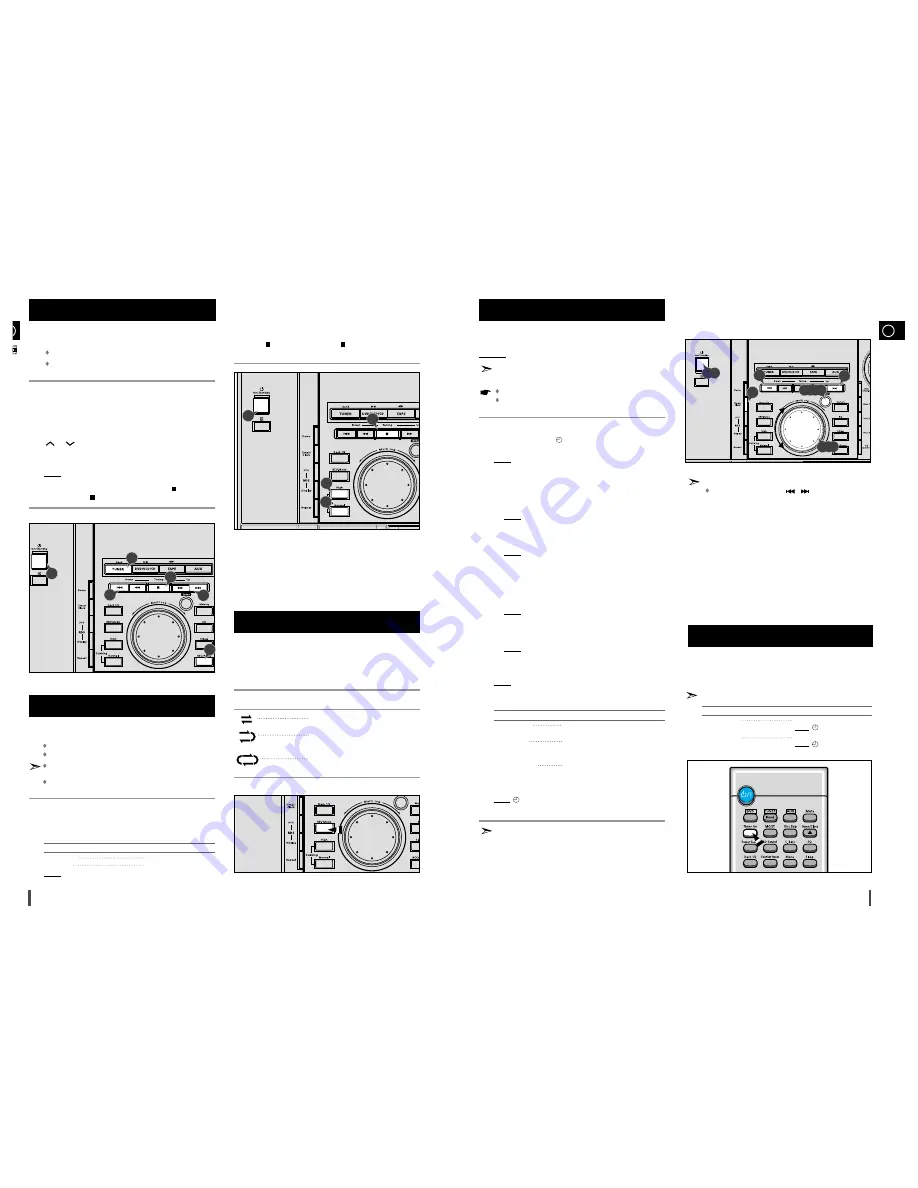
You can record a radio programme of your choice.

You can only record on cassettes in Deck 2.

You do not need to adjust the volume, as it has no effect on
the recording.

Switch the system on by pressing 

On/Standby

.

Insert a blank cassette in Deck 2.

Select the TUNER function by pressing 

TUNER

.

Select the radio station that you wish to record by pressing 

Tuning

or 

on the remote control or by press the 

Tuning  Down

or

Up

on the front panel.

Press 

REC/Pause

.

Result:

REC

is displayed in red and recording starts.

When you have finished recording, press the TAPE 

on the

remote control  or 

on the front panel to stop recording.

You can copy a cassette from Deck 1 to Deck 2. Two options
are available:

Normal speed dubbing

High-speed dubbing

You do not need to adjust the volume, as it has no effect on the
recording.

Take care not to insert the tape to be copied in Deck 2, as it will
be erased when you start recording.

Switch your system on by pressing 

On/Standby

.

Insert a blank cassette in Deck 2.

Insert the tape to be copied in Deck 1.

To copy a cassette at...

Press...

Normal speed

Normal

High speed

High

Result: The appropriate indications are displayed and the cassette in

Deck 1 is copied to the cassette in Deck 2.

Press 

on the front panel or TAPE 

on the remote control when

you have finished recording.

Recording a Radio Programme

1

1
2
3
4

5

6

Copying a Cassette (Dubbing)

1
2
3
4

4

5

5

The timer enables you to switch the system on or off at spe-
cific times.
Example: You wish to wake up to music every morning.

If you no longer want the system to be switched on or off auto-
matically, you must cancel the timer.

Before setting the timer, check that the current time is correct.

For each step, you have a few seconds to set the required
options. If you exceed this time, you must start again.

Switch the system on by pressing 

On/Standby

.

Press 

Timer/Clock

until       

TIMER

is displayed.

Press 

Enter

.

Result:

ON TIME

is displayed (instead of the equalizer symbols) for

a few seconds, followed by any switch-on time already set;
you can set the timer switch-on time.

Set the timer switch-on time.

a

Set the hour by tuning the 

Multi Jog

knob to the right or to the left.

b  

Press 

Enter

.

Result: The minutes flash.

Set the minutes by tuning the 

Multi Jog

knob to the right or to

the left.

d

Press 

Enter

.

Result:

OFF TIME

is displayed (instead of the equalizer symbols)

for a few seconds, followed by any switch-off time already
set; you can now set the timer switch-off time.

Set the timer switch-off time.

a

Set the hour by tuning the 

Multi Jog

knob to the right or to the left.

b

Press 

Enter

.

Result: The minutes flash.

c

Set the minutes by tuning the 

Multi Jog

knob to the right or to

the left.

d

Press 

Enter

.

Result:

VOL XX

is displayed, where 

XX

corresponds to the 

volume already set.

Press 

Tuning Down

and 

Up

to adjust the volume level and press 

Enter

.

Result: The source to be selected is displayed.

Turn the 

Multi Jog

knob to select the source to be played when the

system switches on.

If you select...

You must also...

TAPE (cassette)

Insert a recorded cassette in one of the
decks before setting the system to standby.

TUNER (radio)

Press 

Enter

.

Select a preset station by tuning the

Multi Jog

knob to the right or to the left.

CD (compact disc)

Load one or more compact discs.

Press 

Enter

to confirm the timer.

Press 

On/Standby

to set the system to standby mode.

Result: 

is displayed to the bottom left of the time, indicating that

the timer has been set. The system will switch on and off
automatically at the required times.

If the timer switch on and off times are identical, the word 

ERROR

is

displayed.

Your mini-compact system has three cassette playback modes
which enable you to listen to both sides of a cassette auto-
matically. 
Press REV. Mode until the appropriate symbol is displayed.

When the display indicates...

The mini-compact system plays back...

One side of the selected cassette and
then stops.

One side of the cassette.
The other side of the cassette and then
stops.

Both sides of the cassette indefinitely until 
you press stop.

Timer Function

2

6

4,5,7

4

4

3

1

4

6

5

1,9

6

To set the timer function

You may use 

Multi Jog

or 

/

buttons to adjust in 

step 4,5,6,7.

3,4,5,6,7,8

1
2
3

4

5

6

7

8
9

Selecting the Cassette Playback
Mode (Deck 2 Only)

After having set the timer, it will start automatically as shown
by the TIMER indication on the display. If you no longer wish
to use the timer, you must cancel it.

You can stop the timer at any time (system on or in standby mode).

To...

Press Timer On...

Cancel the timer

Once.
Result:      is no longer displayed.

Restart the timer 

Twice.
Result:      is displayed again.

Cancelling the Timer

Summary of Contents for MAX-DL44

Page 1: ...Instruction Manual THREE CD CHANGER DVD MINI COMPACT SYSTEM MAX DL44 ...

Page 2: ...ON INVISIBLE LASER RADIATION WHEN OPEN AND INTERLOCKS DEFEATED AVOID EXPO SURE TO BEAM This symbol indicates that dangerous voltage which can cause electric shock is present inside this unit This symbol alerts you to important operating and maintenance instructions accompanying the unit WARNING To reduce the risk of fire or electric shock do not expose this appliance to rain or moisture CAUTION TO...

Page 3: ...on buttons 30 Stop button 31 Skip Function buttons Front Panel View 1 2 3 4 5 6 7 8 9 10 12 11 13 1415 16 17 18 19 20 21 22 23 25 24 26 27 28 29 30 31 Display Window 1 CD Playing Disc Mode or CD Repeat Mode 2 Playing Disc Number 3 CD Synchro Recording 4 Hi Speed 5 Recording Tape Reverse Mode 6 Tape 1 2 7 Tuner Preset 8 CD Program and Tuner Preset Number 9 CD Program or Tuner Memory to Program 10 M...

Page 4: ...e Return Subtitle Clear Display Step Program Audio Go To Zoom Repeat Angle Remain Repeat Slow AUX button Mute button EQ button S Bass button Sleep button Menu button Direction Enter button Disc Number Skip button Open Close button Volume Control buttons Speaker output volume control Slow button Setup button Title button Return button Subtitle button Clear button Display button Step button Audio bu...

Page 5: ... on the system Two for the left speaker marked L Two for the right speaker marked R To achieve the correct sound quality connect the Red wire to the terminals Black wire to the terminals To connect a wire to a terminal push the tab as far as it will go To the right on the system Insert the wire up to the plastic sheathing in the hole Push the tab back To the left on the system until it clicks into...

Page 6: ...gh this jack Use an optical cable to connect digital audio equipment DAT deck MD recorder etc Remove the dust cap 1 from the DVD CD DIGITAL OUT jack Then connect an optical cable plug to the DVD CD DIGITAL OUT jack When the DVD CD DIGITAL OUT jack is not being used Attach the supplied dust cap DVD CD Digital Out Jack If the TV input is the Scart Jack type please connect it as shown below Connectio...

Page 7: ...n also use buttons to instead Multi Jog knob in step 4 6 Setting the Clock Viewing the Various Functions on Your System 2 1 1 2 3 4 5 6 7 2 1 4 6 3 5 7 4 6 4 6 B The AM aerial for long and medium waves can be Placed on a stable surface Fixed to the wall you must first remove the base The AM aerial connector terminals are located on the rear of the system and are marked AM To avoid noise interferen...

Page 8: ...ou can search quickly through a chapter or track for a specific scene or tune High Speed Playback Press the and button Each time the button is pressed Each time the button is pressed playback reverse playback is possible on DVDs Forward Reverse Searching What is a Title A movie contained in a DVD disc What is a Chapter Each Title on a DVD disc is divided into several smaller sections called chapte...

Page 9: ...ton to access the different features Press the Enter button The selected item will play Using the Title Menu Press the Title button For DVDs containing multiple titles you can view the title of each movie Depending on the disc this function may either not work at all or may work differently Using Disc Menu Title 1 2 3 Use this function with video and music CDs to play the tracks in a particular or...

Page 10: ...pear select OFF The word INVALID appears on the TV screen If this message appears on the TV screen while buttons are being operated that operation is not possible with that partic ular disc Depending on the disc the audio or subtitle language function may not work V I D E O OFF 1 1 1 1 SPA ENG FRE OFF ENG 1 3 2 3 3 3 To enlarge an image Press the Zoom button Images can be enlarged 2x and 4x During...

Page 11: ...ck or go into a directory Select a track or directory Repeating Playback On an MP3 disc Repeat A B cannot be used You can enjoy only repeat play Press the Repeat button The indication corresponding to the selected mode appears on the TV screen Each time you press the button repeat mode changes as follows REPEAT RANDOM All tracks recorded on the disc will be played once at REPEAT ONE Current track ...

Page 12: ...Enter button Setting up the Language Features 1 2 3 4 To End the Language Features Setup Press the Setup button again 4 3 LB OFF RATING LEVEL BITSTREAM OUTPUT DIGITAL TV SCREEN Move Setup Exit LANGUAGES SYSTEM RATING LEVEL The Rating Level function works in conjunction with DVDs which have been assigned a rating to help control the type of DVD that your family watches Select RATING LEVEL then pres...

Page 13: ...utton to search a stored radio station You can listen to a stored radio station as follows Switch the system on by pressing On Standby Select the TUNER function by pressing Tuner Select the required frequency band by pressing Tuner Band on the remote control or TUNER Band again on the front panel Press button on the front panel of the unit or the button on the remote control until PRESET is displa...

Page 14: ...uency Some stations may not transmit PTY RT or CT information therefore this may not be displayed in all cases 5 TA Traffic Announcement When this symbol flashes it shows that the traffic announcement is in progress About PS NAME MODE Displays the name of broadcasting station Press the RDS Display button to select the PS NAME PS NAME appears on the display If the PS information is being received t...

Page 15: ...ress the to start playing the track Result The track is recorded on the cassette When you have finished recording press TAPE on the remote control or on the front panel to stop recording CD Synchro Record Feature Recording a Compact Disc Listening to a Cassette 1 2 3 4 5 6 7 8 1 1 2 3 4 5 6 7 2 3 4 5 6 7 8 9 26 1 2 7 8 6 8 1 7 6 3 1 7 3 6 8 B The PTY information is composed of an identification sy...

Page 16: ...h c Set the minutes by tuning the Multi Jog knob to the right or to the left d Press Enter Result OFF TIME is displayed instead of the equalizer symbols for a few seconds followed by any switch off time already set you can now set the timer switch off time Set the timer switch off time a Set the hour by tuning the Multi Jog knob to the right or to the left b Press Enter Result The minutes flash c ...

Page 17: ...tem should continue playing before it switches off At any time you can Check the remaining time by pressing Sleep Change the remaining time by repeating Steps 1 and 2 To cancel SLEEP function press Sleep one or more times until OFF is displayed Your mini compact system has a bass amplification function called S Bass Super Bass Sound This function makes the sound more powerful and real Press the S ...

Page 18: ...he tape mechanism It always takes a little time to become familiar with a new appliance If you have any of the problems listed below try the solutions given They may save you the time and inconvenience of an unnecessary service call If the above guidelines do not allow you to solve the problem take a note of The model and serial numbers normally printed on the rear of the system Your warranty deta...

Page 19: ...her An acronym for Pulse Code Modulation another name for digital audio This is recorded on a video CD version 2 0 Selected scenes or information can be chosen from the menu displayed on the TV monitor Both the DVD player and DVD discs are encoded with a region number If the region number on the DVD disc does not correspond to the region number of the DVD player the player cannot play the disc Tra...

Page 20: ...ELECTRONICS THIS APPLIANCE IS MANUFACTURED BY AH68 01064B ...

Reviews: