background image

English-

14

S

P E C I A L

F

E AT U R E S

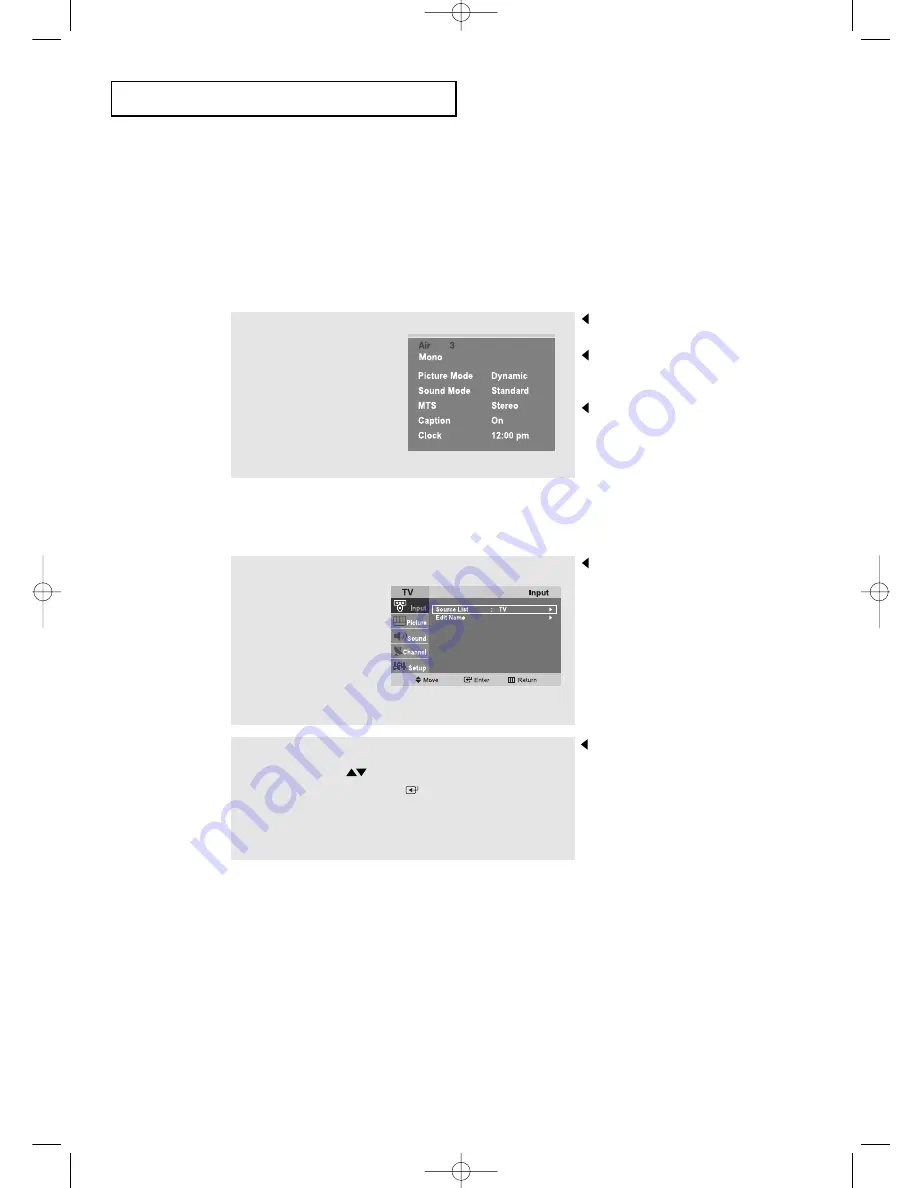
Viewing the Display

The display identifies the current channel and the status of certain
audio-video settings. 

Viewing the Menus

The on-screen displays
disappear after about ten seconds.

Press the button once more or 
wait approximately 10 seconds 
and it disappears automatically.

Allows the user to adjust the 
settings according to his/her 
preference and shows the 
current settings.

1

Press the 

INFO

button

on the remote control.

The TV will display the
channel, the type of
sound, and the status
of certain picture and
sound settings.

1

With the power on,
press the 

MENU

button.

The main menu appears
on the screen. It’s left
side has five icons:
Input, Picture, Sound,
Channel, and Setup. 

The on-screen menus
disappear from the screen after
about two minutes.

You can also use the 
SOURCE buttons 
on the control panel of the TV
to make selections.(See page 19)

2

Use the 

UP/DOWN

buttons to select one of the

five icons. Then press 

ENTER

to access the 

icon’s sub-menu.

3

Press the 

EXIT

button to exit.

 BN68-00633A-00Eng 1.qxd.q  3/22/04 4:05 AM  Page 14

Summary of Contents for LT-P 1545

Page 1: ...Valley Road Suite 201 Mount Arlington NJ 07856 www samsungusa com Canada Samsung Electronics Canada Inc Samsung Customer Care 7037 Financial Drive Mississauga Ontario L5N 6R3 www samsung ca LT P 1545...

Page 2: ...Some Channels 8 Connecting a VCR 10 Connecting an S VHS VCR 11 Connecting a DVD Player 12 Chapter 3 Special Features Turning the TV On and Off 13 Changing Channels 13 Using the Channel Buttons 13 Usi...

Page 3: ...PG PG 13 R NC 17 X 40 How to Reset the TV after the V Chip Blocks a Channel Emergency Escape 41 Chapter 5 PC Display Using Your TV as a Computer PC Display 42 How to Set up Your PC Software Windows on...

Page 4: ...special filter to reduce or eliminate reception problems Fine tuning control for the sharpest picture possible A built in multi channel sound decoder for stereo and bilingual listening Built in dual...

Page 5: ...Press to see an on screen menu on the screen CH Press to change channels Also press to highlight various items on the on screen menu POWER Press to turn the TV on and off HEADPHONE JACK Connect a set...

Page 6: ...DIO IN STEREO PC VIDEO INPUT Connect to the video output port on your PC VIDEO INPUT Connect a video signal from a camcorder or VCR AUDIO INPUT Connect an audio signal L R from a camcorder or VCR S VI...

Page 7: ...function with VCR or DVD units that are compatible with the LCD TV AUTO PROG Use to store the broadcast cable channels that you receive P MODE Adjust the TV picture by selecting one of the preset fac...

Page 8: ...s Make sure to match the and ends of the batteries with the diagram inside the compartment Installing Batteries in the Remote Control 1 Slide the cover out completely YOUR NEW TV If remote control doe...

Page 9: ...nd UHF Antennas on page 7 Antennas with 300 ohm Flat Twin Leads If you are using an off air antenna such as a roof antenna or rabbit ears that has 300 ohm twin flat leads follow the directions below C...

Page 10: ...nal on the bottom of the rear panel INSTALLATION Antennas with 75 ohm Round Leads 1 Plug the antenna lead into the TV ANTENNA terminal on the bottom of the back panel Separate VHF and UHF Antennas If...

Page 11: ...e box descrambles only some channels such as premium channels follow the instructions below You will need a two way splitter an RF A B switch and four lengths of coaxial cable These items are availabl...

Page 12: ...ast coaxial cable between the OUT terminal on the RF A B switch and the VHF UHF terminal on the rear of the TV INSTALLATION After you ve made this connection set the A B switch to the A position for n...

Page 13: ...xial cable is usually included with a VCR If not check your local electronics store If you have a mono non stereo VCR use the Y connector not supplied to hook up to the left and right audio input jack...

Page 14: ...ferent back panel configuration 1 To begin follow steps 1 3 in the previous section to connect the antenna or cable to your VCR and your TV Connecting an S VHS VCR Your Samsung TV can be connected to...

Page 15: ...nnecting a DVD Player The rear panel jacks on your TV make it easy to connect a DVD player to your TV 1 Connect a set of audio cables between the L R AUDIO INPUT jacks on the TV and the AUDIO OUT jack...

Page 16: ...hannel Then use the PRE CH button to quickly alternate between them Chapter Three SPECIAL FEATURES Adjusting the Volume 1 To control speaker volume 2 To control headphone volume when headphone is conn...

Page 17: ...on on the remote control The TV will display the channel the type of sound and the status of certain picture and sound settings 1 With the power on press the MENU button The main menu appears on the s...

Page 18: ...h Fran ais Espa ol or Portugu s then press the ENTER button Press the UP DOWN buttons to select Air STD HRC or IRC then press the ENTER button 3 Press the ENTER Button The TV will begin memorizing all...

Page 19: ...channels you must specify the type of signal source that is connected to the TV i e an antenna or a cable system 1 Press the MENU button to display the menu Press the UP DOWN buttons to select Channel...

Page 20: ...ct the correct signal source Air STD HRC IRC See steps 1 2 on previous page Press the MENU button Press the UP DOWN buttons to select Channel then press the ENTER button 4 After all the available chan...

Page 21: ...on the remote control 1 Use the number buttons to directly select the channel to Add or Delete Press the MENU button to display the menu Press the UP DOWN buttons to select Channel then press the ENTE...

Page 22: ...e MENU button to display the on screen menu Press the ENTER button 2 Press the ENTER button to select TV then press the ENTER button 3 Press the UP DOWN buttons to select the Input source then press E...

Page 23: ...on Press the UP DOWN buttons to select Edit Name then press the ENTER button 2 Press the UP DOWN buttons to select AV S Video Component or PC then press the ENTER button 3 Press the UP DOWN buttons re...

Page 24: ...se Standard for the standard factory settings Choose Movie when viewing a Movie Choose Custom if you want to adjust the settings according to personal preference see Customizing the Picture page 22 1...

Page 25: ...matic settings See the previous page 3 Press the ENTER button to select a particular item Press the UP DOWN buttons to select Contrast Brightness Sharpness Color or Tint 4 Press the LEFT RIGHT buttons...

Page 26: ...ard for the standard factory settings Choose Speech when watching a show that is mostly dialogue i e news 2 Press the UP DOWN buttons repeatedly to select the Standard or Speech sound settings Press t...

Page 27: ...mes SAP has unrelated information like news or weather 3 Press the UP DOWN buttons to select Mono Stereo or SAP then press the ENTER button Press the EXIT button to exit Choose Mono for channels that...

Page 28: ...Press the ENTER button 1 Press the MENU button to display the menu Press the UP DOWN buttons to select Setup then press the ENTER button 3 Press the UP DOWN buttons to select English Fran ais Espa ol...

Page 29: ...ust set the Blue screen mode to Off 1 Press the MENU button to display the menu Press the UP DOWN buttons to select Setup then press the ENTER button 2 Press the UP DOWN buttons to select Blue Screen...

Page 30: ...ss the ENTER button 1 Press the MENU button to display the menu Press the UP DOWN buttons to select Picture then press the ENTER button 3 Press the UP DOWN buttons to select Color Tone Press the EXIT...

Page 31: ...UP DOWN buttons to select Auto Volume then press the ENTER button 1 Press the MENU button to display the menu Press the UP DOWN buttons to select Sound then press the ENTER button 3 Press the UP DOWN...

Page 32: ...the hour is entered press the LEFT RIGHT buttons to select Minute Press the UP DOWN buttons until the correct minute appears Press the LEFT RIGHT buttons to select am pm and adjust with the UP DOWN b...

Page 33: ...the ENTER button to select Time Press the ENTER button to select Clock Option 2 Using the Local PBS Channel to Automatically Set the TV Clock 3 Press the UP DOWN buttons to select Auto then press the...

Page 34: ...o select Time Zone then press the ENTER button 8 Press the UP DOWN buttons to select DST Daylight Saving Time then press the ENTER button 9 Press the UP DOWN buttons to select No or Yes then press the...

Page 35: ...TV s clock See Setting the Clock on page 29 2 Press the UP DOWN buttons to select On Timer then press the ENTER button Press the UP DOWN buttons repeatedly to select the appropriate hour Press the LE...

Page 36: ...tep 4 To set the Off time press the UP DOWN buttons to select Off Timer Press the ENTER button and set the hours and minutes Follow the same procedure as in steps 2 3 above 5 When finished setting the...

Page 37: ...the ENTER button Press the ENTER button to select Time 3 Press the UP DOWN buttons repeatedly until the correct time appears Press the EXIT button to exit 2 Press the UP DOWN buttons to select Sleep...

Page 38: ...impaired or foreign language translations All VCRs record the closed caption signal from television programs so home recorded video tapes also provide closed captions Most pre recorded commercial vide...

Page 39: ...ar Enter your 4 digit PIN Note The default PIN for your new TV set is 0 0 0 0 4 After entering a valid PIN number the V Chip screen will appear Press the UP DOWN buttons to select Change PIN 5 Press t...

Page 40: ...Chip feature press the ENTER button so that the V Chip Lock is set to Yes Pressing the UP DOWN buttons will alternate between On and Off OPERATION 1 Press the MENU button to display the menu Press the...

Page 41: ...two separate groups TV Y and TV Y7 young children through age 7 and TV G through TV MA everybody else The restrictions for these two groups work independently If a household includes very young childr...

Page 42: ...the next section and set up additional restrictions based on the MPAA codes OPERATION 5 At this point one of the TV Ratings is selected Press the ENTER button Depending on your existing setup the col...

Page 43: ...plication is for movies When the V Chip lock is on the TV will automatically block any programs that are coded with objectionable ratings either MPAA or TV Ratings 1 Press the MENU button to display t...

Page 44: ...tedly press the UP DOWN buttons to select a particular MPAA category When a category is selected its color changes to yellow Pressing the UP DOWN buttons will cycle through the MPAA categories G Gener...

Page 45: ...ick on Settings on the Windows start menu While Settings is highlighted move the cursor so that Control Panel is highlighted When the control panel screen appears click on Display and a display dialog...

Page 46: ...o select Image Lock 4 When you are satisfied with the settings press the MENU button repeatedly to return to normal viewing 3 Press the UP DOWN buttons to select Coarse or Fine then press the ENTER bu...

Page 47: ...n to display the menu Press the UP DOWN buttons to select Setup then press the ENTER button Press the UP DOWN buttons to select PC then press the ENTER button 3 Press the UP DOWN buttons to adjusting...

Page 48: ...button to display the menu Press the UP DOWN buttons to select Setup then press the ENTER button 3 Press the UP DOWN buttons to select Image Reset or Color Reset then press the ENTER button Press the...

Page 49: ...adjusts the frequency values and positions PC DISPLAY 1 Press the MENU button to display the menu Press the UP DOWN buttons to select Setup then press the ENTER button 2 Press the UP DOWN buttons to...

Page 50: ...splay the menu Press the UP DOWN buttons to select Picture then press the ENTER button twice 2 Press the UP DOWN buttons to select the Entertain Internet Text or Custom picture setting Press ENTER but...

Page 51: ...ding to personal preference Alternatively you can use one of the automatic settings 3 Press the UP DOWN buttons to select Contrast or Brightness 4 Press the LEFT RIGHT buttons to decrease or increase...

Page 52: ...en press the ENTER button 1 Press the MENU button to display the menu Press the UP DOWN buttons to select Picture then press the ENTER button 3 Press the UP DOWN buttons to select color tone Press the...

Page 53: ...to select a particular item Press the UP DOWN buttons to select Red Green or Blue 4 Press the LEFT RIGHT buttons to decrease or increase the value of a particular item For example if you select Red pr...

Page 54: ...the antenna Check all wire connections Try another channel Adjust the antenna Try another channel Press the SOURCE button Make sure the TV is plugged in Check the antenna connections First check the...

Page 55: ...function and then adjust the Fine function Adjust the Coarse function and then adjust the Fine function On your computer check Power Signal Cable 15 pin D Sub The TV is using its power management sys...

Page 56: ...to physically fix the system when using it in a public place The locking device has to be purchased separately The appearance and locking method may differ from the illustration depending on the manu...

Page 57: ...3 Holder Wall 1EA 15 17 20 This installation is to be used when attaching the wall mount to a concrete wall When attaching to other building materials please contact your nearest dealer 15 17 Screw FH...

Page 58: ...unt bracket kit LT P1745 17 No 47 007 099 Pivot direct mount adapter No 97 101 003 Wall mount bracket kit LT P2045 20 No 47 007 099 Pivot direct mount adapter No 97 101 003 Wall mount bracket kit Alig...

Page 59: ...erious damage Cabinet Never open the cabinet or touch the parts inside Wipe your TV with a clean dry cloth Never use water cleaning fluids wax or chemicals Do not put heavy objects on top of the cabin...

Page 60: ...28 322 25 175 31 500 49 500 65 000 78 750 108 000 135 000 SVGA XGA SXGA LT P1545 1745 LT P1745 LT P1545 1745 Display Mode If the signal from the system equals the standard signal mode the screen is a...

Page 61: ...6 H x 12 05 V inch a si TFT active matrix 0 01003 H x 0 01003 V inch 160 150 30 69kHz 50 75Hz 16 2 Million 30 80kHz 50 75Hz 16 2 Million 28 33kHz 50 70Hz 16 2 Million 480i 480p 500mVrms 480i 480p 500m...

Reviews: