background image

English - 6

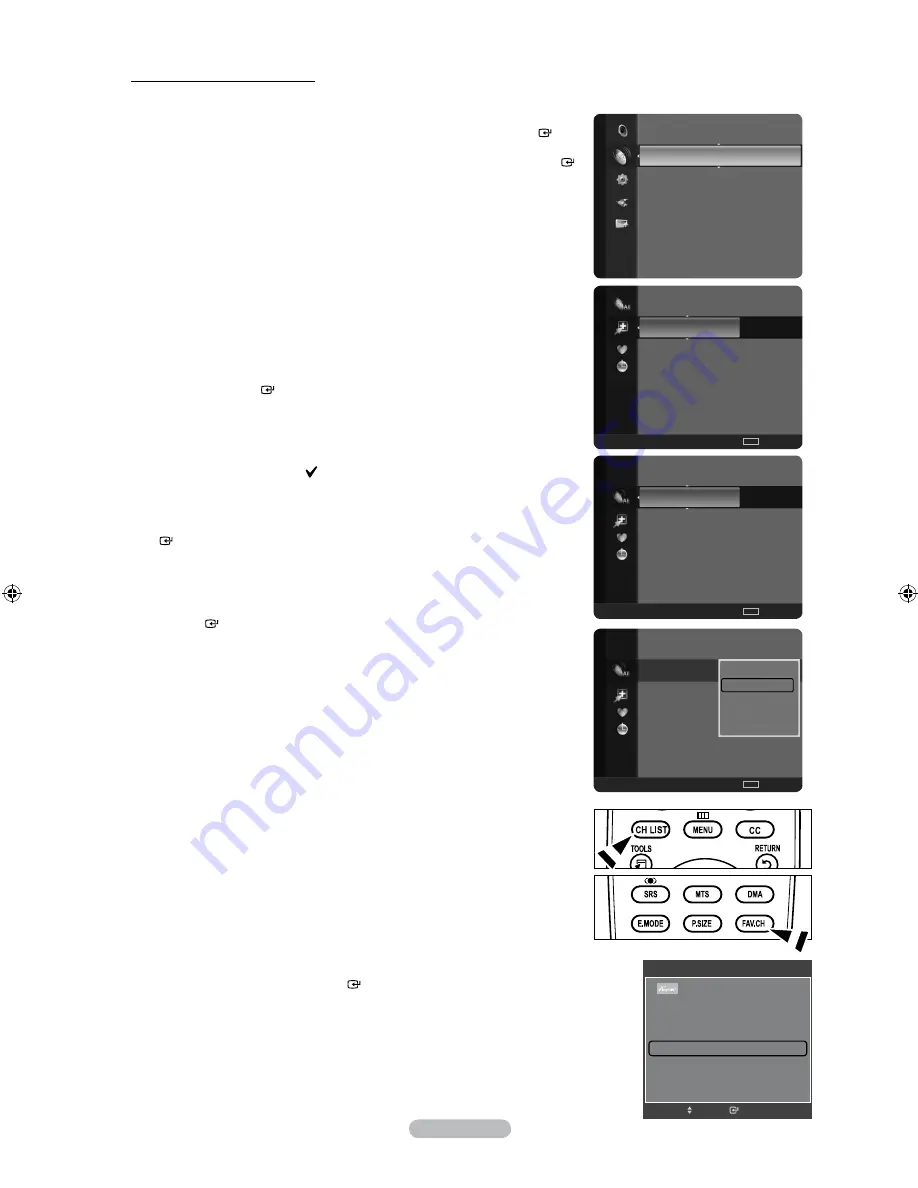
Setting Your Favorite Channels

You can set channels you watch frequently as favorites.

1.

   Press the 

MENU

 button. 

Press the ▲ or ▼ button to select “Channel”, then press the 

ENTER


button. 

Press the ▲ or ▼ button to select “Channel List”, then press the 

ENTER


button.

2.


Press the ◄ button to select “Added Channels”.

3.

   Press the ▲ or ▼ button to select “All Channels”.

Shows all currently available channels.


Press the 

ENTER

   button.

4.


Press the ▲ or ▼ button to select a channel as a favorite channel.

Adding multiple channels to Favorites 

Press the ▲ or ▼ button to select the desired channel in the channel 

list. Then press the yellow button. Repeat the above operation to select 

multiple channels. The   mark appears to the left of the selected 

channels.

5.

  Press the 

TOOLS

 button.

6.

   Press the ▲ or ▼ button to select “Add to Favorite”, then press the 

ENTER


 button. The “♥” symbol will be displayed and the channel will be set as a 

favorite.

7.

   To cancel your favorite channel selection, press the 

TOOLS

 button when a 

favorite channel is selected. 


 Press the ▲ or ▼ button to select “Delete from Favorite”, then press the 

ENTER

   button. 


The channel is deleted from “Favorites” and the “♥” mark also disappears.


Press the 

EXIT

 button to exit.

You can also Add or Delete a channel from Favorites in the “Added 

Channels” menu in the same manner.
All favorite channels will be shown on “Favorite” menu.

Press the 

CH LIST

 button on the remote control to bring up the channel lists.

To select the favorite channels you have set up, press the 

FAV.CH

 button on 

the remote control.

Easy Setting

1.

   Press the 

TOOLS

 button on the remote control.

2.

   Press the ▲ or ▼ button to select “Add to Favorite” (or “Delete from 

Favorite”), then press the 

ENTER

   button. 

The current channel is added to (or deleted from) Favorites.

O

O

Channel

Auto Program

Clear Scrambled Channel

Channel List 


Fine Tune

Signal Strength

2  

Air

4  

Air

4-2   ♥ TV #8

8  

Air

13 

Air

13-1  ♥ TV #3 

Alice’s Adventures in Wonderland

Added Channels

Air

 Antenna


Zoom

 Select

TOOLS

 Option

2  

Air

4  

Air

4-2   ♥ TV #8

8  

Air

13 

Air

13-1  ♥ TV #3 

Alice’s Adventures in Wonderland

All Channels

Air

 Antenna


Zoom

 Select

TOOLS

 Option

2  

Air

4  

Air

4-2   ♥ TV #8

8  

Air

13 

Air

13-1  ♥ TV #3 

Alice’s Adventures in Wonderland

All Channels

Air

 Antenna


Zoom

 Select

TOOLS

 Option

Delete

Add to Favorite

Timer Viewing
Channel Name Edit
Auto Program

TOOLS


Device List

Picture Mode 

Standard

Sound Mode 

Custom

Sleep Timer 

Off

Add to Favorite
Switch to Cable

e


Exit

Enter

Move

BN68-01796A-00Eng.indd   36

2008-07-29   �� 4:43:23

Summary of Contents for LN40A500T1F

Page 1: ...msung Electronics Canada Inc Customer Service 55 Standish Court Mississauga Ontario L5R 4B2 Canada Samsung Electronique Canada Inc Service à la Clientèle 55 Standish Court Mississauga Ontario L5R 4B2 Canada U S A 1 800 SAMSUNG 726 7864 www samsung com Samsung Electronics America Inc 105 Challenger Road Ridgefield Park NJ 07660 0511 LCD TV user manual imagine the possibilities Thank you for purchas...

Page 2: ...60 037 6 023 490 5 878 080 and under US Published Patent Application No 2001 44713 A1 This license is limited to private non commercial use by end user consumers for licensed contents No rights are granted for commercial use The license does not cover any product unit other than this product unit and the license does not extend to any unlicensed product unit or process conforming to ISO IEC 11172 ...

Page 3: ...round XT 30 Choosing Preferred Language 31 Choosing a Multi Channel Sound MTS track 31 Automatic Volume Control 32 Setting the TV Speakers On Off 32 Listening to the Sound of the Sub PIP Picture 33 Resetting the Sound Settings to the Factory Defaults 33 Channel Control Managing Channels 34 Clearing Scrambled Channels Digital 40 Fine Tuning Analog Channels 40 Checking the Digital Signal Strength 41...

Page 4: ...y DNIe technology provides life like clear images SRS TruSurround XT SRS TruSurround XT provides a virtual surround system Accessories Please make sure the following items are included with your LCD TV If any items are missing contact your dealer Remote Control Batteries AAA x 2 BN59 00687A Warranty Card Registration Card Safety Guide Manual Not available in all locations Cover Bottom LN40A500T1F ...

Page 5: ...een menu use this button as you would use the ENTER button on the remote control 2 MENU Press to see an on screen menu of your TV s features 3 VOL Press to increase or decrease the volume In the on screen menu use the VOL buttons as you would use the and buttons on the remote control 4 CH Press to change channels In the on screen menu use the CH buttons as you would use the and buttons on the remo...

Page 6: ...DVI HDMI adapter DVI to HDMI for video connection and the DVI IN HDMI2 R AUDIO L jacks for audio When using an HDMI DVI cable connection you must use the HDMI IN 2 jack 5 ANT IN Connects to an antenna or cable TV system 6 POWER INPUT Connects the supplied power cord 7 SERVICE Connector for SERVICE only 8 COMPONENT IN 1 2 AV IN Connects Component video audio The COMPONENT IN 1 jack is also used as ...

Page 7: ...his remote can be used to control recording on Samsung recorders with the Anynet feature SOURCE Press to display and select the available video sources PRE CH Tunes to the previous channel CH CH Press to change channels MENU Displays the main on screen menu CC Controls the caption decoder RETURN Returns to the previous menu UP DOWN LEFT RIGHT ENTER Use to select on screen menu items and change men...

Page 8: ...Antennas with 300 Ω Flat Twin Leads below If your antenna has one lead that looks like the diagram to the right see Antennas with 75 Ω Round Leads If you have two antennas see Separate VHF and UHF Antennas Antennas with 300 Ω Flat Twin Leads If you are using an off air antenna such as a roof antenna or rabbit ears that has 300 Ω twin flat leads follow the directions below 1 Place the wires from th...

Page 9: ...IN terminal on your cable box This terminal might be labeled ANT IN VHF IN or simply IN 2 Connect this cable to a two way splitter 3 Connect an RF cable between the OUTPUT terminal on the splitter and the IN terminal on the cable box 4 Connect an RF cable between the ANT OUT terminal on the cable box and the B IN terminal on the RF A B switch 5 Connect another cable between the other OUT terminal ...

Page 10: ...2 R AUDIO L jacks on the back of the TV If this happens contact the company that provided the DVD player Cable Box Satellite receiver to confirm the HDMI version then request an upgrade HDMI cables that are not 1 3 may cause annoying flicker or no screen display DVD Player or Cable Box Satellite receiver Set Top Box Rear Panel TV Rear Panel HDMI Cable Not supplied Connecting a DVD Player or Cable ...

Page 11: ... Y PB PR jacks on the DVD Player or Cable Box Satellite receiver Set Top Box 2 Connect Audio Cables between the COMPONENT IN 1 or 2 R AUDIO L jacks on the TV and the AUDIO OUT jacks on the DVD Player or Cable Box Satellite receiver Set Top Box Component video separates the video into Y Luminance brightness Pb Blue and Pr Red for enhanced video quality Be sure to match the component video and audio...

Page 12: ...ck on the TV 5 Connect Audio Cables between the AUDIO OUT jacks on the VCR and the AV IN R AUDIO L jacks on the TV If you have a mono non stereo VCR use a Y connector not supplied to connect to the right and left audio input jacks of the TV Alternatively connect the cable to the R jack If your VCR is stereo you must connect two cables ANT IN Follow the instructions in Viewing a VCR or Camcorder Ta...

Page 13: ...les between the AUDIO OUT R AUDIO L jacks on the TV and AUDIO IN R AUDIO L jacks on the Amplifier DVD Home Theater When an audio amplifier is connected to the AUDIO OUT R AUDIO L jacks Decrease the volume of the TV and adjust the volume level with the Amplifier s volume control Each Amplifier DVD Home Theater has a different back panel configuration When connecting an Amplifier DVD Home Theater ma...

Page 14: ...the or button then press the ENTER button If you have Digital cable select the cable system signal source for both Analog and Digital Contact your local cable company to identify the type of cable system that exists in your particular area 5 The TV will begin memorizing all of the available channels To stop the search before it has finished press the ENTER button with Stop selected After all the a...

Page 15: ... page 16 to memorize channels Using the Number Buttons 1 Press the number buttons to go directly to a channel For example to select channel 27 press 2 then 7 For quick channel change press the number buttons then press the ENTER button Using the Button The button is used to select stations that broadcast a digital signal 1 For example for Channel 7 1 press 7 then then 1 HD indicates the TV is rece...

Page 16: ...atus of certain picture and sound settings Press the INFO button once more or wait approximately 10 seconds and the display disappears automatically Viewing the Menus 1 With the power on press the MENU button The main menu appears on the screen The menu s left side has icons Picture Sound Channel Setup Input Application 2 Press the or button to select one of the icons Then press the ENTER button t...

Page 17: ...hannels selecting a broadcast source memorizing the channels automatic and adding or deleting channels Channel Lists Selecting the Video Signal source Before your television can begin memorizing the available channels you must specify the type of signal source that is connected to the TV i e an Air or a Cable system 1 Press the MENU button to display the menu Press the or button to select Channel ...

Page 18: ...he type of cable system that exists in your particular area At this point the signal source has been selected 5 The TV begins memorizing all available stations After all the available channels are stored it starts to remove scrambled channels see page 40 The Auto program menu then reappears If you want to stop Auto Programming press the ENTER button The Stop Auto Program message will be displayed ...

Page 19: ...trol to view an external signal source O To Edit the Input Source Name Name the device connected to the input jacks to make your input source selection easier 1 Press the MENU button to display the menu Press the or button to select Input then press the ENTER button Press the or button to select Edit Name then press the ENTER button 2 Press the or button to select AV Component1 Component2 PC HDMI1...

Page 20: ...f a particular item Press the ENTER button Press the EXIT button to exit When you make changes to Backlight Contrast Brightness Sharpness Color or Tint G R the OSD will be adjusted accordingly In PC mode you can only make changes to Backlight Contrast and Brightness Settings can be adjusted and stored for each external device you have connected to an input of the TV The energy consumed during use ...

Page 21: ...ction Low Sets the black color depth to low Medium Sets the black color depth to medium High Sets the black color depth to high Setting the Dynamic Contrast You can adjust the screen contrast so that the optimal contrast is provided 6 Press the or button to select Dynamic Contrast then press the ENTER button 7 Press the or button to select Off Low Medium or High Press the ENTER button Off Turns of...

Page 22: ...ress the or button to decrease or increase the value of a particular item Press the ENTER button In Color you can adjust the RGB values for the selected color To reset the adjusted RGB value select Reset Red Adjusts the red saturation level of the selected color Green Adjusts the green saturation level of the selected color Blue Adjusts the blue saturation level of the selected color Reset Resets ...

Page 23: ...t Flesh Tone then press the ENTER button 21 Press the or button to decrease or increase the value Press the ENTER button Changing the adjustment value will refresh the adjusted screen Setting the Edge Enhancement You can emphasize object boundaries in the picture 22 Press the or button to select Edge Enhancement then press the ENTER button 23 Press the or button to select Off or On Press the ENTER...

Page 24: ... color space when watching movies from an external device ie DVD player connected to the HDMI or Component IN jacks 24 Press the or button to select xvYCC then press the ENTER button 25 Press the or button to select Off or On Press the ENTER button xvYCC is available when the picture mode is set to Movie and the external input is set to HDMI or Component mode Detailed Settings Picture Options Pict...

Page 25: ...reen sizes as well In general though you should view the TV in 16 9 mode as much as possible 1 Follow the Activating Picture Options instructions numbers 1 and 2 2 Press the or button to select Size then press the ENTER button 3 Press the or button to select the screen format you want Press the ENTER button Press the EXIT button to exit 16 9 Sets the picture to 16 9 wide mode Zoom1 Magnifies the s...

Page 26: ...be adjusted and stored for each external device you have connected to an input of the TV Input Source Picture Size ATV AV Component 480i 480p 16 9 Zoom1 Zoom2 4 3 DTV 1080i Component 1080i 1080p HDMI 720p 1080i 1080P 16 9 Wide Fit 4 3 Just Scan PC 16 9 4 3 Alternately you can press the P SIZE button on the remote control repeatedly to change the picture size 16 9 Zoom1 U Move Zoom2 U Move 16 9 Set...

Page 27: ... and white enhancement DNIe is only available in Dynamic mode Setting the HDMI Black Level You can select the black level on the screen to adjust the screen depth 1 Follow the Activating Picture Options instructions numbers 1 and 2 Refer to page 23 2 Press the or button to select HDMI Black Level then press the ENTER button 3 Press the or button to select Normal or Low then press the ENTER button ...

Page 28: ...ppropriate to the signal level of each video device using the Red Green Blue Cyan Magenta Yellow Color Bar Patterns without using an additional Blue Filter 1 Follow the Activating Picture Options instructions numbers 1 and 2 Refer to page 23 2 Press the or button to select Blue Only Mode then press the ENTER button 3 Press the or button to select Off or On then press the ENTER button Press the EXI...

Page 29: ...HDMI2 DVI Component1 2 or PC When the resolution is set to 1920 x1080 60Hz and the current input port is either PC or HDMI and PIP is turned on the main picture may not be displayed clearly PIP Settings Main picture Sub picture Component1 2 HDMI1 HDMI2 DVI PC Analog TV broadcasts only Changing the Size of the PIP Window 3 Press the or button to select Size then press the ENTER button Press the or ...

Page 30: ... to exit Easy Setting 1 Press the TOOLS button on the remote control 2 Press the or button to select PIP then press the ENTER button 3 Press the or button to select On 4 Press the or button to select a particular item 5 Press the or button to select the required option 6 Press the EXIT or TOOLS button to exit PIP PIP On Size Position Air Cable Air Channel Air 11 Return Enter Move Air Cable PIP PIP...

Page 31: ...o suit your personal preference 1 Press the MENU button to display the menu Press the or button to select Sound then press the ENTER button 2 Press the or button to select Equalizer then press the ENTER button 3 Press the ENTER button to select Mode Press the or button to select Standard Music Movie Speech or Custom sound setting then press the ENTER button Mode Custom Equalizer SRS TruSurround XT...

Page 32: ...ternal television speakers It is fully compatible with all multichannel formats 1 Press the MENU button to display the menu Press the or button to select Sound then press the ENTER button 2 Press the or button to select SRS TruSurround XT then press the ENTER button 3 Press the or button to select Off or On then press the ENTER button Press the EXIT button to exit Press the SRS button on the remot...

Page 33: ... press the ENTER button 3 Press the or button to select a setting you want then press the ENTER button Press the EXIT button to exit Mono Choose for channels that are broadcasting in mono or if you are having difficulty receiving a stereo signal Stereo Choose for channels that are broadcasting in stereo SAP Choose to listen to the Separate Audio Program which is usually a foreign language translat...

Page 34: ... Sound in analog TV mode Sound Select in PIP mode and Sound Reset in Sound menu The VOL VOL and MUTE buttons do not operate when the TV Speaker is set to Off TV s Internal Speakers Audio Out Optical L R Out to Sound System RF AV Component PC HDMI RF AV Component PC HDMI TV Speaker On Speaker Output Speaker Output Speaker Output Sound Output Sound Output Sound Output TV Speaker Off Mute Mute Mute S...

Page 35: ...s You can restore the Sound settings to the factory defaults 1 Press the MENU button to display the menu Press the or button to select Sound then press the ENTER button 2 Press the or button to select Sound Reset then press the ENTER button Press the EXIT button to exit 3 Press the or button to select Reset All Reset Sound Mode or Cancel then press the ENTER button Press the EXIT button to exit Re...

Page 36: ...he channel lists Using the Color buttons on the Remote with the Channel List Red Antenna Switches to Air or Cable Green Zoom Enlarges or shrinks a channel number Yellow Select Selects multiple channel lists TOOLS Option Displays the Add or Delete Add to Favorite or Delete from Favorite Timer Viewing Channel Name Edit and Auto Program menus A gray colored channel indicates the channel has been dele...

Page 37: ...e manner A channel must be deleted before it can be added back to the Added Channels list To Add Restore a channel back to the Added Channel List follow steps 1 3 above press the or button to select a channel to add then press the TOOLS button Press the ENTER button to select Add Press the CH LIST button on the remote control to bring up the channel lists O Channel Auto Program Clear Scrambled Cha...

Page 38: ... is deleted from Favorites and the mark also disappears Press the EXIT button to exit You can also Add or Delete a channel from Favorites in the Added Channels menu in the same manner All favorite channels will be shown on Favorite menu Press the CH LIST button on the remote control to bring up the channel lists To select the favorite channels you have set up press the FAV CH button on the remote ...

Page 39: ...dures For information on how to confirm a viewing reservation refer to page 38 Only memorized channels can be reserved You can set the channel month day year hour and minute directly by pressing the number buttons on the remote control Press the CH LIST button on the remote control to bring up the channel lists Digital Program Guide and Viewing Reservation When a digital channel is selected and yo...

Page 40: ...press the ENTER button 6 Press the or button to select OK then press the ENTER button The viewing reservation has been canceled Press the EXIT button to exit Programmed Option Change Info Select to change a viewing reservation Cancel schedules Select to cancel a viewing reservation Information Select to view a viewing reservation Press the CH LIST button on the remote control to bring up the chann...

Page 41: ...lled Storing Channels in Memory Auto Program 1 Press the MENU button Press the or button to select Channel then press the ENTER button Press the or button to select Channel List then press the ENTER button 2 Press the or button to select the channel to be assigned a new name then press the TOOLS button 3 Press the or button to select Auto Program then press the ENTER button For further details on ...

Page 42: ...nnel for optimal reception 1 Press the MENU button to display the menu Press the or button to select Channel then press the ENTER button 2 Press the or button to select Fine Tune then press the ENTER button 3 Press the or button to adjust the fine tuning To store the fine tuning setting in the TV s memory press the ENTER button If you do not store the fine tuned channel in memory adjustments are n...

Page 43: ...tion of available digital channels 1 Press the MENU button to display the menu Press the or button to select Channel then press the ENTER button 2 Press the or button to select Signal Strength then press the ENTER button If the signal strength meter indicates that the signal is weak physically adjust your antenna to increase the signal strength Continue to adjust the antenna until you find the bes...

Page 44: ...mode the screen is adjusted automatically If the signal from the system doesn t equal the standard signal mode adjust the mode by referring to your videocard user guide otherwise there may be no video For the display modes listed below the screen image has been optimized during manufacturing D Sub Input Mode Resolution Horizontal Frequency kHz Vertical Frequency Hz Pixel Clock Frequency MHz Sync P...

Page 45: ...ments on your PC and fine tune again After the noise has been reduced re adjust the picture so that it is aligned on the center of the screen Preset Press the SOURCE button to select PC mode 1 Press the MENU button to display the menu Press the or button to select Picture then press the ENTER button 2 Press the or button to select Screen then press the ENTER button 3 Press the or button to select ...

Page 46: ...ion Coarse and Fine You can replace all image settings with the factory default values Preset Press the SOURCE button to select PC mode 1 Press the MENU button to display the menu Press the or button to select Picture then press the ENTER button 2 Press the or button to select Screen then press the ENTER button 3 Press the or button to select Image Reset then press the ENTER button Press the EXIT ...

Page 47: ... the or button to move to Month Day Year Hour Minute or am pm Set the date and time you want by pressing the or button then press the ENTER button Press the EXIT button to exit The current time will appear every time you press the INFO button You can set the month day year hour and minute directly by pressing the number buttons on the remote control Time Setting Setup Plug Play Language English Ti...

Page 48: ...e or button to select DST Daylight Saving Time then press the ENTER button Press the or button to select Off or On then press the ENTER button Press the EXIT button to exit Depending on the broadcast station and signal the auto time may not be set correctly If this occurs set the time manually The Antenna or cable must be connected in order to set the time automatically Setup Plug Play Language En...

Page 49: ...ress the or button to select Off then press the ENTER button 4 Press the EXIT button to exit Easy Setting 1 Press the TOOLS button on the remote control 2 Press the or button to select Sleep Timer 3 Press the or button to select the minute 4 Press the EXIT or TOOLS button to exit Setup Plug Play Language English Time V Chip Caption External Settings Entertainment Off Energy Saving Off PIP SW Upgra...

Page 50: ...t Once Everyday Mon Fri Mon Sat Sat Sun or Manual When Manual is selected press the button to select the desired day of the week Press the ENTER button over the desired day and the mark will appear Press the EXIT button to exit You can set the hour minute and channel by pressing the number buttons on the remote control Auto Power Off When you set the timer On the television will eventually turn of...

Page 51: ...C mode U S A Only This product is covered by the following U S patents US4 930 158 US4 930 160 Setting Up Your Personal ID Number PIN 1 Press the MENU button to display the menu Press the or button to select Setup then press the ENTER button 2 Press the or button to select V Chip then press the ENTER button The message Enter PIN will appear Enter your 4 digit PIN number The default PIN number of a...

Page 52: ...e message Enter PIN will appear Enter your 4 digit PIN number 3 The V Chip screen will appear To enable the V Chip feature press the ENTER button so that the V Chip Lock field is On Pressing the or button will alternate between On and Off Press the ENTER button Press the EXIT button to exit Change PIN Enter new PIN Return 0 9 Enter PIN Confirm new PIN V Chip V Chip Lock Off TV Parental Guidelines ...

Page 53: ...ategories in the young adult group will be blocked TV G TV PG TV 14 and TV MA The sub ratings D L S V work together similarly See next section 6 How to set the FV D L S and V sub ratings First select one of these TV Ratings TV Y TV Y7 TV G TV PG TV 14 or TV MA See Step 4 and press the button The symbol will be displayed for each sub rating While is selected press the ENTER button to go to a sub ra...

Page 54: ...strictions PG Parental guidance suggested PG 13 Parents strongly cautioned R Restricted Children under 17 should be accompanied by an adult NC 17 No children under age 17 X Adults only NR Not rated Allow all Press to unlock all TV ratings Block all Press to lock all TV ratings While a particular category is selected press the ENTER button to activate it The symbol will be displayed Press the ENTER...

Page 55: ... under age 8 C8 Programming generally considered acceptable for children 8 years and over to watch on their own G General programming suitable for all audiences PG Parental Guidance 14 Programming contains themes or content which may not be suitable for viewers under the age of 14 18 Adult programming The V Chip will automatically block any category that is More restrictive For example if you bloc...

Page 56: ...rally considered acceptable for children 8 years and over to watch on their own 13 ans Programming may not be suitable for children under the age of 13 16 ans Programming is not suitable for children under the age of 16 18 ans Programming restricted to adults The V Chip will automatically block any category that is More restrictive For example if you block 8 ans category then 13 ans 16 ans and 18 ...

Page 57: ...tically block certain categories that are more restrictive The rating titles For example Humor Level etc and TV ratings For example DH MH H etc may differ depending on the broadcasting station How to Reset the TV after the V Chip Blocks a Channel Emergency Escape If the TV is tuned to a restricted channel the V Chip will block it The screen will go blank and the following message will appear 1 Pre...

Page 58: ...specific frame CC2 The Special Non Synchronous Use Captions This channel carries data that is intended to augment information carried in the program CC3 Secondary Synchronous Caption Service Alternate program related caption data typically second language captions CC4 Special Non Synchronous Use Captions Similar to CC2 Text1 First Text Service This may be various non program related data Text2 Sec...

Page 59: ...e This option consists of Default Small Standard and Large The default is Standard Font Style This option consists of Default Style0 Style 7 You can change the font you want The default is Style 0 Foreground Color This option consists of Default White Black Red Green Blue Yellow Magenta and Cyan You can change the color of the letter The default is White Background Color This option consists of De...

Page 60: ...hen press the ENTER button 3 Press the or button to select Off Sports Cinema or Game then press the ENTER button Off Switches the Entertainment function off Sports Provides the optimal picture and sound quality for sports Cinema Provides the optimal picture and sound quality for movie watching You can experience a richer picture and enhanced sound Game Provides the optimal picture and sound qualit...

Page 61: ...g then press the ENTER button Select the required option Off Low Medium High Auto by pressing the or button Press the ENTER button Off Turns off the energy saving function Low Sets the TV to low energy saving mode Medium Sets the TV to medium energy saving mode High Sets the TV to high energy saving mode Auto Automatically adjusts the brightness of the TV screen in accordance with the scenes Press...

Page 62: ...seconds is displayed 5 The message Upgrade version XXXX to version XXXX The system will be reset after upgrade is displayed Press the or to select the OK then press the ENTER button Please be careful to not disconnect the power or remove the USB drive while upgrades are being applied The TV will turn off and turn on automatically after completing the firmware upgrade Please check the firmware vers...

Page 63: ...onds Self Diagnostic Test appears on the screen 2 Press the or button to select Sound Test then press the ENTER button Does the problem still exist with this sound test appears on the screen 3 Press the or button to select Yes or No If the test pattern does not appear or there is noise in the test pattern select Yes If you can normally hear the sound from the speakers select No Yes There may be a ...

Page 64: ...ding Anynet device using an HDMI cable 2 Connect the HDMI IN jack of the home theater and the HDMI OUT jack of the corresponding Anynet device using an HDMI cable Connect the Optical cable between the Digital Audio Out Optical jack on your TV and the Digital Audio Input on the Home Theater When following the connection above the Optical jack only outputs 2 channel audio You will only hear sound fr...

Page 65: ...1 Press the TOOLS button Press the or button to select Device List then press the ENTER button Anynet devices connected to the TV are listed If you cannot find a device you want press the red button to scan for devices 2 Press the or button to select to a particular device and press the ENTER button It is switched to the selected device Only when you set Anynet HDMI CEC to On in the Application me...

Page 66: ...OL MUTE button The Anynet function only works when the active source on the TV remote control is set to TV The button works only while in the recordable state You cannot control Anynet devices using the buttons on the TV You can control Anynet devices only using the TV remote control The TV remote control may not work under certain conditions In this case reselect the Anynet device The Anynet func...

Page 67: ...ing or removing the HDMI 1 3 cable please make sure to search devices again or turn your TV off and on again Check if the Anynet Function of Anynet device is set on I want to start Anynet Check if the Anynet device is properly connected to the TV and check if the Anynet HDMI CEC is set to On in the Anynet Setup menu Press the TV button on the TV remote control to switch to TV Then press the TOOLS ...

Page 68: ...tery terminals Check signal cable message Ensure that the signal cable is firmly connected to the PC source Not Supported Mode message Check the maximum resolution and connected device s Video frequency Compare these values with the data in the Display Modes Digital broadcasting screen problem Please check the digital signal strength and input antenna The image is too light or too dark Adjust the ...

Page 69: ... Image is not centered on the screen Adjust the horizontal and vertical position The screen position must be adjusted on the output source i e STB with a digital signal The picture appears distorted in the corner of the screen If Just Scan is selected with some external devices the picture may appear distorted in the corner of the screen This symptom is caused by the external devices not TV The Re...

Page 70: ...o not apply excess downward pressure to the upper left of right sides of the TV 2 Fasten two screws at position 1 and then fasten two screws at position 2 Stand the product up and fasten the screws If you fasten the screws with the LCD TV placed down it may lean to one side Disconnecting the Stand 1 Remove four screws from the back of the TV 2 Separate the stand from the TV Two or more people shou...

Page 71: ...buttons 4 Press the ENTER button to save When Position1 is selected the message Current position saved as Position1 is displayed 5 Press the ENTER button The saved Position appears on the left side of the OSD Moving to the remembered position 1 Complete Step 1 of Entering the menu 2 Pressing a Color Red Green Yellow button moves the auto wall mount to the saved position You can move the wall mount...

Page 72: ...imension as they may cause damage to the inside of the TV set For wall mounts that do not comply with the VESA standard screw specifications the length of the screws may differ depending on their specifications Do not use screws that do not comply with the VESA standard screw specifications Do not fasten the screws too strongly this may damage the product or cause the product to fall leading to pe...

Page 73: ...er to the manual provided with the Kensington Lock for proper use The locking device has to be purchased separately Optional Figure 2 Figure 1 Cable The location of the Kensington Lock may be different depending on its model 1 Insert the locking device into the Kensington slot on the LCD TV Figure 1 and turn it in the locking direction Figure 2 2 Connect the Kensington Lock cable 3 Fix the Kensing...

Page 74: ...hese additionally 2 Remove the screws from the center back of the TV put the screws into the clamps and then fasten the screws onto the TV again Screws may not be supplied with the product In this case please purchase the screws of the following specifications Screw Specifications For a 17 29 Inch LCD TV M4 X 15 For a 32 40 Inch LCD TV M6 X 15 3 Connect the clamps fixed onto the TV and the clamps ...

Page 75: ... 104 2 x 706 mm 43 5 X 12 8 X 30 2 inches 1106 x 326 x 768 mm mm Weight With Stand Without Stand 46 52 lbs 21 1kg 39 24 lbs 17 8 kg 65 26 lbs 29 6kg 53 35 lbs 24 2kg Environmental Considerations Operating Temperature Operating Humidity Storage Temperature Storage Humidity 50 F to 104 F 10 C to 40 C 10 to 80 non condensing 4 F to 113 F 20 C to 45 C 5 to 95 non condensing Stand Swivel Left Right 20 ...

Page 76: ...RONT VIEW SIDE VIEW 7 9 200 mm 7 9 200 mm REAR VIEW NOTE All drawings are not necessarily to scale Some dimensions are subject to change without prior notice Refer to the dimensions prior to performing installation of your TV Not responsible for typographical or printed errors 2008 Samsung Electronics America Inc ...

Page 77: ... 3 FRONT VIEW SIDE VIEW 23 6 600 mm 15 7 400 mm REAR VIEW NOTE All drawings are not necessarily to scale Some dimensions are subject to change without prior notice Refer to the dimensions prior to performing installation of your TV Not responsible for typographical or printed errors 2008 Samsung Electronics America Inc ...

Page 78: ...ns for copying distribution and modification follow TERMS AND CONDITIONS FOR COPYING DISTRIBUTION AND MODIFICATION 0 This License applies to any program or other work which contains a notice placed by the copyright holder saying it may be distributed under the terms of this General Public License The Program below refers to any such program or work and a work based on the Program means either the ...

Page 79: ...erwise to copy modify sublicense or distribute the Program is void and will automatically terminate your rights under this License However parties who have received copies or rights from you under this License will not have their licenses terminated so long as such parties remain in full compliance 5 You are not required to accept this License since you have not signed it However nothing else gran...

Page 80: ...New Programs If you develop a new program and you want it to be of the greatest possible use to the public the best way to achieve this is to make it free software which everyone can redistribute and change under these terms To do so attach the following notices to the program It is safest to attach them to the start of each source file to most effectively convey the exclusion of warranty and each...

Page 81: ...ems that might be introduced by others Finally software patents pose a constant threat to the existence of any free program We wish to make sure that a company cannot effectively restrict the users of a free program by obtaining a restrictive license from a patent holder Therefore we insist that any patent license obtained for a version of the library must be consistent with the full freedom of us...

Page 82: ...y other than as an argument passed when the facility is invoked then you must make a good faith effort to ensure that in the event an application does not supply such function or table the facility still operates and performs whatever part of its purpose remains meaningful For example a function in a library to compute square roots has a purpose that is entirely well defined independent of the app...

Page 83: ...g with the Library A suitable mechanism is one that 1 uses at run time a copy of the library already present on the user s computer system rather than copying library functions into the executable and 2 will operate properly with a modified version of the library if the user installs one as long as the modified version is interface compatible with the version that the work was made with c Accompan...

Page 84: ...ibution limitation excluding those countries so that distribution is permitted only in or among countries not thus excluded In such case this License incorporates the limitation as if written in the body of this License 13 The Free Software Foundation may publish revised and or new versions of the Lesser General Public License from time to time Such new versions will be similar in spirit to the pr...

Page 85: ...e GNU Lesser General Public License as published by the Free Software Foundation either version 2 1 of the License or at your option any later version This library is distributed in the hope that it will be useful but WITHOUT ANY WARRANTY without even the implied warranty of MERCHANTABILITY or FITNESS FOR A PARTICULAR PURPOSE See the GNU Lesser General Public License for more details You should ha...

Reviews: