English -
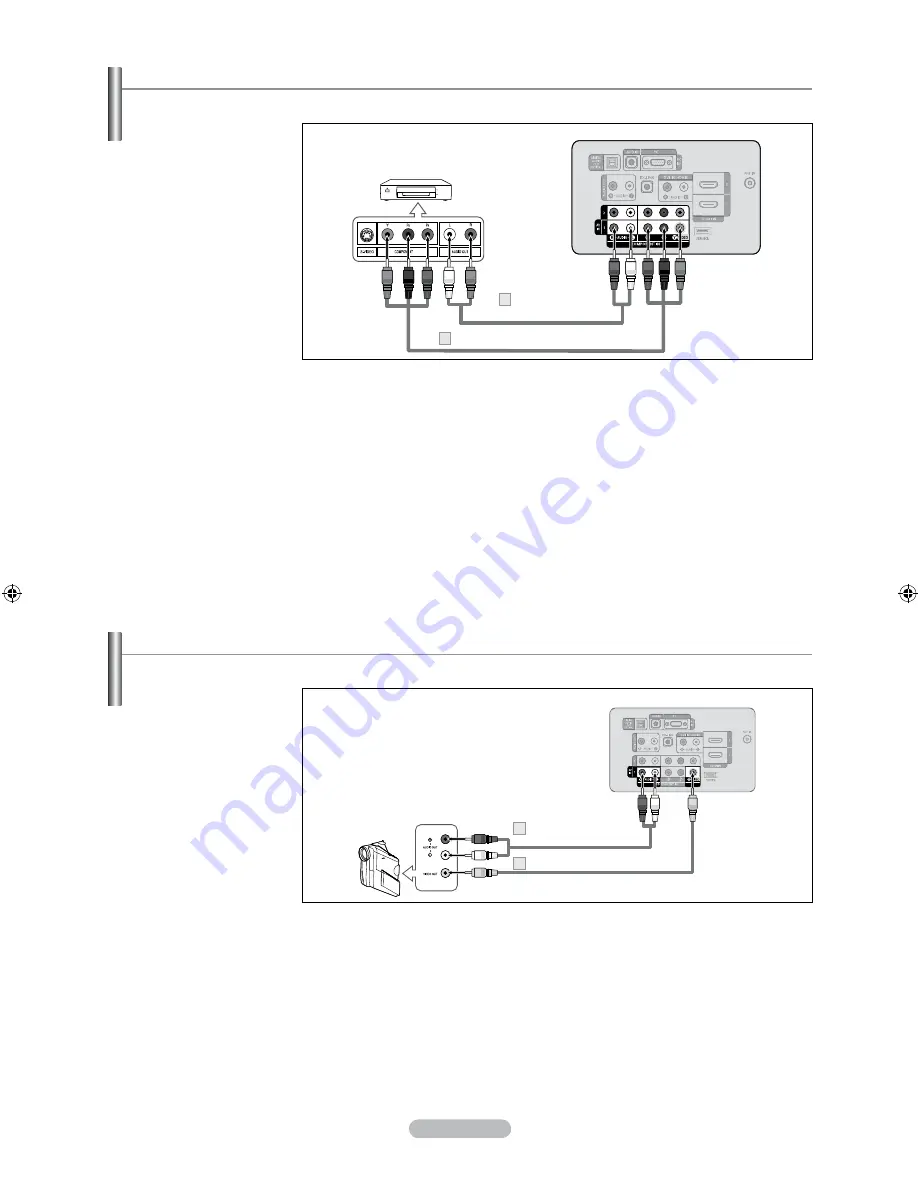
Connecting a Camcorder
They allow you to view the camcorder tapes without using a VCR.
1.
Connect a Video Cable
between the AV IN
[Y/VIDEO] jack on the
TV and the VIDEO OUT
jack on the camcorder.
2.
Connect Audio Cables
between the AV IN
[R-AUDIO-L] jacks on
the TV and the AUDIO
OUT jacks on the
camcorder.
Each Camcorder has a different back panel configuration.
When connecting a Camcorder, match the color of the connection terminal to the cable.
➣
➣
Connecting a DVD Player or Cable Box/Satellite receiver (Set-Top Box) via Component cables
The rear panel jacks on your TV make it easy to connect a DVD Player or Cable Box/Satellite receiver (Set-Top Box) to your TV.
1.
Connect a Component
Cable between the
COMPONENT IN
(1 or 2) [Y, P
B
, P
R
]
jacks on the TV and the
COMPONENT
[Y, P
B
, P
R
] jacks on the
DVD Player or Cable
Box/Satellite receiver
(Set-Top Box).
2.
Connect Audio
Cables between the
COMPONENT IN(1 or
2) [R-AUDIO-L] jacks on
the TV and the AUDIO
OUT jacks on the
DVD Player or Cable
Box/Satellite receiver
(Set-Top Box).
Component video separates the video into Y (Luminance (brightness)), Pb (Blue) and
Pr (Red) for enhanced video quality.
Be sure to match the component video and audio connections.
For example, if connecting a Component video cable to COMPONENT IN 1, connect
the audio cable to COMPONENT IN 1 also.
Each DVD Player or Cable Box/Satellite receiver (Set-Top Box) has a different back
panel configuration.
When connecting a DVD Player or Cable Box/Satellite receiver (Set-Top Box), match
the color of the connection terminal to the cable.
➣
➣
➣
TV Rear Panel
DVD Player or Cable Box /
Satellite receiver (Set-Top Box)
Audio Cable
(Not supplied)
2
Component Cable (Not supplied)
1
TV Rear Panel
Camcorder
Audio Cable
(Not supplied)
2
Video Cable (Not supplied)
1
BN68-01796A-00Eng.indd 9
2008-07-29 �� 4:43:07


