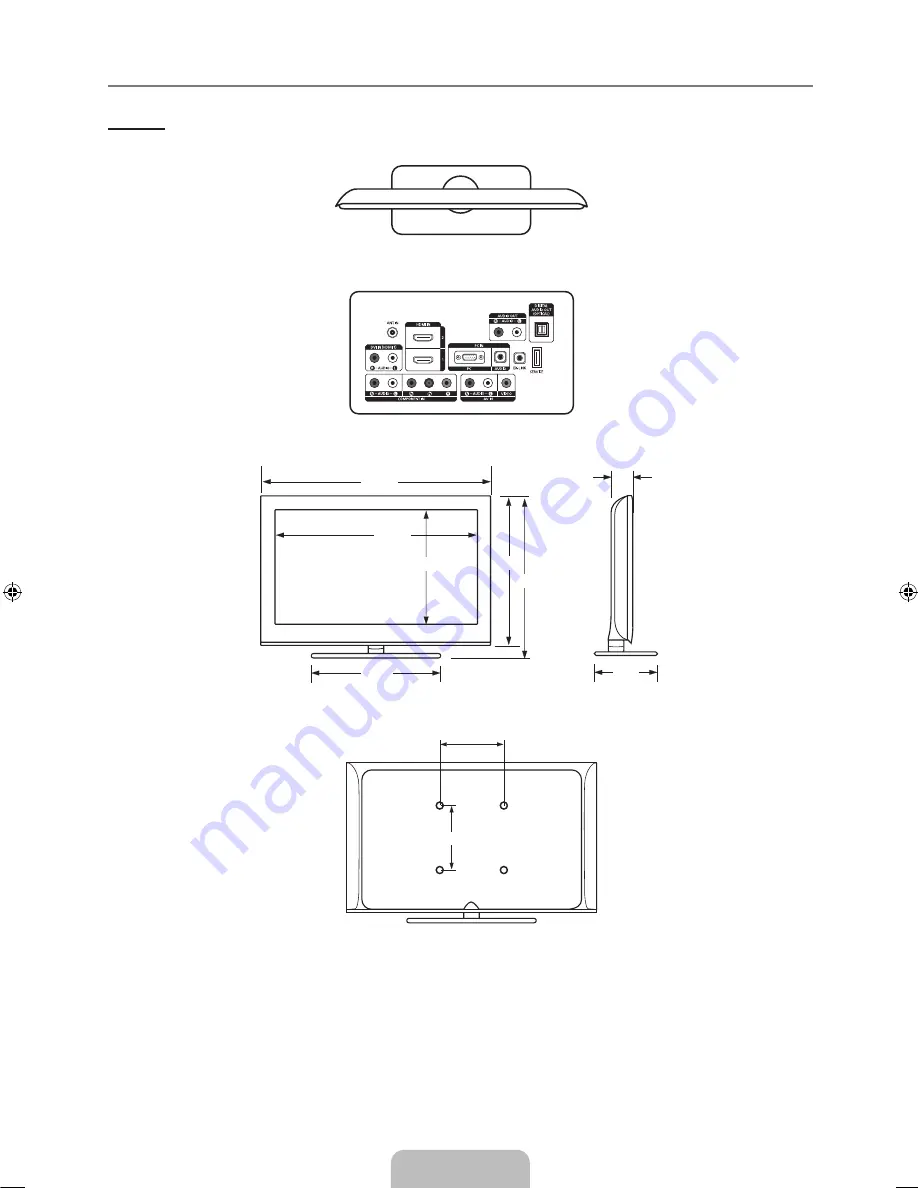
background image

English - 4

Dimensions

LN2B40

TOP VIEW

JACK PANEL DETAIL .2"H X 6.6"W

FRONT VIEW / SIDE VIEW 

REAR VIEW

NOTE: All drawings are not necessarily to scale. Some 

dimensions are subject to change without prior notice. Refer to 

the dimensions prior to performing installation of your TV. Not 

responsible for typographical or printed errors. 

© 2009 Samsung Electronics America, Inc

¦

20.7

22.1

17.6

27.6

15.5

8.7

3.0

31.5

7.9 (200 mm)

7.9 (200 mm)

BN68-01883H-00L02.indb   34

2009-02-24   �� 1:39:24

Summary of Contents for LN32B540P8D

Page 1: ...alguna pregunta o comentario en relación con los productos de Samsung comuníquese con el centro de atención al cliente de SAMSUNG Country Customer Care Center Web Site Address CANADA 1 800 SAMSUNG 726 7864 www samsung com ca Samsung Electronics Canada Inc Customer Service 55 Standish Court Mississauga Ontario L5R 4B2 Canada Samsung Electronique Canada Inc Service à la Clientèle 55 Standish Court M...

Page 2: ...ghts of certain third parties This license is limited to private non commercial use by end user consumers for licensed contents No rights are granted for commercial use The license does not cover any product unit other than this product unit and the license does not extend to any unlicensed product unit or process conforming to ISO IEC 11172 3 or ISO IEC 13818 3 used or sold in combination with th...

Page 3: ...eiver Set Top Box via DVI 9 Connecting a DVD Blu ray player Cable Box Satellite receiver Set Top Box via Component cables 9 Connecting a VCR 10 Connecting a Digital Audio System 10 Connecting an Amplifier DVD Home Theater 11 Connecting a Camcorder 12 Connecting a PC 13 Operation Viewing the menus 14 Plug Play Feature 15 Channel Control Configuring the Channel Menu 16 Managing Channels 16 Picture C...

Page 4: ...ner non subscription HD broadcasts can be viewed with no Cable Box Satellite receiver Set Top Box needed HDMI DVI connection of your PC to this TV Excellent Picture Quality SRS TruSurround HD provides a virtual surround system Accessories Remote Control BN59 00857A Batteries AAA x 2 Power Cord 3903 000144 TV Holder Screw M4 X L16 BN96 10788A Cover Bottom BN63 05284A Screw M4 X L16 6002 001294 Scre...

Page 5: ... menu of your TV s features 3 y Press to increase or decrease the volume In the on screen menu use the y buttons as you would use the and buttons on the remote control 4 Z Press to change channels In the on screen menu use the Z buttons as you would use the and buttons on the remote control 5 P POWER Press to turn the TV on and off 6 REMOTE CONTROL SENSOR Aim the remote control towards this spot o...

Page 6: ... HDMI for video connection and the DVI AUDIO IN R AUDIO L jacks for audio When using an HDMI DVI cable connection you must use the HDMI IN 1 DVI jack You can also use the ports to connect to a PC 2 PC IN PC AUDIO Connects to the video and audio output jacks on your PC 3 H HEADPHONE Connects a set of external headphones for private listening 4 DIGITAL AUDIO OUT OPTICAL Connects to a Digital Audio c...

Page 7: ...NT IN 1 jack is also used as the AV IN 1 jack Connect the video cable to the COMPONENT IN 1 Y VIDEO jack and the audio cable to the COMPONENT IN 1 R AUDIO L jacks KENSINGTON LOCK The Kensington Lock optional is a device used to physically fix the system when used in a public place If you want to use a locking device contact the dealer where you purchased the TV The location of the Kensington Lock ...

Page 8: ...OURCE Press to display and select the available video sources FAV CH Press to switch to your favorite channels MENU Displays the main on screen menu RETURN Returns to the previous menu UP DOWN LEFT RIGHT ENTERE Use to select on screen menu items and change menu values EXIT Press to exit the menu CC Controls the caption decoder a MTS Press to choose stereo mono or Separate Audio Program SAP broadca...

Page 9: ...arate VHF and UHF Antennas If you have two separate antennas for your TV one VHF and one UHF you must combine the two antenna signals before connecting the antennas to the TV This procedure requires an optional combiner adaptor available at most electronics shops 1 Connect both antenna leads to the combiner 2 Plug the combiner into the ANT IN terminal on the bottom of the rear panel Connecting Cab...

Page 10: ...Box via HDMI This connection can only be made if there is an HDMI Output connector on the external device 1 Connect an HDMI Cable between the HDMI IN 1 DVI 2 or 3 jack on the TV and the HDMI jack on the DVD Player or Cable Box Satellite receiver Set Top Box What is HDMI HDMI High Definition Multimedia Interface is an interface that enables the transmission of digital audio and video signals using ...

Page 11: ...tellite receiver Set Top Box to your TV 1 Connect a Component Cable between the COMPONENT IN 1 or 2 Y PB PR jacks on the TV and the COMPONENT Y PB PR jacks on the DVD Blu ray player Cable Box Satellite receiver Set Top Box 2 Connect Audio Cables between the COMPONENT IN 1 or 2 R AUDIO L jacks on the TV and the AUDIO OUT jacks on the DVD Blu ray player Cable Box Satellite receiver Set Top Box Compo...

Page 12: ... Digital Audio Input jacks on the Digital Audio System When a Digital Audio System is connected to the DIGITAL AUDIO OUT OPTICAL jack Decrease the volume of the TV and adjust the volume level with the system s volume control 5 1CH audio is possible when the TV is connected to an external device supporting 5 1CH Each Digital Audio System has a different back panel configuration When the Home Theate...

Page 13: ...plifier is connected to the AUDIO OUT R AUDIO L jacks Decrease the volume of the TV and adjust the volume level with the Amplifier s volume control Each Amplifier DVD Home Theater has a different back panel configuration When connecting an Amplifier DVD Home Theater match the color of the connection terminal to the cable N N N TV Rear Panel 1 Audio Cable Not supplied Amplifier DVD Home Theater ...

Page 14: ...he AV IN 2 R AUDIO L jacks on the TV and the AUDIO OUT jacks on the camcorder Each Camcorder has a different back panel configuration When connecting a Camcorder match the color of the connection terminal to the cable Using an HDMI Cable 1 Connect a HDMI Cable between the HDMI IN 3 jack on the TV and the HDMI OUT jack on the camcorder N N TV Side Panel 1 Video Cable Not supplied 2 Audio Cable Not ...

Page 15: ...k on your computer 2 Connect a 3 5 mm Stereo miniplug 2RCA Cable between the DVI AUDIO IN R AUDIO L jack on the TV and the Audio Out jack of the sound card on your computer When using an HDMI DVI cable connection you must use the HDMI IN 1 DVI terminal Using an HDMI Cable 1 Connect an HDMI cable between the HDMI IN 1 DVI 2 or 3 jack on the TV and the PC output jack on your computer Each PC has a d...

Page 16: ...ct the currently selected item Confirm the setting RETURN R Return to the previous menu EXIT e Exit the on screen menu Example Setting the TV s Brightness in the Picture Menu Adjusting the Brightness to 80 1 Press the MENU button to display the menu 2 Press the ENTERE button to select Picture 3 Press the or button to select Brightness 4 Press the ENTERE button 5 Press the or button until the Brigh...

Page 17: ...Digital Contact your local cable company to identify the type of cable system that exists in your particular area 5 Press the ENTERE button to select Start The TV will begin memorizing all of the available channels To stop the search before it has finished press the ENTERE button with Stop selected After all the available channels are stored it starts to remove scrambled channels The Auto program ...

Page 18: ...annels after Auto Program is completed This process may take up to 20 30 minutes To stop searching scrambled channels Press the ENTERE button to select Stop Press the button to select Yes then press the ENTERE button This function is only available in Cable mode Channel List For detailed procedures on using the Channel List refer to the Managing Channels instructions You can select these options b...

Page 19: ... Favorite You can set channels you watch frequently as Favorite Press the TOOLS button to display the Tools menu You can also set the add to or delete from Favorites by selecting Tools Add to Favorite or Delete from Favorite The symbol will be displayed and the channel will be set as a favorite All favorite channels will be shown in the Favorite menu Timer Viewing If you reserve a program you want...

Page 20: ...f the picture Color Adjusts color saturation of the picture Tint G R Adjusts the color tint of the picture When you make changes to Backlight Contrast Brightness Sharpness Color or Tint G R the OSD will be adjusted accordingly In PC mode you can only make changes to Backlight Contrast and Brightness Settings can be adjusted and stored for each external device you have connected to an input of the ...

Page 21: ...nges to the Color Tone and Size from among the items in Picture Options Color Tone Cool Normal Warm1 Warm2 Warm1 or Warm2 is only activated when the picture mode is Movie Settings can be adjusted and stored for each external device you have connected to an input of the TV Size Occasionally you may want to change the size of the image on your screen Your TV comes with six screen size options each d...

Page 22: ... an external device is connected to the TV via HDMI The HDMI Black Level function may not be compatible with all external devices Film Mode Off Auto The TV can be set to automatically sense and process film signals from all sources and adjust the picture for optimum quality Film Mode is supported in TV Video Component 480i 1080i and HDMI 480i 1080i Picture Reset Reset Picture Mode Cancel Resets al...

Page 23: ... SOURCE button to select PC mode Auto Adjustment Use the Auto Adjust function to have the TV set automatically adjust the video signals it receives The function also automatically fine tunes the settings and adjusts the frequency values and positions Press the TOOLS button to display the Tools menu You can also set the Auto Adjustment by selecting Tools Auto Adjustment This function does not work ...

Page 24: ...ten in a language other than the Preferred Language by pressing the MTS button on the remote control Preferred Language is available only in Digital TV mode You can only select the language from among the actual languages being broadcast Multi Track Sound MTS analog channels only Press the MTS button on the remote control repeatedly to select Mono Stereo or SAP Mono Choose for channels that are br...

Page 25: ...press the INFO button If you disconnect the power cord you have to set the clock again Clock Mode You can set up the current time manually or automatically Auto Set the current time automatically using the time from a digital broadcast Manual Set the current time to a manually specified time Depending on the broadcast station and signal the auto time may not be set correctly If this occurs set the...

Page 26: ...TV ratings V Chip Lock Off On You can block rated TV Programs TV Parental Guidelines You can block TV programs depending on their rating This function allows you to control what your children are watching TV Y Young children TV Y7 Children 7 and over TV G General audience TV PG Parental guidance TV 14 Viewers 14 and over TV MA Mature audience ALL Lock all TV ratings FV Fantasy violence V Violence ...

Page 27: ...ng changes depending on the downloaded information Even if you set the On screen display to your desired language the Downloadable U S Rating menu will appear in English only The rating will automatically block certain categories that are more restrictive The rating titles For example Humor Level etc and TV ratings For example DH MH H etc may differ depending on the broadcasting station Change PIN...

Page 28: ...t The Digital Caption Options are only enabled when the Caption Mode is Service 1 Service 6 If Caption Mode is the default the Digital Caption Options are enabled depending on the broadcast The availability of captions depends on the program being broadcast Default means to follow the standard set by the broadcaster Foreground and Background cannot be set to have the same color Foreground Opacity ...

Page 29: ...persists refer to the external device s user manual Sound Test If you think you have a sound problem please perform the sound test You can check the sound by playing a built in melody sound through the TV Does the problem still exist with this sound test appears on the screen If you hear no sound from the TV s speakers before performing the sound test make sure Speaker Select is set to TV speaker ...

Page 30: ...turn off and turn on automatically after completing the firmware upgrade Please check the firmware version after the upgrades are complete When software is upgraded video and audio settings you have made will return to their default factory settings We recommend you write down your settings so that you can easily reset them after the upgrade HD Connection Guide This menu presents the connection me...

Page 31: ...antenna The image is too light or too dark Adjust the Brightness and Contrast Adjust the Fine tuning Black bars on the screen Make sure the broadcast you re receiving is High Definition HD HD channels sometimes broadcast Standard Definition SD programming which can cause black bars Set your cable satellite box to stretch or widescreen mode to eliminate the bars Picture has a Red Green or Pink tint...

Page 32: ...ark pixels on the screen These pixels will have no impact on the performance of the product Installing the Stand 1 Attach your LCD TV to the stand Two or more people should carry the TV Make sure to distinguish between the front and back of the stand when attaching it To make sure the TV is installed on the stand at a proper level do not apply excess downward pressure to the upper left of right si...

Page 33: ...ow the product installation instructions Our 57 and 63 models do not comply with VESA Specifications Therefore you should use our dedicated wall mount kit for this model Do not exceed 15 degrees tilt when mounting this TV Product Family inches VESA Spec A B Standard Screw Quantity LCD TV 19 22 100 x 100 M4 4 23 29 200 x 100 30 40 200 x 200 M6 46 55 400 x 400 M8 57 70 800 x 400 80 1400 x 800 PDP TV...

Page 34: ...2 Firmly fasten the screws to the wall or cabinet where the TV is to be installed Tie the TV Holder attached to the TV and the screws fastened on the wall or cabinet so that the TV is fixed Purchase the screws to be used on the wall or cabinet separately Install the TV close to the wall so that it does not fall When attaching the TV to the wall tie the cord level with the ground or slanted downwar...

Page 35: ...mm Weight Without Stand With Stand 21 6 Ibs 9 8 kg 26 0 Ibs 11 8 kg Environmental Considerations Operating Temperature Operating Humidity Storage Temperature Storage Humidity 50 F to 104 F 10 C to 40 C 10 to 80 non condensing 4 F to 113 F 20 C to 45 C 5 to 95 non condensing Stand Swivel Left Right 20 20 Design and specifications are subject to change without prior notice This device is a Class B d...

Page 36: ...drawings are not necessarily to scale Some dimensions are subject to change without prior notice Refer to the dimensions prior to performing installation of your TV Not responsible for typographical or printed errors 2009 Samsung Electronics America Inc 20 7 22 1 17 6 27 6 15 5 8 7 3 0 31 5 7 9 200 mm 7 9 200 mm ...

Page 37: ...This page is intentionally left blank ...

Page 38: ...erechos de propiedad intelectual de otras empresas Esta licencia está limitada al uso no comercial privado de consumidores que sean usuarios finales para contenido con licencia No se otorga ningún derecho para uso comercial La licencia no cubre ninguna unidad del producto que no sea ésta y la licencia no se extiende a ninguna unidad del producto o proceso sin licencia en conformidad con el ISO IEC...

Page 39: ... través de los cables de componentes 9 Conexión de un reproductor de vídeo 10 Conexión de un sistema de audio digital 10 Conexión de un amplificador DVD para Home Cinema 11 Conexión de una videocámara 12 Conexión a un PC 13 Funcionamiento Visualización de los menús 14 Función Plug Play 15 Control de los canales Configuración del menú de canales 16 Gestión de los canales 16 Control de la imagen Con...

Page 40: ...s emisiones HD que no exigen una suscripción sin que sea necesario disponer de un receptor de televisión por cable satélite decodificador Conexión HDMI DVI del PC con este televisor Calidad excelente de la imagen SRS TruSurround HD proporciona un sistema surround virtual Accesorios Mando a distancia BN59 00857A 2 pilas AAA Cable de alimentación 3903 000144 Soporte TV y tornillo M4 x L16 BN96 10788...

Page 41: ...n las características del TV 3 y Púlselos para subir o bajar el volumen En el menú de la pantalla utilice los botones y del mismo modo que los botones y del mando a distancia 4 Z Permiten cambiar de canal En el menú de la pantalla utilice los botones Z del mismo modo que los botones y del mando a distancia 5 P Encendido Pulse para encender o apagar el TV 6 INDICADOR DE ALIMENTACIÓN Parpadea y se a...

Page 42: ...xión del vídeo y los terminales DVI AUDIO IN R AUDIO L para el audio Cuando se usa una conexión de cable HDMI DVI se debe conectar en el terminal HDMI IN 1 DVI También puede utilizar los puertos para conectarse al PC 2 PC IN PC AUDIO Permite conectar a los terminales de salida de audio y de vídeo de su PC 3 H HEADPHONE Permite conectar unos auriculares externos para audiciones privadas 4 DIGITAL A...

Page 43: ...minal COMPONENT IN 1 también se usa como terminal AV IN 1 Conecte el cable de vídeo al terminal COMPONENT IN 1 Y VIDEO y el cable de audio a los terminales COMPONENT IN 1 R AUDIO L BLOQUEO KENSINGTON El bloqueo Kensington es un dispositivo que se usa para fijar físicamente el sistema cuando se usa en un lugar público Si desea usar un dispositivo de bloqueo póngase en contacto con el distribuidor d...

Page 44: ...ccionar las fuentes de vídeo disponibles FAV CH Permite cambiar a los canales favoritos MENU Muestra el menú de pantalla principal RETURN Vuelve al menú anterior ARRIBA ABAJO IZQUIERDA DERECHA ENTERE Se usan para seleccionar los elementos del menú en pantalla y cambiar los valores del menú EXIT Púlselo para salir del menú CC Controla el decodificador de subtítulos a MTS Pulse para elegir programas...

Page 45: ...tenas de VHF y UHF independientes Si dispone de dos antenas independientes para el TV una de VHF y otra de UHF debe combinar ambas señales de la antena antes de conectarlas al TV Este procedimiento precisa un adaptador combinador especial disponible en la mayoría de tiendas de electrónica 1 Conecte ambos cables de antena al combinador 2 Conecte el combinador en el terminal ANT IN de la parte infer...

Page 46: ...erno 1 Conecte un cable HDMI entre el terminal HDMI IN 1 DVI 2 o 3 del televisor y el terminal HDMI del reproductor DVD o receptor por cable satélite decodificador Qué es HDMI HDMI o interfaz multimedia de alta definición es una interfaz que permite la transmisión de señales digitales de audio y de vídeo mediante un solo cable La diferencia entre los dispositivos HDMI y DVI es que el HDMI es más p...

Page 47: ...cable satélite decodificador al TV 1 Conecte un cable de componentes entre los terminales COMPONENT IN 1 o 2 Y PB PR del televisor y los terminales COMPONENT Y PB PR del reproductor DVD Blu ray o receptor por cable satélite decodificador 2 Conecte los cables de audio entre los terminales COMPONENT IN 1 o 2 R AUDIO L del televisor y los terminales AUDIO OUT del reproductor DVD Blu ray receptor por ...

Page 48: ...or y los terminales de entrada de audio digital del sistema de audio digital Cuando un sistema de audio digital se conecta al terminal DIGITAL AUDIO OUT OPTICAL Reduzca el volumen del TV y ajuste el volumen con el control del sistema El audio de 5 1 canales es posible cuando el televisor está conectado a un dispositivo externo que admita 5 1 canales Cada sistema de audio digital tiene una configur...

Page 49: ... audio se conecta a los terminales AUDIO OUT R AUDIO L Reduzca la ganancia volumen del TV y ajuste el volumen con el control del amplificador Cada amplificador DVD para Home Cinema tiene una configuración distinta en el panel posterior Cuando conecte un amplificador DVD para Home Cinema debe hacer coincidir los colores del terminal de conexión y del cable N N N Panel posterior del TV 1 Cable de au...

Page 50: ...R AUDIO L del televisor y los terminales AUDIO OUT de la videocámara Cada videocámara tiene una configuración distinta en el panel posterior Cuando conecte una videocámara debe hacer coincidir los colores del terminal de conexión y del cable Uso de un cable HDMI 1 Conecte un cable HDMI entre el terminal HDMI IN 3 del televisor y el terminal HDMI OUT de la videocámara N N Panel lateral del TV 1 Cab...

Page 51: ...cte un cable estéreo miniclavija 2 RCA de 3 5 mm entre el terminal DVI AUDIO IN R AUDIO L del televisor y el terminal de salida de audio de la tarjeta de sonido del ordenador Cuando se usa una conexión de cable HDMI DVI se debe conectar en el terminal HDMI IN 1 DVI Uso de un cable HDMI 1 Conecte un cable HDMI entre el terminal HDMI IN 1 DVI 2 o 3 del televisor y el terminal de salida PC del ordena...

Page 52: ...ERE Mueva el cursor y seleccione una opción Seleccione la opción marcada Confirme la configuración RETURN R Volver al menú anterior EXIT e Salir del menú en pantalla Ejemplo Configuración del brillo del televisor en el menú de imagen Ajuste del Brillo a 80 1 Pulse el botón MENU para ver el menú 2 Pulse el botón ENTERE para seleccionar Imagen 3 Pulse el botón o para seleccionar Brillo 4 Pulse el bo...

Page 53: ...ógica y para digital Póngase en contacto con su proveedor de cable para saber el tipo de sistema de cable existente en su zona 5 Pulse el botón ENTERE para seleccionar Iniciar El televisor empezará a memorizar todos los canales disponibles Para detener la búsqueda antes de que termine pulse el botón ENTERE con la opción Detener seleccionada Una vez guardados todos los canales disponibles se inicia...

Page 54: ...er la búsqueda de canales codificados Pulse el botón ENTERE para seleccionar Detener Pulse el botón para seleccionar Sí y a continuación pulse el botón ENTERE Esta función sólo está disponible en el modo Cable Lista de canales Para conocer el procedimiento detallado sobre cómo usar la Lista de canales consulte las instrucciones de Gestión de los canales Puede seleccionar estas opciones simplemente...

Page 55: ...rrar de Favoritos Puede configurar como favoritos los canales que vea con más frecuencia Pulse el botón TOOLS para ver el menú Herramientas También puede añadir o borrar canales favoritos seleccionando Herramientas Agregar a Favoritos o Borrar de Favoritos Se mostrará el símbolo y el canal se configurará como favorito Todos los canales favoritos se mostrarán en el menú Favoritos Visualización con ...

Page 56: ...justa la definición de los bordes de la imagen Color Ajusta la saturación del color de la imagen Tinte V R Ajusta el matiz del color de la imagen Cuando haga cambios en Luz de fondo Contraste Brillo Definición Color o Tinte V R el color de la OSD también se ajustará En el modo PC sólo se pueden cambiar Luz de fondo Contraste y Brillo La configuración de cada dispositivo externo conectado a la entr...

Page 57: ...ibio1 Tibio2 Tibio1 o Tibio2 sólo están disponibles cuando el modo de imagen está configurado en Cine La configuración de cada dispositivo externo conectado a la entrada del televisor se puede ajustar y guardar Tamaño Es posible que alguna vez desee cambiar el tamaño de la imagen en la pantalla El televisor se suministra con seis opciones de tamaño de la pantalla cada una diseñada para que funcion...

Page 58: ...isor a través de HDMI La función N neg HDMI puede que no sea compatible con dispositivos externos Modo película Apagado Auto El televisor se puede configurar para detectar automáticamente y procesar las señales de las películas procedentes de todas las fuentes y ajustar la imagen para conseguir una calidad óptima Modo película es compatible con TV Video Component 480i 1080i y HDMI 480i 1080i Reini...

Page 59: ...ante la función de ajuste automático se puede establecer que el televisor se ajuste automáticamente de acuerdo con las señales de vídeo que reciba La función también ajusta automáticamente con más configuración y ajusta los valores y las posiciones de la frecuencia Pulse el botón TOOLS para ver el menú Herramientas También puede establecer el ajuste automático seleccionando Herramientas Ajuste Aut...

Page 60: ...s simultáneas del programa en otros idiomas Puede seleccionar un idioma que no sea el Idioma preferido pulsando el botón MTS del mando a distancia Idioma preferido está disponible sólo en el modo de televisión digital Sólo se puede seleccionar uno de los idiomas que ofrece la emisora Sonido Multi track MTS sólo canales analógicos Pulse varias veces el botón MTS del mando a distancia para seleccion...

Page 61: ...hora actual aparecerá siempre que se pulse el botón INFO Si desconecta el cable de alimentación debe configurar el reloj de nuevo Modo Reloj Se puede configurar la hora actual manual o automáticamente Auto Configure la hora automáticamente con la hora de la emisora digital Manual Configure la hora actual manualmente Según la emisora y la señal la hora automática no se puede ajustar correctamente E...

Page 62: ... desbloquear todos los programas de televisión Bloq todo Se pulsa para bloquear todos los programas de televisión Bloqueo V Chip Apagado Encendido Puede bloquear los programas de TV clasificados Guías pater TV Puede bloquear los programas de TV según su clasificación Esta función permite controlar lo que los niños pueden ver TV Y Niños pequeños TV Y7 Niños de más de 7 años TV G Todos los públicos ...

Page 63: ...rgada Aunque configure la visualización en pantalla en su propio idioma el menú Clasificación U S Descargable siempre lo verá en inglés La clasificación bloqueará automáticamente ciertas categorías que son más restrictivas Los títulos de clasificación por ejemplo nivel de humor etc y las clasificaciones de televisión por ejemplo DH MH H etc pueden diferir según la emisora Cambiar Código Aparecerá ...

Page 64: ...rvicio 6 Si el Modo de Subtítulo es el predeterminado las opciones Opciones Subtítulos Dig se habilitan según el emisora La disponibilidad de los subtítulos depende del programa que se esté emitiendo Programado significa que se sigue el estándar establecido por el emisor Las opciones de color de primer plano y color de fondo no se pueden ajustar con el mismo color Opacidad de primer plano y Opacid...

Page 65: ...lema consulte el manual del usuario del dispositivo externo Prueba de sonido Si cree que tiene un problema con el sonido efectúe la prueba de sonido Compruebe el sonido reproduciendo una melodía en el televisor En la pantalla se muestra Continúa el problema con esta prueba del sonido Si no oye sonido a través de los altavoces del televisor antes de realizar la prueba de sonido compruebe que Selecc...

Page 66: ...cenderá automáticamente después de completar la actualización del firmware Después de realizar la actualización compruebe la versión del firmware Cuando se actualiza el software la configuración del vídeo y audio que se haya efectuado vuelve a la configuración predeterminada de fábrica Es aconsejable anotar la configuración para recuperarla fácilmente después de la actualización Guía de conexión H...

Page 67: ...ión digital Compruebe la potencia de la señal digital y la antena de entrada La imagen es demasiado clara o demasiado oscura Ajuste el brillo y el contraste Ajuste la sintonización fina Barras negras en la pantalla Compruebe que la emisión que se está recibiendo es de alta definición HD Los canales HD en ocasiones emiten una programación en SD definición estándar que puede dar lugar a la aparición...

Page 68: ...logía altamente sofisticada para su fabricación No obstante puede que existan unos cuantos píxeles brillantes u oscuros en la pantalla Estos píxeles no influirán en el rendimiento del aparato Instalación del soporte 1 Monte el TV de pantalla LCD en el soporte El televisor lo deben transportar dos o más personas Cuando monte el soporte debe distinguir entre la parte frontal y la posterior del sopor...

Page 69: ...e las instrucciones de instalación del producto Nuestros modelos de 57 y 63 no son compatibles con las especificaciones VESA Por ello debe usar un equipo de montaje en la pared exclusivo para este modelo No supere los 15 grados de inclinación cuando monte este televisor Familia de producto pulgadas Especificaciones VESA A B Tornillo estándar Cantidad LCD TV 19 22 100 x 100 M4 4 23 29 200 x 100 30 ...

Page 70: ...os 2 Apriete firmemente los tornillos en la pared o el mueble donde se instala el televisor Asegure el soporte al televisor y a los tornillos de la pared o el mueble Debe adquirir por separado los tornillos que usará en la pared o el mueble Instale el televisor cerca de la pared para evitar que caiga hacia a atrás Cuando instale el televisor en la pared asegure el cable nivelado respecto al suelo ...

Page 71: ...soporte 21 6 Ibs 9 8 kg 26 0 Ibs 11 8 kg Consideraciones medioambientales Temperatura de funcionamiento Humedad de funcionamiento Temperatura de almacenamiento Humedad de almacenamiento Entre 10 C y 40 C 50 F y 104 F 10 al 80 sin condensación Entre 20 C y 45 C 4 F y 113 F 5 al 95 sin condensación Soporte giratorio izquierda derecha 20 20 El diseño y las especificaciones pueden cambiar sin previo a...

Page 72: ...dos los dibujos están necesariamente a escala Algunas dimensiones están sujetas a cambio sin previo aviso Consulte las dimensiones antes de efectuar la instalación del televisor La empresa no se responsabiliza de los errores tipográficos o de impresión 2009 Samsung Electronics America Inc 20 7 22 1 17 6 27 6 15 5 8 7 3 0 31 5 7 9 200 mm 7 9 200 mm ...

Page 73: ...Esta pagina se ha dejado en blanco expresamente ...

Reviews: