background image

English - 

When you start using your set for the first time, you must 

select the language which will be used for displaying menus 

and indications.
1.

  Press the 

MENU

 button to display the on-screen menu. 


Press the ▲ or ▼ button to select "Setup", then press the  


ENtER  

button.

.

  Press the ▲ or ▼ button to select "Language", then press  


the 

ENtER  

button.

.

  Select a particular language by pressing the ▲ or ▼ button  


repeatedly. 


Press the 

ENtER  

button.

.

  Press the 

EXIt

 button to exit.

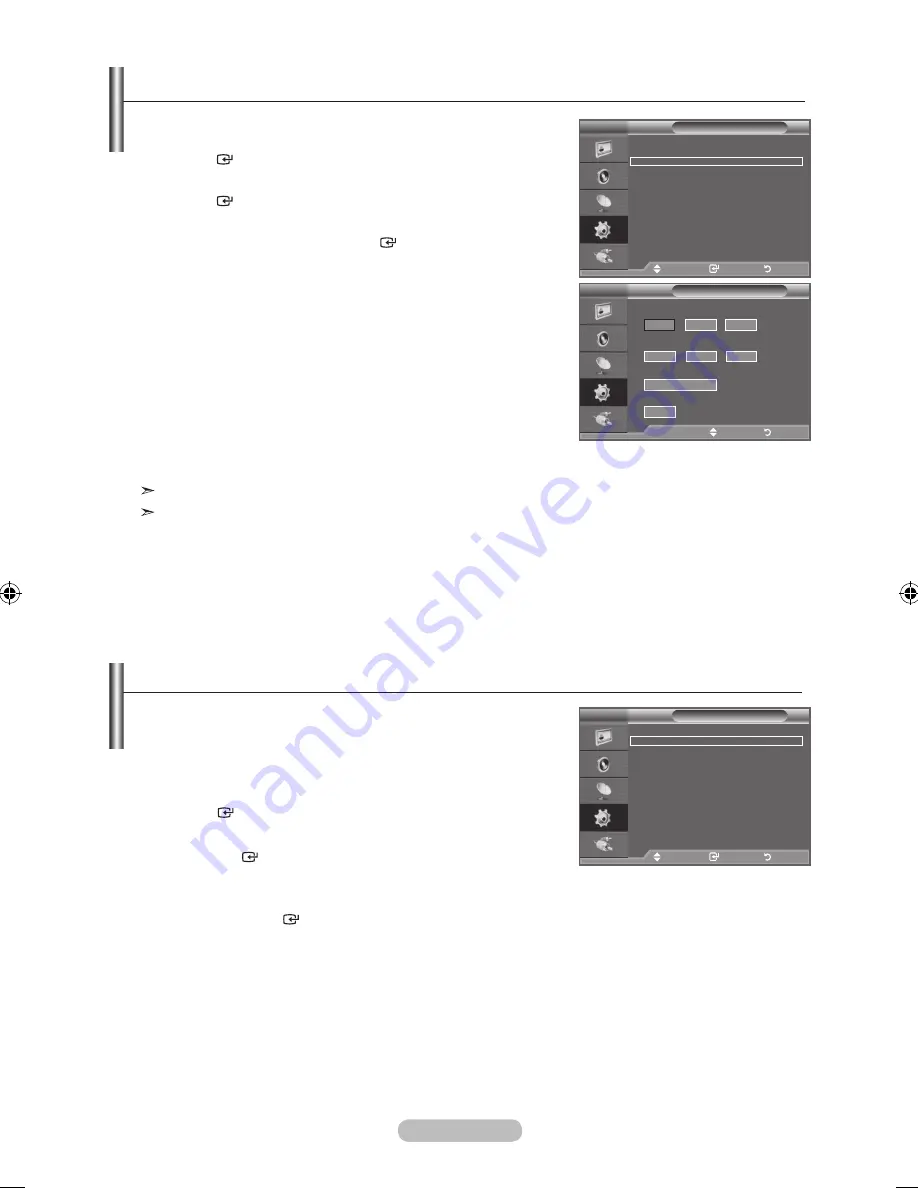
Choosing Your Language

tV

Setup

Plug & Play 


Language 

: English 

time 


Melody 

: Off 

Energy Saving 

: Off 

PIP 


Move    

Enter 

Return

1.

  Press the 

MENU

 button to display the menu.  


Press the ▲ or ▼ button to select "Setup", then press the  


ENtER  

button.

.

  Press the ▲ or ▼ button to select "Time", then press the  


ENtER  

button.

.

   Press the ▲ or ▼ button to select "Timer 1", "Timer 2",


"Timer 3", then press the 

ENtER  

button. 

Three different On/Off Timer Settings can be made.

You must set the clock first.

.

   Press the ◄ or ► button to select the required item below.

Press the ▲ or ▼ button to adjust to the setting satisfied.
♦  

On  time

:  Select hour, minute, and "On"/"Off". (To activate 

timer with the setting satisfied, set to "On".)

♦  

Off  time

:  Select hour, minute, and "On"/"Off". (To activate 

timer with the setting satisfied, set to "On".)

♦  

Repeat

:  Select "Once", "Everyday", "Mon~Fri", "Mon~Sat", 

or "Sat~Sun".

♦ 

Volume

: Select the desired turn on volume level. 

   You can set the hour and minute directly by pressing the number buttons on the remote control.
  

 Auto Power Off


When you set the timer On, the TV will eventually turn off, if no controls are operated for 3 hours 

after the TV was turned on by timer. This function is only available in timer On mode and prevents 

overheating, which may occur if a TV is on for too long time.

Switching the television On and Off Automatically

tV

Setup

Plug & Play 


Language 

: English 

time 


Melody 

: Off 

Energy Saving 

: Off 

PIP 


Move    

Enter 

Return

tV

timer 1

On time

Repeat

Once

Volume

10

00

00

Off

:

Off time

00

00

Off

:

  ► Move  


Adjust 

Return

6

5

BN68-01425H-Eng.indd   24

2008-05-13   ¿ÀÈÄ 4:42:28

Summary of Contents for LE22A451C1

Page 1: ...AMSUNG 726 7864 www samsung com pt SLOVAKIA 0800 SAMSUNG 726 7864 www samsung com sk SPAIN 902 10 11 30 www samsung com SWEDEN 0771 400 200 www samsung com se SWITZERLAND 0800 SAMSUNG 726 7864 www sam...

Page 2: ...riod of time may leave traces of borders displayed on the left right and center of the screen caused by the difference of light emission on the screen Playing a DVD or a game console may cause a simil...

Page 3: ...the Picture Settings to the Factory Defaults 17 Changing the Picture Options 18 Viewing the Picture In Picture PIP 20 Setting the Sound Sound Features 21 Selecting the Sound Mode 22 Connecting Headph...

Page 4: ...ld carry the TV Make sure to distinguish between the front and back of the stand when assembling them 2 Fasten two screws at position 1 and then fasten two screw at position 2 Stand the product up and...

Page 5: ...ou use the and buttons on the remote control 4 Press to change channels In the on screen menu use the buttons as you use the and buttons on the remote control Without the Remote Control you can turn o...

Page 6: ...on enabled AV devices Set Top Boxes DVD players No additional Audio connection is needed for an HDMI to HDMI connection What is HDMI High Definition Multimedia interface allows the transmission of hig...

Page 7: ...e 8 COMPONENT IN Connect component video cables optional to component connector PR PB Y on the rear of your set and the other ends to corresponding component video out connectors on the DVD If you wis...

Page 8: ...P Next channel P Previous channel Returns to the previous menu Control the cursor in the menu Exit the on screen menu Picture size selection Displays the main on screen menu Selects the HDMI mode dire...

Page 9: ...You also can press the POWER button or the TV button on the remote control to turn the TV on The channel that you were watching last is reselected automatically 3 Press the numeric button 0 9 or chann...

Page 10: ...al l ll see page 22 PIP see page 20 Auto Adjustment see page 29 TOOLS 1 With the power on press the MENU button The main menu appears on the screen The menu s left side has icons Picture Sound Channel...

Page 11: ...ted correctly 5 Select the appropriate country by pressing the or button Press the ENTER button to confirm your choice 6 The Auto Store menu is displayed with the Start selected Press the ENTER button...

Page 12: ...button to display the menu Press the or button to select Channel then press the ENTER button 2 Press the ENTER button to select Country 3 Select the appropriate country by pressing the or button Press...

Page 13: ...s the or button to select C Air channel or S Cable channel Press the button then press the or button to select the required number You can also select the channel number directly by pressing the numer...

Page 14: ...r button to select Child Lock then press the ENTER button 6 Select On by pressing the or button then press the ENTER button 7 Press the or button to select Channel List then press the ENTER button 8 M...

Page 15: ...ssign new names 1 Press the MENU button to display the menu Press the or button to select Channel then press the ENTER button 2 Press the or button to select Name then press the ENTER button 3 If nece...

Page 16: ...4 Press the or button to adjust the fine tuning Press the ENTER button 5 Press the EXIT button to exit Fine tuned channels that have been saved are marked with an asterisk on the right hand side of t...

Page 17: ...for each input source Changing the Picture Standard Picture Mode Standard Backlight 7 Contrast 95 Brightness 45 Sharpness 50 Colour 50 Tint G 50 R 50 Picture Options Reset OK TV Move Enter Return Pict...

Page 18: ...them more dull Colour Adjusts the colours making them lighter or darker Tint Adjusts the colour of objects making them more red or green for a more natural look The adjusted values are stored accordi...

Page 19: ...instructions number 1 to 3 on page 15 2 Press the or button to select Reset then press the ENTER button 3 Press the or button to select OK or Cancel Press the ENTER button 4 Press the EXIT button to e...

Page 20: ...the default setting for a video movie or normal broadcasting Just Scan Use the function to see the full image without any cutoff when HDMI 720p 1080i or Component 1080i signals are input Auto Wide fu...

Page 21: ...nify the size of the picture vertically on screen 4 3 Sets the picture to 4 3 normal mode This function is available in Auto Wide mode This function is not available in Component or HDMI mode Digital...

Page 22: ...on on the remote control 2 Press the or button to select PIP then press the ENTER button 3 Press the or button to select a particular item 4 Press the or button to select the required option 5 Press t...

Page 23: ...patented SRS technology that solves the problem of playing 5 1 multichannel content over two speakers TruSurround delivers a compelling virtual surround sound experience through any two speaker playba...

Page 24: ...This feature lets you automatically adjust the volume of the desired channel by lowering the sound output when the modulation signal is high or by raising the sound output when the modulation signal...

Page 25: ...me if you wish to use the automatic On Off timers 1 Press the MENU button to display the menu Press the or button to select Setup then press the ENTER button 2 Press the or button to select Time then...

Page 26: ...er Settings can be made You must set the clock first 4 Press the or button to select the required item below Press the or button to adjust to the setting satisfied On Time Select hour minute and On Of...

Page 27: ...d When the TV is turned off by Sleep Timer function Energy Saving Off Low Medium High This feature adjusts the screen brightness depending on the surrounding lighting conditions Off Turns off the ener...

Page 28: ...are connected to the TV 3 Select the required device by pressing the or button Press the ENTER button O Press the SOURCE button on the remote control to toggle between all the available source TV mode...

Page 29: ...ect Edit Name then press the ENTER button 3 Press the or button to select the device that you wish to edit Press the ENTER button 4 Press the or button to select the required device Press the ENTER bu...

Page 30: ...or and its resolution The resolutions in the table are recommended D Sub Input Mode Resolution Horizontal Frequency kHz Vertical Frequency Hz Pixel Clock Frequency MHz Sync Polarity H V IBM 640 x 350...

Page 31: ...coarse and Fine tune again After the noise has been reduced re adjust the picture so that it is aligned on the center of screen Press the or button to select Coarse or Fine then press the ENTER button...

Page 32: ...quired The page is displayed with other coloured information that can be selected in the same way To display the previous or next page press the corresponding coloured button 5 teletext on mix Press t...

Page 33: ...Using the Anti Theft KENSINGTON LOCK depending on the model The Kensington lock is a device used to physically fix the system when using it in a public place The appearance and locking method may dif...

Page 34: ...ase these additionally 2 Remove the screws from the center back of the TV put the screws into the clamps and then fasten the screws onto the TV again Screws may not be supplied with the product In thi...

Page 35: ...unctions Replace the remote control batteries Clean the upper edge of the remote control transmission window Check the battery terminals Check signal cable message is displayed Check that the signal c...

Page 36: ...h stand 7 kg Environmental Considerations Operating Temperature Operating Humidity Storage Temperature Storage Humidity 10 C to 40 C 50 F to 104 F 10 to 80 non condensing 20 C to 45 C 4 F to 113 F 5 t...

Reviews: