background image

GB

CONNECTIONS

13

12

Speaker Packages

Please confirm that all the following contents are included in the package.

Center Speaker

Subwoofer Speaker

Speaker Cable (5EA)

Front/Rear Speaker (4EA)

Speaker Accessories

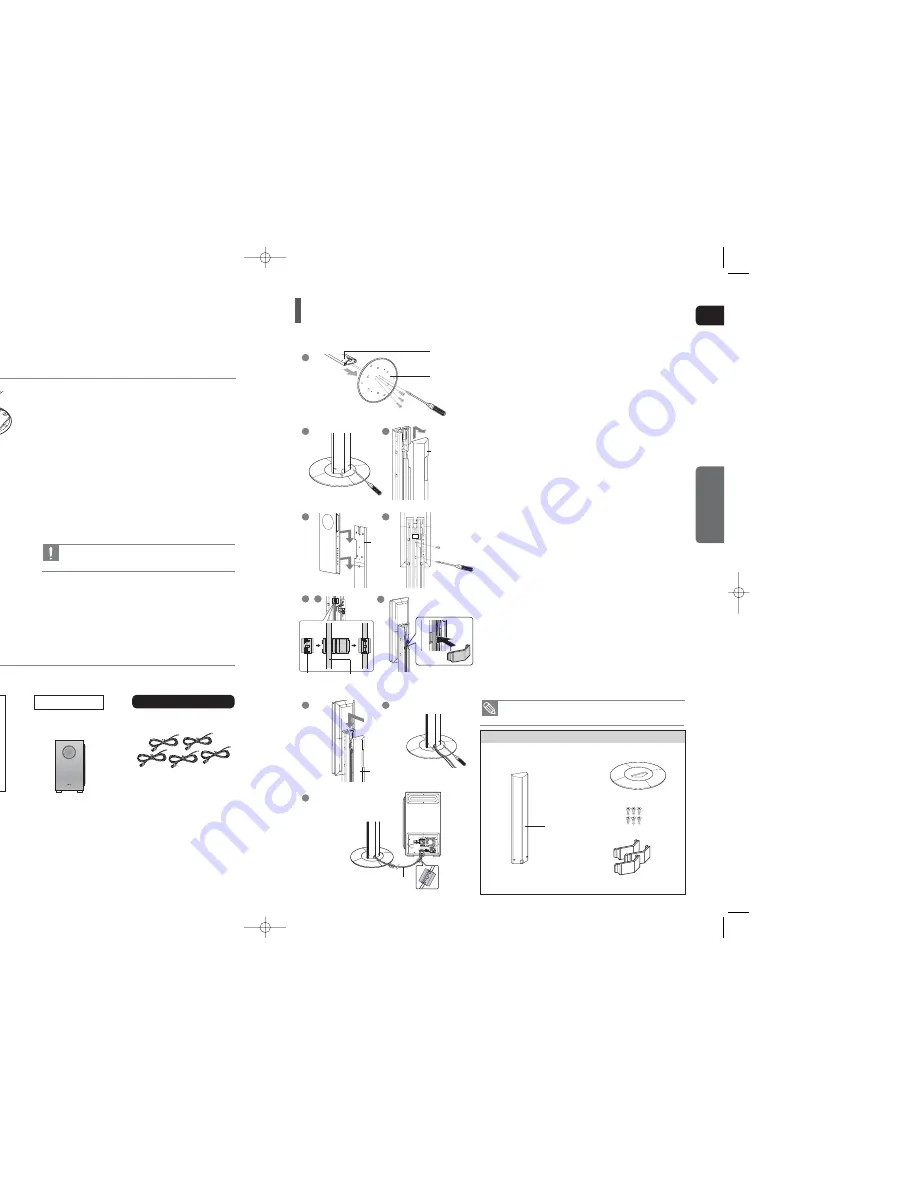
Speaker Installation

1

Turn the stand upside down and mount it on the stand
base.

2

Tighten 4 screws on the bottom side of the stand base.

3

Place the stand on the floor and tighten 2 screws on the
back of the stand.

4

Mount the speaker on the stand.

5

Tighten 2 screws on the back of the speaker. 

6

This is the successfully assembled speaker.

How to Install the Speaker and the Stand

• Make sure that the speaker is installed on a flat and

stable area. Otherwise it may be easily knocked over.

SPEAKER

STAND

Screw

Screw

STAND BASE

1

6

3

4

2

5

*

Front speakers and rear speakers are
packaged separately as shown in the
diagram.

STAND

STAND 
BASE

SPEAKER

STAND

Installing the DVD player

1

Mount the stand on the stand base and tighten 4
screws on the bottom side of the stand base.

2

Loosen 2 screws at the bottom of the back cover.

3

Detach the back cover by lifting it up.

4

Secure the main unit by aligning 4 protruding points 
on the back of the main unit with the fixing holes 
on the stand.  

5

Tighten 2 screws in the middle of the stand.

6

Open a Toroidal Ferrite Core by pulling it upward.
Wrap it around of the system connection cable so it
will be next to the DVD Player. Close it back by  press-
ing it all the way down until you hear a clicking sound.

7

Push the cable into the cable fixing hole in the stand.

8

To fix the cable, insert the cable holder into the hole on
the stand.

9

Let the cable run through the hole at the bottom 
of the back cover and close the back cover.

10

Tighten 2 screws at the bottom of the back cover.

11

Open a Toroidal Ferrite Core by pulling it upward.
Wrap it around of the system connection cable so it 
will be next to the DVD Player. Close it back by  press-
ing it all the way down until you hear a clicking sound.

2

1

3

6

7

9

11

10

4

5

BACK COVER

Toroidal 
Ferrite Core

System connection
cable - main unit

System connection cable -

Main Unit to Subwoofer

STAND

STAND

STAND BASE

STAND

BACK COVER

BACK COVER

8

Please confirm that all the following contents are included in
the package.

Stand Packages

•  The Toroidal Ferrite Core is designed to reduce electromag-

netic waves that may cause interference.

STAND BASE

Screw (6EA)

Cable Holder (3EA)

  HT-TXQ120(1~43P)_GB  2007.3.9  9:45 AM  Page 12

Summary of Contents for HT-TXQ120

Page 1: ...DIGITAL HOME CINEMA SYSTEM HT TXQ120 GB Instruction Manual AH68 01660E REV 01 COMPACT DIGITAL AUDIO AH68 01959B ge 2...

Page 2: ...contain chemicals that are harmful to the environment Do not dispose of batteries in the general household trash Plug UK Only ed plug incorporating a fuse The value of the fuse is indicated on the pin...

Page 3: ...el 46 Setting the Password 46 Setting the Wallpaper 47 To Select One of the 3 Wallpaper Settings you ve made 47 DVD Playback Mode 48 DivX R registration 48 SACD Playback Mode 49 Setting the Speaker Mo...

Page 4: ...isession disc the disc can be played only up to the blank segment A maximum of 9 999 images can be stored on a single CD When playing a Kodak Fuji Picture CD only the JPEG files in the picture folder...

Page 5: ...4 15 16 17 FRONT REAR 1 Standby indicator 2 Power on indicator 3 Auto Sound Calibration Input Connector 4 5 1 Channel Speaker Output Connector 5 Cooling Fan 6 FM 75 COAXIAL Jack 7 Component Video Outp...

Page 6: ...DIT button 35 DIMMER button 36 SD Standard Definition HD High Definition button 37 LOGO button 38 HDMI AUDIO SELECT button 39 SLEEP 1 Remove the battery cover in the direction of the arrow 2 Insert tw...

Page 7: ...the stand 6 Open a Toroidal Ferrite Core by pulling it upward Wrap it around of the system connection cable so it will be next to the DVD Player Close it back by press ing it all the way down until y...

Page 8: ...f the subwoofer speaker Do not hang the subwoofer on the wall through the duct hole 1 2 Connecting the Speakers Black Red Center Speaker Front Speaker L Front Speaker R Rear Speaker R Rear Speaker L R...

Page 9: ...be damaged or the card may not be removed easily Do not insert the TX card upside down or in the reverse direction If the TX Card is inserted sound is not output from the Rear Speaker connectors on t...

Page 10: ...remote control s REMAIN button for 5 seconds The STANDBY LED on the front panel of the wireless receiver module blinks 2 With the wireless receiver module turned on use a ball point pen or a toothpick...

Page 11: ...vailable when using the HDMI IN function The audio signals transmitted over the HDMI Cable can be toggled ON OFF In Stop mode press and hold the SD HD button on the remote control Resolutions availabl...

Page 12: ...FM Antenna FM Antenna supplied 1 Connect the FM antenna supplied to the FM 75 COAXIAL Jack 2 Slowly move the antenna wire around until you find a location where reception is good then fasten it to a w...

Page 13: ...n on the remote controller for over 5 seconds while the power is turned off By default the video format is set to PAL NTSC or PAL will appear in the display At this time press the NT PAL button shortl...

Page 14: ...ay is stopped select a track using the Cursor button and press the ENTER button During the play you cannot select a track using the Cursor button 3 Press the STOP button to stop playback You can liste...

Page 15: ...t the Icon ing on the recording mode some MP3 WMA CDs may not play contents of a MP3 CD varies depending on the MP3 WMA track format d on the disc Images captured with a digital camera or camcorder or...

Page 16: ...ence shaking on the screen during playback Supported Audio Formats yback ck press the button xt file whenever you press the button if there are over 2 files in the disk vious file whenever you press t...

Page 17: ...nges as follows Fast Playback TITLE ELAPSED TITLE REMAIN CHAPTER ELAPSED CHAPTER REMAIN 2X 4X 8X 32X PLAY 2X 4X 8X 32X PLAY TRACK ELAPSED TRACK REMAIN TOTAL ELAPSED TOTAL REMAIN TRACK REMAIN TRACK ELA...

Page 18: ...Each time the button is pressed during playback the repeat playback mode changes as follows 1 Press the INFO button twice 2 Press the Cursor button to move to the REPEAT PLAYBACK display 3 Press the C...

Page 19: ...he INFO button 2 Press the Cursor button to move to ANGLE display 3 Press the Cursor or numeric buttons to select the desired angle Each time the button is pressed the angle changes as follows This fu...

Page 20: ...See the disc packaging ck press the button on the remote control the desired image from a DVD Audio disc containing still images cs you may not be able to select images To operate this function you c...

Page 21: ...itle Menu The Disc menu display may be different depending on the disc 1 In Stop mode press the MENU button 2 Press the Cursor button to move to the Disc Menu and then press the ENTER button When you...

Page 22: ...ppears on the TV screen and the saved file is played yback press the STOP button Removal amage to the memory stored in the USB device perform safe removal before g the USB cable the STOP button twice...

Page 23: ...aspect ratio to fit your TV or monitor For a standard TV select either 4 3LB or 4 3PS option according to personal preference Select 16 9 if you have a widescreen TV 1 In Stop mode press the MENU butt...

Page 24: ...g While watching a DVDx or JPEG CD you can set the image you like as background wallpaper 1 During playback press the PLAY PAUSE button when an image you like appears 2 Press the LOGO button COPY LOGO...

Page 25: ...to move to DVD TYPE and then press the ENTER Cursor button to move to DVD VIDEO and then press the tton 1 4 again if you want to switch to DVD AUDIO Play mode g DVD Play Mode et to play the DVD video...

Page 26: ...ance of Df is equal to the distance of Ds in the figure set the mode as 0ms Otherwise change the setting according to the table ER D Distance between Df and Dc Delay Time 0 00 m 0 34 m 0 68 m 1 02 m 1...

Page 27: ...or button to move to AV SYNC and then press the ENTER button 4 Press the Cursor button to select the AV SYNC Delay Time and then press the ENTER button You can set the audio delay time between 0 ms an...

Page 28: ...and Dolby Pro Logic II button does not work This function works only in Dolby Pro Logic MUSIC mode 1 Press the PL II MODE button to select MUSIC mode 2 Press the PL II EFFECT button to select P PANOR...

Page 29: ...and the speaker is less than 3 m Set the main unit s volume to 15 4 Press the ASC button To create the optimal 5 1 channel sound filed the selections are in the following sequence L C R SR SL SW The a...

Page 30: ...ffect for audiences at home that simulates 9 1 channel of a movie theater s for movies MISCELLANEOUS 1 Plug the headphones into the headphone jack You can purchase headphones from most Electronics sto...

Page 31: ...a preset station press the button on the remote to select a channel Press the RDS DISPLAY button while listening to an FM station Each time you press the button the display change to show you the fol...

Page 32: ...e MUTE button MUTE appears in the display To restore the sound press the button again Mute Function MISCELLANEOUS es et stations cess press PTY SEARCH while searching eps If the setting is cancelled b...

Page 33: ...06 07 08 09 10 11 12 13 14 01 18 40 48 57 58 81 59 60 18 03 03 18 25 97 03 18 46 15 03 05 61 82 83 84 62 03 59 61 63 03 02 03 04 15 16 17 18 19 20 21 22 23 24 25 26 27 28 29 30 32 34 35 36 48 59 90 40...

Page 34: ...language and subtitles will not work for DVDs not contain ing them And depending on the disc they may work differently Audio language and subtitles do not work Are you using a disc that does not conta...

Page 35: ...051 Aymara 1209 Hausa 1353 Moldavian 1513 Siswati 1052 Azerbaijani 1217 Hindi 1356 Marathi 1514 Sesotho 1053 Bashkir 1226 Croatian 1357 Malay 1515 Sundanese 1057 Byelorussian 1229 Hungarian 1358 Malte...

Page 36: ...Player Product Company Type MP3 Player MOMOBAY UX 2 Dvico USB 2 0 Product Company Type USB External HDD Specifications MISCELLANEOUS Speaker system Impedance Frequency range Output sound pressure lev...

Page 37: ...Samsung products please contact the SAMSUNG customer care centre Customer Care Center Web Site age 72...

Reviews: