background image

GB

48

SETUP

2

1

3

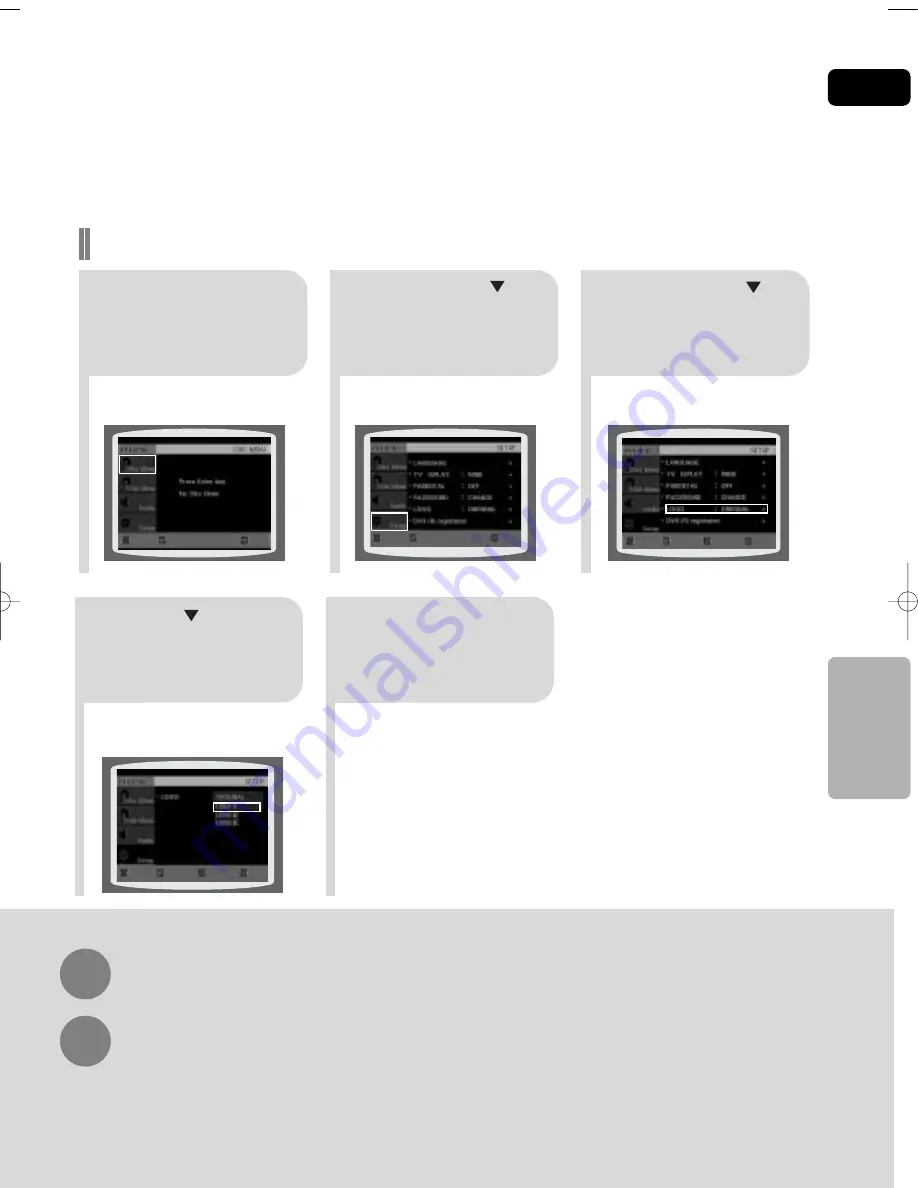
In Stop mode,
press 

MENU

button.

Press Cursor
button to move to
‘Setup’ and then
press 

ENTER

button.

Press Cursor
button to move to
‘LOGO’ and then
press 

ENTER

button.

To select one of the 3 wallpaper settings you've made

5

4

Press 

MENU

button to exit
the setup

Press      to select
the desired ‘USER’,
and then press

ENTER

.

Press 

RETURN

button to return to the previous level.

Press 

MENU

button to exit the setup screen.

This selects one of the 3
wallpaper screens

MOVE

ENTER

EXIT

MOVE

ENTER

EXIT

MOVE

ENTER

RETURN

EXIT

MOVE

SELECT

RETURN

EXIT

HT-Q20(41~70) GB  3/1/06 2:45 PM  Page 47

Summary of Contents for HT-Q20

Page 1: ...DIGITAL HOME CINEMA SYSTEM HT Q20 HT TQ22 HT TQ25 STANDBY OPEN CLOSE VOLUME FUNCTION Instruction Manual COMPACT DIGITAL AUDIO ...

Page 2: ...stance However if there is no alternative to cutting off the plug remove the fuse and then safely dispose of the plug Do not connect the plug to a main socket as there is a risk of shock hazard from the bared flexible cord Never attempt to insert bare wires directly into a main socket A plug and fuse must be used at all times IMPORTANT The wires in the main lead are coloured in accordance with the...

Page 3: ...or a long period of time Protect the player from moisture i e vases and excess heat e g fireplace or equipment creating strong magnetic or electric fields i e speakers Disconnect the power cable from the AC supply if the player malfunctions Your player is not intended for industrial use Use of this product is for personal use only Condensation may occur if your player or disc has been stored in co...

Page 4: ...ion The HT Q20 HT TQ22 HT TQ25 automatically brightens and darkens your TV screen after 3 minutes in the stop mode The HT Q20 HT TQ22 HT TQ25 automatically switches itself into the power saving mode after 20 minutes in the screen saver mode Customized TV Screen Display The HT Q20 HT TQ22 HT TQ25 allows you to select your favorite image during JPEG DVD or VCD playback and set it as your background ...

Page 5: ...o Language 35 Selecting Subtitle Language 36 Playing Media Files using the USB HOST feature 37 Moving Directly to a Scene Song 39 Using Disc Menu 40 Using the Title Menu 40 SETUP Setting the Language 41 Setting TV Screen type 43 Setting Parental Controls Rating Level 45 Setting the Password 46 Setting the Wallpaper 47 DivX R registration 49 Setting the Speaker Mode 50 Setting the Delay Time 51 Set...

Page 6: ...g types of disc Many DVD discs are encoded with copy protection Because of this you should only connect your DVD player directly to your TV not to a VCR Connecting to a VCR results in a distorted pic ture from copy protected DVD discs This product incorporates copyright protection technology that is protected by methods claims of certain U S patents and other intellectual property rights owned by ...

Page 7: ...ck A maximum of 500 tracks can be played per CD A maximum of 300 folders can be played per CD CD R JPEG Discs Only files with the jpeg and JPEG extensions can be played If the disc is not closed it will take longer to start playing and not all of the recorded files may be played Only CD R discs with JPEG files in ISO 9660 or Joliet format can be played JPEG file names should be 8 characters or les...

Page 8: ...en Close button Disc Tray Function button USB Connector DOLBY DIGITAL indicator PRO LOGIC indicator TITLE indicator PROGRAM indicator STEREO indicator CHAPTER indicator TRACK indicator TUNER indicator DSP indicator RDS indicator RTA indicator P SCAN indicator RADIO FREQUENCY indicator System Status Display SPEAKER indicator DTS Disc indicator LINEAR PCM indicator MPEG indicator PBC indicator REPEA...

Page 9: ... TV s video input jacks VIDEO IN to the VIDEO OUT connector SCART JACK Connect to a TV with scart input jack Cooling Fan COMPONENT VIDEO OUTPUT jacks Connect a TV with component video inputs to these jacks External Audio Input Connector TX Card Connector Accessories 8 Video Cable Remote Control FM Antenna User s Manual ...

Page 10: ...utton DIGEST button EZ VIEW NT PAL button SLIDE MODE button LOGO button RETURN button SOUND EDIT button TEST TONE button AUDIO button MUTE button INFO button TUNING CH button ZOOM button TUNER MEMORY P SCAN button SLOW MO ST button DIMMER button REMAIN button STEP button SEARCH buttons SUB TITLE button PL II EFFECT button Remote Control Play Pause button Tuning Preset CD Skip button Stop button DV...

Page 11: ...ry cover on the back of the remote by pressing down and sliding the cover in the direction of the arrow 1 Insert two 1 5V AAA batteries paying attention to the correct polarities and 2 Replace the battery cover 3 Follow these precautions to avoid leaking or cracking cells Place batteries in the remote control so they match the polarity to and to Use the correct type of batteries Batteries that loo...

Page 12: ...heir tweeters will be at the same height as your ear Align the front face of the front speakers with the front face of the center speaker or place them slightly in front of the center speakers Center Speaker It is best to install it at the same height as the front speakers You can also install it directly over or under the TV Position of the DVD Player Place it on a stand or cabinet shelf or under...

Page 13: ...r speaker cable to the green center speaker output terminal on the rear of the subwoofer according to the polarity markings 3 Red Do not let children play with or near the speakers They could get hurt if a speaker falls When connecting the speaker wires to the speakers make sure that the polarity is correct Caution If you place a speaker near your TV set screen color may be distorted because of th...

Page 14: ...t Speaker R Rear Speaker R Subwoofer Center Speaker Front Speaker L Rear Speaker L Front Speaker R Rear Speaker R Subwoofer Center Speaker Front Speaker L Rear Speaker L HT TQ22 HT TQ25 Connecting the Speakers ...

Page 15: ...unit Hold the TX card so that the slanted side faces downward and insert the card into the port The TX card enables communication between the main unit and the wireless receiver Connect the left and right rear speakers to the wireless receiving module Plug the power cord of the wireless receiving module in the wall outlet and switch the power switch ON 1 2 3 4 Do not insert a card other than the T...

Page 16: ...p blue The indicator will turn off in 1 second With the wireless receiver module turned on use a ball point pen or a pair of tweezers to press the RESET button on the back of the unit The Standby On LED on the front panel of the wireless receiver module blinks 2 times 2 1 Turn on the main unit The Link LED of the wireless receiver module is lit and the setup is finished If Power Standby mode conti...

Page 17: ...k panel of the system to the corresponding jacks on your television When the Progressive scan mode is selected the VIDEO output Yellow and SCART output does not output any signal Note CONNECTIONS 16 Choose one of the three methods for connecting to a TV Connecting the Video Out to TV VIDEO SELECT Function Press and hold VIDEO SEL button on the remote control for over 5 seconds COMPOSITE or RGB wil...

Page 18: ...lds are dis played every 1 60th of a second The interlaced scanning method is intended for capturing a still object Interlaced Scan 1 FRAME 2 FIELDS The progressive scanning method scans one full frame of video consecutively down the screen line by line An entire image is drawn at one time as opposed to the interlaced scanning process by which a video image is drawn in a series of passes The progr...

Page 19: ...ut You can also use the FUNCTION button on the main unit The mode switches as follows DVD CD AUX USB FM 2 Example Analog signal components such as a VCR Connecting an External Analog Component Audio Cable not supplied If the external analog component has only one Audio Out connect either left or right You can connect the Video Output jack on your VCR to the TV and connect the Audio Output jacks on...

Page 20: ...temperature inside the unit could rise and may damage it Do not obstruct the cooling fan or ventilation holes If the cooling fan or ventilation holes are covered with a newspaper or cloth heat may build up inside the unit and fire may result Cooling Fan Connect the FM antenna supplied to the FM 75Ω COAXIAL terminal Slowly move the antenna wire around until you find a location where reception is go...

Page 21: ... FUNCTION button on the main unit or DVD button on the remote to enable DVD CD playback 1 Plug the main unit s power cord into the AC power supply 4 Press DVD RECEIVER button to switch to DVD RECEIVER mode Note Your Home Theater is capable of playing DVD CD MP3 WMA and JPEG discs Depending on the disc you are using these instructions may vary slightly Read the instructions carefully before using B...

Page 22: ...d chapters Numbers are allotted to these sections These numbers are called title numbers and chapter numbers TITLE 1 TITLE 2 CHAPTER 1 CHAPTER 2 CHAPTER 1 CHAPTER 2 CHAPTER 3 Tracks Video and music CDs Video and music CDs are divided into sections called tracks Numbers are allotted to these sections These numbers are called track numbers TRACK 1 TRACK 2 TRACK 4 TRACK 5 TRACK 3 Files DivX DivX is d...

Page 23: ...lly Selecting the Video Format Press and hold NT PAL button on the remote controller for over 5 seconds while the power is turned off By default the video format is set to PAL NTSC or PAL will appear in the display At this time press the NT PAL button shortly to select between NTSC and PAL Each country has a different video format standard For normal playback the video format of the disc must be t...

Page 24: ...then load the MP3 WMA disc 4 Press the STOP button to stop playback To select another album and track repeat Steps 2 and 3 above 3 To change the album use to select another album in Stop mode and then press the ENTER button Data CDs CD ROM CD R CD RW encoded in MP3 WMA format can be played MP3 WMA CD Playback Music File Icon Image File Icon Movie File Icon All File Icon Press the button when it is...

Page 25: ...you can also select DTS DOLBY DIGITAL or PRO LOGIC Note You can view disc playback information on the TV screen Displaying Disc Information Screen Display CD display DVD display VCD display TITLE display ELAPSED TIME display TRACK FILE display CHAPTER display SUBTITLE display AUDIO LANGUAGE display REPEAT PLAYBACK display ANGLE display DOLBYDIGITALdisplay STEREO L R display What is a Title A movie...

Page 26: ...ed the image makes the transition as follows Press SLIDE MODE button 3 From top to bottom From bottom to top Rectangular shape in the center Vertical blinds effect Each time a new image is displayed slide modes 1 11 will be applied randomly and automatically Cancels the slide mode Images captured with a digital camera or camcorder or JPEG files on a PC can be stored on a CD and then played back wi...

Page 27: ...g playback JPEG files will be shown in 9 windows You can view 9 JPEG images on the TV screen The selected image is played for 5 seconds before moving to the next image 26 To view the previous or next image with 9 windows press Press Cursor buttons during playback Original Image OPERATION The maximum resolutions supported by this product are 5120 x 3480 or 19 0 MPixel for standard JPEG files and 20...

Page 28: ...2x Normal 27 DIVX file can be zoomed only in ZOOM X2 mode DivX files have Avi file extensions however not all Avi files are DivX and may not be playable in this unit Note Zoom Function 2 Press Cursor buttons to move to the area you want to enlarge 1 Press ZOOM button Each time you press the button your selection will toggle between ZOOM X2 and ZOOM OFF DivX Playback 5 Minute Skip function During p...

Page 29: ...Formats This product only supports the following media formats If both video and audio formats are not supported the user may experience problems such as broken images or no sound 2 Caption Function You must have some experience with video extraction and editing in order to use this feature properly To use the caption function save the caption file smi in the same file name as that of the DivX med...

Page 30: ...ing the total and remaining time of a title or chapter being played Each time the REMAIN button is pressed CHAPTER REMAIN TITLE REMAIN CHAPTER ELAPSED TITLE ELAPSED DVD VIDEO CD VCD TRACK REMAIN TOTAL ELAPSED TOTAL REMAIN TRACK ELAPSED MP3 TRACK ELAPSED TRACK REMAIN ...

Page 31: ...es each time is pressed playback will skip back or forward 5 minutes Fast Playback DVD VCD MP3 CD Press Each time the button is pressed during playback the playback speed changes as follows Press SLOW button Each time the button is pressed during playback the playback speed changes as follows Slow Playback DVD VCD No sound is heard during slow playback and step motion playback Reverse slow playbac...

Page 32: ... DVD CD VCD MP3 JPEG Repeat playback allows you to repeatedly play a chapter title track song or directory MP3 file Repeat Playback VCD CD MP3 JPEG DVD VIDEO Repeat playback operation is not possible with version 2 0 VCD discs if PBC is turned on To use Repeat Playback on a VCD with PBC you should set the PBC to OFF in the disc menu See page 40 To Select a Repeat Playback Mode in the Disc Informat...

Page 33: ...egment will be played repeatedly 4 Press ENTER button at the end of the desired segment When ENTER button is pressed the selected position will be stored in memory 3 Press Cursor buttons to select A and then press ENTER button at the beginning of the desired segment To return to normal playback press Cursor buttons to select OFF DVD VCD Note OPERATION You can repeatedly play back a designated sect...

Page 34: ...umeric buttons to select the desired angle 2 3 3 3 1 3 1 3 The Angle function works only with discs on which multiple angles have been recorded Note Step Function DVD VCD Press STEP button The picture moves forward one frame each time the button is pressed during playback This function allows you to view the same scene in different angles Angle Function 1 ...

Page 35: ...top and bottom of the TV screen can be removed by pressing the EZ VIEW button OPERATION EZ VIEW OFF EZ VIEW SELECT ZOOM POSITION This function allows you to enlarge a particular area of the displayed image Zoom Screen Enlarge Function EZ VIEW Function This function will not work if the DVD is recorded with multi camera angle format Black bars may not disappear because some DVD discs have a built i...

Page 36: ... audio language ENGLISH SPANISH FRENCH etc is selected each time the button is pressed 2 Press Cursor buttons or numeric buttons to select the desired audio language 1Press INFO button twice SP 2 3 FR 3 3 Audio Language Selection Function DVD Selecting Audio Language ...

Page 37: ...TLE buttons on the remote control Depending on the disc the Subtitle and Audio Language functions may not be available Subtitle Language Selection Function DVD 2 Press Cursor button to move to SUBTITLE display 1Press INFO button twice 3 Press Cursor button or numeric buttons to select the desired subtitle Note Selecting Subtitle Language ...

Page 38: ...en you press the button the previous file is selected To play back the disc at a faster speed press or during playback Each time you press either button the playback speed will change as follows 2x 4x 8x 32x Normal You can enjoy media files such as pictures movies and music saved in an MP3 player USB memory or digital camera in high quality video with 5 1 channel home theater sound by connecting t...

Page 39: ...evice might not be recognized Supported Formats CBI Control Bulk Interrupt is not supported Digital Cameras that use PTP protocol or require additional program installation when connected to a PC are not supported A device using NTFS file system is not supported Only FAT 16 32 File Allocation Table 16 32 file system is supported Some MP3 players when connected to this product may not operate depen...

Page 40: ...lect the desired chapter and then press ENTER button 01 05 025 040 0 00 01 1 1 Moving to a Chapter 6 Press the numeric buttons to select the desired time and then press ENTER button 01 05 028 040 1 30 00 1 1 Moving to a Specific Time 3 Press Cursor buttons to move to Chapter display Moving to a Chapter 01 05 025 040 1 17 30 1 1 5 Press Cursor buttons to move to time display Moving to a Specific Ti...

Page 41: ...For DVDs containing multiple titles you can view the title of each movie Depending on the disc the availability of this feature may vary Using the Title Menu Title menu display may be different depending on the disc Note ENTER MOVE EXIT ENTER MOVE EXIT ENTER MOVE EXIT ENTER MOVE EXIT When playing a VCD version 2 this toggles between PBC ON and OFF PBC Playback Control Function When playing a VCD v...

Page 42: ... MENU button Press Cursor button to move to Setup and then press ENTER button To select another language select OTHER and enter the language code of your country See page 72 for language codes AUDIO SUB TITLE and DISC MENU language can be selected Note MOVE ENTER EXIT MOVE ENTER EXIT MOVE SELECT EXIT RETURN ...

Page 43: ...e Language recorded on the disc Selecting the Disc Menu Language recorded on the disc Select Language and then press ENTER button 5 Press Cursor button to select OSD Language and then press ENTER button Press Cursor button to select the desired language and then press ENTER button Press RETURN button to return to the previous level Press MENU button to exit the setup screen MOVE ENTER EXIT RETURN ...

Page 44: ... TV DISPLAY and then press ENTER button Press Cursor button to select the desired item and then press ENTER button Press RETURN button to return to the previous level Press MENU button to exit the setup screen Depending on your TV type Wide Screen or conventional 4 3 you can select the TV s aspect ratio Setting TV Screen type ENTER MOVE EXIT ENTER MOVE EXIT ENTER RETURN MOVE EXIT SELECT RETURN MOV...

Page 45: ...mode on your widescreen TV You can enjoy the widescreen aspect Select this to play a 16 9 picture in the letter box mode on a conventional TV Black bars will appear at the top and bottom of the screen Select this to play a 16 9 picture in the pan scan mode on a conventional TV You can see the central portion of the screen only with the sides of the 16 9 picture cut off 4 3LB 4 3 Letterbox WIDE 4 3...

Page 46: ...r the content is to violent or adult material 3 5 Press Cursor button to move to PARENTAL and then press ENTER button Press Cursor button to select the desired rating level and then press ENTER button Enter the password and then press ENTER button Note 45 2 1 In Stop mode press MENU button Press Cursor button to move to Setup and then press ENTER button Use this to restrict playback of adult or vi...

Page 47: ...f you have forgotten the rating level password do the following While the player is in the no disc mode hold the main unit s button for longer than 5 seconds INITIALIZE appears on the display and all settings will return to the default values Press the POWER button Using the RESET function will erase all stored settings Do not use this unless necessary You can set the password for the Parental rat...

Page 48: ...er will be displayed You can select up to 3 wallpaper settings 2 1 3 During playback press PLAY PAUSE button when an image you like appears Press LOGO button The power will turn off and then back on PAUSE COPY LOGO DATA Setting the Wallpaper While watching a DVD VCD or JPEG CD you can set the image you like as background wallpaper Setting the Wallpaper MOVE SELECT RETURN EXIT MOVE SELECT RETURN EX...

Page 49: ...button To select one of the 3 wallpaper settings you ve made 5 4 Press MENU button to exit the setup Press to select the desired USER and then press ENTER Press RETURN button to return to the previous level Press MENU button to exit the setup screen This selects one of the 3 wallpaper screens MOVE ENTER EXIT MOVE ENTER EXIT MOVE ENTER RETURN EXIT MOVE SELECT RETURN EXIT ...

Page 50: ...ress ENTER button 3 Press Cursor button to move to DIVX R registration and then press ENTER button Please use the Registration code to register this player with the DivX R video on demand format To learn more go to www divx com vod DivX R registration MOVE ENTER EXIT MOVE ENTER EXIT MOVE ENTER RETURN EXIT ...

Page 51: ...ately as follows SMALL NONE For L and R the mode is set to SMALL SMALL Select this when using the speakers NONE Select this when no speakers are connected Depending on PRO LOGIC and STEREO settings the speaker mode may vary see page Note Signal outputs and frequency responses from the speakers will automatically be adjusted according to your speaker configuration and whether certain speakers are u...

Page 52: ...nter and Surround Speakers 2 1 In Stop mode press MENU button Press Cursor button to move to Audio and then press ENTER button With Dolby Pro Logic II the delay time may be different for each mode With AC 3 and DTS the delay time can be set between 00 and 15mSEC The Center channel is only adjustable on 5 1 channel discs Note If the speakers cannot be placed at equal distances from the listening po...

Page 53: ...Cursor to set the Delay time 0 ms 3 ms 6 ms 9 ms 12 ms 15 ms Setting REAR SURROUND SPEAKERS If the distance of Df is equal to the distance of Ds in the figure set the mode as 0ms Otherwise change the setting according to the table Setting CENTER SPEAKER If the distance of Dc is equal to or longer than the distance of Df in the figure set the mode as 0ms Otherwise change the setting according to th...

Page 54: ...to L C R SR SL SW in order If the ENTER button is pressed again at this time the test tone will stop Press TEST TONE button Test tone will be produced as follows When playing a DVD or CD this will work only in Stop mode Use this function to check that each speaker is correctly connected and that there is no problem To end the test tone press TEST TONE button again Alternate method press the TEST T...

Page 55: ...o move to DRC and then press ENTER button Press Cursor to adjust the DRC Press RETURN button to return to the previous level Press MENU button to exit the setup screen This feature balances the range between the loudest and quietist sounds You can use this function to enjoy Dolby Digital sound when watching movies at low volume at night Setting the DRC Dynamic Range Compression SETUP MOVE ENTER RE...

Page 56: ...R button Press Cursor button to move to SOUND EDIT and then press ENTER button Method 1 When adjusting the audio quality using the setup screen Press Cursor buttons to select and adjust the desired item Press the buttons to adjust the settings You can adjust the balance and level for each speaker Setting the Audio MOVE ENTER EXIT MOVE ENTER EXIT MOVE ENTER RETURN EXIT MOVE CHANGE RETURN EXIT ...

Page 57: ... you get closer to 6dB Method 2 When manually adjusting with the SOUND EDIT button 2 1 Adjusting Front Speaker Balance Adjusting Rear Speaker Balance Press SOUND EDIT button and then press Cursor 3 Adjusting Center Speaker Level 4 5 Adjusting Rear Speaker Level Adjusting Subwoofer Speaker Level 56 Press SOUND EDIT button and then press Cursor Press SOUND EDIT button and then press Cursor Press SOU...

Page 58: ...p screen 2 1 Setup menu appears 3 Press Cursor buttons to move to Audio and then press ENTER button Press Cursor buttons to move to AV SYNC and then press ENTER button Press the MENU button 4 You can set the audio delay time between 0 ms and 300 ms Set it to the optimal status Press Cursor buttons to select the AV SYNC Delay Time and then press the ENTER button MOVE ENTER EXIT MOVE ENTER RETURN EX...

Page 59: ...ng in a grand church PASS Select this for normal listening Press DSP EQ button SETUP DSP EQ function is only available in STEREO mode Press the PL II mode button to show STEREO on the display This feature works with CDs MP3 CDs 2 channel DivX and Dolby Digital discs When playing a DVD disc encoded with two or more channels multi channel mode will be selected automatically and DSP EQ function does ...

Page 60: ...t left and right speakers MATRIX You will hear 5 1 channel surround sound STEREO Select this to listen to sound from the front left and right speakers and the subwoofer only Each time the button is pressed the mode changes as follows When selecting Pro Logic II mode connect your external device to the AUDIO INPUT jacks L and R on the player If you connect to only one of the inputs L or R you canno...

Page 61: ...mode will be selected automatically and Dolby Pro Logic II button does not work You can select either 0 or 1 This mode extends the front stereo image to include the surround speakers for an exciting wraparound effect with side wall imaging Press PL II MODE button to select MUSIC mode Press PL II EFFECT button to select Panorama then press Cursor buttons to select the desired effect setting Press P...

Page 62: ...s STOP to select MANUAL and then briefly press to tune in to a lower or higher frequency Manual Tuning Each time the button is pressed the sound switches between STEREO and MONO In a poor reception area select MONO for a clear interference free broadcast Press MO ST button to listen in Mono Stereo This applies only when listening to an FM station When is pressed a preset broadcast station is selec...

Page 63: ...t 89 10 Press the TUNER button and select the FM band Press the TUNER MEMORY button before PRGM disappears from the display PRGM disappears from the display and the station is stored in memory 5 4 You can select between 1 and 15 presels Press the TUNER MEMORY button Press the TUNER MEMORY button again 6 To preset another station repeat steps 2 to 5 Press to select preset number RADIO OPERATION Pre...

Page 64: ... Time Decodes the real time clock from the FM frequency Some stations may not transmit PTY RT or CT information therefore this may not be displayed in all cases 5 TA Traffic Announcement When this symbol flashes it shows that the traffic announcement is in progress Note Note You can see the RDS signals the station sends on the display TO show the RDS signals Press RDS DISPLAY while listening to an...

Page 65: ...ou have selected and tunes in that station 3 Display NEWS AFFAIRS INFO SPORT EDUCATE DRAMA CULTURE SCIENCE VARIED POP M ROCK M M O R M LIGHT M CLASSICS OTHER M WEATHER FINANCE CHILDREN SOCIAL A RELIGION PHONE IN TRAVEL LEISURE JAZZ COUNTRY NATION M OLDIES FOLK M DOCUMENT Program Type News including an announced opinion and report Several matters including a current incident documentary discussion ...

Page 66: ...an set the time that the Home Theater will shut itself off Convenient Functions The remaining time before the Home Theater will shut itself off is displayed Pressing the button again changes the sleep time from what you have set earlier To confirm the sleep timer setting press SLEEP button To cancel the sleep timer press SLEEP button until OFF appears on the display ...

Page 67: ...n adjust the brightness of the display on the main unit so it won t interfere with your movie viewing Press DIMMER button MISCELLANEOUS MUTE ON appears in the display To restore the sound press the button again to select MUTE OFF Mute Function This is useful when answering a doorbell or telephone call Press MUTE button ...

Page 68: ...n to turn on the TV 3 Point the remote control toward the TV 4 While holding down POWER enter the code corresponding to your brand of TV If the code matches the TV s code the TV will be turned off If there is more than one code listed for your TV in the table enter one at a time to determine which code works Example For a Samsung TV While holding down POWER use the number buttons to enter 00 01 02...

Page 69: ...16 017 037 038 039 040 041 042 043 044 018 019 054 056 059 060 062 063 065 071 015 017 018 048 054 059 060 062 072 089 040 054 054 018 040 018 040 059 060 075 44 45 46 47 48 49 50 51 52 53 54 55 56 57 58 59 60 61 62 63 64 65 66 67 68 69 70 71 72 73 74 75 76 77 78 79 80 81 82 83 84 85 86 MTC NEC Nikei Onking Onwa Panasonic Penney Philco Philips Pioneer Portland Proton Quasar Radio Shack RCA Proscan...

Page 70: ...yer again after condensation disappears When listening to a CD or radio sound is output to the front speakers L R only Select PRO LOGIC II by pressing Dolby Pro Logic II on the remote control to use all six speakers Make sure that the DVD disc is 5 1 CH compatible If you set C SL and SR to NONE in the speaker mode in the audio setup of the setup screen no sound is heard from the center speaker and...

Page 71: ...n unit s button for longer than 5 seconds INITIALIZE appears on the display and all settings will return to the default values Press the POWER button Using the RESET function will erase all stored settings Do not use this unless necessary Turn off the power and hold the button on the main unit for longer than 5 seconds Using the RESET function will erase all stored settings Do not use this unless ...

Page 72: ...side to the outside of the disc Handling discs Disc Storage Handling and Storing Discs Do not allow the discs to become contaminated with dirt Do not load cracked or scratched discs Caution Condensation may form if warm air comes into contact with cold parts inside the player When condensation forms inside the player the player may not operate correctly If this occurs remove the disc and let the p...

Page 73: ...landic 1393 Occitan 1529 Tigrinya 1079 Catalan 1254 Italian 1403 Afan Oromo 1531 Turkmen 1093 Corsican 1257 Hebrew 1408 Oriya 1532 Tagalog 1097 Czech 1261 Japanese 1417 Punjabi 1534 Setswana 1103 Welsh 1269 Yiddish 1428 Polish 1535 Tonga 1105 Danish 1283 Javanese 1435 Pashto Pushto 1538 Turkish 1109 German 1287 Georgian 1436 Portuguese 1539 Tsonga 1130 Bhutani 1297 Kazakh 1463 Quechua 1540 Tatar 1...

Page 74: ... Camera Sora PDR T30 Toshiba Digital Camera Coolpix 5900 Nikon Digital Camera Coolpix S1 Nikon Digital Camera Coolpix 7600 Nikon Digital Camera DMC FX7 Panasonic Digital Camera Dimage Xt Minolta Digital Camera AZ 1 Olympus Digital Camera Product Company Type Digital Camera Cruzer Micro Sandisk USB 2 0 USB Flash Drive 128M Cruzer Mini Sandisk USB 2 0 128M Cruzer Mini Sandisk USB 2 0 256M SONY Micro...

Page 75: ... output Rear speaker output Subwoofer speaker output Frequency range S N Ratio Channel separation Input sensitivity G E N E R A L T U N E R F M O U T P U T V I D E O A M P L I F I E R 80W 3 5Kg 430 x 65 x 351 5 mm 5 C 35 C 10 75 10dB 60dB 0 5 1 0Vp p 75Ω load Compositive Video 1 0Vp p 75Ω load RGB Signal 0 714Vp p 75Ω load Y 1 0Vp p 75Ω load Pr 0 70Vp p 75Ω load Pb 0 70Vp p 75Ω load 80W x 2 3Ω 80W...

Page 76: ... x H x D Weights S P E A K E R Subwoofer speaker 3Ω 35Hz 160Hz 85dB W M 100W 200W 175 x 320 x 381 mm 5 1 kg Front Rear Center 90 x 1045x 90 mm 90 x 152x 90 mm 200 x 90 x 92 mm 3 Kg 0 4 Kg 0 6 Kg Front Rear Center Front Center Rear speaker 3Ω x 5 140Hz 20KHz 82dB W M 80W 160W 5 1ch speaker system Speaker system Impedance Frequency range Output sound pressure level Rated input Maximum input Dimensio...

Page 77: ......

Page 78: ......

Page 79: ...Memo ...

Page 80: ...AH68 01850B REV 01 THIS APPLIANCE IS MANUFACTURED BY ...

Reviews: