background image

1


English

English


1

03

Setup

Before Starting (Initial Setting)

Press the 

POWER

 button when it is plugged in 

TV for the fi rst time.
Initial Setting screen will be displayed.

Move  

Select              Return

Initial settings I On-Screen Language
Select a language for the on-screen displays.

English

한국어

Nederlands

Français
Deutsch

Italiano

Press the ▲▼ buttons to select the desired 
language, then press the 

ENTER

 button.

Press the 

ENTER

 button to select Start button.

Press the ▲▼ buttons to select desired TV Aspect, 
then press the 

ENTER

 button. 

 NOTE

If you have not selected a preferred language in 

the initial settings, you will see a language 

selection window next time you turn on the 

product.

Your language selection will apply to all menus: 
On-Screen Menu, Disc Menu, Audio, Subtitle.
If you want to move to the previous screen, press the 

RETURN

 button.

Once you select a menu language, you can change it by 
pressing the 

STOP

 (

@

) button on the remote control for 

more than 5 seconds with no disc inserted.
When the Initial Setting screen does not appear, refer to 
the Initial Setting. (see 

page

 22)

1.

2.

3.
4.

`

`

`

`

`

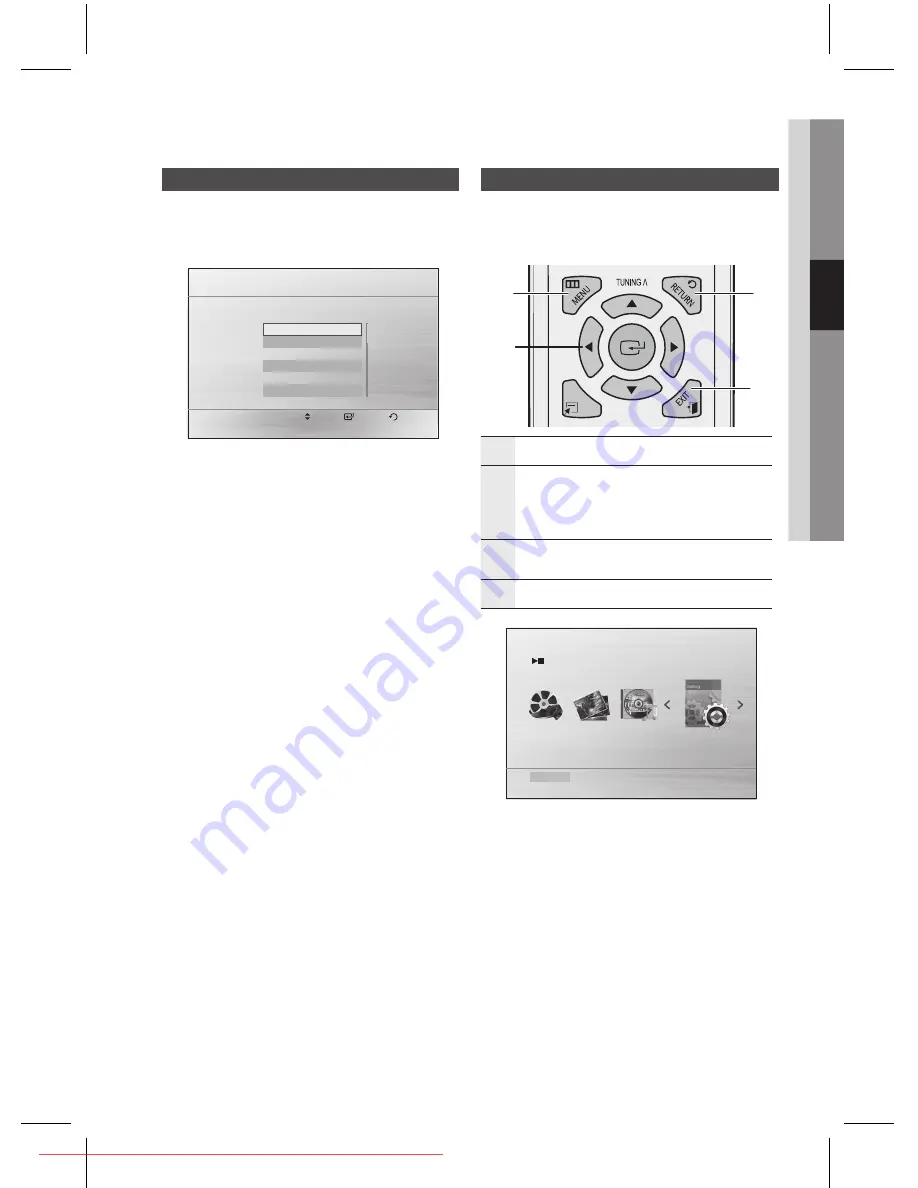
Setting the Setup menu

The access step may differ depending on the selected 
menu. The GUI (Graphical User Interface) in this 
manual may differ, depending on the fi rmware version.

1

2

3

4

5

6

7

8

0

9

FUNCTION

TV SOURCE

DSP / EQ

A

B

C

D

S/W LEVEL

REPEAT

USB REC

DIMMER

TUNER 

MEMORY

MO/ST

DISC

MENU

TITLE

INFO

GIGA

VOL

TV CH V

TUNING V

DVD RECEIVER

SELECT

SAMSUNG

TV

MUTE

POWER

P L

TOOLS

1

2

3

4

1

MENU 

BUTTON : Display the home menu.

2

ENTER / DIRECTION

 BUTTON

Move the cursor and select an item.
Select the currently selected item.
Confi rm the setting.

3

RETURN

 BUTTON : Return to the previous 

setup menu.

4

EXIT

 BUTTON : Exit the setup menu.

Function    DVD/CD      

Settings

Press the 

POWER

 button.

Press the 

_+

 buttons to select 

Settings

, then 

press the 

ENTER

 button.

Press the 

$%

 buttons to select the desired 

menu, then press the 

ENTER

 button.

Press the 

$%

 buttons to select the desired sub-

menu, then press the 

ENTER

 button.

Press the 

$%

 buttons to select the desired 

item, then press the 

ENTER

 button.

Press the 

EXIT

 button to exit the setup menu.

1.
2.

3.

4.

5.

6.

Setup

Downloaded From TheatreSystem-Manual.com Manuals

Summary of Contents for HT-D330K

Page 1: ...nual Imagine the possibilities Thank you for purchasing this Samsung product To receive more complete service please register your product at www samsung com register HT D350K HT D353HK HT D355K Downloaded From TheatreSystem Manual com Manuals ...

Page 2: ...d no objects filled with liquids such as vases shall be placed on the apparatus The Mains plug is used as a disconnect device and shall stay readily operable at any time This apparatus shall always be connected to an AC outlet with a protective grounding connection To disconnect the apparatus from the mains the plug must be pulled out from the mains socket therefore the mains plug shall be readily...

Page 3: ... completely from the power supply remove the AC plug from the wall outlet especially when left unused for a long period of time During thunderstorms disconnect the AC plug from the wall outlet Voltage peaks due to lightning could damage the product Do not expose the product to direct sunlight or other heat sources This could lead to overheating and malfunction of the product Protect the product fr...

Page 4: ...cial DivX Certified device that plays DivX video Visit www divx com for more information and software tools to convert your files into DivX video ABOUT DIVX VIDEO ON DEMAND This DivX Certified device must be registered in order to play DivX Video on Demand VOD content To generate the registration code locate the DivX VOD section in the device setup menu Go to vod divx com with this code to complet...

Page 5: ...Language 23 Security 23 Parental Rating 23 Change Password 23 Support 23 Product Information Basic Functions 23 Disc Playback 24 Audio CD CD DA MP3 WMA Playback 24 JPEG File Playback 25 Using the Playback Function 28 Sound Mode 29 Listening to Radio Advanced Functions 30 USB Function 30 USB Recording Other Information 31 Troubleshooting 32 Language code list 33 Specifications Figures and illustrat...

Page 6: ...d the discs are coded by region These regional codes must match in order for the disc to play If the codes do not match the disc will not play A DVD Video labeled ALL will also play on this system Disc Types and Characteristics Disc types that can be played Disc Types Mark Logo Recorded Signals Characteristics DVD VIDEO VIDEO DVD video DVD R DVD RW IN DVD video FORMAT DVD R DVD RW IN DVD video FOR...

Page 7: ... tracks can be played per CD A maximum of 300 folders can be played per CD CD R JPEG Discs A maximum of 999 images can be stored on a folder When playing a Kodak Fuji Picture CD only the JPEG files in the picture folder can be played Picture discs other than Kodak Fuji Picture CDs may take longer to start playing or may not play at all DVD R RW CD R RW Discs Software updates for incompatible forma...

Page 8: ...more than one memory device to a multi card reader may not operate properly PTP protocol for digital camera is not supported Do not disconnect USB device during a Reading process Bigger the image resolution the longer the delay to displaying DRM applied MP3 WMA or video files downloaded from a commercial site are not played back External HDD device is not supported The maximum current supported by...

Page 9: ... 2 ONLY FOR SERVICE 3 EXTERNAL DIGITAL OPTICAL IN JACK DIGITAL AUDIO IN 4 HDMI OUT JACK 5 COMPONENT VIDEO OUTPUT JACKS 6 FM ANTENA JACK 7 VIDEO OUT JACK 8 AUX IN JACKS 3 5 4 6 8 7 1 DISC TRAY 2 DISPLAY 3 USB PORT 4 OPEN CLOSE BUTTON 5 FUNCTION BUTTON 6 STOP BUTTON 7 PLAY PAUSE BUTTON 8 VOLUME CONTROL BUTTON 9 POWER BUTTON 10 REMOTE CONTROL SENSOR 11 MIC JACKS 5V 500mA MIC 1 MIC 2 1 2 8 6 7 9 4 5 3...

Page 10: ...ton Select the desired DSP EQ audio mode 3 S W LEVEL button Used to adjust the level of the subwoofer 4 REPEAT button Allows you to repeat a title chapter track or disc Adjust the volume up down Press to skip forwards Change channels up Press to select TV Exit the menu Return to the previous menu To open and close the disc tray Press to select TV s video mode or This is mode selection button Press...

Page 11: ...t and Center speakers the surround speakers are used to handle mainly sound effects and sound will not come from them all the time Subwoofer g The position of the subwoofer is not so critical Place it anywhere you like Position of the product Place it on a stand or cabinet shelf or under the TV stand Selecting the Listening Position The listening position should be located about 2 5 to 3 times the...

Page 12: ... R STAND STAND BASE L R SCREW 5 15 4EA SCREW 4 20 16EA SUBWOOFER Center SPEAKER FRONT SURROUND SPEAKER SUBWOOFER CENTER HT D355K SPEAKER CABLE HT D353HK HT D353HK SPEAKER CABLE SURROUND L R Stand Nut 2EA STAND BASE FRONT L R SUBWOOFER CENTER SUBWOOFER FRONT SPEAKER SURROUND SPEAKER Center SPEAKER Stand Screwdriver 2EA Downloaded From TheatreSystem Manual com Manuals ...

Page 13: ...er the speaker is installed Follow this steps to install other speaker 3 4 5 5 4 5 4 3 Stand Speaker Installing the Speakers on the Half Tallboy Stand HT D353HK only Front Speakers Stretch out the speaker cable and arrange it through the hole of the stand base as shown Tighten the stand nut C as shown and use the stand screwdriver D to tighten it in the arrow direction This is after the speaker is...

Page 14: ...ions below Fasten the screws to the wall then hang the speaker on the wall 1 2 3 Color tube Front left speaker L White Front right speaker R Red Center speaker Green Surround left speaker L Blue Surround right speaker R Gray 5 mm 10 mm Hold on the back of the speaker 30 mm 4 mm 8 to 10 mm Depth of fastened screw Adjust the speaker height by fitting it up to any of the provided holes See the follow...

Page 15: ... See page 20 for the resolution setting This product operates in Interlace scan mode 480i 576i for component composite output After making the video connection set the Video input source on your TV to match the corresponding Video output mode on your product Turn this product on first before you set the video input source on your TV See your TV owner s manual for more information on how to select ...

Page 16: ...rovides a secure digital link between a video source PC DVD etc and a display device TV projector etc Content is encrypted at the source device to prevent unauthorized copies from being made Using Anynet HDMI CEC Anynet is a function that enables you to control other Samsung Devices with your Samsung TV s remote control Anynet can be used by connecting this product to a SAMSUNG TV using a HDMI Cab...

Page 17: ...nt of the product Press the MIC VOL button to adjust the volume of the microphone Press the ECHO button to adjust the echo level of the microphone NOTE If you hear strange noises squealing or howling while using the Karaoke feature move the microphone away from the speakers Turning down the microphone s volume or the speaker volume is also effective The microphone does not operate in the AUX and T...

Page 18: ...nal components such as a VCR Connect AUX IN Audio on the back of the product to the Audio Out of the external Analog component Be sure to match the Colors of the connecting jacks Press the FUNCTION button to select AUX input The mode switches as follows DVD CD D IN AUX USB FM NOTE You can connect the Video Output jack of your VCR to the TV and connect the Audio Output jacks of the VCR to this prod...

Page 19: ...ds with no disc inserted When the Initial Setting screen does not appear refer to the Initial Setting see page 22 1 2 3 4 Setting the Setup menu The access step may differ depending on the selected menu The GUI Graphical User Interface in this manual may differ depending on the firmware version 1 2 3 4 5 6 7 8 0 9 DSP EQ A B C D S W LEVEL REPEAT USB REC DIMMER INFO GIGA VOL TV CH V TUNING V DVD RE...

Page 20: ...he resolution of the disc NOTE This will optimize the picture quality according to the content In the DVD disc etc that you want to play and the product or your BD Wise compliant Samsung TV If you want to change the resolution in BD Wise mode you must set BD mode to Off in advance BD Wise will be disabled if the product is connected to a device that does not support BD Wise Resolution Sets the out...

Page 21: ...d gets louder as you move closer to 6dB and quieter as you get closer to 6dB Delay Time If the speakers cannot be placed at equal distances from the listening position you can adjust the delay time of the audio signals from the Center and Surround speakers You can also set the Test Tone in this mode Setting up the Speaker Delay Time When 5 1CH Surround Sound is played you can enjoy the best sound ...

Page 22: ...sted only using the TV remote control KARAOKE SCORING Karaoke score display can be toggled On or Off Off Turns off the karaoke score display On After the singing the score is displayed on the screen NOTE This function is available only for the CD DA DVD Karaoke score may be affected by ambient noise System Initial Settings By using the Initial Setting you can set the language and TV aspect NOTE If...

Page 23: ...ersion etc 1 2 Disc Playback Press the OPEN CLOSE button Place a disc gently into the tray with the disc s label facing up Press the OPEN CLOSE button to close the disc tray NOTE Resume function When you stop disc play the product remembers where you stopped so when you press PLAY button again it will pick up where you left off This function works only with DVDs Press the STOP button twice during ...

Page 24: ...d with a digital camera or camcorder or JPEG files on a PC can be stored on a CD and then played back with this product Insert a JPEG disc on the disc tray Press the _ buttons to select Photo and then press the ENTER button Press the buttons to select the folder you want to play and then press the ENTER button Press the buttons to select the photo you want to play and then press the ENTER button T...

Page 25: ...es not work Step Motion Play D Press the PAUSE button repeatedly The picture moves forward one frame each time the button is pressed during playback NOTE No sound is heard during step motion playback 5 Minute Skip function D During playback press the _ button Playback skips 5 minutes forward whenever you press the button Playback skips 5 minutes backward whenever you press the _ button NOTE This f...

Page 26: ...A B C D MO ST REPEAT CD RIPPING DIMMER TUNER MEMORY P SCAN INFO VOL TV CH V TUNING V DVD RECEIVER TV MUTE POWER PL T O O L S CD MP3 Repeat During the CD MP3 playback press the REPEAT button repeatedly to select the repeat mode you want B Repeat Off Repeat Disc Repeat All Random Repeat Section A B A Repeat Off Repeat Disc Repeat Dir Directory Repeat All Random A B Repeat Playback B You can repeated...

Page 27: ...n quickly find a specific chapter Playing time Allows playback of the film from a desired time You must enter the starting time as a reference The time search function does not operate on some discs Audio Refers to the film s soundtrack language A DVD Disc can contain up to 8 audio languages Subtitle Refers to the subtitle languages available in the disc You will be able to choose the subtitle lan...

Page 28: ... Angle Function This function allows you to view the same scene in different angles Press the TOOLS button Press the buttons to select ANGLE display Press the _ buttons to select the desired angle 1 2 3 1 2 3 NOTE The Angle function works only with discs on which multiple angles have been recorded DIMMER You can adjust the brightness of the display on the main unit Press the DIMMER button Sound Mo...

Page 29: ...tation Manual Tuning Press the STOP button to select MANUAL and then press the TUNING 1 2 button to tune in to a lower or higher frequency Automatic Tuning Press the STOP button to select MANUAL and then press and hold the TUNING button to automatically search the band Setting Mono Stereo Press the MO ST button Each time the button is pressed the sound switches between STEREO and MONO In a poor re...

Page 30: ...s the USB REC button on the remote control To start ripping the current track press the USB REC button on the remote control while the system is playing a track or stopped temporarily To record the entire CD press and hold the USB REC button on the remote control FULL CD RIPPING appears on the display and recording starts Press the STOP button to stop recording When USB recording of a CD is comple...

Page 31: ...me When listening to a CD radio or TV sound is output to the front speakers only Select PROLOG by pressing PL II Dolby Pro Logic II on the remote control to use all six speakers Dolby Digital 5 1 CH Surround Sound is not produced Is there Dolby Digital 5 1 CH mark on the disc Dolby Digital 5 1 CH Surround Sound is produced only if the disc is recorded with 5 1 channel sound Is the audio language c...

Page 32: ...1 Albanian 1581 Vietnamese 1070 Breton 1196 Guarani 1305 Kashmiri 1403 Afan Oromo 1512 Serbian 1587 Volapuk 1079 Catalan 1203 Gujarati 1307 Kurdish 1408 Oriya 1513 Siswati 1613 Wolof 1093 Corsican 1209 Hausa 1311 Kirghiz 1417 Punjabi 1514 Sesotho 1632 Xhosa 1097 Czech 1217 Hindi 1313 Latin 1428 Polish 1515 Sundanese 1665 Yoruba 1103 Welsh 1226 Croatian 1326 Lingala 1435 Pashto Pushto 1516 Swedish ...

Page 33: ...deo 480i 576i 1 channel 1 0 Vp p 75 Ω load Component Video 480i 576i Y 1 0 Vp p 75 Ω load Pr 0 70 Vp p 75 Ω load Pb 0 70 Vp p 75 Ω load Video Audio HDMI 1080p 1080i 720p 480p 576p Amplifier Front speaker output 51W x 2 3Ω Center speaker output 51W 3Ω Surround speaker output 51W x 2 3Ω Subwoofer output 75W 3Ω Frequency range 20Hz 20KHz S N Ratio 65dB Channel separation 60dB Input sensitivity AUX 80...

Page 34: ...fer 3 Ω 40Hz 160Hz 88dB W M 75W 150W Front Surround 84 x 104 5 x 68 5 mm Center 84 x 104 5 x 68 5 mm Subwoofer 155 x 350 x 285 mm Front Surround 3 43 Kg Center 0 96 Kg Subwoofer 3 2 Kg Front Surround 3 Ω 140Hz 20KHz 86dB W M 51W 102W Center 3 Ω 140Hz 20KHz 86dB W M 51W 102W Subwoofer 3 Ω 40Hz 160Hz 88dB W M 75W 150W Front Surround 90 x 1100 x 119 mm stand base 250 x 250 Center 360 x 74 5 x 68 5 mm...

Page 35: ...Site Serbia 0700 Samsung 0700 726 7864 www samsung com Slovakia 0800 SAMSUNG 726 7864 www samsung com Spain 902 1 SAMSUNG 902 172 678 www samsung com Sweden 0771 726 7864 SAMSUNG www samsung com Switzerland 0848 SAMSUNG 7267864 CHF 0 08 min www samsung com ch www samsung com ch_fr French U k 0330 SAMSUNG 7267864 www samsung com Eire 0818 717100 www samsung com Lithuania 8 800 77777 www samsung com...

Page 36: ...Downloaded From TheatreSystem Manual com Manuals ...

Page 37: ...ا نظام المستخدم دليل اإلمكانات تخيل هذا Samsung منتج شرائك على لك ا ً شكر على المنتج تسجيل يرجى األكمل الوجه على خدمة لتلقي www samsung com register HT D350K HT D353HK HT D355K Downloaded From TheatreSystem Manual com Manuals ...

Page 38: ...ت الجهاز تعريض عدم ينبغي الجهاز على الزهور كآنية بالسوائل المليئة أن وينبغي الجهاز عن التيار لفصل كأداة الرئيسي الكهربي التيار قابس يستخدم وقت أي في للتشغيل ا ً جاهز يظل وصلة وجود مع المتردد التيار بمنفذ ًا م دو ً متصال الجهاز هذا يكون أن ينبغي واقية ٍ أرض التيار مقبس من القابس سحب يجب الرئيسي الكهربي التيار عن الجهاز لفصل ا ً جاهز الرئيسي الكهربي التيار قابس يكون أن ينبغي ولذا الرئيسي الكهربي للت...

Page 39: ...ة في ا ً وخصوص الحائط منفذ من المتردد التيار قابس بإزالة قم الكهربي التيار مصدر عن ًا م تما المنتج لفصل المنتج تلف في البرق عن الناجم الشدة بالغ الكهربي الجهد حاالت تتسبب فقد الحائط منفذ عن المتردد التيار قابس افصل الرعدية العواصف أثناء وتعطله المنتج سخونة زيادة إلى ذلك يؤدي فقد األخرى الحرارة مصادر أو المباشرة الشمس ألشعة المنتج تعرض ال السماعات مثل قوية كهربية أو مغناطيسية مجاالت تصدر التي األجه...

Page 40: ...www divx com بزيارة تفضل DivX فيديو لتشغيل DivX فيديو إلى الملفات لتحويل البرامج وأدوات المعلومات هذا DivX Certified جهاز تسجيل يجب للطلب ا ً وفق DIVX فيديو حول حدد التسجيل كود إلصدار VOD الطلب ا ً وفق DivX فيديو محتوى لتشغيل من مزيد على للحصول إلى انتقل الجهاز إعداد بقائمة DivX VOD قسم موقع التسجيل إكمال كيفية حول المعلومات المميز المحتوى ذلك في بما DivX فيديو لتشغيل DivX Certified تعد لشركة تجار...

Page 41: ...ه بمقدار إبالغك سيتم المنزلية بالزيارة السالمة معلومات السالمة تحذيرات 2 االحتياطات 3 الملحقات 3 وتخزينها األقراص مع التعامل حول تنبيهات 4 الترخيص 4 النشر قوق 4 النسخ ضد الحماية 4 التشغيل بدء الدليل في استخدامها سيتم التي الرموز 6 وخصائصها األقراص أنواع 6 الوصف 9 األمامية اللوحة 9 الخلفية اللوحة 9 ُعد ب عن التحكم وحدة 10 التوصيالت السماعات توصيل 11 بالتلفزيون الفيديو خرج توصيل 15 FM هوائي توصيل 17...

Page 42: ...شغيل يتم لن األكواد مطابقة عدم حالة في القرص لتشغيل بالترتيب النظام هذا على ا ً أيض ALL الملصق يحمل الذي DVD فيديو قرص تشغيل سيتم وخصائصها األقراص أنواع تشغيلها يمكن التي األقراص أنواع األقراص أنواع الشعار والعالمة اإلشارات المسجلة الخصائص DVD VIDEO VIDEO DVD فيديو DVD R DVD RW تنسيق IN DVD video DVD R DVD RW تنسيق IN DVD video AUDIO CD AUDIO المضغوط الصوتي القرص DivX AUDIO VIDEO المضغوط الصوتي ال...

Page 43: ...لصوت تخطي يتم قد ثانية كيلوبايت مضغوط قرص لكل أقصى بحد ٍ مسار 500 تشغيل يمكن مضغوط قرص لكل أقصى بحد ٍ د مجل 300 تشغيل يمكن CD R JPEG أقراص واحد مجلد في أقصى بحد صورة 999 تخزين يمكن ملفات تشغيل يمكن Kodak Fuji لصور مضغوط قرص تشغيل عند فقط الصور مجلد في الموجودة JPEG Kodak لصور المضغوطة األقراص بخالف الصور أقراص تستغرق قد اإلطالق على تعمل ال قد أو التشغيل لبدء أطول ا ً وقت Fuji DVD R RW CD R RW أقرا...

Page 44: ...T32 و FAT16 الملفات أنظمة 5 5 والموسيقى JPEG الصور ملفات أسماء تكون أن يجب لن وإال اإلنجليزية أو الكورية باللغة والفيديو WMAMP3 الملف عرض يتم 6 6 من التوصيل بالمنتج الخاص USB بمنفذ ً ة مباشر بالتوصيل قم USB توافق في مشاكل عنه ينتج قد آخر كابل خالل 7 7 ال قد متعددة بطاقات قارئ إلى واحد ذاكرة جهاز من أكثر إدخال ا ً د جي يعمل 8 8 مدعوم غير الرقمية للكاميرات PTP بروتوكول 9 9 القراءة عملية أثناء USB جه...

Page 45: ...ل مقبس الرقمي الصوت دخل الخارجي 4 HDMI خرج مقبس 5 المكون فيديو خرج مقابس 6 FM هوائي مقبس 7 الفيديو دخل مقبس بتوصيل قم الفيديو دخل بالتلفزيون الخاص الفيديو خرج بمقبس 8 مساعد دخل مقبس 3 5 4 6 8 7 1 األقراص درج 2 العرض شاشة 3 USb منفذ 4 إغالق فتح OPEN CLOSE زر 5 وظيفة زر 6 إيقاف زر 7 مؤقت إيقاف تشغيل زر 8 الصوت مستوى في التحكم زر 9 تشغيل زر 10 ُعد ب عن التحكم وحدة مستشعر 11 MIC الميكروفون مقابس 5V 50...

Page 46: ...ة معالج صوت وضع لتحديد المطلوب EQ يستخدم المستوى SW SW LEVEL الزر 3 الصوت ُضخم م مستوى لتعديل عنوان تكرار لك يتيح تكرار REPEAT الزر 4 قرص أو مسار أو فصل أو الصوت مستوى خفض رفع لضبط ألعلى القنوات تغيير لألمام للتخطي عليه اضغط التلفاز لتحديد اضغط القائمة من للخروج الزر هذا على اضغط السابقة القائمة إلى للرجوع وإغالقه األقراص درج لفتح بالتلفزيون الخاص الفيديو وضع لتحديد اضغط أو الوضع تحديد زر هو هذا ا...

Page 47: ...عات تستخدم والمركزية األمامية السماعات بخالف الوقت طوال منها الصوت يصدر ولن g الصوت مضخم تريد أينما ضعه بالغة أهمية الصوت مضخم موضع يمثل ال المنتج وضع التلفزيون حامل تحت أو الخزانة رف أو حامل على ضعه االستماع موضع تحديد بمقدار التلفزيون عن تبعد مسافة على االستماع موضع يكون أن يجب التلفزيون شاشة حجم أضعاف 3 إلى 2 5 من يتراوح 2 4 إلى 2 من المسافة تتراوح بوصة 32 حجم للتلفزيون بالنسبة مثال متر أمتار 4...

Page 48: ...ة مجﺴﻤة ﺳﻤاعة ﺃمامية HT D355K HT D355K ﺃمامية مجﺴﻤة L R الﺤامﻞ الﺤامﻞ قاعدﺓ L R 4EA 15 5 ﺑرغﻲ 16EA 20 4 ﺑرغﻲ الﺼﻮت مﻀﺨﻢ مرﻛزﻳة الﺴﻤاعة ﻛاﺑﻞ HT D353HK الﺴﻤاعة ﻛاﺑﻞ مجﺴﻤة L R الﺤامﻞ قاعدﺓ ﺃمامية L R مرﻛزﻳة مجﺴﻤة HT D353HK الﺼﻮت مﻀﺨﻢ األمامية الﺴﻤاعة مجﺴﻤة ﺳﻤاعة الﻤرﻛزﻳة الﺴﻤاعة 2EA الﺤامﻞ ﺻامﻮلة 2EA الﺤامﻞ مفﻚ Downloaded From TheatreSystem Manual com Manuals ...

Page 49: ...سماعة لتركيب الخطوة هذه اتبع 1 2 الحامل الحامل قاعدة 5 4 3 الحامل السماعة االرتفاع متوسط قائم حامل على السماعات تركيب األمامية السماعات فقط HT D353HK 1 هو كما الحامل قاعدة فتحة خالل من وضبطه السماعة كابل بتطويل قم موضح 2 D ا ً مفك واستخدم موضح هو كما C الحامل صامولة ربط بإحكام قم السهم اتجاه في ربطه إلحكام 3 بالكامل السماعة تركيب بعد هذا يكون الطريقة بنفس األخرى السماعات ربط بإحكام قم االرتفاع متو...

Page 50: ...لحائط البراغي تثبيت أحكم الملون األنبوب أبيض L اليسرى األمامية السماعة أحمر R اليمنى األمامية السماعة أخضر الوسطى السماعة أزرق L اليسرى اإلحاطة صوت سماعة رمادي R اليمنى اإلحاطة صوت سماعة 5 mm 10 mm الخلفي الجزء من السماعة بتعليق قم 30 mm 4 mm 10 إلى 8 mm المثبت البرغي عمق 3 األمثلة انظر المتوفرة الفتحات من بأي ضبطها طريق عن السماعة ارتفاع اضبط السماعة بارتفاع المتعلقة التالية السماعة الرتفاع ملم 6...

Page 51: ...كسل 480 هي HDMI لخرج المتوفرة الدقة مستويات المركب المكون لخرج 576i 480i المتداخل المسح وضع في المنتج هذ يعمل بمنتجك المناظر الفيديو إخراج ليطابق بالتلفزيون الفيديو إدخال مصدر اضبط فيديو اتصال إجراء بعد كيفية حول المعلومات من مزيد على للحصول بالتلفزيون الخاص المالك دليل انظر بالتلفزيون الفيديو إدخال مصدر ضبط قبل ً أوال المنتج هذا بتشغيل قم بالتلفزيون الخاص الفيديو إدخال مصدر تحديد تنبيه حماية بأنظ...

Page 52: ... إلى وما DVD الكمبيوتر الفيديو مصدر بين ا ً ن آم ًا ي رقم ا ً ارتباط ويوفر نسخه يجري إنشاؤه يجري مما المرخصة غير النسخ لمنع المصدر الجهاز في المحتوى تشفير يتم ذلك HDMI CEC Anynet استخدام يمكن Samsung بتلفزيون الخاصة ُعد ب عن التحكم وحدة باستخدام األخرى Samsung أجهزة في التحكم من تمكنك وظيفة Anynet تمثل SAMSUNG تلفزيون مع ذلك يتوفر HDMI كابل باستخدام SAMSUNG بتلفزيون المنتج هذا توصيل طريق عن Anynet...

Page 53: ... بتوصيل قم 2 الميكروفون صوت مستوى لضبط الميكروفون صوت مستوى MIC VOL زر على اضغط 2 الميكروفون صدى مستوى لضبط صدى ECHO زر على اضغط مالحظة الميكروفون صوت مستوى خفض ويعد السماعات عن الميكروفون فأبعد كاريوكي ميزة استخدام أثناء صراخ أو ضجيج غريبة ا ً أصوات سمعت إذا ا ً أيض ً فعاال ا ً أمر السماعة أو الموالف TUNER ووضع المساعد AUX الوضع في الميكروفون يعمل ال D SURROUND SUBWOOFER CENTER FRONT SPEAKERS OUT...

Page 54: ...X الفيديو أشرطة مسجل مثل التناظرية اإلشارة مكونات 1 الخارجي التناظري للمكون الصوت بخرج للمنتج الخلفي بالجزء الموجود الصوت AUX IN بتوصيل قم التوصيل مقابس ألوان مطابقة من تأكد 2 AUX دخل لتحديد وظيفة FUNCTION الزر على اضغط التالي النحو على الوضع تبديل يتم DVD CD D IN AUX USb FM مالحظة المنتج بهذا الفيديو أشرطة لمسجل الصوت خرج مقابس وتوصيل بالتلفزيون الفيديو أشرطة لمسجل الفيديو خرج مقبس توصيل يمكنك خا...

Page 55: ...ر على 6 اإلعداد قائمة من للخروج خروج EXIT الزر على اضغط األولي اإلعداد التشغيل بدء قبل 1 بالتلفزيون توصيله عند تشغيل POWER زر على اضغط مرة ألول األولي اإلعداد شاشة عرض سيتم Move Select Return Initial settings I On Screen Language Select a language for the on screen displays English 한국어 Nederlands Français Deutsch Italiano 2 الزر على اضغط ثم المطلوبة اللغة لتحديد الزرين على اضغط إدخال ENTER 3 البدء...

Page 56: ... PAL الصوت السماعة إعداد السماعة حجم بهذا صوت اختبار وكذلك والمجسمة المركزية للسماعتين السماعة حجم ضبط يمكنك الوضع الشاشة إلى وما والدقة التليفزيون نسب مثل متعددة عرض خيارات تهيئة يمكنك ذلك التليفزيون نسب الشاشة إعداد ضبط إلى تحتاج قد لديك المتوفر التليفزيون نوع حسب Pan Scan 4 3 ارتفاع بنسبة فيديو عرض تريد عندما الخيار هذا حدد دون DVD أقراص توفرها التي 16 9 العرض إلى من والسفلي العلوي الجزء في الس...

Page 57: ...bwoofer بالترتيب الصوت مضخم ر إدخال ENTER الزر على اضغط الصوت اختبار إليقاف Settings Move Select Return Speaker Setting Speaker Size Sound Edit Delay Time Test Tone Off Select Return صغيرة على الوضع ضبط تم األمامية للسماعة بالنسبة موجودة على الوضع ضبط يتم الصوت لمضخم بالنسبة إلى الوضع تحويل يمكنك والمجسمة المركزية للسماعتين بالنسبة بدون أو صغيرة السماعات استخدام حالة في الخيار هذا حدد صغيرة سماعة ...

Page 58: ...حسين EQ الرقمية اإلشارة معالج II مستوى ضبط يمكن تشغيل على HDMI صوت ضبط بعد بالتلفزيون الخاصة ُعد ب عن التحكم وحدة باستخدام فقط الصوت كاريوكي نقاط تسجيل كاريوكي نقاط شاشة تشغيل إيقاف أو تشغيل بين التبديل يمكن كاريوكي نقاط شاشة تشغيل إليقاف تشغيل إيقاف Off الشاشة على النقاط عرض يتم التسجيل بعد تشغيل On مالحظة فقط CD DA DVD ألقراص الوظيفة هذه تتوفر المحيطة بالضوضاء Karaoke تقييم يتأثر قد نظام األولي ...

Page 59: ...اص تشغيل ١ ١ إغالق فتح OPEN CLOSE زر على اضغط ٢ ٢ أعلى إلى القرص ملصق توجيه مع الدرج في برفق ا ً قرص ضع ٣ ٣ إلغالق إغالق فتح OPEN CLOSE زر على اضغط األقراص درج مالحظة موضع المنتج يتذكر القرص تشغيل إيقاف عند االستئناف وظيفة ً ثانية ً ة مر تشغيل PLAY زر على تضغط عندما لذا التوقف الوظيفة هذه تعمل عندها توقفت التي النقطة باسترجاع المنتج سيقوم DVD أقراص مع فقط وظيفة لتعطيل التشغيل أثناء مرتين إيقاف STO...

Page 60: ...ية بكاميرا التقاطها تم التي الصور تخزين يمكن تشغيلها إعادة ثم مضغوط قرص على كمبيوتر جهاز على JPEG ملفات المنتج هذا باستخدام ١ ١ األقراص درج في JPEG قرص أدخل ٢ ٢ اضغط ثم صورة Photo لتحديد الزرين على اضغط إدخال ENTER زر على ٣ ٣ ثم تشغيله تريد الذي المجلد لتحديد الزرين على اضغط إدخال ENTER زر على اضغط ٤ ٤ ثم تشغيلها تريد التي الصورة لتحديد الزرين على اضغط إدخال ENTER زر على اضغط الشرائح عرض وسيبدأ تح...

Page 61: ...يء التشغيل التدريجية الحركة تشغيل D متكرر بشكل مؤقت إيقاف PAUSE زر على اضغط الضغط فيها يتم مرة كل في واحد إطار بمعدل لألمام الصورة تتحرك التشغيل أثناء الزر على مالحظة التدريجية الحركة تشغيل أثناء صوت سماع يتم ال دقائق 5 تخطي وظيفة D زر على اضغط التشغيل أثناء الزر على ضغطت كلما لألمام دقائق 5 التشغيل يتخطى الزر على ضغطت كلما للخلف دقائق 5 التشغيل يتخطى مالحظة الوقت معلومات على يحتوي الذي DivX لـ فق...

Page 62: ...D MO ST REPEAT CD RIPPING DIMMER TUNER MEMORY P SCAN INFO VOL TV CH V TUNING V MUTE POWER PL T O O L S CD MP3 تكرار 1 REPEAT زر على اضغط CD MP3 تشغيل أثناء تريد الذي التكرار وضع لتحديد متكرر بشكل تكرار B Repeat Off Repeat Disc RepeatAll Random Repeat SectionA b A Repeat Off Repeat Disc Repeat Dir Directory Repeat All Random A b تشغيل تكرار B بشكل مضغوط قرص أو DVD بقرص معين مقطع تشغيل يمكنك متكرر 1...

Page 63: ...ين على اضغط 3 الصوت لغة لتحديد الرقمية األزرار أو الزرين على اضغط المطلوبة لغة تحديد يتم DVD قرص على المتوفرة اللغات لعدد ا ً وفق الزر هذا على الضغط فيها يتم مرة كل في مختلفة صوت مالحظة مدعوم غير DTS AUDIO األقراص معلومات عرض Change Select 03 04 001 001 0 00 21 KO 1 2 EN 02 02 1 1 D Change Select 1 6 1 1 Off 1 1 أدوات TOOLS زر على اضغط التشغيل أثناء بعد عن التحكم بوحدة 2 المطلوب العنصر لتحديد الزر...

Page 64: ...رة كل في مختلفة مالحظة الصوت ولغة الترجمة وظائف تتوفر ال قد للقرص ا ً وفق التوضيحية التسمية وظيفة D الفيديو وتحرير استخراج في الخبرة بعض لديك يكون أن يجب صحيح بشكل الميزة هذه الستخدام التوضيحية التسمية ملف بحفظ قم التوضيحية التسمية وظيفة الستخدام DivX الوسائط ملف مع يحدث كما الملف اسم بنفس smi المجلد بنفس avi Samsung_007CD1 avi Root مثال Samsung_007CD1 smi رقمي أبجدي حرف 100 إلى يصل ما الملف اسم ي...

Page 65: ...ات كرر ا ً مسبق أخرى محطة لضبط S W مستوى S W LEVEL زر على الضغط ا ً أيض يمكنك الزرين واستخدام بعد عن التحكم بوحدة S W مستوى الصوت مضخم مستوى لضبط _ أو S W LEVEL زر على اضغط Dolby Pro Logic II وضع وظيفة أو المطلوب Dolby Pro Logic II صوت وضع تحديد يمكنك P Bass أو MP3 تحسين PL II زر على اضغط enhance on power bass mp3 on power bass off music movie prolog matrix stereo مالحظة الخارجي جهازك بتوصيل قم Pr...

Page 66: ... النظام يتوقف مضغوط أخرى DTS CD أقراص تسجيل يمكن ال ملف إنشاء يمكن فال ٍ ثوان 5 من أقل التسجيل مدة كانت إذا ُسجل م USB جهاز تنسيق حالة في فقط USB على التسجيل يعمل مدعوم غير NTFS ملفات نظام FAT ملفات بنظام للقرص USB تسجيل أثناء الصوت إشارة إخراج يتم لن المضغوط USB وظيفة تكون On على HDMI AUDIO ضبط عند مدعومة غير Recording المضغوط القرص من النسخ أثناء الميكروفون بإدخال تقم ال USb وظيفة مضيف ميزة باست...

Page 67: ...ات إلى الصوت إخراج يتم تلفزيون أو راديو أو مضغوط قرص إلى االستماع عند Dolby Pro Logic II PL II على بالضغط PROLOG حدد فقط األمامية كلها الست السماعات الستخدام ُعد ب عن التحكم بوحدة ذوي مجسم صوت صدور عدم حالة في Dolby Digital بتقنية قناة 5 1 بتقنية قناة 5 1 ذو المجسم الصوت يصدر القرص على Dolby Digital 5 1 CH عالمة توجد هل قناة 5 1 ذي الصوت باستخدام القرص تسجيل حالة في فقط Dolby Digital المعلومات شاش...

Page 68: ... 1511 Albanian 1581 Vietnamese 1070 Breton 1196 Guarani 1305 Kashmiri 1403 Afan Oromo 1512 Serbian 1587 Volapuk 1079 Catalan 1203 Gujarati 1307 Kurdish 1408 Oriya 1513 Siswati 1613 Wolof 1093 Corsican 1209 Hausa 1311 Kirghiz 1417 Punjabi 1514 Sesotho 1632 Xhosa 1097 Czech 1217 Hindi 1313 Latin 1428 Polish 1515 Sundanese 1665 Yoruba 1103 Welsh 1226 Croatian 1326 Lingala 1435 Pashto Pushto 1516 Swed...

Page 69: ...قصى الحد الفيديو خرج المركب الفيديو 576i 480i أوم 75 بمقدار حمل الذروة إلى الذروة من فولت 1 0 قناة 1 المكون فيديو 576i 480i أوم 75 بمقدار حمل الذروة إلى الذروة من فولت 1 0 Y أوم 75 بمقدار حمل الذروة إلى الذروة من فولت 0 70 Pr أوم 75 بمقدار حمل الذروة إلى الذروة من فولت 0 70 Pb صوت فيديو HDMI 576p 480p 720p 1080i 1080p المكبر األمامية السماعة خرج أوم 3 2 وات 51 المركزية السماعة خرج أوم 3 وات 51 الم...

Page 70: ...ملم 68 5 x 10⁴ 5 x 84 المركزية ملم 285 x 350 x 155 الصوت مضخم كجم 0 96 المركزية كجم 3 43 مجسمة األمامية كجم 3 2 الصوت مضخم مجسمة األمامية أوم 3 هرتز كيلو 20 إلى هرتز 140 من متر وات ديسيبل 86 وات 51 وات 102 المركزية أوم 3 هرتز كيلو 20 إلى هرتز 140 من متر وات ديسيبل 86 وات 51 وات 102 الصوت مضخم أوم 3 هرتز كيلو 160 إلى هرتز 40 من متر وات ديسيبل 88 وات 75 وات 150 250 x 250 الحامل قاعدة ملم 119 x 1100 ...

Page 71: ...0 SAMSUNG 72678 doar din reţeaua Romtelecom tarif local 2 021 206 01 10 din orice reţea tarif normal www samsung com Area Contact Center Web Site Serbia 0700 Samsung 0700 726 7864 www samsung com Slovakia 0800 SAMSUNG 726 7864 www samsung com Spain 902 1 SAMSUNG 902 172 678 www samsung com Sweden 0771 726 7864 SAMSUNG www samsung com Switzerland 0848 SAMSUNG 7267864 CHF 0 08 min www samsung com ch...

Page 72: ...Code No AH68 02352N 04 Downloaded From TheatreSystem Manual com Manuals ...

Reviews: