background image

26


English

Setup

Before Starting (Initial Setting)

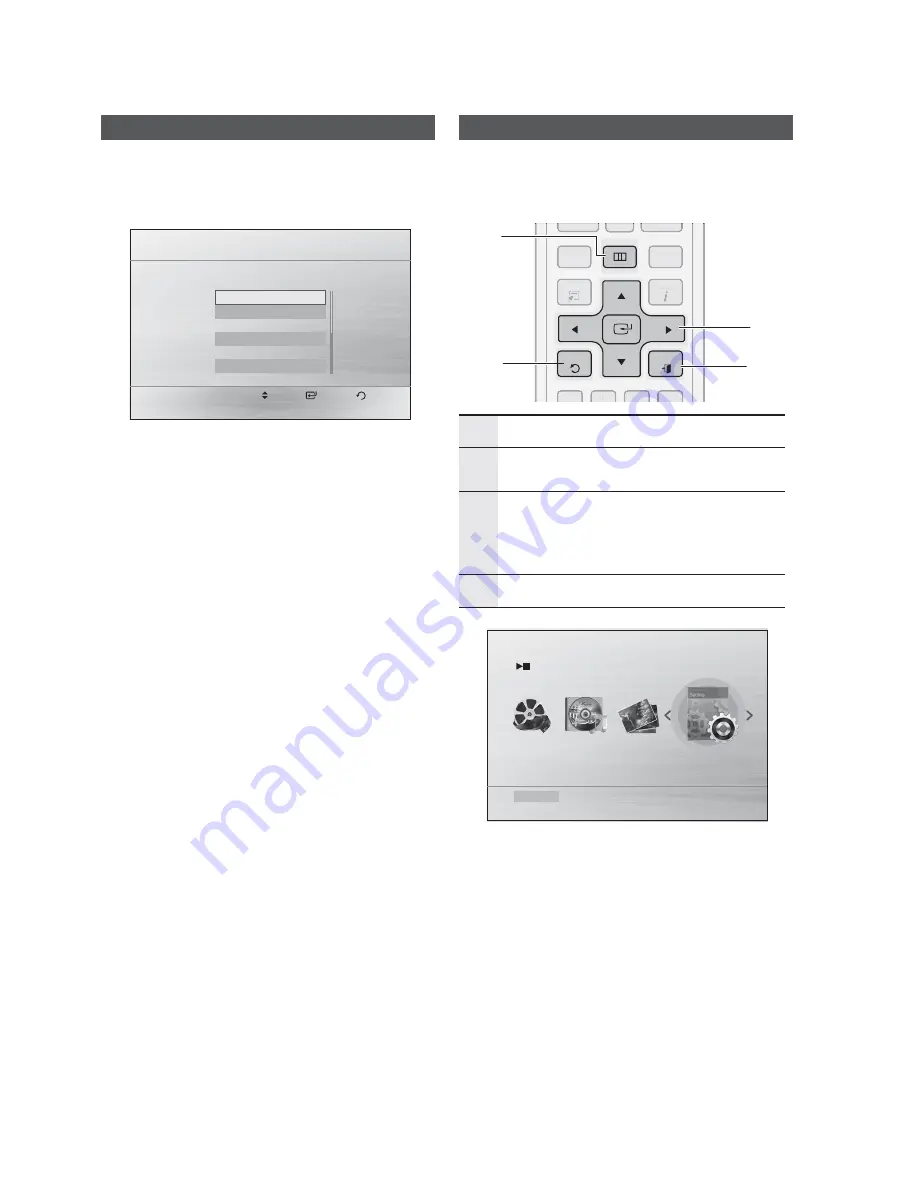
Press the 

POWER

 button when it is plugged in 

TV for the fi rst time.
Initial Setting screen will be displayed.

Move  

Select              Return

Initial setting > On-Screen Language

Select a language for the on-screen displays.

English

Korean

Dutch

French

German

Italian

Press the ▲▼ buttons to select the desired 
language, then press the 

ENTER

 button.

Press the 

ENTER

 button to select Start button.

Press the ▲▼ buttons to select desired TV Aspect, 
then press the 

ENTER

 button.

Plug the ASC microphone into the ASC IN jack 
on the product. 
- Auto Sound Calibration screen will be displayed.

Press the 

ENTER

 button to select Start button.

 NOTE

If the HDMI cable is connected to the product, TV 
aspect does not appear.
If you want to move to the previous screen, press the 

RETURN

 button.

Once you select a menu language, you can change it by 
pressing the 

STOP

 (

) button on the remote control for 

more than 5 seconds with no disc inserted.

When the Initial Setting screen does not appear, refer to 

the Initial Setting. (see page 31)

1.

2.

3.

4.

5.

6.

Setting the Setup menu

The access step may differ depending on the selected 
menu. The GUI (Graphical User Interface) in this 
manual may differ, depending on the fi rmware version.

DISC MENU

MENU

TITLE MENU

TOOLS

RETURN

EXIT

INFO

TUNER MEMORY

MO/ST

CD R PPING

DISC MENU

MENU

TITLE MENU

TOOLS

INFO

A

B

C

D

TUNER MEMORY

MO/ST

CD R PPING

1

2

3

4

1

MENU 

BUTTON : Display the home menu.

2

RETURN

 BUTTON : Return to the previous 

setup menu.

3

ENTER / DIRECTION

 BUTTON

Move the cursor and select an item.
Select the currently selected item.

Confi rm the setting.

4

EXIT

 BUTTON : Exit the setup menu.

Function    DVD/CD      

Settings

Press the 

POWER

 button.

Press the 

◄►

 buttons to select 

Settings

, then 

press the 

ENTER

 button.

Press the 

▲▼

 buttons to select the desired 

menu, then press the 

ENTER

 button.

Press the 

▲▼

 buttons to select the desired sub-

menu, then press the 

ENTER

 button.

Press the 

▲▼

 buttons to select the desired 

item, then press the 

ENTER

 button.

Press the 

EXIT

 button to exit the setup menu.

1.

2.

3.

4.

5.

6.


Summary of Contents for HT-C550

Page 1: ...em user manual Imagine the possibilities Thank you for purchasing this Samsung product To receive more complete service please register your product at www samsung com register HT C550 HT C553 HT C555 HT C650W HT C653W HT C655W ...

Page 2: ...ntial installation This equipment generates uses and can radiate radio frequency energy and if not installed and used in accordance with the instructions may cause harmful interference to radio communications However there is no guarantee that interference will not occur in a particular installation If this equipment does cause harmful interference to radio or television reception which can be det...

Page 3: ...tning storms or when unused for long periods of time 14 Refer all servicing to qualified service personnel Servicing is required when the apparatus has been damaged in any way such as power supply cord or plug is damaged liquid has been spilled or objects have fallen into the apparatus the apparatus has been exposed to rain or moisture does not operate normally or has been dropped Precautions Ensur...

Page 4: ...7 210 067 7 228 062 7 245 566 7 245 567 7 257 065 7 263 045 7 269 110 7 272 086 7 272 106 7 280 460 7 283 729 7 286 454 7 304 938 This device is protected by U S Patent Nos 6 836 549 6 381 747 7 050 698 6 516 132 and 5 583 936 ABOUT DIVX VIDEO DivX is a digital video format created by DivX Inc This is an official DivX Certified device that plays DivX video Visit www divx com for more information and...

Page 5: ...15 15 Connecting the Speakers 22 Connecting the Video Out to your TV 24 Connecting the FM Antenna 24 Connecting Audio from External Components SETUP 26 26 Before Starting Initial Setting 26 Setting the Setup menu 27 Display 27 TV Aspect 27 BD Wise 27 Resolution 27 HDMI Format 28 Audio 28 Speaker Setting 29 ASC Auto Sound Calibration Setting 30 DRC Dynamic Range Compression 30 AV SYNC 30 HDMI AUDIO...

Page 6: ...ction 37 Sound Mode 39 Listening to Radio ADVANCED FUNCTIONS 40 40 USB Function 40 Using an iPod 42 CD Ripping OTHER INFORMATION 43 43 Troubleshooting 44 Country code list 45 Index 46 Specifications Contents Figures and illustrations in this User Manual are provided for reference only and may differ from actual product appearance ...

Page 7: ... This feature is enabled only if BD Wise compliant Samsung products are connected to each other using an HDMI cable AV SYNC Function Video may lag behind the audio if the product is connected to a digital TV To compensate for this you can adjust the audio delay time to sync up with the video Getting Started Icons that will be used in manual Make sure to check the following terms before reading the...

Page 8: ...n single sided Approx 160 min double sided AUDIO CD AUDIO 5 inches 74 min 3 1 2 inches 20 min DivX AUDIO VIDEO 5 inches 3 1 2 inches Do not use the following type of discs LD CD G CD I CD ROM DVD ROM and DVD RAM discs cannot be played in this unit If such discs are played a WRONG DISC FORMAT message appears on the TV screen DVD discs purchased abroad may not play on this product If such discs are ...

Page 9: ...e played Picture discs other than Kodak Fuji Picture CDs may take longer to start playing or may not play at all DVD R RW CD R RW Discs Software updates for incompatible formats are not supported Example QPEL GMC resolutions higher than 800 x 600 pixels etc If a DVD R RW disc has not been recorded properly in DVD Video format it will not be playable DivX Digital internet video express DivX is a vi...

Page 10: ...ient power supply you can use a separate power cable to supply power so that it can work properly The connector of the USB cable may differ depending on the manufacturer of the USB device USB card Reader One slot USB card reader and Multi slot USB card reader The USB card reader may not be supported depending on the manufacturer If you install multiple memory devices into a multi card reader you m...

Page 11: ...rack Tunes down the FM frequency band 7 STOP BUTTON Stops disc playback 8 PLAY PAUSE BUTTON Plays a disc or pauses playback 9 TUNING UP SKIP BUTTON Goes to the next title chapter track Tunes up the FM frequency band 10 VOLUME CONTROL BUTTON Volume adjustment 11 POWER BUTTON Turns the product on and off 12 AUX IN 1 ASC IN CONNECTOR Connect external components such as an MP3 player Connect to use th...

Page 12: ...RELESS The TX card enables communication between the product and the wireless receiver module The wireless receiver module is not provided for HT C550 C553 C555 5 HDMI OUT JACK Using an HDMI cable connect this HDMI output jack to the HDMI input jack on your TV for the best quality picture 6 AUX IN 2 JACKS Connect to the 2CH Analog output of an external device such as a VCR 7 VIDEO OUT JACK Connect...

Page 13: ...ls Cut off the sound temporarily Press to check the disc menu Brings up the product s setup menu Select on screen menu items and change menu value Return to the previous menu Allow access to common functions of the DVD Home Theater such as navigating the Photo List or GREEN B Press to preset FM stations Select the desired Dolby Pro Logic II audio mode Set the Sleep time to shut off the Home Theate...

Page 14: ... 14 Nikei 03 AOC 01 18 40 48 Onking 03 Bell Howell M Wards 57 58 81 Onwa 03 Brocsonic 59 60 Panasonic 06 07 08 09 54 66 67 73 74 Candle 18 Penney 18 Cetronic 03 Philco 03 15 17 18 48 54 59 62 69 90 Citizen 03 18 25 Philips 15 17 18 40 48 54 62 72 Cinema 97 Pioneer 63 66 80 91 Classic 03 Portland 15 18 59 Concerto 18 Proton 40 Contec 46 Quasar 06 66 67 Coronado 15 Radio Shack 17 48 56 60 61 75 Crai...

Page 15: ... Unlike the front and center speakers the rear speakers are used to handle mainly sound effects and sound will not come from them all the time Subwoofer g The position of the subwoofer is not so critical Place it anywhere you like Position of the product Place it on a stand or cabinet shelf or under the TV stand Selecting the Listening Position The listening position should be located about 2 5 to...

Page 16: ...er Components Speaker Components FRONT L R REAR L R CENTER STAND STAND BASE SUBWOOFER SPEAKER CABLE HT C553 SCREW Large 2EA SCREW Smal 8EA FRONT L R STAND STAND BASE SPEAKER CABLE REAR L R SCREW Large 4EA SCREW Small 16EA Assembled Speakers HT C553 HT C555 HT C555 CENTER SPEAKER REAR SPEAKER SUBWOOFER FRONT SPEAKER FRONT REAR SPEAKERS CENTER SPEAKER SUBWOOFER CENTER SUBWOOFER ...

Page 17: ...ts FRONT L R REAR L R STAND STAND BASE SPEAKER CABLE FRONT L R STAND STAND BASE SPEAKER CABLE REAR L R Speaker Components Assembled Speakers HT C653W HT C655W HT C655W CENTER SPEAKER SUBWOOFER CENTER SPEAKER REAR SPEAKER SUBWOOFER FRONT SPEAKER CENTER SUBWOOFER CENTER SUBWOOFER REAR SPEAKER FRONT SPEAKER SCREW Large 2EA SCREW Small 8EA SCREW Large 4EA SCREW Small 16EA ...

Page 18: ... Turn the Stand Base upside down and connect it to the Stand Insert four small screws clockwise into the four holes marked using a screwdriver as shown in the illustration Connect the upper Speaker to the assembled Stand Insert another large screw clockwise into the hole on the rear of the speaker using a screwdriver 1 2 3 4 2 3 Stand Speaker 4 Stand 1 Stand Base ...

Page 19: ...to the speaker jacks 1 2 3 Black Red HT C550 P d Front Speaker R Subwoofer Rear Speaker R Rear Speaker L Front Speaker L Center Speaker Refer to page 16 for the HT C553 C555 speakers The HT C553 C555 speakers connect in the same way NOTE HT C650W C653W C655W do not have rear speaker connectors on the main unit The rear speakers are connected to the Wireless Receiver Module See pages 20 21 The rear...

Page 20: ...ireless Receiver Module TX Card Speaker Cable 2EA Connecting the Speakers Connecting The Speakers Continued HT C650W C653W C655W only i od A O Front Speaker R Subwoofer Center Speaker Rear Speaker R Wireless Receiver Module Front Speaker L Rear Speaker L Refer to page 17 for the HT C653W C655W speakers The HT C653W C655W speakers connect in the same way ...

Page 21: ...eet 10m but may vary depending on your operating environment If a steel concrete wall or metallic wall is between the product and the wireless receiver module the system may not operate at all because the radio wave cannot penetrate metal If the product doesn t make wireless connection the product needs ID Setting between the product and wireless receiver module With the product turned off press r...

Page 22: ...ideo cable from the VIDEO OUT jack on the back of the product to the VIDEO IN jack on your TV NOTE Resolutions available for the HDMI output are 480p 720p 1080i 1080p See page 27 for the resolution setting This product operates in Interlace scan mode 480i for component composite output After making the video connection set the Video input source on your TV to match the corresponding Video output H...

Page 23: ...l link between a video source PC DVD etc and a display device TV projector etc Content is encrypted at the source device to prevent unauthorized copies from being made NOTE When a HDMI cable is connected composite Video and component video signals are not output Using Anynet HDMI CEC Anynet is a function that enables you to control other Samsung Devices with your Samsung TV s remote control Anynet...

Page 24: ...wall or other rigid surface NOTE This product does not receive AM broadcasts 1 2 FM Antenna supplied Connecting Audio from External Components AUX IN 1 ASC IN Audio Cable not supplied Audio Out AUX1 Connecting an External Component MP3 player Components such as an MP3 Player Connect AUX IN1 ASC IN Audio on the front of the product to the Audio Out of the external component MP3 player Press the FUN...

Page 25: ...nent Be sure to match the colors of the connecting jacks Press the FUNCTION button to select AUX 2 input The mode switches as follows DVD CD D IN AUX 1 AUX 2 USB IPOD FM NOTE You can connect the Video Output jack of your VCR to the TV and connect the Audio Output jacks of the VCR to this product OPTICAL Connecting an External Digital Component Digital signal components such as a Cable Box Satellit...

Page 26: ...re than 5 seconds with no disc inserted When the Initial Setting screen does not appear refer to the Initial Setting see page 31 1 2 3 4 5 6 Setting the Setup menu The access step may differ depending on the selected menu The GUI Graphical User Interface in this manual may differ depending on the firmware version DISC MENU MENU TITLE MENU TOOLS RETURN EXIT INFO TUNERMEMORY MO ST CD R PPING DISC MEN...

Page 27: ...e output to the TV direct Off The output resolution will be fixed according to the Resolution previously set regardless of the resolution of the disc NOTE This will optimize the picture quality according to the content In the DVD disc etc that you want to play and the product or your BD Wise compliant Samsung TV If you want to change the resolution in BD Wise mode you must set BD mode to Off in adv...

Page 28: ... Balance You can select between 0 and 6 The volume decreases as you move closer to 6 Adjusting Center Rear Subwoofer Speaker Level The volume level can be adjusted in steps from 6dB to 6dB The sound gets louder as you move closer to 6dB and quieter as you get closer to 6dB Delay Time If the speakers cannot be placed at equal distances from the listening position you can adjust the delay time of th...

Page 29: ... NOTE With PL II Dolby Pro Logic II the delay time may be different for each mode With AC 3 and DTS the delay time can be set between 00 and 15mSEC The Center channel is only adjustable on 5 1 channel discs Test Tone Settings Move Select Return Speaker Setting Speaker Size Sound Edit Delay Time Test Tone On Select Return Use the Test Tone feature to check the speaker connections Press the buttons ...

Page 30: ...Sound Calibration Setting When the message REMOVE MIC appears on the display unplug the ASC microphone 1 2 NOTE Setting the Auto Sound Calibration function takes about 3 minutes DRC Dynamic Range Compression This feature balances the range between the loudest and quietest sounds You can use this function to enjoy Dolby Digital sound when watching movies at low volume at night You can select either...

Page 31: ... only appear if it is supported on the disc Security The Parental Lock function works in conjunction with DVDs that have been assigned a rating which helps you control the types of DVDs that your family watches There are up to 8 rating levels on a disc Parental Rating Select the rating level you want to set A larger number indicates that the program is intended for adult use only For example if yo...

Page 32: ... an invalid button is pressed TV Screen Saver Power Saving Function If the main unit is left in the stop mode for more than 5 minutes without being used a screen saver will appear on your TV If the product is left in the screen saver mode for more than 25 minutes the power will automatically turn off 1 2 3 Basic Functions Audio CD CD DA MP3 WMA Playback BA Track01 1 17 0 15 3 59 Function DVD CD Re...

Page 33: ...s the GREEN B or YELLOW C button during the PAUSE mode GREEN B Button Rotate 90 counterclockwise YELLOW C Button Rotate 90 clockwise NOTE The maximum resolutions supported by this product are 5120 x 3480 or 19 0 MPixel for standard JPEG files and 2048 x 1536 or 3 0 MPixel for progressive image files 1 2 3 4 Using the Playback Function Forward Reverse Search dBAD Press the buttons to use the Search F...

Page 34: ...c Menu d You can view the menus for the audio language subtitle language profile etc During playback press the DISC MENU button on the remote control Press the buttons to make the desired selection then press the ENTER button NOTE Depending on the disc menu setup items may vary and this menu may not be available 1 2 Using the Title Menu d For DVDs containing multiple titles you can view the title o...

Page 35: ...ant B Normal Repeat Track Repeat All Random Repeat Section A B A Normal Repeat Track Repeat Dir Directory Repeat All Random 1 2 3 1 A B Repeat Playback dB You can repeatedly play back a designated section of a DVD or CD During the DVD disc or CD playback press the REPEAT button on the remote control For DVD press the buttons to select A For CD press the REPEAT button repeatedly until appears Press...

Page 36: ...a DVD each movie will be identified as a Title Chapter Most DVD discs are recorded in chapters so that you can quickly find a specific chapter Playing time Allows playback of the film from a desired time You must enter the starting time as a reference The time search function does not operate on some discs 1 2 3 4 Audio Refers to the film s soundtrack language A DVD Disc can contain up to 8 audio langu...

Page 37: ...d Chinese for the file name The subtitle of DivX files are smi sub srt over 148 kbyte is not supported Angle Function d This function allows you to view the same scene in different angles Press the TOOLS button Press the buttons to select ANGLE 1 2 3 1 2 Press the buttons or numeric buttons to select the desired angle NOTE The Angle function works only with discs on which multiple angles have been r...

Page 38: ...astic volume change when changing channels or during a scene transition Press the S VOL button Each time the button is pressed the selection changes as follows SMART VOLUME ON SMART VOLUME OFF Dolby Pro Logic II Mode You can select the desired Dolby Pro Logic II audio mode Press the PL II button MUSIC When listening to music you can experience sound effects as if you are listening to the actual pe...

Page 39: ...ch the band Manual Tuning Press the STOP button to select MANUAL and then press the buttons to tune in to a lower or higher frequency Setting Mono Stereo Press the MO ST button Each time the button is pressed the sound switches between STEREO and MONO In a poor reception area select MONO for a clear interference free broadcast 1 2 1 2 Presetting Stations Example Presetting FM 89 10 in the memory P...

Page 40: ... to your music files with 5 1 channel sound you must set the Dolby Pro Logic II mode to Matrix See page 38 Remove the USB cable from the USB port slowly Otherwise it may cause damage 1 2 3 Using an iPod You can enjoy music and video files from an iPod through the product P d A AU H M U AUX MP U V U A AU H M U AUX MP U V U iPod Connect the iPod dock connector to the iPod Jack on the rear panel of the...

Page 41: ...d player by connecting it to the product ࣜ Press the FUNCTION button to select IPOD Connect the iPod dock connector to the iPod Jack on the rear panel of the product In the iPod screen move to Settings Videos then set the TV Out option and the TV signal Place the iPod in the Dock iPod appears on the TV screen Press the buttons to select Videos Select the video file to play You can use the remote co...

Page 42: ... ripping When the CD ripping is done a directory named RIPPING will be created in the USB device and the ripped file will be saved in a format of SAM XXXX MP3 NOTE Do not disconnect the USB connection or the power cable during the CD ripping Otherwise it may cause damage to the data To stop CD ripping press the STOP button and disconnect the USB device after the system stops playing the CD complete...

Page 43: ...peakers only Check if the speakers are connected properly Adjust the volume When listening to a CD radio or TV sound is output to the front speakers only Select PROLOG by pressing PL II Dolby Pro Logic II on the remote control to use all six speakers Dolby Digital 5 1 CH Surround Sound is not produced Is there Dolby Digital 5 1 CH mark on the disc Dolby Digital 5 1 CH Surround Sound is produced on...

Page 44: ...a 1039 Amharic 1149 Spanish 1253 Icelandic 1350 Malayalam 1491 Kinyarwanda 1531 Turkmen 1044 Arabic 1150 Estonian 1254 Itaian 1352 Mongoian 1495 Sanskrit 1532 Tagalog 1045 Assamese 1151 Basque 1257 Hebrew 1353 Moldavian 1498 Sindhi 1534 Setswana 1051 Aymara 1157 Persian 1261 Japanese 1356 Marathi 1501 Sangro 1535 Tonga 1052 Azerbaijani 1165 Finnish 1269 Yiddish 1357 Malay 1502 Serbo Croatian 1538 ...

Page 45: ...1 Dolby Pro Logic ll Mode 38 DRC Dynamic Range Compression 30 DSP 38 E EQ 38 EQ Optimizer 30 H HDMI Audio 30 HDMI Format 27 I Initial Setting 31 iPod 40 L Language 31 M Mono Stereo 39 MUTE 13 P P BASS 37 Parental Rating 31 Product Information 31 Power Saving 32 R Region code 8 Remote Control 13 Remote control sensor 11 Repeat 35 Resolution 27 S Search 33 Setting the Setup Menu 26 Setup 26 Skip 33 ...

Page 46: ...0i 1 channel 1 0 Vp p 75 Ω load Component Video 480i Y 1 0 Vp p 75 Ω load Pr 0 70 Vp p 75 Ω load Pb 0 70 Vp p 75 Ω load Video Audio HDMI 1080p 1080i 720p 480p Amplifier Front speaker output 166W x 2 3Ω Center speaker output 166W 3Ω Rear speaker output 166W x 2 3Ω Subwoofer output 170W 3Ω Frequency range 20Hz 20KHz S N Ratio 70dB Channel separation 60dB Input sensitivity AUX 400mV Nominal specificat...

Page 47: ... Subwoofer 8 38 Ibs Front Rear 3 140Hz 20KHz 86dB W M 166W 332W Center 3 140Hz 20KHz 86dB W M 166W 332W Subwoofer 3 40Hz 160Hz 88dB W M 170W 340W Front 3 54 x 51 18 x 4 69 inches stand base 9 84 x 9 84 Rear 3 54 x 5 57 x 2 7 inches Center 14 17 x 2 93 x 2 7 inches Subwoofer 6 1 x 13 78 x 11 22 inches Front 6 11 Ibs Center 1 2 Ibs Rear 1 28 Ibs Subwoofer 8 38 Ibs Front 3 140Hz 20KHz 86dB W M 166W 3...

Page 48: ...140Hz 20KHz 86dB W M 166W 332W Center 3 140Hz 20KHz 86dB W M 166W 332W Subwoofer 3 40Hz 160Hz 88dB W M 170W 340W Rear 3 140Hz 20KHz 86dB W M 166W 332W Front Rear 3 140Hz 20KHz 86dB W M 166W 332W Center 3 140Hz 20KHz 86dB W M 166W 332W Subwoofer 3 40Hz 160Hz 88dB W M 170W 340W Front Rear 3 54 x 5 57 x 2 7 inches Center 14 17 x 2 93 x 2 7 inches Subwoofer 6 1 x 13 78 x 11 22 inches Front Rear 1 28 I...

Page 49: ...accessories applications installations repairs external wiring or connectors not supplied and authorized by SAMSUNG or which damage this product or result in service problems incorrect electrical line voltage fluctuations and surges customer adjustments and failure to follow operating instructions cleaning maintenance and environmental instructions that are covered and prescribed in the instructio...

Page 50: ... 10 Min www samsung com nl NORWAY 3 SAMSUNG 7267864 www samsung com no POLAND 0 801 1SAMSUNG 172678 022 607 93 33 www samsung com pl PORTUGAL 80820 SAMSUNG 726 7864 www samsung com pt SLOVAKIA 0800 SAMSUNG 726 7864 www samsung com sk SPAIN 902 1 SAMSUNG 902 172 678 www samsung com es SWEDEN 0771 726 7864 SAMSUNG www samsung com se U K 0845 SAMSUNG 7267864 www samsung com uk E RE 0818 717 100 www s...

Page 51: ...ONS OR COMMENTS COUNTRY CALL OR VISIT US ONLINE AT WRITE IN THE US 1 800 SAMSUNG 7267864 www samsung com us Samsung Electronics America Inc 105 Challenger Road Ridgefield Park NJ 07660 0511 Code No AH68 02269R ...

Page 52: ...ith the disc s label facing up 3 Press the OPEN CLOSE button to close the disc tray Thank you for purchasing this Samsung 5 1 CH Digital Home Theater System We have manufactured this product to provide you with many hours of AudioNideo Entertainment This QUICK START GUIDE guide has been included to get you up and running in the least amount of time as possible If you have any questions or comments...

Page 53: ...stations DIMMER BUTTON Adjust the brightness of Display S VOL BUTTON Regulate and stabilize the volume level against a drastic volume change e English FUNCTIONITV SOURCE BUnON This is the Function mode selection button or Press to select your TV s video mode OPEN CLOSE BUTTON To open and close the disc tray SLEEP BUnON Set the Sleep time to shut off the Home Theater DSP EO BUTTON Select the desire...

Page 54: ...ith the product tumed off insert the TX card into the TX Card Connection AIIRELESS on the back of the product Hold the TX card so that the label WIRELESS faces upward and insert the card into the port The TX card enables communication between the product and the wireless receiver module 3 Connect the left and right rear speakers to the wireless Receiver module 4 Plug the power cord of the wireless...

Page 55: ...V METHOD 3 Composite Video GOOD QUALITY Connect the supplied Video cable from the VIDEO OUT jack on the back of the product to the VIDEO IN jack on your TV NOTE Resolutions available for the HDMI output are 480p 720p 1 080il1 080p This product operates in Interlace scan mode 480i for componenVcomposite output After making the video connection set the Video input source on your TV to match the corr...

Page 56: ...og Component Analog signal components such as a VCR 1 Connect AUX IN 2 AUdio on the back of the product to the Audio Out of the extemal Analog component Be sure to match the colors of the connecting jacks 2 Press the FUNCTION button to select AUX 2 input The mode switches as follows DVD CD D lN AUX 1 AUX 2 USB IPOD FM NOTE You can connect the Video Output jack of your VCR to the 1V and connect the...

Page 57: ...ing 2 Press and hold the TUNING CH V button to automatically search for active broadcasting stations Manual Tuning Press the TUNING CH V button to increase or decrease the frequency incrementally Using buttons on the product 1 Press the FUNCTION FU C button to select FM 2 Select a broadcast station Automatic Tuning 1 Press the STOP button to select PRESET and then press the 1 4 buttons to select t...

Page 58: ...s number button 0 1 3 5 then between the main unit and the wireless receiver module are ready for pairing With the wireless receiver module turned on press 10 SET button on the back of the unit for 5 seconds Accessories Wireless Receiver Module Specifications TX Card AH40 00163A Speaker Cable 2EA AH81 02137A Power Requirements AC 120V 60Hz Power Consumption 50W Weight 2 521bs Dimensions W x H x D ...

Page 59: ...ng are provided for your safety If the provided plug does not fit into your outlet consult an electrician for replacement of the obsolete outlet 10 Protect the power cord from being walked on or pinched particularly at plugs convenience receptacles and the point where they exit from the apparatus 11 Only use attachments accessories specified by the manufacturer 12 Use only with the cart stand trip...

Page 60: ...nnect the unit to other equipment To prevent electromagnetic interference with electric appliances such as radios and televisions use shielded cables and connectors for connections FCC NOTE FOR U S A This equipment has been tested and found to comply with the limits for aClass Bdigital device pursuant to Part 15 of the FCC Rules These limits are designed to provide reasonable protection against ha...

Page 61: ...t the main plug from the socket Do not place heavy items on the main lead Main cable damage can lead to damage of the equipment fire hazard and can cause electric shock Do not expose the unit to direct sun radiation or other heat sources This could lead to overheating and malfunction of the unit i l II 1 11 I I I r mJll 5 i t I 1 11 I 1 1 During thunderstorms disconnect the main plug from the sock...

Page 62: ...aTV antenna Analog TVs should continue to work as before for other purposes e g for watching low power TV stations still broadcasting in analog watching pre recorded movies or playing video games When aConverter is used with an older television receiver or directly with this product a signal splitter might be necessary to continue to receive low power analog broadcasts via an antenna For more info...

Page 63: ......

Page 64: ......

Page 65: ......

Page 66: ......

Reviews: