background image

English - 2

Important Warranty Information Regarding Television Format Viewing

Wide screen format PDP Displays (16:9, the aspect ratio of the screen width to height) are primarily designed to view wide

screen format full-motion video. The images displayed on them should primarily be in the wide screen 16:9 ratio format,

or expanded to fill the screen if your model offers this feature and the images are constantly moving. Displaying stationary

graphics and images on screen, such as the dark side-bars on nonexpanded standard format television video and

programming, should be limited to no more than 5% of the total television viewing per week.

Additionally, viewing other stationary images and text such as stock market reports, video game displays, station logos,

web sites or computer graphics and patterns, should be limited as described above for all televisions. 

Displaying stationary

images that exceed the above guidelines can cause uneven aging of PDP Displays that leave subtle, but permanent

burned-in ghost images in the PDP picture. To avoid this, vary the programming and images, and primarily display

full screen moving images, not stationary patterns or dark bars.

On PDP models that offer picture sizing features, use these controls to view different formats as a full screen picture.

Be careful in the selection and duration of television formats used for viewing. Uneven PDP aging as a result of format

selection and use, as well as burned-in images, are not covered by your Samsung limited warranty.

© 2007 Samsung Electronics Co., Ltd. All rights reserved. 

U.S.A Only

The product unit accompanying this user manual is licensed under certain intellectual property rights of certain 

third parties. In particular, this product is licensed under the following US patents: 5,991,715, 5,740,317, 4,972,484, 

5,214,678, 5,323,396, 5,539,829, 5,606,618, 5,530,655, 5,777,992, 6,289,308, 5,610,985, 5,481,643, 5,544,247, 

5,960,037, 6,023,490, 5,878,080, and under US Published Patent Application No. 2001-44713-A1.  


This license is limited to private non-commercial use by end-user consumers for licensed contents. No rights are 

granted for commercial use. The license does not cover any product unit other than this product unit and the license 

does not extend to any unlicensed product unit or process conforming to ISO/IEC 11172-3 or ISO/IEC 13818-3 used or 

sold in combination with this product unit. The license only covers the use of this product unit to encode and/or decode 

audio files conforming to the ISO/IEC 11172-3 or ISO/IEC 13818-3. No rights are granted under this license for product 

features or functions that do not conform to the ISO/IEC 11172-3 or ISO/IEC 13818-3.

Other countries

The product unit accompanying this user manual is licensed under certain intellectual property rights of certain third 

parties. This license is limited to private non-commercial use by end-user consumers for licensed contents. No rights 

are granted for commercial use. The license does not cover any product unit other than this product unit and the license 

does not extend to any unlicensed product unit or process conforming to ISO/IEC 11172-3 or ISO/IEC 13818-3 used or 

sold in combination with this product unit. The license only covers the use of this product unit to encode and/or decode 

audio files conforming to the ISO/IEC 11172-3 or ISO/IEC 13818-3. No rights are granted under this license for product 

features or functions that do not conform to the ISO/IEC 11172-3 or ISO/IEC 13818-3.

BN68-01192F-02Eng-1.indd   2

2007-02-26   ソタネト 3:16:18

Summary of Contents for HPT4254 - 42" Plasma TV

Page 1: ...SPLAY HP T4254 HP T5054 Owner s Instructions Register your product at www samsung com global register Record your Model and Serial number here for future reference Model _______________ Serial No _______________ ...

Page 2: ...certain intellectual property rights of certain third parties In particular this product is licensed under the following US patents 5 991 715 5 740 317 4 972 484 5 214 678 5 323 396 5 539 829 5 606 618 5 530 655 5 777 992 6 289 308 5 610 985 5 481 643 5 544 247 5 960 037 6 023 490 5 878 080 and under US Published Patent Application No 2001 44713 A1 This license is limited to private non commercial...

Page 3: ... as temperature or humidity This is normal and not a defect of the unit Cell Defects The PDP uses a panel consisting of 1 230 000 SD level to 3 150 000 HD level pixels which require sophisticated technology to produce However there may be a few bright or dark pixels on the screen These pixels will have no impact on the performance of the product Avoid operating the TV at temperatures below 5 C 41 ...

Page 4: ...ti Channel Sound MTS Track Digital 35 Choosing a Multi Channel Sound MTS Track Analog 36 Automatic Volume Control 36 Selecting the Internal Mute 36 Adjusting the Melody Sound 37 Listening to the Sound of the Sub PIP Picture 37 CHANNEL CONTROL Selecting the Antenna 38 Adding and Erasing Channels 38 Setting Your Favorite Channels 39 Viewing the Channel Lists 40 Setting the Default Channel List Mode ...

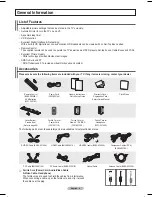
Page 5: ... items are missing contact your dealer RET URN FAV CH Remote Control BN59 00599A AAA Batteries 4301 000103 Power Cord 3903 000144 Owner s Instructions Quick Setup Guide Warranty Card Registration Card Safety Guide Manual Cloth Clean Cover Bottom Screws 2ea Refer to page 68 Ferrite Core for Power Cord 3301 001110 Ferrite Core for Side AV S VIDEO 3301 001305 Ferrite Core for Headphone 3301 001456 Th...

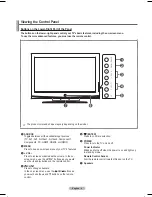
Page 6: ...en menu of your TV s features 3 VOL Press to increase or decrease the volume In the on screen menu use the VOL buttons as you would use the and buttons on the remote control 4 CH Press to change channels In the on screen menu use the CH buttons as you would use the and buttons on the remote control 5 ENTER Press to confirm a selection 6 POWER Press to turn the TV on and off Power Indicator Blinks ...

Page 7: ...TV allow you to receive left and right audio from your DVI device Not compatible with PC 8 ANT 1 IN AIR ANT 2 IN CABLE 75Ω Coaxial connector for Air Cable Network 9 EX LINK Connect this to the jack on the optional wall mount bracket This will allow you to adjust the TV viewing angle using your remote control 0 AUDIO R L AV IN 1 Audio inputs for external devices such as a camcorder or VCR S VIDEO A...

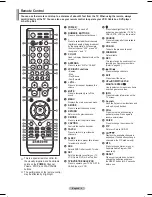
Page 8: ... or Set Top Box TV DVD STB CABLE VCR Press to operate your TV DVD STB CABLE box or VCR Press to backlight the VOL CH and active source button TV DVD CABLE STB VCR on the remote SOURCE Press to display all of the available video sources a PRE CH Tunes to the previous channel b WISELINK Not available c REC This remote can be used to control recording on Samsung recorders Refer to page 64 d CH Press ...

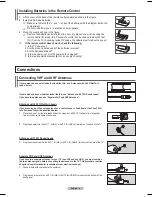
Page 9: ... the antennas to the TV This procedure requires an optional combiner adaptor available at most electronics shops 1 Connect both antenna leads to the combiner 2 Plug the combiner into the ANT 1 IN AIR or ANT 2 IN CABLE terminal on the bottom of the back panel ANT 1 IN AIR ANT 1 IN AIR UHF VHF ANT 1 IN AIR UHF VHF Installing Batteries in the Remote Control 1 Lift the cover at the back of the remote ...

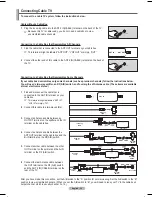
Page 10: ...the cable that is connected to the ANT IN terminal on your cable box This terminal might be labeled ANT IN VHF IN or simply IN 2 Connect this cable to a two way splitter 3 Connect an Antenna cable between an OUTPUT terminal on the splitter and the IN terminal on the cable box 4 Connect an Antenna cable between the ANT OUT terminal on the cable box and the B IN terminal on the RF A B switch 5 Conne...

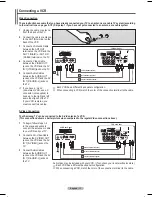
Page 11: ...O L jacks on the TV If you have a mono non stereo VCR use a Y connector not supplied to hook up to the right and left audio input jacks of the TV If your VCR is stereo you must connect two cables Each VCR has a different back panel configuration When connecting a VCR match the color of the connection terminal to the cable VCR Rear Panel TV Rear Panel 2 Audio Cable Not supplied 5 Video Cable Not su...

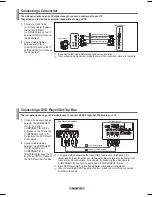
Page 12: ...MPONENT IN 1 Y PB PR or COMPONENT IN 2 Y PB PR jacks on the TV and the COMPONENT OUT Y PB PR jacks on the DVD Player Set Top Box 2 Connect Audio Cables between the COMPONENT IN 1 R AUDIO L or COMPONENT IN 2 R AUDIO L jacks on the TV and the AUDIO OUT jacks on the DVD Player Set Top Box Component video separates the video into Y Luminance brightness PB Blue and PR Red for enhanced video quality Be ...

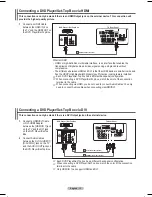
Page 13: ...his connection can only be made if there is an HDMI Output jack on the external device This connection will provide the highest quality picture 1 Connect an HDMI Cable between the HDMI IN 2 on the TV and the HDMI OUT on the DVD Player Set Top Box What is HDMI HDMI or high definition multimedia interface is an interface that enables the transmission of digital audio and video signals using a single...

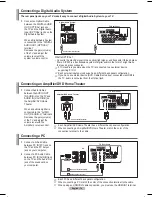
Page 14: ... an HDMI DVI cable connection you must use the HDMI IN1 terminal PC TV Rear Panel PC Audio Cable Not supplied 2 D Sub Cable Not supplied 1 Connecting a Digital Audio System The rear panel jacks on your TV make it easy to connect a Digital Audio System to your TV 1 Connect an Optical Cable between the DIGITAL AUDIO OUT OPTICAL jacks on the TV and the Digital Audio Input OPTICAL jacks on the Digital...

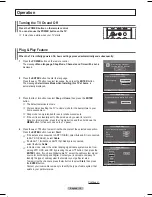
Page 15: ...memorize the channels of the selected connection Press the ENTER button to select Start If the antenna is connected to ANT1 IN AIR select Air and if it is connected to ANT 2 IN CABLE select Cable If both ANT 1 IN AIR and ANT 2 IN CABLE are connected select the Air Cable In Cable mode select the correct analog signal cable system source from among STD HRC and IRC by pressing the or button then pres...

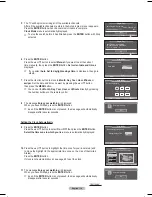
Page 16: ...seconds Setting the Clock Automatically 9 Press the ENTER button Press the or button to select On or Off then press the ENTER button Select the time zone in which you live menu is automatically displayed 10 Press the or button to highlight the time zone for your local area and to move the highlight to the appropriate time zone on the map of the United States Press the ENTER button If clock is not ...

Page 17: ...ss 2 then 7 The TV will change channels when you press the second number Using the Button The button is used to select stations that broadcast a digital signal 1 For example for Channel 7 1 press 7 then then 1 HD indicates the TV is receiving a Digital High Definition signal SD indicates the TV is receiving a Standard Definition signal For quick channel change press the number buttons then press t...

Page 18: ...annel the type of sound and the status of certain picture and sound settings Press the INFO button once more or wait approximately 10 seconds and it disappears automatically Viewing the Menus 1 With the power on press the MENU button The main menu appears on the screen Its left side has five icons Picture Sound Channel Setup Input 2 Use the or button to select one of the five icons Then press the ...

Page 19: ...ource from among STD HRC and IRC then press the ENTER button If you have Digital cable TV select the cable system signal source for both Analog and Digital If you have Digital cable TV select the signal source for both Analog and Digital STD HRC and IRC identify various types of cable TV systems Contact your local cable company to identify the type of cable system that exists in your particular ar...

Page 20: ...V s remote control 4 Using the number buttons on your remote control enter three digits of the cable box code listed on page 23 of this manual for your brand of cable box Make sure you enter three digits of the code even if the first digit is a 0 If more than one code is listed try the first one 5 Press the POWER button on the remote control Your cable box should turn on if your remote is set up c...

Page 21: ...e control is in DVD mode the volume buttons still control your TV s volume Setting Up the Remote to Operate Your Set Top Box 1 Turn off your STB 2 Press the STB button on your TV s remote control 3 Press the SET button on your TV s remote control 4 Using the number buttons on your remote control enter three digits of the STB code listed on page 23 of this manual for your brand of STB Make sure you...

Page 22: ... 018 026 037 070 025 038 025 081 082 083 021 056 059 007 008 018 021 026 037 062 006 036 073 074 075 076 021 006 021 024 025 034 005 019 041 075 Brand MITSUBISHI MONTGOMERY WARD MTC MULTITECH NEC OPTIMUS PANASONIC PENTAX PENTEX RESEARCH PHILCO PHILIPS PIONEER PORTLAND PROSCAN QUARTZ QUASAR RADIO SHACK REALISTIC RCA SANSUI SANYO SCOTT SEARS SHARP SHIMTOM SIGNATURE SONY SYLVANIA SYMPHONIC TANDY TASH...

Page 23: ...rand ALPHASTAR ANAM CHANNEL MASTER CROSSDIGITAL CHAPARRAL DIRECT TV DAEWOO DISH NETWORK SYSTEM DISHPRO DRAKE DX ANTENNA ECHOSTAR EXPRESSVU GOI GE GENERAL INSTRUMENT HTS HOME CABLE HITACHI HUGHES NETWORK IQ IQ PRISM JANEIL JERROID JVC Code 023 043 018 034 019 035 015 016 017 019 022 045 060 061 062 065 066 067 068 074 069 070 069 018 024 032 027 025 069 070 071 069 069 065 046 047 048 063 064 069 0...

Page 24: ...74 122 123 027 065 077 078 079 082 080 125 081 095 066 146 067 068 090 060 061 089 133 135 069 074 074 064 113 071 073 091 110 089 092 091 022 033 115 116 073 051 108 109 073 059 100 106 107 074 075 025 031 057 058 054 055 056 076 093 074 094 073 Brand NORCENT NEXT BASE NEC NANTAUS NESA OPTOMEDIA ELECTRONICS OPTIVIEW ONKYO PHILCO PRINCETON PROSCAN PANASONIC PHILIPS ROTEL RIO RCA RAITE ROWA SAMPO S...

Page 25: ...ce selection easier 1 Press the MENU button to display the menu Press the or button to select Input then press the ENTER button Press the or button to select Edit Name then press the ENTER button 2 Press the or button to select AV1 AV2 S Video1 S Video2 Component1 Component2 PC HDMI1 HDMI2 or HDMI3 input jack then press the ENTER button 3 Press the or button to select VCR DVD D VHS Cable STB HD ST...

Page 26: ...andard picture settings 3 Press the or button to select Contrast Brightness Sharpness Color or Tint then press the ENTER button 4 Press the or button to decrease or increase the value of a particular item Press the ENTER button Tint doesn t operate in PC mode In PC mode only the Contrast and Brightness can be selected Each adjusted setting will be stored separately according to its input mode When...

Page 27: ...utton to select Picture then press the ENTER button 2 Press the or button to select Digital NR then press the ENTER button 3 Press the or button to select Off Low Mediunm High or Auto then press the ENTER button Press the EXIT button to exit The Digital NR function is available in all modes except PC More Color Tone Cool1 Detailed Settings Size 16 9 Digital NR Auto Active Color On DNIe On Reset OK...

Page 28: ...16 9 4 3 and Wide Fit can be selected In Zoom1 Zoom2 and Wide Fit modes you can move the picture on the screen by pressing the or button You can not change the picture size when PIP is set to Double When Double mode has been set in PIP the Picture Size cannot be set Wide Fit can be used when watching a Digital HD High Definition signal Wide Fit sets the optimum picture format by expanding it both ...

Page 29: ...he previously adjusted white balance will be reset to the factory defaults My Color Control Pink Green Blue White Reset This setting can be adjusted to suit your personal preferences Pink Green Blue White Select the desired color by pressing the or button then press the ENTER button Press the or button until you reach the optimal setting When using the My Color Control Feature the current picture ...

Page 30: ...re activated If you set the DNIe to Demo you can view the applied DNIe and normal pictures on the screen for demonstration purposes Using this function you can view the difference in the visual quality 1 Press the MENU button to display the menu Press the or button to select Picture then press the ENTER button 2 Press the or button to select DNIe then press the ENTER button This function doesn t w...

Page 31: ...n is displayed when there is no signal from an external device regardless of the Blue Screen Setting More Blue Screen Off Melody Medium PC Home Theater PC Off Light Effect In Watching TV Energy Saving Off More Setup T V More Blue Screen Off Melody Medium PC Home Theater PC Off Light Effect In Watching TV Energy Saving Off More Setup T V Enter Move Return Enter Move Return Setting the HDMI Black Le...

Page 32: ... on again the PIP window will disappear Press the PIP button on the remote control to activate or deactivate the PIP Analog TV signals can be viewed on the PIP screen while viewing the picture from an external source DVD Set top box PC etc connected to the Component 1 2 PC and HDMI 1 2 3 jacks on the main screen Changing the Size of the PIP Window 3 Press the or button to select Size then press th...

Page 33: ...TER button Press the or button at the bottom of the remote to select the desired channel in the PIP window then press the ENTER button The channel can be active when the sub picture is set to TV Press the EXIT button to exit Press the PIP CH and CH and buttons on the remote control to change the PIP channel Freezing the Current Picture 1 Press the STILL button to freeze a moving picture Normal sou...

Page 34: ...the or button to select a particular frequency to adjust Press the or button to increase or decrease the level of the particular frequency then press the ENTER button Press the EXIT button to exit R L Sound Balance Adjustment To adjust the sound balance of the R L speakers Frequency Adjustment 100Hz 300Hz 1KHz 3KHz 10KHz To adjust the level of different frequencies If you make any changes to the e...

Page 35: ...ton 2 Press the or button to select Multi Track Options then press the ENTER button 3 Press the ENTER button to select Preferred Language Press the or button to choose the language English Spanish or French you want then press the ENTER button Press the EXIT button to exit You can only select the language from among the actual languages being broadcast Press the MTS button on the remote control to...

Page 36: ...ound Stereo Multi Track Options T V Mono Stereo SAP Enter Move RETURN FAV CH Return Return 1 Press the MENU button to display the menu Press the or button to select Sound then press the ENTER button 2 Press the or button to select Auto Volume then press the ENTER button 3 Press the or button to select Off or On then press the ENTER button Press the EXIT button to exit Automatic Volume Control Redu...

Page 37: ...RADEMARK LABEL LICENSE NOTICE More Blue Screen Off Melody Medium PC Home Theater PC Off Light Effect In Watching TV Energy Saving Off More Setup T V Off Low Medium High Enter Move More Blue Screen Off Melody Medium PC Home Theater PC Off Light Effect In Watching TV Energy Saving Off More Setup T V Enter Move Return Return Mode Custom Equalizer SRS TruSurround XT Off Multi Track Options Auto Volume...

Page 38: ...el List then press the ENTER button 3 Press the or button to select Added then press the ENTER button 4 Press the buttons to select a channel to add then press the ENTER button Press the or button to select Add then press the ENTER button to add the channel Press the MENU button to return All added channels will be shown on Added menu Continued All Added Favorite Default List Mode All Channel List...

Page 39: ...avorite To cancel your Favorite channel selection press the ENTER button until the symbol disappears Press the EXIT button to exit Only memorized channels can be set as favorite channels All favorite channels will be shown on the Favorite menu To select the favorite channels you have set up press the FAV CH button on the remote control Antenna Air Auto Program Clear Scrambled Channel Channel List ...

Page 40: ...t Mode then press the ENTER button Press the or button to select All Added or Favorite then press the ENTER button Select the Channel list you want to appear when you press the CH LIST button All Shows All the channels when you press the CH LIST button on the remote control Added Shows Added channels when you press CH LIST button on the remote control Favorite Shows Favorite channels when you pres...

Page 41: ...og Channels Use fine tuning to manually adjust a particular channel for optimal reception 1 Press the MENU button to display the menu Press the or button to select Channel then press the ENTER button 2 Press the or button to select Fine Tune then press the ENTER button 3 Press the or button to adjust the fine tuning 4 To store the fine tuning setting in the TV s memory press the ENTER button To re...

Page 42: ...exit the menu LNA Low Noise Amplifier If the TV is operating in a weak signal area sometimes the LNA function can improve the reception a low noise preamplifier boosts the incoming signal 1 Press the MENU button to display the menu Press the or button to select Channel then press the ENTER button 2 Press the or button to select LNA then press the ENTER button 3 Press the or button to select Off or...

Page 43: ...ng the Analog Input mark means that this mode can be supported For the HP T4254 PC text quality is optimum in XGA mode 1024 x 768 60Hz For the HP T5054 PC text quality is optimum in WXGA mode 1360 x 768 60Hz Three pixels on left right top and bottom will be grayed out at the resolution setting of 1360x768 60Hz This is not a mechanical problem but a result caused by the pixel difference between the...

Page 44: ...ing alone then do the frequency adjustments to the utmost and fine tune again After the noise has been reduced re adjust the picture so that it is aligned on the center of the screen Change to the PC mode first 1 Press the MENU button to display the menu Press the or button to select Setup then press the ENTER button Press the or button to select PC then press the ENTER button 2 Press the ENTER bu...

Page 45: ...previously adjusted settings will be reset to the factory defaults Image Lock Position Auto Adjustment Image Reset PC T V Enter Move Return Position T V Adjust Enter Return Image Reset is completed Image Lock Position Auto Adjustment Image Reset PC T V Enter Move Return Setting the Home Theater PC This function enables you to view higher quality pictures while in PC Mode After setting the Home The...

Page 46: ...ss the or button to move to Month Day Year Hour Minute or am pm Set the date and time you want by pressing the or button then press the ENTER button Press the EXIT button to exit The current time will appear every time you press the INFO button You can set the Month Day Year Hour and Minute directly by pressing the number buttons on the remote control Continued Plug Play Language English Time Game...

Page 47: ... the or button to select DST Daylight Saving Time then press the ENTER button Press the or button to select On or Off then press the ENTER button Press the EXIT button to exit Depending on the broadcast station and signal the auto time may not be set correctly If this occurs set the time manually Antenna or Cable must be connected in order to set the time automatically Continued Plug Play Language...

Page 48: ...by timer This function is only available in timer On mode and prevents overheating which may occur if a TV is on for too long time Setting the Sleep Timer The sleep timer automatically shuts off the TV after a preset time 30 60 90 120 150 and 180 minutes 1 Press the MENU button to display the menu Press the or button to select Setup then press the ENTER button Press the or button to select Time th...

Page 49: ...console and connect another external device set Game to Off in the setup menu If you display the TV menu in Game mode the screen shakes slightly The mark appears on the screen which means that Game Mode is on with the selected source If Game Mode is On Picture Mode is automatically changed to Game and cannot be changed Sound Mode in the Sound menu is deactivated Adjust the sound using the equalize...

Page 50: ...ange the font you want The default is Default Foreground Color This option consists of Default White Black Red Green Blue Yellow Magenta and Cyan You can change the color of the letter The default is Default Background Color This option consists of Default White Black Red Green Blue Yellow Magenta and Cyan You can change the background color of the caption The default is Default Foreground Opacity...

Page 51: ...This channel carries data that is intended to augment information carried in the program CC3 Secondary Synchronous Caption Service Alternate program related caption data typically second language captions CC4 Special Non Synchronous Use Captions Similar to CC2 Text1 First Text Service This may be various non program related data Text2 Second Text Service Additional data usually not program related...

Page 52: ...the MENU button to display the menu Press the or button to select Setup then press the ENTER button 2 Press the or button to select Light Effect then press the ENTER button Press the or button to select Off In Standby In Watching TV or Always then press the ENTER button Press the EXIT button to exit Off The LED is always off In Standby The LED lights while in Standby mode and it turns off when you...

Page 53: ...e time between movement of the picture in minutes 1 Press the MENU button to display the menu Press the or button to select Setup then press the ENTER button 2 Press the or button to select Screen Burn Protection then press the ENTER button 3 Press the ENTER button to select Pixel Shift then press the ENTER button Pressing the or button will alternate between On and Off You will also see the items...

Page 54: ... executed for a long time approximately 1 hour to effectively remove after images on the screen If the after image is not removed after performing the function repeat the function again Press any key on the remote control to cancel this feature Pixel Shift White Scroling Side Gray Dark Screen Burn Protection T V Enter Move Dark Light Return Reducing the Effects of Screen Burn If screen burn has oc...

Page 55: ...allation position When you turn the power on your TV moves to the last remembered position you adjusted Using the remote Control Buttons Button Operations Wall mount angle adjustment Tilt Up Tilt Down Move right Move left Reset Moves to the initial installation position Remembering the position and moving to the remembered position Remembers 3 positions with the Red Green and Yellow buttons Moves ...

Page 56: ...rive Upgrades will be possible by connecting a USB drive to the USB port located on the side of your TV 1 Insert a USB drive containing the firmware upgrade into the USB Upgrade Port on the side of the TV 2 Press the MENU button to display the menu Press the or button to select Setup then press the ENTER button 3 Press the or button to select SW Upgrade then press the ENTER button 4 Press the or b...

Page 57: ...nter your 4 digit PIN number Continued Plug Play Language English Time Game Mode Off V Chip Caption Menu Transparency Medium More Setup T V Enter Move V Chip T V 0 9 Enter PIN Enter PIN Return Return 3 The V Chip screen will appear Press the or button to select Change PIN then press the ENTER button The Change PIN screen will appear Choose any 4 digits for your PIN and enter them Re enter the same...

Page 58: ... lock all TV ratings The TV Y TV Y7 TV G TV PG TV 14 and TV MA have additional options See the next step to change any of the following sub ratings FV Fantasy violence D Sexually suggestive dialog L Adult language The V Chip will automatically block certain categories that are more restrictive For example if you block TV Y category then TV Y7 will automatically be blocked Similarly if you block th...

Page 59: ...audience no restriction PG Parental guidance suggested PG 13 Parents strongly cautioned R Restricted Children under 17 should be accompanied by an adult NC 17 No children under age 17 X Adults only NR Not rated The V Chip will automatically block any category that is more restrictive For example if you block the PG 13 category then R NC 17 and X will automatically be blocked also How to Set up Res...

Page 60: ...ENU button to display the menu Press the or button to select Setup then press the ENTER button 2 Press the or button to select V Chip then press the ENTER button The message Enter PIN will appear Enter your 4 digit PIN number 3 The V Chip screen will appear Press the or button to select Canadian French then press the ENTER button 4 Press the or button to select an appropriate restriction Press the...

Page 61: ...Humor Level etc and TV ratings for example DH MH H etc may differ depending on the broadcasting station How to Reset the TV after the V Chip Blocks a Channel Emergency Escape If the TV is tuned to a restricted channel the V Chip will block it The screen will go blank and the following message will appear 1 Enter your PIN To resume normal viewing tune to a different channel using CH or CH button Un...

Page 62: ...ter s speakers Otherwise you can only listen to 2 channel stereo sound in other cases Make sure to connect the Digital Audio IN Optical of the home theater and the TV correctly to listen to TV sound through the home theater However you cannot listen to sound from the BD recorder that is sent to the home theater via the TV in 5 1 channel sound because the TV outputs only 2 channel stereo sound Plea...

Page 63: ...the or button to select to a particular device and press the ENTER button It is switched to the selected device 3 If you cannot find a device you want press the or button to select Searching Connections then press the ENTER button The message Configuring Anynet connection is displayed When searching devices completes the connected devices are listed in the Anynet menu Switching to the selected dev...

Page 64: ... device while playing a file Backward search Forward search Stop Play Pause Device with built in Tuner After switching to the device when you are watching a TV program CH button Audio Device When Receiver is activated VOL button MUTE button Anyview2 When watching TV Play Pause The Anynet function only works when the remote control is set to TV The REC button works only while in the recordable stat...

Page 65: ...emote control Anynet doesn t work at a certain condition Searching channels When connecting or removing the HDMI 1 3 cable please make sure to search devices again or restart your TV Check if the Anynet Function of Anynet device is set on I want to start Anynet Check if the Anynet device is properly connected to the TV and check if the Anynet HDMI CEC is set to On in the Anynet Setup menu Press th...

Page 66: ...e image is too large or too small Adjust the Size settings The visual qualities of digital channels vary The visual qualities of digital channels may vary depending on the original production method analog or digital If the original production method is digital High visual quality If the original production method is analog The digital program displayed on the screen is originally an analog progra...

Page 67: ...Standard Screw C D Quantity LCD TV 23 26 200 100 M4 L10 4 32 40 200 200 M6 L10 4 46 52 600 400 M8 L15 4 57 700 400 PDP TV 42 50 600 400 63 No VESA M8 6 1 We provide the standard dimensions for wall mount kits as shown in the table above 2 When purchasing our wall mount kit a detailed installation manual and all parts necessary for assembly are provided 3 Do not use screws longer than the standard ...

Page 68: ...ight Body With stand 67 6 lbs 30 7 kg 73 8 lbs 33 5 kg 91 4 lbs 41 5 kg 97 lbs 44 kg Environmental Considerations Operating Temperature Operating Humidity Storage Temperature Storage Humidity 50 F to 104 F 10 C to 40 C 10 to 80 non condensing 4 F to 113 F 20 C to 45 C 5 to 95 non condensing This device is a Class B digital apparatus Design and specifications are subject to change without prior not...

Page 69: ...English 69 Dimensions HP T4254 TOP VIEW FRONT VIEW SIDE VIEW REAR VIEW JACK PANEL DETAIL 2 1 4 H x 18 3 4 W 5 3 4 UP FROM BOTTOM ...

Page 70: ...English 70 Dimensions HP T5054 TOP VIEW FRONT VIEW SIDE VIEW REAR VIEW JACK PANEL DETAIL 2 1 4 H x 18 3 4 W 5 3 4 UP FROM BOTTOM ...

Page 71: ...This page is intentionally left blank ...

Page 72: ...54 Manuel du propriétaire Enregistrez vos produits Samsung en vous connectant sur www samsung com global register Inscrivez ici le modèle et le numéro de série pour référence ultérieure Modèle _______________ N de série _______________ ...

Page 73: ... de droits de propriété intellectuelle de certaines tierces parties Ce produit est protégé en vertu des brevets américains suivants 5 991 715 5 740 317 4 972 484 5 214 678 5 323 396 5 539 829 5 606 618 5 530 655 5 777 992 6 289 308 5 610 985 5 481 643 5 544 247 5 960 037 6 023 490 5 878 080 et en vertu de la demande de brevet nº 2001 44713 A1 publiée aux États Unis Cette licence permet aux consomm...

Page 74: ...t normal et n est pas le signe d une défectuosité Défauts de cellules L écran à plasma comporte de 1 230 000 définition standard à 3 150 000 haute définition pixels dont la création nécessite une technologie hautement perfectionnée Toutefois il peut y avoir quelques pixels lumineux ou sombres à l écran Ces pixels n ont aucune incidence sur le rendement du produit Éviter de faire fonctionner le tél...

Page 75: ...5 Sélection d une piste de son multicanaux analogique 36 Contrôle automatique du volume 36 Sélection de la sourdine interne 36 Réglage du son Mélodie 37 Écoute du son provenant de la fenêtre secondaire ISI 37 RÉGLAGE DES CANAUX Sélection de l antenne 38 Ajout et suppression de canaux 38 Sélection des canaux favoris 39 Visualisation des listes de canaux 40 Réglage du mode de liste des canaux par dé...

Page 76: ...contacter le détaillant RET URN FAV CH Télécommande BN59 00599A Piles AAA 4301 000103 Cordon d alimentation 3903 000144 Guide de l utilisateur Guide de configuration rapide Carte de garantie Carte d enregistrement Guide de sécurité Linge de nettoyage Couvre base Vis 2ea Consulter la page 68 Tore de ferrite pour le câble d alimentation 3301 001110 Tore de ferrite pour câble de prise AV latérale S V...

Page 77: ... Afficher à l écran le menu des fonctions du téléviseur 3 VOL Augmenter ou diminuer le volume Dans le menu à l écran utiliser les touches VOL de la même manière que les touches and de la télécommande 4 CH Changer de canal Dans le menu à l écran utiliser les touches CH de la même manière que les touches et de la télécommande 5 ENTER Confirmer une sélection 6 POWER Allumer et éteindre le téléviseur ...

Page 78: ...orties gauche et droite de l appareil DVI Non compatible avec un ordinateur 8 ANT 1 IN AIR ANT 2 IN CABLE Connecteur coaxial de 75 Ω pour l antenne et le réseau câblé 9 EX LINK Brancher cette sortie à la prise sur le support mural en option Cette fonction permet de régler l angle de visionnement du téléviseur à l aide de la télécommande 0 AUDIO R L AV IN 1 Entrées audio pour appareils externes com...

Page 79: ... Contrôler le téléviseur le lecteur DVD le récepteur le câblosélecteur ou le magnétoscope Appuyer sur cette touche pour illuminer les touches VOL et CH et la touche source active TV DVD CABLE STB VCR de la télécommande SOURCE Appuyer sur cette touche pour afficher toutes les sources vidéo accessibles a PRE CH Syntoniser le canal précédent b WISELINK Non disponible c REC Cette fonction peut être ut...

Page 80: ...inés avant de raccorder les antennes au téléviseur Pour cette opération un multiplexeur adaptateur en option en vente dans la plupart des boutiques d électronique est nécessaire 1 Raccorder les conducteurs des deux antennes au combinateur 2 Brancher le combinateur dans l entrée AIR ou ANT 2 IN CABLE à l arrière du téléviseur ANT 1 IN AIR ANT 1 IN AIR UHF VHF ANT 1 IN AIR UHF VHF Insertion des pile...

Page 81: ...ectronique 1 Repérer et débrancher le câble raccordé à l entrée d antenne ANT IN de le câblosélecteur Cette prise peut porter l inscription ANT IN VHF IN ou simplement IN 2 Relier ce câble à un répartiteur à deux voies 3 Raccorder un câble d antenne entre une sortie OUTPUT du répartiteur et l entrée IN du câblosélecteur 4 Raccorder un câble d antenne entre la sortie d antenne ANT OUT du câblosélec...

Page 82: ...ntrée audio droite et gauche du téléviseur au moyen d un connecteur en Y non fourni Si le magnétoscope fonctionne en stéréo deux câbles distincts doivent être branchés Chaque magnétoscope possède une configuration de panneau arrière différente Lors du branchement d un magnétoscope les couleurs du câble et de la borne de branchement doivent correspondre Panneau arrière du magnétoscope Panneau arriè...

Page 83: ...trée COMPONENT IN 1 Y PB PR ou COMPONENT IN 2 Y PB PR du téléviseur et les prises de sortie COMPONENT OUT Y PB PR du lecteur DVD ou du récepteur 2 Brancher les câbles audio entre les prises d entrée COMPONENT IN 1 R AUDIO L ou COMPONENT IN 2 R AUDIO L du téléviseur et les prises de sortie AUDIO OUT du lecteur DVD ou du récepteur Le composant vidéo sépare le vidéo en Y luminance luminosité PB bleu ...

Page 84: ...a prise HDMI Cette connexion assure la meilleure qualité d image 1 Brancher un câble HDMI entre la prise d entrée HDMI IN 2 du téléviseur et la prise de sortie HDMI OUT du lecteur DVD ou du récepteur Qu est ce que la HDMI HDMI ou interface multimédia à haute définition est une interface qui permet la transmission de signaux numériques audio et vidéo en utilisant un seul câble sans compression La d...

Page 85: ...t doivent correspondre La prise d entrée HDMI IN 1 doit être utilisée pour un branchement de câble HDMI DVI PC Panneau arrière du téléviseur CâbleAudio non fourni 2 Câble D Sub non fourni 1 Branchement d un système audio numérique Les prises du panneau arrière du téléviseur permettent de brancher facilement un système audio numérique 1 Brancher un câble optique entre les prises de sortie numérique...

Page 86: ...é la touche MENU du panneau du téléviseur pendant cinq secondes 4 Appuyer sur la touche ou pour mémoriser les canaux du branchement sélectionné Appuyer sur ENTER pour choisir Démarrer Si l antenne est branchée sur la prise d entrée ANT 1 IN AIR sélectionner Air Si elle est branchée sur la prise d entrée ANT 2 IN CABLE sélectionner Câble Si les prises ANT 2 IN AIR et ANT 1 IN CABLE sont toutes deux...

Page 87: ...ndes Réglage automatique de l horloge 9 Appuyer sur la touche ENTER Appuyer sur la touche ou pour sélectionner Activé ou Désactivé suivie de la touche ENTER Choisir le fuseau horaire de la région le menu s affiche automatiquement 10 Appuyer sur la touche ou pour mettre le fuseau horaire en surbrillance et pour mettre le fuseau horaire approprié en surbrillance sur la carte des États Unis Appuyer s...

Page 88: ... quand le second chiffre est enfoncé Utilisation de la touche La touche sert à choisir les stations émettrices de signaux numériques 1 Par exemple pour choisir le canal 7 1 appuyer sur 7 puis sur et sur 1 Le code HD indique que le téléviseur est en mode réception réglé sur un signal DHD haute définition numérique Le code SD indique que le téléviseur est en mode réception réglé sur un signal de déf...

Page 89: ...de configuration sonore et l état de certains paramètres du son et de l image Appuyer sur la touche INFO une fois de plus ou attendre environ 10 secondes qu il disparaisse automatiquement Affichage des menus 1 Alors que le téléviseur est allumé appuyer sur la touche MENU Le menu principal apparaît à l écran Les cinq icônes de gauche représentent Image Son Canal Configuration Entrée 2 Sélectionner ...

Page 90: ...uis sur ENTER Si le câble est numérique sélectionner la source de signal pour une diffusion analogique et numérique Si le câble est numérique sélectionner la source de signal pour une diffusion analogique et numérique STD HRC et IRC désignent différents systèmes de câblodistribution Pour connaître le système utilisé dans un secteur particulier communiquer avec le câblodistributeur La sélection de ...

Page 91: ...ommande du téléviseur 3 Appuyer sur la touche SET de la télécommande du téléviseur 4 Appuyer sur les touches numériques de la télécommande qui correspondent aux trois chiffres du code du câblosélecteur dont les marques sont répertoriées à la page 23 du présent guide Veiller à entrer tous les chiffres du code même si le premier chiffre est 0 Si plusieurs codes sont indiqués essayer d abord le premi...

Page 92: ...nde est dans le mode DVD les touches de volume commandent toujours le volume du téléviseur Configuration de la télécommande pour contrôler le récepteur 1 Éteindre le récepteur 2 Appuyer sur la touche STB de la télécommande du téléviseur 3 Appuyer sur la touche SET de la télécommande du téléviseur 4 Appuyer sur les touches numériques de la télécommande qui correspondent aux trois chiffres du code d...

Page 93: ...6 037 007 008 018 026 037 070 025 038 025 081 082 083 021 056 059 007 008 018 021 026 037 062 006 036 073 074 075 076 021 006 021 024 025 034 005 019 041 075 Marque MITSUBISHI MONTGOMERY WARD MTC MULTITECH NEC OPTIMUS PANASONIC PENTAX PENTEX RESEARCH PHILCO PHILIPS PIONEER PORTLAND PROSCAN QUARTZ QUASAR RADIO SHACK REALISTIC RCA SANSUI SANYO SCOTT SEARS SHARP SHIMTOM SIGNATURE SONY SYLVANIA SYMPHO...

Page 94: ...3 014 Marque ALPHASTAR ANAM CHANNEL MASTER CROSSDIGITAL CHAPARRAL DIRECT TV DAEWOO DISH NETWORK SYSTEM DISHPRO DRAKE DX ANTENNA ECHOSTAR EXPRESSVU GOI GE GENERAL INSTRUMENT HTS HOME CABLE HITACHI HUGHES NETWORK IQ IQ PRISM JANEIL JERROID JVC Code 023 043 018 034 019 035 015 016 017 019 022 045 060 061 062 065 066 067 068 074 069 070 069 018 024 032 027 025 069 070 071 069 069 065 046 047 048 063 0...

Page 95: ...22 123 027 065 077 078 079 082 080 125 081 095 066 146 067 068 090 060 061 089 133 135 069 074 074 064 113 071 073 091 110 089 092 091 022 033 115 116 073 051 108 109 073 059 100 106 107 074 075 025 031 057 058 054 055 056 076 093 074 094 073 Marque NORCENT NEXT BASE NEC NANTAUS NESA OPTOMEDIA ELECTRONICS OPTIVIEW ONKYO PHILCO PRINCETON PROSCAN PANASONIC PHILIPS ROTEL RIO RCA RAITE ROWA SAMPO SONY...

Page 96: ...a source d entrée 1 Appuyer sur la touche MENU pour afficher le menu Appuyer sur la touche ou pour sélectionner Entrée suivie de la touche ENTER Appuyer sur la touche ou pour sélectionner Entrer le nom suivie de la touche ENTER 2 Appuyer sur la touche ou pour sélectionner la prise d entrée AV1 AV2 S Video1 S Video2 Composant1 Composant2 PC HDMI1 HDMI2 ou HDMI3 suivie de la touche ENTER 3 Appuyer s...

Page 97: ...r la touche ou pour sélectionner Contraste Luminosité Précision Couleur ou Teinte suivie de la touche ENTER 4 Appuyer sur la touche ou pour augmenter ou réduire la valeur d un élément particulier Appuyer sur la touche ENTER Teinte ne fonctionne pas en mode PC En mode PC seuls Contraste et Luminosité peuvent être sélectionnés Chaque paramètre configuré est enregistrée séparément en fonction du mode...

Page 98: ...r la touche ou pour sélectionner Picture suivie de la touche ENTER 2 Appuyer sur la touche ou pour sélectionner Réduct bruit num suivie de la touche ENTER 3 Appuyer sur la touche ou pour sélectionner Off Basse Moyen Haute ou Auto suivie de la touche ENTER Appuyer sur la touche EXIT pour quitter le menu La fonction Réduct bruit num Digital NR est accessible dans tous les modes à l exception du mode...

Page 99: ... large l image à l écran à l aide peut être déplacée à l aide des touches ou Il est impossible de modifier la taille de l image lorsque le PIP image sur image est réglé à Double Lorsque le mode Double est choisi pour PIP la taille de l image ne peut être configurée Le format large peut être utilisé lorsque le mode réception est réglé sur un signal HD haute définition Le format large règle l image ...

Page 100: ... optimal Régler L équilibre des blancs précédemment établi sera rétabli selon les valeurs par défaut prédéfinies en usine Mon contrôle de couleur Rose Vert Bleu Blanc Régler Ce réglage peut être ajusté pour répondre à des préférences particulières Rose Vert Bleu Blanc Choisir la couleur voulue en appuyant sur la touche ou puis sur ENTER Appuyer sur ou jusqu à l atteinte du réglage optimal Pendant ...

Page 101: ...des fins de démonstration Cette fonction permet de constater la différence dans la qualité de l image 1 Appuyer sur la touche MENU pour afficher le menu Appuyer sur la touche ou pour sélectionner Image suivie de la touche ENTER 2 Appuyer sur la touche ou pour sélectionner DNIe suivie de la touche ENTER Cette fonction est désactivée lorsque la source d entrée est en mode PC 3 Appuyer sur la touche ...

Page 102: ...n pour régler le niveau de noir de l image en mode HDMI 1 Appuyer sur la touche MENU pour afficher le menu Appuyer sur la touche ou pour sélectionner Configuration suivie de la touche ENTER 2 Appuyer sur la touche ou pour sélectionner Nv nr HDMI suivie de la touche ENTER 3 Appuyer sur la touche ou pour sélectionner Normal ou Basse suivie de la touche ENTER Appuyer sur la touche EXIT pour quitter l...

Page 103: ...r est éteint alors qu il est en mode ISI la fenêtre ISI ne s afficher pas au rallumage Appuyer sur la touche PIP de la télécommande pour activer ou désactiver l ISI Les signaux numériques peuvent être reçus sur l écran ISI lorsque l image provient d une source externe lecteur DVD récepteur ordinateur etc branchée aux prises Composant 1 ou 2 PC ou aux prises HDMI 1 2 ou 3 à l écran principal Redime...

Page 104: ...touche ou au bas de la télécommande pour sélectionner le canal désiré dans la fenêtre ISI suivie de la touche ENTER Le canal peut être actif lorsque l image secondaire est réglée à TV Appuyer sur la touche EXIT pour quitter Appuyer sur les touches PIP CH et CH de la télécommande pour changer de canal ISI Arrêt sur Image 1 Appuyer sur la touche STILL de la télécommande pour faire un arrêt sur image...

Page 105: ...r ou pour choisir une fréquence particulière à ajuster Appuyer sur la touche ou pour augmenter ou réduire le niveau de la fréquence particulière suivie de la touche ENTER Appuyer sur la touche EXIT pour quitter le menu Réglage de l équilibre du son G D Pour régler l équilibre du son des haut parleurs gauche et droit Réglage des fréquences 100Hz 300Hz 1KHz 3KHz 10KHz Pour régler le niveau des fréqu...

Page 106: ...ilégiée 1 Appuyer sur la touche MENU pour afficher le menu Appuyer sur la touche ou pour sélectionner Son suivie de la touche ENTER 2 Appuyer sur la touche ou pour sélectionner Options multi pistes suivie de la touche ENTER 3 Appuyer sur ENTER pour choisir Langue privilégiée Appuyer sur la touche ou pour sélectionner la langue désirée Anglais Espagnol ou Français suivie de la touche ENTER Appuyer ...

Page 107: ... ENTER 3 Appuyer sur la touche ou pour sélectionner Off ou On suivie de la touche ENTER Appuyer sur la touche EXIT pour quitter Contrôle automatique du volume Réduit la différence de niveau sonore entre les diffuseurs 1 Appuyer sur la touche MENU pour afficher le menu Appuyer sur la touche ou pour sélectionner Son suivie de la touche ENTER 2 Appuyer sur la touche ou pour sélectionner Sourdine int ...

Page 108: ...s Sourdine Sourdine Composant PC HDMI Sortie haut parleurs Sourdine Sourdine TV Sortie du son Sortie du son Sourdine AV S Vidéo Sortie du son Sortie du son Sourdine Composant PC HDMI Sortie du son Sortie du son Mute Lorsque la sourdine interne est activée les menus audio à l exception de l option multi pistes ne peuvent pas être ajustés Sortie audio optique sortie G D vers la chaîne audio 3 Appuye...

Page 109: ...2 Appuyer sur la touche ou pour sélectionner Liste des canaux suivie de la touche ENTER 3 Appuyer sur la touche ou pour sélectionner Ajouté suivie de la touche ENTER 4 Appuyer sur les touches pour choisir le canal à ajouter suivies de la touche ENTER Appuyer sur la touche ou pour sélectionner Ajouter suivie de la touche ENTER Appuyer sur la touche MENU pour revenir en arrière Tous les canaux ajout...

Page 110: ...et le canal est enregistré comme canal favori Pour supprimer une sélection de canal favori appuyer sur la touche ENTER jusqu à ce que le symbole disparaisse Appuyer sur la touche EXIT pour quitter Seuls les canaux déjà en mémoire peuvent faire partie des canaux favoris Tous les canaux favoris sont affichés dans le menu Favorite Pour accéder aux canaux classés dans la liste des canaux favoris appuy...

Page 111: ...r la touche ou pour sélectionner Mode liste par défaut suivie de la touche ENTER Appuyer sur la touche ou pour sélectionner Tout Ajouté ou Favorite suivie de la touche ENTER Sélectionnez la liste de canaux souhaitée lorsque vous appuyez sur la touche CH LIST Tout Affiche tous les canaux lorsqu on appuie sur la touche CH LIST de la télécommande Ajouté Affiche tous les canaux ajoutés lorsqu on appui...

Page 112: ...alogiques La fonction de syntonisation précise permet d optimiser manuellement la réception d un canal 1 Appuyer sur la touche MENU pour afficher le menu Appuyer sur la touche ou pour sélectionner Chaîne suivie de la touche ENTER 2 Appuyer sur la touche ou pour sélectionner Syn Précise suivie de la touche ENTER 3 Appuyer sur ou pour ajuster la syntonisation précise 4 Pour mémoriser les réglages de...

Page 113: ... touche EXIT pour quitter le menu Amplificateur à faible bruit LNA Si le signal d entrée est faible dans la zone où est situé le téléviseur l amplificateur à faible bruit peut amplifier ce signal et ainsi améliorer la réception 1 Appuyer sur la touche MENU pour afficher le menu Appuyer sur la touche ou pour sélectionner Canal suivie de la touche ENTER 2 Appuyer sur la touche ou pour sélectionner L...

Page 114: ...M VESA et se base sur l utilisation de l entrée analogique signifie que ce mode est pris en charge Pour le HP T4254 la qualité du texte PC est optimale en mode XGA 1 024 x 768 à 60 Hz Pour le HP T5054 la qualité du texte PC est optimale en mode XGA 1360 x 768 à 60 Hz Trois pixels à gauche à droite en haut et en bas sont ombragés au paramètre de résolution 1 360 x 768 60 Hz Il ne s agit pas d un pr...

Page 115: ...upprimer les parasites régler la fréquence le mieux possible puis recommencer le réglage de précision Une fois les parasites réduits reprendre le réglage de l image de façon à bien centrer celle ci sur l écran Passer d abord en mode PC 1 Appuyer sur la touche MENU pour afficher le menu Appuyer sur la touche ou pour sélectionner Configuration suivie de la touche ENTER Appuyer sur la touche ou pour ...

Page 116: ...our quitter le menu Les réglages définis précédemment seront rétablis selon les valeurs par défaut prédéfinies en usine Réglage du PC cinéma maison Cette fonction permet d avoir des images de meilleure qualité en mode PC Après avoir activé la fonction PC cinéma maison vous pouvez ouvrir le menu réglages détaillés et effectuer des réglages sans que cela ne se répercute sur les réglages du mode TV 1...

Page 117: ...5 Appuyer sur la touche ou pour passer à Mois Jour Année Heure Minute ou am pm Régler la date et l heure en appuyant sur la touche or suivie de la touche ENTER Appuyer sur la touche EXIT pour quitter le menu L heure s affiche chaque fois que la touche INFO est enfoncée Il est possible de régler directement le Mois le appuyant l Année les Heure et les Minute en appuyant sur les touches numériques d...

Page 118: ...a touche ENTER Appuyer sur la touche ou pour sélectionner Activé ou Désactivé suivie de la touche ENTER Appuyer sur la touche EXIT pour quitter le menu En fonction de la station émettrice et du signal il est possible que la fonction de réglage automatique de l horloge ne fonctionne pas correctement Dans un tel cas régler l horloge manuellement L antenne ou le câble doit être branché pour que le ré...

Page 119: ...sous tension du téléviseur par la minuterie Cette fonction est seulement disponible en mode Minuterie activée et évite toute fuite ou surchauffe lorsque le téléviseur est sous tension pendant une période prolongée pendant les vacances par exemple Réglage de la minuterie de mise en veille Cette minuterie éteint automatiquement le téléviseur après le délai choisi 30 60 90 120 150 et 180 minutes 1 Ap...

Page 120: ...r la console de jeu et brancher un autre dispositif externe régler l option Jeu à Off dans le menu de configuration Si le menu du téléviseur est affiché en mode Jeu l écran vibre légèrement The mark s affiche à l écran indiquant que le mode Jeu est activé avec la source sélectionnée Si le mode Jeu est activé Le mode Image passera automatiquement à Jeu et il ne peut être changé Le mode Son du menu ...

Page 121: ...ar défaut est Par défaut Couleur avant plan Cette option permet de choisir entre Par défaut Blanc Noir Rouge Vert Bleu Jaune Magenta et Cyan Il est possible de modifier la couleur du lettrage La sélection par défaut est Par défaut Couleur arrière plan Cette option permet de choisir entre Par défaut Blanc Noir Rouge Vert Bleu Jaune Magenta et Cyan Il est possible de choisir la couleur d arrière pla...

Page 122: ...ccroître l information transmise par le programme CC3 Service de sous titrage secondaire synchronisé Programme alternatifde données de sous titrage généralement dans une seconde langue CC4 Sous titrage non synchronisés particulier Option semblable à CC2 Text 1 Premier service de texte Il peut comprendre diverses données qui ne se rapportent pas au programme Text 2 Deuxième service de texte Données...

Page 123: ... de la touche ENTER Appuyer sur la touche EXIT pour quitter le menu Off La DEL est toujours éteinte Mode veille La DEL s allume lorsque le téléviseur est en mode de mise en veille et s éteint lorsque le téléviseur est allumé Pen ècoute La DEL s allume lorsque le téléviseur est allumé et s éteint lorsque le téléviseur est éteint Toujours La DEL est toujours allumée Régler l effet lumière à Off pour...

Page 124: ...NTER 3 Appuyer sur la touche ENTER pour choisir Déplac Point suivie de la touche ENTER Appuyer sur la touche ou pour permuter entre On et Off S affichent également les options Point horiz Ligne verticale et Heure Déplac point Cette fonction permet de déplacer avec une très grande précision les points à l écran verticalement et horizontalement afin d éviter la présence d images rémanentes 4 Appuyer...

Page 125: ...format de l image est réglé à 4 3 les côtés gauche et droit sont plus clairs Pour supprimer les images rémanentes à l écran utiliser la fonction Blanc ou Défilement Bien que ces deux fonctions suppriment les images rémanentes à l écran la fonction Défilement est la plus efficace Pour atteindre sa pleine efficacité la fonction de suppression des images rémanentes doit être activée pendant une longu...

Page 126: ...a télécommande Touche Actions Ajustement de l angle de la fixation murale Incliner vers le haut incliner vers le bas déplacer vers la droite déplacer vers la gauche Rétablir Rétablit dans la position initiale Mémorisation de la position et passage à la position enregistrée Les touches rouge verte et jaune permettent de mémoriser trois positions Les trois touches de couleur permettent de passer aux...

Page 127: ...USB contenant la mise à jour du microprogramme dans le port de mise à jour USB situé sur le côté du téléviseur 2 Appuyer sur la touche MENU pour afficher le menu Appuyer sur la touche ou pour sélectionner Configuration suivie de la touche ENTER 3 Appuyer sur la touche ou pour sélectionner Mise à niveau du logiciel suivie de la touche ENTER 4 Appuyer sur la touche ou pour sélectionner USB suivie de...

Page 128: ...e de la touche ENTER Le message Entrer NIP s affiche Entrer le NIP à 4 chiffres Suite 3 L écran V Chip s affiche Appuyer sur la touche ou pour sélectionner Changer NIP suivie de la touche ENTER L écran Changer NIP s affiche Choisir et saisir quatre chiffres pour le NIP Entrer de nouveau le code à 4 chiffres Le message NIP modifié avec succès est affiché Le NIP a été enregistré Appuyer sur la touch...

Page 129: ...pour bloquer toutes les classifications Les classifications TV Y7 TV Y7 TV G TV SP TV 14 et TV A comportent des options supplémentaires Voir l étape suivante pour changer les sous classifications ci dessous FV Fantastique violence D Dialogues à connotation sexuelle L Langage pour adultes La fonction V Chip permet de bloquer automatiquement certaines classifications plus restrictives Par exemple si...

Page 130: ...ons G Public de tous âges aucune restriction PG Surveillance parentale recommandée PG 13 Supervision des parents fortement recommandée R Réservé aux adultes Les enfants de moins de 17 ans devraient être accompagnés d un adulte NC 17 Non recommandé pour les enfants de moins de 17 ans X Adultes seulement NR Non classé La fonction V Chip bloque automatiquement toute classification plus restrictive Pa...

Page 131: ...ntrer le NIP à 4 chiffres 3 L écran V Chip s affiche Appuyer sur la touche ou pour sélectionner Français canadien suivie de la touche ENTER 4 Appuyer sur la touche ou pour sélectionner la restriction appropriée Appuyer sur la touche ENTER pour activer la restriction sélectionnée Le symbole s affiche Appuyer sur la touche EXIT pour quitter le menu Perm tout Appuyer sur cette touche pour débloquer t...

Page 132: ...quement certaines classifications plus restrictives Les titres de classification par exemple Humor Level et les classifications par exemple DH MH H peuvent varier selon la station émettrice Réinitialisation du téléviseur lorsque la fonction V Chip bloque un canal solution d urgence Si un canal à accès restreint est syntonisé la fonction V Chip la bloque L écran devient vide et le message suivant s...

Page 133: ...t parleurs du cinéma maison Autrement les autres cas ne permettent que l écoute du son stéréo de 2 canaux Veiller à ce que l entrée audionumérique optique du cinéma maison et le téléviseur soient bien branchés afin de pouvoir écouter le son par le cinéma maison Cela étant il n est pas possible d écouter le son provenant de l enregistreur et envoyé au cinéma maison par le son à 5 1 canaux étant don...

Page 134: ...éléviseur s affiche 2 Appuyer sur la touche ou pour sélectionner un appareil particulier suivie de la touche ENTER Le système commande l appareil sélectionné 3 S il est impossible de trouver l appareil désiré appuyer sur la touche ou pour sélectionner Recherche de connexions suivie de la touche ENTER Le message Configuration de la connexion Anynet s affiche Lorsque la recherche d appareil est term...

Page 135: ... Pause Appareil avec syntoniseur intégré Après la permutation vers l appareil pendant l écoute d une émission télévisée CH Touche Appareil audio Lorsque le récepteur est activé Touches VOL Touche MUTE Anyview2 En mode d écoute de la télévision Lecture Pause La fonction Anynet n est accessible que lorsque la télécommande est réglée à TV La touche REC ne fonctionne qu à l état d écoute de la télévis...

Page 136: ... de la télécommande exclusive Anynet Anynet ne fonctionne pas dans certaines conditions recherche de canaux Au moment du branchement ou du débranchement du câble HDMI 1 3 s assurer d effectuer une nouvelle recherche des appareils ou de redémarrer le téléviseur Vérifier si la fonction Anynet de l appareil Anynet est activée Je souhaite lancer Anynet Vérifier si l appareil Anynet est bien branché au...

Page 137: ...cision L image est trop grande ou trop petite Redimensionner l image La qualité visuelle des canaux numériques varie La qualité visuelle des canaux numériques peut varier selon la méthode de production d origine analogue ou numérique Si la méthode de production d origine est numérique Une émission de haute qualité visuelle Si la méthode de production d origine est analogue Le programme numérique a...

Page 138: ... M6 L10 4 46 52 600 400 M8 L15 4 57 700 400 Plasma TV 42 50 600 400 63 Aucun VESA M8 6 1 Nous offrons les dimensions standard pour les jeux d installation murale indiquées dans le tableau ci dessus 2 Un manuel d installation détaillée et toutes les pièces nécessaires à l assemblage sont comprises avec l achat de notre jeu d installation murale 3 Ne pas utiliser de vis plus longues que les dimensio...

Page 139: ... lb 30 7 kg 73 8 lb 33 5 kg 91 4 lb 41 5 kg 97 lb 44 kg Environnement d utilisation Température pour le fonctionnement Niveau d humidité relative pour le fonctionnement Température pour l entreposage Niveau d humidité pour l entreposage 50 F à 104 F 10 C à 40 C 10 à 80 sans condensation 20 00 C à 45 00 C 20 C à 45 C 5 à 95 sans condensation Appareil numérique de catégorie B La conception et les sp...

Page 140: ... REMARQUE Tous les dessins ne sont pas nécessairement des représentations à l échelle Certaines dimensions peuvent avoir été changées sans avis Mesurez les dimensions de chaque unité avant de procéder à des travaux de menuiserie Nous n assumons aucune responsabilité pour les erreurs typographiques ou d impression 2007 Samsung Electronics America Inc ...

Page 141: ... REMARQUE Tous les dessins ne sont pas nécessairement des représentations à l échelle Certaines dimensions peuvent avoir été changées sans avis Mesurez les dimensions de chaque unité avant de procéder à des travaux de menuiserie Nous n assumons aucune responsabilité pour les erreurs typographiques ou d impression 2007 Samsung Electronics America Inc ...

Page 142: ...Cette page est laissée intentionnellement en blanc ...

Page 143: ...Cette page est laissée intentionnellement en blanc ...

Page 144: ...uer avec le centre de service à la clientèle SAMSUNG Country Customer Care Center Web Site Address CANADA 1 800 SAMSUNG 7267864 www samsung com ca Samsung Electronics Canada Inc Customer Service 55 Standish Court Mississauga Ontario L5R 4B2 Canada Samsung Electronique Canada Inc Service à la Clientèle 55 Standish Court Mississauga Ontario L5R 4B2 Canada U S A 1 800 SAMSUNG 7267864 www samsung com ...

Reviews: