background image

0

Submenu items

• 

Off:

 Disables the function. 

• 

Normal ( ):

 Record a brighter image by extending 

the low shutter speed range to 1/30.

• 

Super ( ):

 Record a brighter image by fixing the 

shutter speed to 1/15 in a dark location.

1. 

Touch the Menu (

) tab 

Super C.Nite.

2. 

Touch a desired submenu item.

3.

  To exit the menu, touch the Exit ( ) or Return (

) tab.

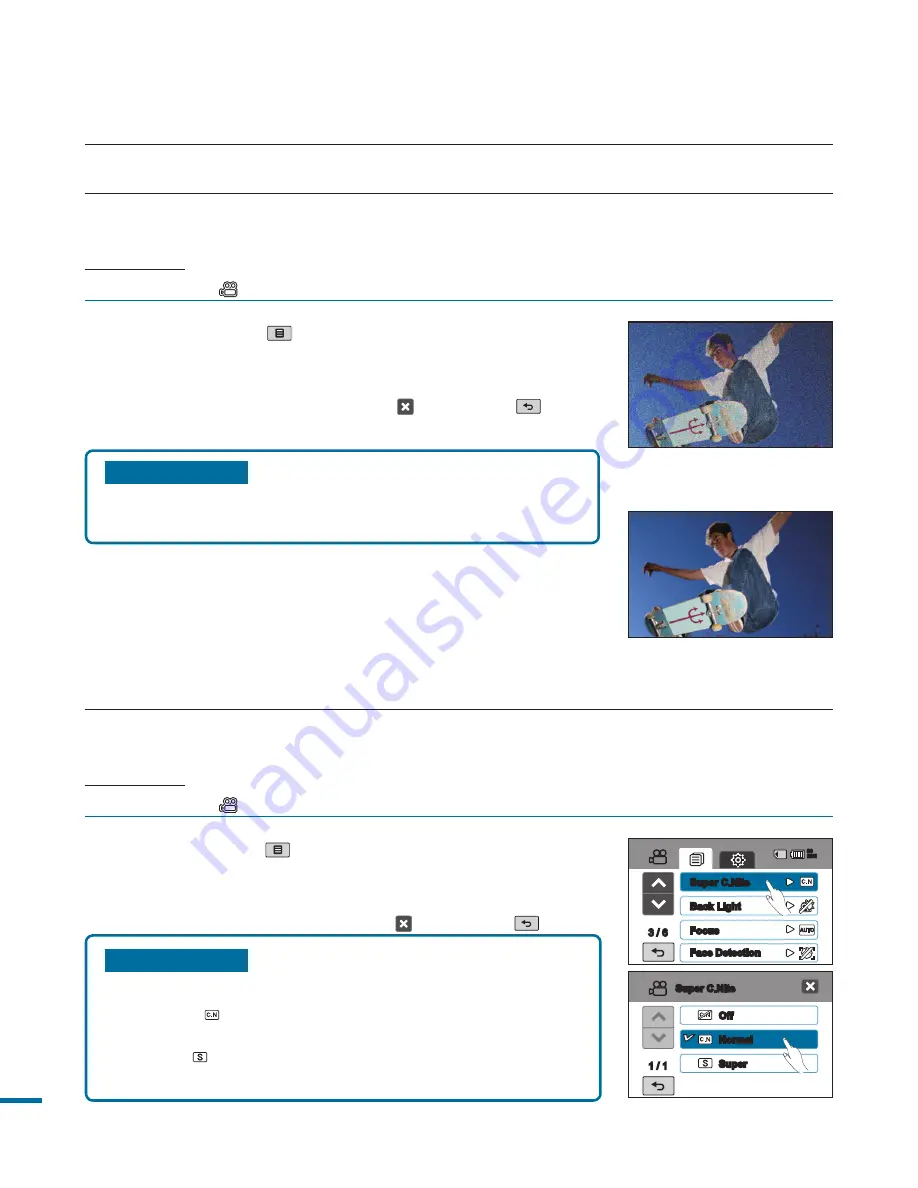
Super C.Nite

You can adjust the shutter speed when recording a slow moving object, or record a brighter image 
in dark places without a compromise in colors.

PRECHECK!

Select the Video (

) mode by pressing the 

MODE

 button. 

page 33

3D-NR

3D-NR (3-Dimension Noise Reduction) function reduces video noise and improves the quality.
This is especially effective during low light shooting.

PRECHECK!

Select the Video (

) mode by pressing the 

MODE

 button. 

page 33

1. 

Touch the Menu (

) tab 

3D-NR.

2. 

Touch a desired submenu item.

3. 

To exit the menu, touch the Exit ( ) or Return (

) tab.

Submenu items

• 

Off : 

Disables the function.

• 

On :

 Enables the 3D-NR function.

advanced recording

Off

Normal

Super

1 / 1

Super C.Nite

 / 

Super C.Nite

Back Light

Focus

Face Detection

90

MIN

<Conventional image result 

when recorded with low 

light shooting.> 

<When the 3D-NR function 

is applied in the same 

recording conditions.>

Summary of Contents for HMX-R10BN

Page 1: ... R10BN imagine the possibilities Thank you for purchasing this Samsung product To receive more complete service please register your product at www samsung com register High Definition Digital Camcorder user manual ...

Page 2: ...080 30 progressive resolutions to display an image The interlace system scans odd lines and even lines in the image by turns while the progressive system scans all lines at once like processing a film image Accordingly you can obtain high quality shake free images on a HDTV screen as if you are sitting in the cinema High Speed Recording Recording up to 600 frames per second fps your camcorder feat...

Page 3: ...tness for the touched point enabling you professional results with this simple operation Comfortable Ergonomic Design This camcorder is designed for comfort when making long recordings With this ergonomic design you can shoot subjects comfortably from any position Time Lapse Recording Catches the Moment You can record a long scene in short intervals Record artistic documentary videos including the...

Page 4: ...ing the camcorder These warning signs are here to prevent injury to you and others Please follow them explicitly After reading this section keep it in a safe place for future reference Warning This camcorder should always be connected to an AC outlet with a protective grounding connection Batteries shall not be exposed to excessive heat such as sunshine fire or the like Caution Danger of explosion...

Page 5: ...e Copyrights Please note that this camcorder is intended for individual use only Data recorded on the storage media in this camcorder using other digital analog media or devices is protected by the copyright act and cannot be used without permission of the owner of the copyright except for personal enjoyment Even if you record an event such as a show performance or exhibition for personal enjoymen...

Page 6: ...er countries Intel Core and Pentium are the registered trademarks or trademarks of the Intel Corporation in the United States and other countries Macintosh Mac OS are either registered trademarks or trademarks of Apple Inc in the United States and or other countries YouTube is a trademark of Google Inc Flickr is a trademark of Yahoo HDMI the HDMI logo and High Definition Multimedia Interface are t...

Page 7: ...s heat registers stoves or other apparatus including amplifiers that produce heat 9 Do not defeat the safety purpose of the polarized or grounding type plug A polarized plug has two blades with one wider than the other A grounding type plug has two blades and a third grounding prong The wide blade or the third prong are provided for your safety If the provided plug does not fit into your outlet co...

Page 8: ... plug still fails to fit contact your electrician to replace your outlet Do not defeat the safety purpose of the polarized plug 19 POWER CORD PROTECTION Power supply cords should be routed so that they are not likely to be walked on or pinched by items placed upon or against them paying particular attention to cords or plugs convenient receptacles and the point where they exit from the unit 20 OUT...

Page 9: ...operation e If the CAMCORDER has been dropped or the cabinet has been damaged f When the CAMCORDER exhibits a distinct change in performance this indicates a need for service 27 REPLACEMENT PARTS When replacement parts are required be sure the service technician has used replacement parts specified by the manufacturer and having the same characteristics as the original part Unauthorized substituti...

Page 10: ...erference by one or more of the following measures Reorient or relocate the receiving antenna Increase the separation between the equipment and receiver Connect the equipment into an outlet on a circuit different from that to which the receiver is connected Consult the dealer or an experienced radio TV technician for help and for additional suggestions The user may find the following booklet prepa...

Page 11: ...ptor Doing so may pose a fire hazard W 4 4 W Do not disconnect the AC adaptor by pulling on its power cord as this could damage the power cord Do not bend the powercord or damage the AC power adaptor by pressing on it with a heavy object There may be a risk of fire or electric shock No oil Oil entering the camcorder or AC power adaptor could cause electric shock malfunctions or defects L I O Do no...

Page 12: ...cian immediately Do not attempt to disassemble repair or reform the camcorder or the AC adaptor to avoid a risk of fire or electric shock Do not plug or unplug the power cord with wet hands There is a risk of electric shock Keep the power cord unplugged when not in use or during lightning storms There is a risk of fire When cleaning the AC adaptor unplug the power cord There is a risk of malfuncti...

Page 13: ...als d sabl ng normal operat on Do not expose the camcorder to nsect c de Insect c de enter ng the camcorder could fa l the product to operate normally Turn the camcorder off and cover t w th v nyl sheet etc before us ng nsect c de E D I C I T C E S N I Do not drop or expose the camcorder battery pack AC adaptor or other accessor es to severe v brat ons or mpact Th s may cause a malfunct on or njur...

Page 14: ...near strong radio waves or magnetism such as speakers and a large motor Noise could enter video or audio that are being recorded W 4 4 W Keep important data separately Samsung is not responsible for data loss Place the camcorder on a stable surface and a place with ventilation openings W 4 4 W Use Samsung approved accessories only Using products from other manufacturers may cause overheating fire ...

Page 15: ...n of the camcorder 31 Turning your camcorder on off 32 Switching to the power saving mode 33 Setting the operation modes 33 Using the display iCHECK button 34 Using the touch panel 35 First time settings 35 Setting the time zone and date time for the first time 36 Selecting the language 37 Getting ready to start recording 37 Inserting and removing a memory card not supplied 38 Selecting a suitable...

Page 16: ...56 Advanced Recording 56 Handling menus and quick menus 57 Menu items 60 Quick menu items 61 SCENE 62 Resolution 63 Quality 64 Slow Motion 65 Sharpness 65 White Balance 67 ISO 68 Aperture 69 Shutter 69 EV 70 3D NR 70 Super C Nite 71 Back Light 71 Dynamic Range 72 Flash 73 Focus 74 Face Detection 75 Magic Touch 76 Metering 77 Anti Shake EIS 78 Digital Effect 79 Fader 80 Super Macro 81 Wind Cut 81 M...

Page 17: ... Set 92 Date Time Display 93 Date Type 93 Time Type 94 File No 95 Time Zone 96 LCD Control 96 LCD Enhancer 97 Auto LCD Off 97 Booting Mode 98 Quick On STBY 99 PC Software 99 Storage Info 100 Format 101 Beep Sound 101 Shutter Sound 102 Auto Power Off 102 Rec Lamp 103 USB Connect 103 TV Connect Guide 104 TV Display 104 TV Type 105 Analog TV Out 105 Default Set 106 Demo 106 Anynet HDMI CEC ADVANCED O...

Page 18: ...F printing setting 117 Direct printing with a PictBridge printer 119 Connecting to a TV 119 To connect to a high definition TV 121 Connecting to a regular TV 123 Viewing on a TV screen 124 Dubbing videos 124 Dubbing to a vcr or DVD HDD recorder 125 Using with a Windows computer 125 Checking your computer type 126 What you can do with a Windows computer 127 Using the Intelli studio program 133 Usin...

Page 19: ...record videos in H 264 format that is convenient to email and share with your friends and family You can also take photos with your camcorder This quick start guide introduces the basic operation and features of your camcorder See the reference pages for more information STEP2 Record with your camcorder 15 CMOS 9 0 M EGA PIXELS Recording start stop button LCD screen Your camcorder turns on when yo...

Page 20: ...n when you open the LCD screen 2 Press the Recording start stop button To stop recording press the Recording start stop button 1 Open the LCD screen 2 Press the MODE button until the photo indicator lights up 3 Press PHOTO button lightly to adjust the focus then press it fully a shutter click sounds quick start guide Recording videos with HD high definition image quality Recording photos Using Qui...

Page 21: ...etailed beautiful images page 62 Viewing on a high definition TV You can enjoy HD high definition videos page 119 120 Simple and fun Enjoy the various features of Intelli studio on your Windows computer Using the Intelli studio programme built in your camcorder you can import video photos onto your computer edit or share the videos photos with your friends For details see page 125 STEP4 Save recor...

Page 22: ...your contents with the world by uploading photos and videos directly to web site with one click Click Share Add tab on the browser page 130 STEP5 Delete videos or photos If the storage media is full you cannot record new videos or photos Delete videos or photos data that has been saved on a computer from the storage media Then you can record new videos or photos on newly freed up space Touch the P...

Page 23: ... on the sales region Parts and accessories are available for purchase at your local Samsung dealer SAMSUNG is not responsible for reduced battery life time or malfunctions caused by any unauthorized use of accessories such as the AC adaptor or the batteries Your camcorder includes the user manual CD and quick start guide printed For more detailed instructions refer to the user manual PDF on the pr...

Page 24: ...ul not to block the internal microphone and lens 1 Built in flash 2 Lens 3 Recording indicator 4 Internal microphone 5 Q MENU button 6 Zoom W T button 7 Recording start stop button 8 TFT LCD screen Touch screen 9 Built in speaker 10 Display iCHECK button 11 EASY Q button 12 Power button 13 PHOTO button 14 Hand strap hook ...

Page 25: ...indicator Video Photo mode 2 Zoom W T lever 3 Charging CHG lamp 4 Recording start Stop button 5 HDMI jack 6 Jack cover 7 DC IN jack 8 c USB Component AV jack 9 Battery Memory card cover switch 10 Battery Memory card cover 11 Tripod receptacle ...

Page 26: ...tice for the purpose of better performance The total number of recordable photos is counted based on available space on the storage media 1 Video record mode 2 Operating status STBY standby recording 3 Time counter video recording time Self Timer 4 Warning indicators and messages 5 Remaining recordable time 6 Storage media memory card 7 Battery info remaining battery level time 8 Resolution 9 LCD ...

Page 27: ...age 33 Video play mode The playback control tabs disappear a few seconds after a video playback Touch anywhere on the screen to display them again For warning indicators and messages see pages 136 139 1 Video play mode 2 Operating status Play Pause 3 File name file number 4 Playback time Recorded time 5 Warning indicators and messages Volume control 6 Storage media memory card 7 Battery info Remai...

Page 28: ...ages on the On Screen Display OSD is 9 999 1 Photo record mode 2 Focus indicator half shutter 3 Self Timer 4 Warning indicators and messages 5 Image counter total number of recordable photo images 6 Storage media memory card 7 Battery info remaining battery level time 8 Quality Resolution 9 LCD enhancer Anti Shake EIS 10 Super Macro Back Light 11 Dynamic Range Cont Shot Bracket Shot Flash 12 ISO S...

Page 29: ...hown in Photo playback mode only Select the Play tab on the LCD screen to select the playback mode page 33 Photo play mode 1 Photo play mode 2 Slide show zooming control 3 File name 4 Image counter current image total number of recorded images 5 Storage media memory card 6 Battery info Remaining battery level time 7 LCD enhancer Quality Resolution 8 Date time 9 Previous image Next image tab 10 Sli...

Page 30: ...e battery memory card cover by sliding the battery memory card cover switch to the left OPEN as shown in the figure 2 Slide the battery eject lever Gently slide the battery eject lever in the direction as shown in the figure 3 Close the battery memory card cover and slide the battery memory card cover switch to the right CLOSE as shown in the figure USING THE BATTERY PACK Purchase extra battery pa...

Page 31: ...recommended you to have one or more additional battery packs to allow continuous use of your camcorder PRECHECK Before starting the following procedure make sure that the battery pack is inserted in your camcorder 1 Press the power button to turn off the camcorder and then close the LCD screen page 31 2 Connect the power cord to the AC Adaptor and the wall outlet 3 Connect the AC Adaptor to the DC...

Page 32: ...Store the battery pack separately when finished charging or when not using it for a long time This will help extend the life of the battery The Battery pack is charged over 95 after about 1 hour and 40 minutes and the indicator color changes to green It takes about 2 hours for the battery pack to charge 100 getting started Charging state Charge Fully Discharged Charging Fully Charged Error LED col...

Page 33: ...ed It may cause leakage generate heat or cause fire Maintaining the battery pack The recording time is affected by temperature and environmental conditions We recommend only using the original battery pack that is available from your Samsung retailer When the battery reaches the end of its life please contact your local dealer The batteries have to be dealt with as chemical waste Make sure that th...

Page 34: ...inks during charging or Battery Info will not be correctly displayed under the following conditions The battery pack is not inserted correctly The battery pack is damaged The battery pack is worn out For the battery information only It is recommended that you use the AC power adaptor to power the camcorder from a household AC outlet when you perform settings on it play back or edit images or use i...

Page 35: ... 139 and take corrective action If you close the LCD screen when the power is on the power saving mode activates basic operation of the camcorder TURNING YOUR CAMCORDER ON OFF This chapter introduces you to the basic operation procedures of this camcorder such as turning the power on off switching modes and setting on screen indicators When using this camcorder for the first time When you use your...

Page 36: ...der for the extended time the following functions enable you to prevent unnecessary energy consumption In STBY mode The camcorder switches to Quick On STBY mode when the LCD screen is closed page 98 In Playback mode Includes the thumbnail view mode The camcorder switches to the sleep mode when the LCD screen is closed and then if idle for more than 20 minutes the camcorder turns off However if Aut...

Page 37: ...ctive mode indicator lights on Touching the Play tab in the video or photo record mode switches the operation mode into the video or photo playback mode Mode Icon Functions Video mode Records or playback videos Photo mode Records or playback photos When you turn on the camcorder for the first time the video mode will start up as the default Booting mode can be selected by setting Booting Mode to P...

Page 38: ...njoy playback and recording with a simple touch of your finger Place your hand on the rear side of the LCD screen to support it Then touch the items displayed on the screen USING THE TOUCH PANEL Be careful not to accidentally press the buttons near the LCD panel while using the touch panel The tabs and indicators that appear on the LCD screen depend on the current recording playback status of your...

Page 39: ... Your camcorder turns on automatically when you open the LCD screen The Time Zone Home screen appears based on Lisbon London Greenwich Mean Time You can also set your current time zone from the Settings menu page 95 2 Select your local area on the map by touching the left or right tab on the LCD screen then press the OK tab The Date Time Set screen appears 3 Touch the date and time information and...

Page 40: ...or Return tab to complete the setting The menu screen and messages are displayed in the selected language Language options may be changed without prior notice Selected language is retained even without the battery pack or AC power adaptor The date and time format may change depending on the selected language SELECTING THE LANGUAGES You can select the language to display the menu screen or messages...

Page 41: ...art recording INSERTING AND REMOVING A MEMORY CARD NOT SUPPLIED Your camcorder supports only SD Secure Digital and SDHC Secure Digital High Capacity cards The compatibility with the camcorder may vary depending on manufacturers and types of the memory cards To avoid the data loss turn off the camcorder by pressing the power button for one second before inserting or ejecting the memory card Do not ...

Page 42: ...y memory card An SDHC card is a higher version Ver 2 00 of SD card and supports capacity above 2GB Cannot be used with current SD enabled host devices Common cautions for memory cards Damaged data may not be recovered It is recommended you make a back up of important data separately on the hard disk of your PC Turning the power off or removing a memory card during an operation such as formatting d...

Page 43: ...a period of use the memory card may get warm This is normal and is not a malfunction The camcorder supports SD and SDHC memory cards for data storage preference The data storage speed may differ according to the manufacturer and production system SLC single level cell system faster write speed enabled MLC multi level cell system only lower write speed is supported For best results we recommend usi...

Page 44: ...iCHECK button page 20 The maximum number of recordable photos and videos is 9 999 The above items marked with indicate the default setting Unit Approximate minutes of recording Photo resolution Quality Storage media Capacity 1GB 2GB 4GB 8GB 16GB 32GB 12M 4000x3000 Super Fine 168 327 655 1316 2685 5407 Fine 252 490 981 1969 4017 8088 Nomal 380 735 1471 2954 6026 9999 9M 3456x2592 Super Fine 226 440...

Page 45: ...iently rotate the screen by 180 towards the lens then fold it back to the body Excessive rotation may damage the connective hinge between the screen and the camcorder Clean fingerprints or dust on the screen with a soft cloth When the LCD screen is rotated by 180 toward the lens the left and the right sides of the subject are shown in the opposite direction as if you are looking at the mirror This...

Page 46: ...p the hand strap to your hand 3 Make sure your footing is stable and there is no danger of colliding with another person or object 4 Aim and focus as shown in the illustration This camcorder lens angle is approx 25 higher than the rest of the camcorder body Make sure the camcorder lens is angled for proper shooting It is recommended to keep the sun behind you while shooting To avoid underexposing ...

Page 47: ...recording starts 3 To stop recording press the Recording start stop button again 4 The Quick View icon appears on the screen Touch the Quick View icon to view the most recently recorded video After the Quick View is complete your camcorder returns to the standby mode basic recording Recording Videos This camcorder supports both High Definition HD and Standard Definition SD image resolutions Set yo...

Page 48: ...io and video recording The brightness of the LCD screen can be adjusted in the menu options Adjusting the LCD screen does not affect the image being recorded page 96 For various functions available during recording see Recording menu items pages 57 58 Do not turn off the camcorder or remove the memory card while accessing the storage media Doing so may damage the storage media or the data in the s...

Page 49: ... can also record photos in STBY mode 1 Press the PHOTO button in STBY mode The photo is recorded while the indicator appears and the shutter sound is heard You cannot capture photos in the following conditions Slow motion record mode When time lapse recording is performed You cannot use the flash during dual recording Resolution of the captured photos differs according to the resolution of the rec...

Page 50: ...tos and store them in an SD SDHC memory card Set the desired resolution and quality before recording page 62 PRECHECK Open the LCD screen to turn on the camcorder Your camcorder turns on automatically when you open the LCD screen Select the Photo mode by pressing the MODE button page 33 Recordable number of photos varies depending on the photo size and quality page 40 Audio is not recorded when ta...

Page 51: ...tments PRECHECK Select the Video or Photo mode by pressing the MODE button page 33 Photo record mode Video record mode The EASY Q mode automatically sets the following record functions SCENE White Balance Aperture Shutter EV Super C Nite Back Light Focus Face Detection Anti Shake EIS Digital Effect Fader Super Macro ISO Dynamic Range Flash Magic Touch Metering Cont Shot Bracket Shot etc Cancel the...

Page 52: ... the PHOTO button halfway at the scene you want to capture The playback screen is paused 4 Press the PHOTO button fully down The captured still image is recorded in JPEG format 5 When the photo is recorded on the storage media touch the Return tab to view the thumbnail index Touch the Photo tab to view the recorded photo images page 50 Capturing Photos while Playing Back Videos You can capture pho...

Page 53: ...nstable when recording with a fast zoom or zooming into a subject standing too far away In this case use the manual focus function page 73 The minimum possible distance between camcorder and subject while maintaining sharp focus is about 10cm about 3 9 inches for wide angle and about 1m about 39 37 inches for telephoto If you want to shoot the object close to the lens at a wide angle use the Super...

Page 54: ...rd mode from the thumbnail display mode you can touch the video photo tab on the LCD screen In the video or photo thumbnail display mode you can directly enter the video or photo record mode by pressing the Recording start stop or PHOTO button Understanding how to change the operation modes You can simply change the operation modes by touching the LCD screen or using the buttons as shown in the fo...

Page 55: ... select the playback mode page 33 It may take some time to start playback depending on the size and quality of the selected video When the LCD screen is closed during playback the built in speaker automatically turns off The camcorder may not play the following video files A video edited by using the different software that was not built in your camcorder or whose file name is changed on a PC A vi...

Page 56: ...ack During pause touching the Frame advance tab makes play go forward one frame at a time Magnifying the image size while playing back the videos When you playback videos recorded at Slow Motion or Resolution Web Mobile the image s viewing size can be adjusted by using the zoom button or the zoom lever Operating the zoom button or the zoom lever toward the direction of T telephoto magnifies the im...

Page 57: ...e Return tab VIEWING PHOTOS You can view recorded photos by using various playback functions PRECHECK Touch the Play tab on the LCD screen to select the playback mode page 33 Do not power off or eject the memory card during photo playback Doing so may damage the recorded data Your camcorder may not playback the following photo files normally A photo with its file name changed on a PC A photo recor...

Page 58: ...can use the Slide Show Option menus as follows Using the Slide Show Option VIEWING A SLIDE SHOW You can view a photo slide show PRECHECK This function works in Photo mode only Touch the Play tab on the LCD screen to select the playback mode page 33 Tip Music built in music will play Off Random 1 Mist 2 Muse 3 Fall 4 Dawn 5 Party 6 Drops 7 Trip Interval 1 Sec 3 Sec Effect Off Random Effect 1 Effect...

Page 59: ...om is in use other images cannot be selected 4 Touch the up down left right tab to view the area you want on the magnified photo 5 To cancel touch the Return tab ZOOMING DURING PLAYBACK You can magnify a playback image Touch up down left right to select a desired area to magnify PRECHECK This function works only in the photo play mode Touch the Play tab on the LCD screen to select the playback mod...

Page 60: ...ngly To exit the menu touch the Exit or Return tab Using the Q MENU button 1 Open the LCD screen to turn on the camcorder If you find the LCD screen is already open when the power is turned off press the power button to turn on the camcorder 2 Select the Video or Photo mode by pressing the MODE button 3 Touch the Menu tab on the touch panel The menu screen appears To change the current page touch ...

Page 61: ...hen you press the Q MENU button on the LCD screen 1 Press the Q MENU button The quick menu screen appears 2 Touch the Edit tab 3 Touch the Q MENU item you want to delete or replace with a new one 4 Touch the replace add or delete tab to make changes If adding an item for example Focus select it Press the OK tab to save changes Q MENU screen has been changed according to your changes Customizing th...

Page 62: ...On Video 1 Sec Photo 87 Guideline Off 88 o available X not available Playback menu items Operation mode Video Thumbnail Video Single Photo Thumbnail Single Default value Page Play Option X Play All 89 Highlight X 89 Playlist X X 110 Delete 113 Protect Off Single 114 Edit Partial Delete X 107 Divide X 108 Combine X X 109 Cont Capture X 1Cut 90 File Info 90 Slide Show Start X X 54 Slide Show Option ...

Page 63: ...92 LCD Control 96 LCD Enhancer Off 96 Auto LCD Off On 97 Beep Sound On 101 Shutter Sound On 101 Booting Mode Video Mode 97 Auto Power Off 5 Min 102 Quick On STBY 5 Min 98 PC Software On 99 USB Connect Mass Storage 103 TV Type 16 9 104 Analog TV Out Component Auto 105 TV Connect Guide 103 TV Display On 104 REC Lamp On 102 Default Set 105 Language 36 Demo On 106 Anynet HDMI CEC On 106 ...

Page 64: ...e Resolution HD 1080 60i SF 6M 3328x1872 62 EV 0 69 Back Light X Off 71 Flash X Off 72 Focus Auto 73 Video Thumbnail Video Single Photo Thumbnail Single Page Highlight X 89 Playlist X X 110 Slide Show Start X X 54 Delete 113 115 Protect X 114 Edit X 107 109 Print Mark X X 116 Recording menu items default Playback menu items default advanced recording o available X not available o available X not a...

Page 65: ...ht reflection such as the beach or ski resort Food When recording the food images in high saturation Candle Light When recording subjects under low light conditions such as candles at night time 1 Touch the Menu tab SCENE 2 Touch a desired submenu item To change the current page touch up down tab 3 To exit the menu touch the Exit or Return tab SCENE This camcorder automatically sets the shutter sp...

Page 66: ...rded on a memory card PRECHECK Select Video or Photo mode by pressing the MODE button page 33 Resolution submenu in the Video Record mode HD 1080 60i SF Records in the HD 1920x1080 60i Super Fine format HD 1080 60i N Records in the HD 1920x1080 60i Fine format HD 1080 30p Records in the HD 1920x1080 30p format HD 720 60p Records in the HD 1280x720 60p format SD 480 60p Records in the SD 720x480 60...

Page 67: ... the normal image quality 1 Touch the Menu tab Quality 2 Touch a desired submenu item 3 To exit the menu touch the Exit or Return tab Quality You can select the quality of photo images to be recorded PRECHECK Select the Photo mode by pressing the MODE button page 33 Super Fine Fine Normal 1 1 Quality 1 7 SCENE Resolution Quality Sharpness 90 MIN ...

Page 68: ... Slow Motion function is set to SD 300frame sec 300 frame per second Recording for 1 second When recording in slow motion the recording stops after 10 seconds but when you playback the same recording it play back for the following time 300 Frame Sec 50 seconds 600 Frame Sec 100 seconds Recording does not stop for 10 seconds even if the Recording start stop button is pressed to stop Also audio is n...

Page 69: ...onditions Daylight Controls the white balance according to the outdoor lighting Cloudy When recording in the shade or cloudy weather Fluorescent When recording under white fluorescent lights Tungsten When recording under halogen lamps and incandescent lights Custom WB You can manually adjust the white balance to match the light source or situation 1 Touch the Menu tab White Balance 2 Touch a desir...

Page 70: ...re rendered white in your photo Proper white balance has to take into account the color temperature of a light source which refers to the relative warmth or coolness of white light When setting the white balance manually the subject must be white otherwise your camcorder may not detect an appropriate setting value The adjusted setting remains until you set the white balance again During normal out...

Page 71: ...image might be noisy at the minimum level 400 I S O 400 800 I S O 800 1600 I S O 1600 3200 I S O 3200 The image may be grainy These settings will help brighten a subject in a dark surroundings 1 Touch the Menu tab ISO 2 Touch a desired submenu item 3 To exit the menu touch the Exit or Return tab ISO ISO sensitivity is a measure of how rapidly the camcorder reacts to a light source The higher the s...

Page 72: ...ackground is overly dark for example night scenery 1 Touch the Menu tab Aperture Manual 2 Touch the decrease Touch the decrease or increase or increase tab to adjust the aperture as you want Aperture value can be set between 3 5 and 16 3 To exit the menu touch Exit or Return tab Aperture The camcorder adjusts the aperture automatically depending on the subject and recording conditions You can also...

Page 73: ...speed according to the scene conditions PRECHECK Select the Video or Photo mode by pressing the MODE button page 33 1 Touch the Menu tab EV 2 Touch the decrease Touch the decrease or increase or increase tab to adjust the setting values as you want EV values 2 0EV 1 6EV 1 3EV 1 0EV 0 6EV 0 3EV 0EV 0 3EV 0 6EV 1 0EV 1 3EV 1 6EV 2 0EV 3 To exit the menu touch Exit or Return tab Understanding EV Expo...

Page 74: ...lect the Video mode by pressing the MODE button page 33 3D NR 3D NR 3 Dimension Noise Reduction function reduces video noise and improves the quality This is especially effective during low light shooting PRECHECK Select the Video mode by pressing the MODE button page 33 1 Touch the Menu tab 3D NR 2 Touch a desired submenu item 3 To exit the menu touch the Exit or Return tab Submenu items Off Disa...

Page 75: ...pressing the MODE button page 33 Submenu items Off Disables the function On Backlight compensation brightens the subject quickly 1 Touch the Menu tab Back Light 2 Touch a desired submenu item 3 To exit the menu touch the Exit or Return tab Back Light When a subject is lit from behind this function will compensate for lighting so that the subject is not too dark PRECHECK Select the Video or Photo m...

Page 76: ...sed to reduce this phenomenon Fill In Using the Fill In flash mode the flash fires regardless the environmental light conditions You can effectively use this flash mode when photographing against the light Slow Sync When you take a picture in low light conditions you may find a difference in the aperture between the subject and the background This allows you to have the same brightness for the bac...

Page 77: ...oint function you can focus on a small section of the picture The Touch Point function is only available in video recording mode However you can also adjust the focus in the photo recording mode see Magic Touch page 75 The Auto Focus AF setting is useful when you operate the zoom function because you might not be able to keep accurate focus after the zoom ratio has been changed In the manual focus...

Page 78: ... touch the Exit or Return tab Face Detection Your camcorder detects a subject s face and automatically adjusts the brightness and image quality to the optimized conditions Record faces more vividly PRECHECK Select the Video or Photo mode by pressing the MODE button page 33 advanced recording Off On 1 1 Face Detection 3 6 Super C Nite Back Light Focus Face Detection 90 MIN 00 00 00 55Min 90 MIN ...

Page 79: ...ck Light Face Detection Focus Manual Digital Zoom or Metering Even if the Cont Shot is enabled continuous shooting is not available by touching the LCD screen 4 7 Focus Face Detection Magic Touch Metering 90 MIN Tip Using the Magic Touch Using the Magic Touch function you can focus on a small section of the picture You can also activate Magic Touch by pressing the same point for about 2 seconds on...

Page 80: ... only the center of the screen and determines aperture 1 Touch the Menu tab Metering 2 Touch a desired submenu item 3 To exit the menu touch the Exit or Return tab Metering You can choose the metering standard for the brightness of your subject PRECHECK Select the Photo mode by pressing the MODE button page 33 advanced recording Multi Center 1 1 Metering Spot 4 7 Focus Face Detection Magic Touch M...

Page 81: ...ecommend using a tripod not supplied and turning the Anti Shake to Off Anti Shake EIS Use the Anti Shake EIS Electronic Image Stabilizer function to compensate for unstable images caused by shaking movements when holding the camcorder PRECHECK Select the Video or Photo mode by pressing the MODE button page 33 Submenu items Off Disable the function On The Anti Shake EIS function is enabled to compe...

Page 82: ... adjust for facial imperfections Examples of 5 digital effect options 1 Touch the Menu tab Digital Effect 2 Touch a desired submenu item 3 To exit the menu touch the Exit or Return tab Digital Effect Using the digital effect function gives your recording a creative look PRECHECK Select the Video or Photo mode by pressing the MODE button page 33 advanced recording Off Black White 1 2 Digital Effect...

Page 83: ...nu item 3 To exit the menu touch the Exit or Return tab Fader You can give your recording a professional look by using special effects such as fade in at the beginning of a sequence or fade out at the end of a sequence PRECHECK Select the Video mode by pressing the MODE button page 33 Fade in approx 3 seconds Fade out approx 3 seconds This function is disabled after being used one time Off In 1 1 ...

Page 84: ... you use the zoom function when the Super Macro is set to On the super macro function is disabled Super Macro Using the Super Macro function you can get close up images which were created by focusing on a small portion of a large object at a wide angle The effective focal distance in the Super Macro mode is between 1 to 10 cm 0 39 to 3 93 inches PRECHECK Select the Video or Photo mode by pressing ...

Page 85: ...e MIC volume at the medium level Low Adjust the MIC volume at the lowest level 1 Touch the Menu tab MIC Level 2 Touch a desired submenu item 3 To exit the menu touch the Exit or Return tab MIC Level Using the MIC Level function which will pick up sounds more clearly and accurately you can adjust the audio volume levels PRECHECK Select the Video mode by pressing the MODE button page 33 Submenu item...

Page 86: ... digital zoom enables higher zoom magnification than the intelli or optical zoom ratio The digital zoom function can archive the maximum 100 times bigger enlargement in video record mode about 50 times bigger enlargement in photo record mode by having the electronic zoom magnification PRECHECK Select the Video or Photo mode by pressing the MODE button page 33 Off On 1 1 Digital Zoom 5 6 Wind Cut M...

Page 87: ...uality or the recording condition Cont Shot This function allows you to capture photos in succession to give you more photo taking opportunities when recording moving subjects PRECHECK Select the Photo mode by pressing the MODE button page 33 Submenu items Off Records only one photo image Normal Speed When you press and hold the PHOTO button you can record photos continuously High Speed When press...

Page 88: ...button 1 Touch the Menu tab Self Timer 2 Touch a desired submenu item 3 To exit the menu touch the Exit or Return tab This function is disabled after used for one time Self Timer When the self timer is enabled there is a time delay after you actually press the Record Start Stop or PHOTO button You can use this function when you want to take a shot of many people including yourself PRECHECK Select ...

Page 89: ...it the menu touch the Exit or Return tab If you do not touch OK tab and finish settings by using the Exit or Return tab the Time Lapse REC function will operate at its default setting The changed setting value you have made will not be applied 5 After setting the Time Lapse REC mode press the Recording start stop button Then the Time Lapse recording starts Submenu items Off Disables the function O...

Page 90: ...ould be taken for at least 15 minutes to record a minimum video length of 1 second 30 images Once the Time Lapse Recording finishes recording for its total recording time it switches to the standby mode Press the Recording start stop button if you want to stop the Time Lapse Recording Audio is not recorded during Time Lapse Recording When a video recording fills up 3 8GB of storage memory a new re...

Page 91: ...sec The most recently taken photo image is shown for 1 second 3sec The most recently taken photo image is shown for 3 seconds Hold The most recently taken photo image appears and does not disappear until you press the PHOTO button Quick View function in the video record mode Quick View function in the photo record mode 1 Touch the Menu tab Quick View 2 Touch a desired submenu item 3 To exit the me...

Page 92: ...ording to the subject The selected guideline appears on the screen If you do not want to use this function touch Off 3 To exit the menu touch the Exit or Return tab Position the subject at a crosspoint of the guideline to balance the image composition The guidelines on the screen do not appear on the images actually recorded Guideline This camcorder provides 3 types of guidelines to help you to se...

Page 93: ...l Play One 1 1 Play Option Repeat All Repeat One 1 2 Play Option Highlight Playlist Delete 160 MIN Submenu items Recent Shows a section of the videos that were created within the last 24 hours All Shows a section of all video files 1 Touch the Menu tab Highlight 2 Touch a desired submenu item When the highlight view is finished the video thumbnail view appears In the highlight play mode you can ad...

Page 94: ...ayback will pause each time an image is captured This will make the image capture seem longer than 1 second however 2 or 5 images are being captured for each second of video playback Cont Capture You can take photos JPEG format in succession while playing a video PRECHECK Touch the Play HD HD or SD SD tab on the LCD screen page 50 90 Min 1Cut 2Cut 1Sec 1 1 Cont Capture 5Cut 1Sec 1 Touch the Menu t...

Page 95: ...t touching the OK tab The year can be set up to 2039 based on Home item Set Date Time Display display to on page 92 Activating the icon forwards the time by 1 hour Date Time Set By setting the date and time you can display the date and time of the recording during playback 2 7 Date Time Set Date Type Time Type Date Time Display 90 MIN OK Date Time Set 01 Day 12 Hour 00 Minute AM Month JAN Year 200...

Page 96: ...e LCD screen according to the selected option The date time will read JAN 01 2009 12 00 AM in the following cases When video or photo recording was made before setting the date time in the camcorder When the built in rechargeable battery is depleted Date Time Display You can set the date and time to be displayed on the LCD screen according to the selected option system setting Off Date 1 1 Date Ti...

Page 97: ...ate Type You can set the display type for the date set according to the selected option Submenu items 12Hr Displays the time information in 12 hour units 24Hr Displays the time information in 24 hour units 1 Touch the Menu Setting tab Time Type 2 Touch the desired display option 3 To exit the menu touch the Exit or Return tab Time Type You can set the display type for the time set according to the...

Page 98: ...gement on a PC Reset Resets the file number to 0001 after formatting or deleting all files or inserting a new memory card 1 Touch the Menu Setting tab File No 2 Touch a desired submenu item 3 To exit the menu touch the Exit or Return tab When you set File No to Series each file is assigned with a different number so as to avoid duplicating file names It is convenient when you want to manage your f...

Page 99: ...ce with the time difference between the two locations 1 Touch the Menu tab Setting tab Time Zone Visit 2 Touch the left or the right tab to select the visited area 3 Touch OK tab when the time zone setting is completed The time zone set value is not applied if you finish the setting with or tab without touching the OK tab Time Zone You can easily set the clock to the local time when using your cam...

Page 100: ...wer LCD Control You can adjust the brightness and saturation of the LCD screen LCD enhancer function does not affect the quality of the image being recorded 1 Touch the Menu Setting tab LCD Enhancer 2 Touch a desired submenu item 3 To exit the menu touch the Exit or Return tab LCD Enhancer Contrast is enhanced for a clear and bright image This effect also works outdoors in bright daylight Submenu ...

Page 101: ... can press any button on the camcorder to return LCD brightness to normal Submenu items Video Mode When the power is on the camcorder will turn on in the video standby mode Photo Mode When the power is on the camcorder will turn on in the photo standby mode Previous Mode The camcorder will keep turning on in the last mode used 1 Touch the Menu Setting tab Booting Mode 2 Touch a desired submenu ite...

Page 102: ...u are going to record frequently for an extended time use the Quick On STBY function In standby mode closing the LCD screen will commence the Quick On STBY mode to reduce energy consumption Once you are ready to record again this function enables to the camcorder to come on quickly from the power saving mode Turning off the camcorder after use is always recommended to reduce the energy consumption...

Page 103: ...le between the camcorder and your PC You can download the stored video and photo images on the camcorder to your PC s hard disk Editing video photo files is also available using the PC software Submenu items Off Disables the function On The built in editing software launches when the camcorder is connected to the PC 1 Touch the Menu Setting tab PC Software 2 Touch a desired submenu item 3 To exit ...

Page 104: ...e the recording medium or perform any other operation such as turning off the power during formatting Also be sure to use the provided AC adapter as the recording medium may be corrupted if the battery becomes exhausted during formatting If the recording medium becomes corrupted format it again Format Use this function if you want to delete all files completely or to correct problems on the storag...

Page 105: ...ton or recording start stop button Submenu items Off Disable the function On You will hear the shutter sound when operating the PHOTO button Beep Sound This setting allows operations such as touching tabs and buttons on the screen to be signaled by a beep Shutter Sound You can turn the shutter sound on or off when pressing the PHOTO button The shutter sound is not heard in the following conditions...

Page 106: ...unction 5 Min The camcorder turns off if idle for 5 minutes without an operation Auto Power Off You can set your camcorder to automatically turn off if it is idle for 5 minutes without an operation This function will prevent unnecessary power consumption 1 Touch the Menu Setting tab Rec Lamp 2 Touch a desired submenu item 3 To exit the menu touch the Exit or Return tab If you set Rec Lamp to On yo...

Page 107: ... Connect 5 7 PC Software USB Connect TV Type Analog TV Out 90 MIN 1 Touch the Menu tab TV Connect Guide 2 Touch a desired submenu item TV Connect Guide appears depending on the selected submenu items Refer to the TV Connect Guide when connect your camcorder with other external devices 3 To exit the menu touch the Exit or Return tab TV Connect Guide You can view the TV Connect Guide before you conn...

Page 108: ...set TV Display to Off 1 Touch the Menu Setting tab TV Display 2 Touch a desired submenu item 3 To exit the menu touch the Exit or Return tab Submenu items Off The OSD On Screen Display menus are only shown on the LCD screen On The OSD menus are shown on the LCD screen and the TV screen as well TV Display You can enable or disable the On Screen Display OSD that appears on the TV screen when connect...

Page 109: ...V Component 480p The recorded file is output in the 720x480P format Use this setting only when connecting to a regular TV which supports the progressive scan at the SD Standard Definition level by using the component Y Pb Pr AUDIO jacks Component 480i 480i The recorded file is output in the 720x480i format Use this setting only when connecting to a regular TV which only supports the SD Standard De...

Page 110: ...urn on the camcorder that is connected to an Anynet supporting TV with an HDMI cable the TV Anynet supported is automatically turned on If you do not want to use this Anynet function set the Anynet HDMI CEC to Off For details on the Anynet HDMI CEC function refer to the user manual of Samsung s Anynet supported TV The Demo function does not operate in the following cases If Auto Power Off is set t...

Page 111: ... files that are protected Cancel the protect function to delete the file page 114 If you want to cancel the partial delete or to edit from the beginning touch the Return tab The Partial Delete function is not available in the following conditions If the duration of the section to delete is less than 3 seconds If the duration of the remaining section after deleting the section ends up being less th...

Page 112: ...out leaving 3 seconds at the beginning and the end If the video file is recorded in the Time Lapse REC mode If the remaining section of the memory space is less than 8MB Videos recorded or edited by other devices Videos transferred to this camcorder by using Samsung Intelli studio The division function does not work if available space on the storage is insufficient Delete unnecessary videos When t...

Page 113: ...he original file make sure to back up important recordings separately PRECHECK This function works in Video play mode only Touch the Play HD HD or SD SD tab on the LCD screen page 50 You can not delete files with the protect indicator is written on Cancel the protect function first page 114 The original video will not be preserved Photos cannot be combined The combine function is not available in ...

Page 114: ...st by selecting your favorite scenes leaving the original recording as it is What s a Playlist editing the playlist PLAYLIST JAN 12 2009 JAN 30 2009 Video clip 1 Video clip 2 Video clip 3 Video clip 4 Video clip 5 Video clip 6 Video clip 7 10 00 10 30 11 30 14 00 16 10 18 20 20 00 Recorded Videos Playlist The maximum number of playlists on the storage media One playlist can be created per each res...

Page 115: ...your confirmation 6 Touch Yes The playlist is created You can play the playlist in the same manner as you play a video If available space on the storage is insufficient you can not create or add a playlist Delete unnecessary videos While editing the playlist do not eject the memory card or power off the camcorder Doing so may damage the storage media or data CREATING THE PLAYLIST You can create a ...

Page 116: ...e position you want then touch OK OK tab A message appears asking for your confirmation 6 Touch Yes The video moves to the selected position ARRANGING VIDEOS IN THE PLAYLIST You can change the order of videos on the playlist PRECHECK This function works in Video play mode only Touch the Play tab on the LCD screen to select the playback mode page 33 While editing the playlist do not eject the memor...

Page 117: ...K OK tab A message appears asking for your confirmation 6 Touch Yes The selected videos are deleted from the playlist DELETING VIDEOS FROM THE PLAYLIST You can delete undesired videos from the playlist PRECHECK This function works in Video play mode only Touch the Play tab on the LCD screen to select the playback mode page 33 While editing the playlist do not eject the memory card or power off the...

Page 118: ...OM ACCIDENTAL ERASURE You can protect important recordings from accidental erasure The protected videos and photos are not deleted unless they are formatted or the protection is canceled PRECHECK Touch the Play tab on the LCD screen to select the playback mode page 33 Submenu items Select Files Protects individual images Touch images to protect from erasure The indicator is displayed on the select...

Page 119: ...e the image protection function in advance page 114 You can not delete protected files Cancel the protect function first If the write protection tab on the memory card is set to lock you cannot delete the images page 38 You can also operate this function in the full and single image display mode The delete function does not work if battery charge is insufficient It is recommended to use AC power t...

Page 120: ...n to select the playback mode page 33 1 Touch the Photo tab The photo thumbnails are displayed 2 Touch the Menu tab Print Mark DPOF 3 You can choose the following submenu options Select Files Print marks individual images The print marks indicator is displayed on the selected images Touching the thumbnail image toggles the image between being selected or not selected Touch the OK tab Set All Print...

Page 121: ...e print setting Touch the Return tab on the LCD screen To stop printing after printing starts Touch Cancel on the screen If the camcorder is connected to a printer while USB Connect is set to Mass Storage the message Fail USB Connecting Change USB Connect appears Set the USB Connect to the PictBridge then connect the USB cable again Use the supplied USB cable DIRECT PRINTING WITH A PICTBRIDGE PRIN...

Page 122: ...ter does not support this option PictBridge is a registered trademark of CIPA Camera Imaging Products Association an image transfer standard developed by Canon Fuji HP Olympus Seiko Epson and Sony Use the AC power adaptor for your camcorder during PictBridge direct printing Turning the camcorder off during printing might damage data on the storage media Video images cannot be printed Photos record...

Page 123: ...provides a two in one component AV cable that functions as an component and AV cable Therefore when using the component AV cable you must select the right method for the TV output by setting the Analog TV Out menu page 105 Type A Using a MINI HDMI cable 1 Turn on the camcorder and connect a Mini HDMI cable to the HDMI jack on your TV When connecting via HDMI the connected device may not be recogni...

Page 124: ...th this camcorder The HDMI jack on the camcorder is provided for the output usage only If the Anynet supported TV is connected with the camcorder turning on the camcorder may turn the TV s TV power on Anynet function If you don t want this function set Anynet HDMI CEC to Off page 106 Use only the HDMI 1 3 cable when connecting to the HDMI jack of this camcorder If the camcorder is connected with o...

Page 125: ...io on your TV After the connection is complete set Analog TV Out to Component page 105 2 Turn on your TV and set the TV s input selector to the Input your camcorder is connected to Refer to the TV s instruction manual to see how to select the TV input Check your TV connection jack and select the connection method depending on the component or the composite jack For more information about the conne...

Page 126: ...age 105 2 Turn on your TV and set the TV s input selector to the Input your camcorder is connected to This is often referred to as line Refer to the TV s instruction manual to see how to select the TV input Check the connection status between the HD camcorder and TV the TV screen may not deliver the right video information if connected incorrectly When the camcorder is connected to a TV with more ...

Page 127: ...Wide 16 9 TV 4 3 TV Images recorded in a 16 9 ratio Video Image Photo capture images Photo Image 16 9 4 3 Images recorded in 4 3 ratio Video Image Photo images Photo capture images 16 9 4 3 Images in the Slow Motion mode 16 9 4 3 CMOS 9 0MEGA PIXELS CMOS 9 0 M EGA PIXELS VIEWING ON A TV SCREEN You can enjoy the enjoy widescreen videos on a HDTV or a regular TV after recording videos using the HD c...

Page 128: ...ecording resolution HD SD You cannot dub to a recorder with an HDMI cable To copy a video recorded with HD high definition image quality use the built in software of your camcorder and copy the images to your computer Since dubbing is performed via analog data transfer the image quality may deteriorate To hide the screen indicators such as a counter etc on the screen of the monitor device connecte...

Page 129: ...ding to your computer type If you are using a Windows PC If you are using a Macintosh Connect your camcorder to the computer using the USB cable The built in editing software Intelli studio runs on the PC automatically once the camcorder is connected to Windows computer When you specify PC Software On page 99 The built in software on your camcorder Intelli studio is not Macintosh compliant Play ba...

Page 130: ...g requirements must be satisfied to use built in editing software Intelli studio Items Requirement OS Microsoft Windows XP SP2 or Vista CPU Intel Core 2 Duo 1 66 GHz or higher is recommended AMD Athlon X2 Dual Core 2 2 GHz or higher is recommended RAM 512 MB 1 GB and above recommended Video Card nVIDIA Geforce 7600GT or higher Ati X1600 series or higher Display 1024 x 768 16 bit color or higher 12...

Page 131: ...layer software installed on your computer the EmoDio software may load first USING THE Intelli studio PROGRAM Using the Intelli studio program built in your camcorder you can transfer video photo files onto your PC and edit them on your computer Intelli studio offers the most convenient way for you to manage the video photo files by using the simple USB cable connection between the camcorder and y...

Page 132: ...to Share mode 7 Displays videos or photos as full screen Displays photos as thumbnails Displays videos as thumbnails Sorts the files 8 Imports folders from PC 9 Selects the connected camcorder or storage 10 Saves new files to PC 11 Slide show of the photo files from the connected camcorder Playback of the video files from the connected camcorder 12 Saves the selected file to PC Saves the selected ...

Page 133: ...he selected source 3 Select the video or photo that you want to play and then double click to play back Playback starts and playback controls appear With Intelli studio you can edit the videos or photos in various ways Select the video or photo that you want to edit and then click the EDIT icon Step 4 Editing the videos or photos The following is the file format supportable in Intelli studio Video...

Page 134: ...ck SHARE on the browser 2 Move the video or photo drag and drop to the sharing window for upload The selected file appears on the sharing window 3 Click the website you would like to upload files to You can choose YouTube Flickr or the specified website you want to set for your uploading management Step 5 Sharing the video photo images online ...

Page 135: ...indow appears asking your ID and the password 5 Enter your ID and the password to access Access to the web site contents can be limited depending on your web access environment For more information about Intelli studio use see the Help Guide by clicking Menu Help ...

Page 136: ...lled on a Windows computer it will run faster after connecting the camcorder to your computer Moreover the application can be updated automatically and run directly in the Windows computer The Intelli studio application can be installed on a Windows computer as follows Click the Menu Install Intelli studio on PC on the Intelli studio screen ...

Page 137: ...heck out the USB Connect Mass Storage setting page 103 2 Check out the PC Software Off setting page 99 3 Check out the storage media If you want to record on a memory card insert the memory card 4 Connect the camcorder to the PC with the USB cable page 127 The Removable Disk or Samsung window appears on the PC s screen after a moment The removable disk appears when connecting a USB Select Open fol...

Page 138: ...ew folder stores files from CAM_0001 JPG The folder name increases in the order of 100PHOTO 101PHOTO etc Up to 999 files are created in one folder and new folder is created when the files exceed more than 999 File format Video files Video files are compressed in H 264 format The file extension is MP4 Refer to page 62 for the video resolution Photo files Photo images are compressed in JPEG Joint Ph...

Page 139: ...ame then Double click it 3 Select the folder to copy then drag and drop it into the destination folder The folder is copied from the storage media to the PC When using a removable disk all types of files in the computer can be transferred to your camcorder Note that only the video and photo that have been recorded by your camcorder can be played back If the files are arbitrarily modified or edited...

Page 140: ...Icon Informs that Action Insert card There is no memory card inserted in the memory card slot Insert a memory card Card Full There is not enough space to record on memory card Delete unnecessary files on the memory card Back up files to PC or another storage media and delete files Change memory card to another one has enough free space Card Locked The write protection tab on an SD or SDHC card has...

Page 141: ...ith a one Recording Message Icon Informs that Action Write Error To recover file please restart Some problem occured while writing data to storage media Turn the camcorder s power off and on for data recovery If a file is not recovered format storage media using menus after back up important files to PC or another storage media Release the EASY Q You can not operate some functions manually when EA...

Page 142: ... less than 3 8GB Select 5 files for combine You can not combine more than 5 different videos into one It is possible to combine up to 5 different videos into one Different format The files you want to combine have different resolutions It is not possible to combine the files that have different resolutions Read Error Some problems occurred when reading data from thestorage media Format the storage...

Page 143: ... service center Print Error A problem occurred during printing Do not remove power source or eject memory card during printing When there is dew condensation put the camcorder aside for a while before using What is dew condensation Dew condensation happens when a camcorder is moved to a place where there is a significant temperature difference from the previous place The Dew condenses on the exter...

Page 144: ...r Off To disable this option change the setting of Auto Power Off to Off page102 The battery pack is almost exhausted Charge the battery pack or replace it with a charged one Power cannot be turned off Remove the battery pack or unplug AC power adaptor and connect the power supply to the camcorder again before turning it on The battery pack is quickly discharged The temperature is too low The batt...

Page 145: ... LCD screen This occurs if you disconnect the AC power adaptor or remove the battery pack before turning the power off The image on the LCD screen looks dark Ambient light too bright Adjust the brightness and angle of LCD Use LCD enhancer function Recording Symptom Explanation Solution Pressing the Recording start stop button does not start recording Press the MODE button to set Video page 21 Ther...

Page 146: ...d by bright light a vertical line appears This is not a malfunction When the screen is exposed to direct sunlight during recording the screen becomes red or black for an instant This is not a malfunction During recording the date time does not display Date Time Display is set to Off Set the Date Time Display to On page 92 You cannot record a photo image Set your camcorder to Photo mode page 46 Rel...

Page 147: ... Memory card functions are not operable Insert a memory card into your camcorder properly page 37 If you use a memory card formatted on a computer format it again directly on your camcorder page 100 Image cannot be moved or deleted Release the lock on the write protect tab of the memory card SDHC SD memory card if any page 39 You cannot move or delete the protected images Release the protection of...

Page 148: ...red Adjust to the proper White Balance page 65 The subject passing by the frame appears very quickly This is called the focal plane phenomenon This is not a malfunction Because of the way the image device CMOS sensor reads out video signals the subject passing by the frame rapidly may appear to bend depending on the recording condition Playback on your camcorder Symptom Explanation Solution Playba...

Page 149: ...mode This is not an error The image appears distorted on a TV This happens when TV type of the camcorder is different from the TV Set the TV type to match the aspect ratio of your TV page 104 You cannot view the image or hear the sound from a TV connected using the HDMI cable Images will not be output from the HDMI jack if the material is copyright protected Connecting Dubbing with other devices R...

Page 150: ...es not function properly Exit the Intelli studio application and restart the Windows computer Intelli studio is not performed Set PC Software to On in the Settings menu or install Intelli studio in the computer pages 125 135 The image or sound on your camcorder is not played on your computer properly Video playback or sound may stop temporarily depending on your computer The video or sound copied ...

Page 151: ...ck mode There are some functions you cannot activate simultaneously The list shown above shows examples of unworkable combinations of functions and menu items Menu and quick menu cannot be used in EASY Q mode The following functions cannot be used during video recording Resolution Slow Motion Fader In In Out MIC Level Digital Zoom Self Timer Time Lapse REC Wind Cut White Balance Custom WB 3D NR Ap...

Page 152: ...ded that you put the camcorder in a box together with a small silica bag when storing it in a closet etc Do not store the camcorder in a place subject to strong magnetism or intense vibration This could cause malfunctions Detach the battery pack from the camcorder and store it in a cool place Leaving the battery pack attached or storing it at a high temperature could shorten its life Cleaning the ...

Page 153: ...ture or high humidity Do not touch the metal parts Copy the recorded files to your PC Samsung shall not be responsible for any lost data It is recommended that you copy the data from your PC to other media for storage A malfunction may cause the storage media to fail to operate properly Samsung will not provide any compensation for any lost contents Refer to pages 38 39 for details LCD screen Befo...

Page 154: ...es recorded with SD standard definition image quality you need an NTSC system based TV with Audio Video input jacks A component cable or Multi AV cable connected On TV color systems Your camcorder is an NTSC system based camcorder If you want to view your recordings on a TV or to copy it to an external device it must be an NTSC system based TV or an external device and have the appropriate Audio V...

Page 155: ...C type connector 7 5 dBs 600 Ω terminated USB 2 0 General Power source Power source type Power consumption Recording Operating temperature Storage temperature Storage media External dimensions WxHxD Weight Internal MIC DC 5 V Lithium Ion battery pack 3 6 V Lithium Ion battery pack Power supply 100 V 240 V 50 60 Hz 3W LCD on 0 40 C 32 F 104 F 20 C 60 C 4 F 140 F a memory card SD SDHC Optional Width...

Page 156: ...nted to the authorized service center EXCLUSIONS WHAT IS NOT COVERED This warranty does not cover damage due to accident fire flood and or other acts of God misuse incorrect line voltage improper installation improper or unauthorized repairs commercial use or damage that occurs in shipping Exterior and interior finish lamps and glass are not covered under this warranty Customer adjustments which a...

Page 157: ...e the 6 hazardous materials Cadmium Cd Lead Pb Mercury Hg Hexavalent Chromium Cr 6 Poly Brominated Biphenyls PBBs Poly Brominated Diphenyl Ethers PBDEs in our products If you have any questions or comments relating to Samsung products please contact the SAMSUNG customer care center Samsung Electronics America inc 1 800 SAMSUNG 726 7864 www samsung com us ...

Reviews: