background image

English - 59

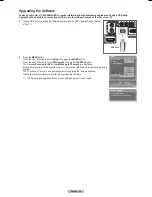
Upgrading the Software

Samsung call center at 1-800-SAMSUNG to receive information about downloading upgrades and using a USB drive. 

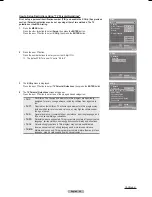
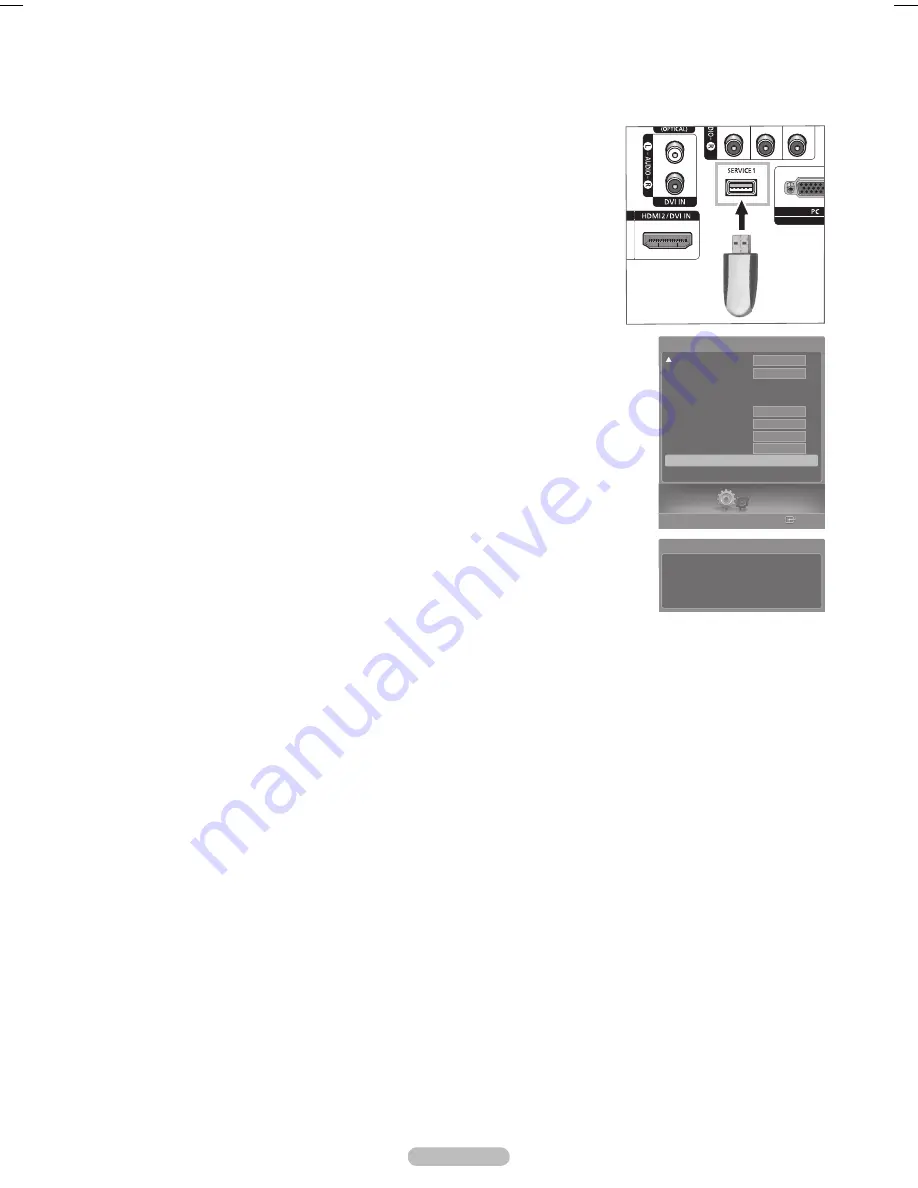
Upgrades will be possible by connecting a USB drive to the USB port located on the rear of your TV.

Insert a USB drive containing the firmware upgrade into the USB Upgrade Port on the rear 

of the TV.

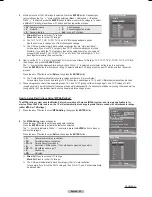
2

  Press the 

MENU

 button. 

Press the ◄ or ► button to select 

Setup

, then press the 

ENTER

 button. 

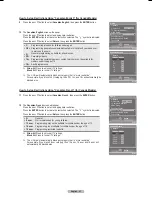
Press the ▲ or ▼ button to select 

SW Upgrade

, then press the 

ENTER 

button. 

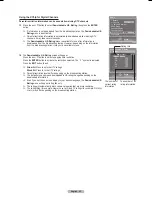
The message 

Scanning for USB... It may take up to 30 seconds.

 is displayed. 

Please be careful to not disconnect the power or remove the USB drive while upgrades are being 

applied. 

The TV will shut off and turn on automatically after completing the firmware upgrade. 

Please check the firmware version after the upgrades are complete.

  The firmware and upgrade process may be different by country and region. 

USB drive

Scanning for USB...

It may take up to 30 seconds.

Software Upgrade

Setup

Enter

Blue Screen

Melody

Color Weakness 

PC

Home Theater PC

HDMI Black Level

Film Mode

Function Help

SW Upgrade 

Setup

Off

Off

Normal

Medium

Off

On

BN68-00630D-Eng_2.indd   59

2007-04-09   ソタネト 6:55:23

Summary of Contents for HL-T6756W

Page 1: ...r product at www samsung com global register Record your Model and Serial number here for future reference Model _______________ Serial No _______________ Owner s Instructions HL T5656W HL T6156W HL T...

Page 2: ...parties In particular this product is licensed under the following US patents 5 991 715 5 740 317 4 972 484 5 214 678 5 323 396 5 539 829 5 606 618 5 530 655 5 777 992 6 289 308 5 610 985 5 481 643 5...

Page 3: ...it was originally encoded for broadcast This is a big advantage for DTV over analog TV there is no noise ghosting static or scratchy audio 3 How can I connect an antenna in my townhouse co operative...

Page 4: ...Setting up DNSe Digital Natural Sound engine 36 Choosing a Multi Channel Sound MTS Track Digital 37 Choosing a Multi Channel Sound MTS Track Analog 37 Automatic Volume Control 38 Selecting the Intern...

Page 5: ...ing the product make sure to keep it away from the wall more than 10cm 4inches for ventilation purposes Poor ventilation may cause an increase in the internal temperature of the product resulting in a...

Page 6: ...In addition it has these special features Easy to operate remote control Dynamic menus and Navigating menus by using the menu map Easy to use on screen menu system you can access from the TV panel or...

Page 7: ...e Panel The buttons on the lower right panel control your TV s basic features including the on screen menu To use the more advanced features you must use the remote control Continued The product color...

Page 8: ...over on the rear of the set is not properly shut Check if the ventilation hole on the rear of the set is blocked because if the inner temperature is too high the power will shut off Lamp may be defect...

Page 9: ...DMI 6 COMPONENT IN 1 2 Video Y PB PR and audio L AUDIO R component inputs 7 POWER IN Connect the supplied power cord 8 ANT 1 IN CABLE ANT 2 IN AIR 75 Coaxial connector for Air Cable Network 9 HDMI IN...

Page 10: ...of the available video sources Press to activate the backlight of the VOL CH and the active source button TV DVD CABLE STB VCR on the remote control PRE CH Tunes to the previous channel FAV CH Press t...

Page 11: ...t of leads that look like this see Antennas with 300 Flat Twin Leads below If your antenna has one lead that looks like this see Antennas with 75 Round Leads If you have two antennas see Separate VHF...

Page 12: ...o the ANT IN terminal on your cable box This terminal might be labeled ANT IN VHF IN or simply IN 2 Connect this cable to a two way splitter 3 Connect an Antenna cable between an OUTPUT terminal on th...

Page 13: ...you must connect two cables Each VCR has a different panel configuration When connecting a VCR match the color of the connection terminal to the cable S Video Connection Your Samsung TV can be connect...

Page 14: ...COMPONENT IN 1 Y PB PR or COMPONENT IN 2 Y PB PR jacks on the TV and the COMPONENT OUT Y PB PR jacks on the DVD Player Set Top Box 2 Connect Audio Cables between the COMPONENT IN 1 L AUDIO R or COMPON...

Page 15: ...le cable Multimedia interface is a more accurate name for it especially because it allows multiple channels of digital audio 5 1 channels The difference between HDMI and DVI is that the HDMI device is...

Page 16: ...electric signal into an optical light signal and transmits it through glass fibers S PDIF is a transmission system of digital audio in the form of a light wave that uses a glass conductor Connecting...

Page 17: ...o mini plug 2RCA Cable between the DVI IN L AUDIO R jack on the TV and the Audio Out jack of the sound card on your computer Each PC has a different panel configuration When connecting a PC match the...

Page 18: ...g all of the available channels After all the available channels are stored the Auto program menu reappears Press the ENTER button when channel memorization is complete The message Set the Clock Mode...

Page 19: ...annels that the TV has memorized The TV must have memorized at least three channels You will not see channels that were either erased or not memorized See page 22 to memorize channels Using the Number...

Page 20: ...l Viewing the Menus 1 With the power on press the MENU button The main menu will appear at the bottom of the screen There are seven menu groups Picture Sound Channel Setup Input Application and Menu M...

Page 21: ...u map 1 Press the MENU button The main menu will appear at the bottom of the screen 2 Press the or button to select Menu Map then press the ENTER button The menu map will appear 3 Press the button to...

Page 22: ...e ENTER button Air Air antenna signal Cable Cable antenna signal Air Cable Air and Cable antenna signals If the antenna is connected to ANT 1 IN CABLE select Cable and if it is connected to ANT 2 IN A...

Page 23: ...D Make sure you enter three digits of the code even if the first digit is a 0 If more than one code is listed try the first one 5 Press the POWER button on the remote control Your DVD should turn on i...

Page 24: ...7 070 025 038 025 081 082 083 021 056 059 007 008 018 021 026 037 062 006 036 073 074 075 076 021 006 021 024 025 034 005 019 041 075 Brand MITSUBISHI MONTGOMERY WARD MTC MULTITECH NEC OPTIMUS PANASON...

Page 25: ...MSUNG SET TOP BOX Brand ALPHASTAR ANAM CHANNEL MASTER CROSSDIGITAL CHAPARRAL DIRECT TV DAEWOO DISH NETWORK SYSTEM DISHPRO DRAKE DX ANTENNA ECHOSTAR EXPRESSVU GOI GE GENERAL INSTRUMENT HTS HOME CABLE H...

Page 26: ...4 122 123 027 065 077 078 079 082 080 125 081 095 066 146 067 068 090 060 061 089 133 135 069 074 074 064 113 071 073 091 110 089 092 091 022 033 115 116 073 051 108 109 073 059 100 106 107 074 075 02...

Page 27: ...the input jacks to make your input source selection easier 1 Press the MENU button Press the or button to select Input then press the ENTER button Press the or button to select Edit Name then press t...

Page 28: ...htness Sharpness Color or Tint then press the ENTER button 4 Press the or button to decrease or increase the value of a particular item Press the ENTER button In PC mode only the Contrast and Brightne...

Page 29: ...select OK or Cancel then press the ENTER button Press the EXIT button to exit Each picture mode can be reset Picture Enter Picture Mode Contrast 100 Brightness 45 Sharpness 75 Color 55 Tint G50 R50 Co...

Page 30: ...ed Gamma 3 3 You can adjust the Primary Color Intensity Press the or button until you reach the optimal setting White Balance 10 10 You can adjust the color temperature for more natural picture colors...

Page 31: ...to 4 3 normal mode Just Scan Use the function to see the full image without any truncation when DTV 1080i HDMI 1080i 1080p or Component 1080i 1080p signals are input You can select the 16 9 4 3 Wide...

Page 32: ...ss the ENTER button to select Picture Press the or button to select DNIe then press the ENTER button This function doesn t work when the Input Source is PC 2 Press the or button to select Off Demo or...

Page 33: ...tton to select Off or On then press the ENTER button Press the EXIT button to exit This function is not available in PC mode When you select Standard or Movie in Picture Mode the Active Color automati...

Page 34: ...Press the or button to select Mode then press the ENTER button 2 Press the or button to select Mode then press the ENTER button Press the or button to select Standard Music Movie Speech or Custom sou...

Page 35: ...increase or decrease the level of the particular frequency then press the ENTER button L R Sound Balance Adjustment To adjust the sound balance of the L R speakers Bandwidth Adjustment 100Hz 300Hz 1kH...

Page 36: ...elect DNSe then press the ENTER button 2 Press the or button to select Off or On then press the ENTER button Press the EXIT button to exit Press the DNse button on the remote control to select On or O...

Page 37: ...us translations of the program into foreign languages The availability of these additional multitracks depends upon the program Preferred Language 1 Press the MENU button Press the or button to select...

Page 38: ...V S Video Component PC HDMI TV AV S Video Component PC HDMI TV AV S Video Component PC HDMI Internal Mute Off Speaker Available Speaker Available Speaker Available Speaker Available Speaker Available...

Page 39: ...s the ENTER button Press the EXIT button to exit Adding and Erasing Channels You can add or delete a channel to display the channels you want To use the Channel List function first run Auto Program se...

Page 40: ...then press the ENTER button 3 Press the buttons to select a channel as a favorite channel then press the ENTER button Press the CH and CH button to display the next channel list page 4 Press the or b...

Page 41: ...el Lists You can display a list of all channels added channels or your favorite channels 1 Press the MENU button Press the or button to select Channel then press the ENTER button Press the or button t...

Page 42: ...Use fine tuning to manually adjust a particular channel for optimal reception 1 Press the MENU button Press the or button to select Channel then press the ENTER button Press the or button to select Fi...

Page 43: ...ike analog channels you cannot fine tune a digital channel You can however adjust your antenna to improve the reception of available digital channels 1 Press the MENU button Press the or button to sel...

Page 44: ...ER button Press the or button to select Auto then press the ENTER button 3 Press the or button to select Time Zone then press the ENTER button Press the or button to highlight the time zone for your l...

Page 45: ...n set the month day year hour and minute directly by pressing the number buttons on the remote control Setting the Sleep Timer The sleep timer automatically shuts off the TV after a preset time 30 60...

Page 46: ...Sports or Standard then press the ENTER button Press the EXIT button to exit Off It cancels the game mode Adventure It provides clear images for the game implementing dark area such as cave and room...

Page 47: ...NTER button 2 Press the or button Press the number buttons to enter your current 4 digit PIN The default PIN for a new TV set is 0 0 0 0 3 The V Chip menu is displayed Press the or button to select V...

Page 48: ...message PIN is changed successfully is displayed then your PIN has been memorized Press the EXIT button to exit If you forget the PIN press the remote control buttons in the following sequence which...

Page 49: ...ned for a very young audience including children from ages two to six Directed to older children The themes and elements in this program may include mild physical or comedic violence or may frighten c...

Page 50: ...ings in TV 14 and TV MA will automatically be blocked These categories consist of two separate groups TV Y and TV Y7 young children through age 7 and TV G through TV MA everybody else The restrictions...

Page 51: ...nch for Canada Models 11 Press the or button to select Canadian French then press the ENTER button 12 The Canadian French screen will appear Press the or button to select an appropriate restriction Pr...

Page 52: ...e restriction selected The symbol is indicated Press the EXIT button to exit Allow All Press to unlock all TV ratings Block All Press to lock all TV ratings Parental restriction levels differ dependin...

Page 53: ...kground Opacity cannot be both set to Transparent Size This option consists of Default Small Standard and Large Font Style This option consists of Default Style0 Style 7 You can change the font you wa...

Page 54: ...ies data that is intended to augment information carried in the program CC3 Secondary Synchronous Caption Service Alternate program related caption data typically second language captions CC4 Special...

Page 55: ...ress the ENTER button 2 Press the or button to select Off or On then press the ENTER button Press the EXIT button to exit Blue Screen is displayed when there is no signal from an external device regar...

Page 56: ...then press the ENTER button Press the or button to select Melody then press the ENTER button 2 Press the or button to select Off Low Medium or High then press the ENTER button Press the EXIT button t...

Page 57: ...ect HDMI Black Level then press the ENTER button 2 Press the or button to select Normal or Low then press the ENTER button Press the EXIT button to exit This function is active only when the externel...

Page 58: ...ct Function Help then press the ENTER button 2 Press the or button to select Off or On then press the ENTER button Press the EXIT button to exit The Function Help default setting is On Setup Enter Blu...

Page 59: ...SW Upgrade then press the ENTER button The message Scanning for USB It may take up to 30 seconds is displayed Please be careful to not disconnect the power or remove the USB drive while upgrades are b...

Page 60: ...n almost all cases If not contact your computer manufacturer or Samsung Dealer 1 First click on Control Panel on the Windows start menu 2 When the control panel window appears click on Appearance and...

Page 61: ...23 75 00 N P 1280 x 1024 63 98 60 02 P P 74 62 70 00 N N 76 82 72 00 N N 79 97 75 02 P P 1920 x 1080 66 58 60 00 P N HDMI DVI Input Video Signal Resolution Dot X Line Horizontal frequency KHz Vertica...

Page 62: ...adjustments to the utmost and fine tune again After the noise has been reduced re adjust the picture so that it is aligned on the center of the screen Change to the PC mode first 3 Press the or butto...

Page 63: ...select Image Reset then press the ENTER button 9 The message Image Reset is completed appears on the screen Viewing the Current Resolution You can get the resolution information of your PC Change to t...

Page 64: ...the Detailed Settings when Picture Mode is set to Standard or Movie as in PC Mode 1 Press the MENU button Press the or button to select Setup then press the ENTER button Press the or button to select...

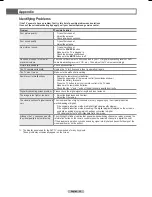
Page 65: ...s Press the TV button to put your remote control in the TV mode Make sure the remote has batteries Check that the and ends of the batteries are inserted correctly Digital broadcasting screen problem P...

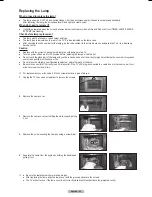
Page 66: ...ng the lamp as it will be hot Do not touch the glass part of the lamp with your bare hands and do not insert any foreign object inside the cover as it may cause poor screen quality electric shock or f...

Page 67: ...Wipe your TV with a clean dry cloth Never use water cleaning fluids wax or chemicals This DLP TV projects the image onto a large screen by applying an optical system If you place the TV set face down...

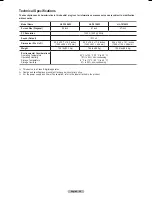
Page 68: ...906 x 415 mm 55 3 x 38 6 x 17 6 inches 1405 x 981 x 448 mm 62 4 x 44 3 x 19 1 inches 1586 x 1124 x 486 mm Weight 73 4 lbs 33 3 Kg 79 4 lbs 36 Kg 109 8 lbs 49 8 Kg Environmental Considerations Operatin...

Page 69: ...ay be distributed under the terms of this General Public License The Program below refers to any such program or work and a work based on the Program means either the Program or any derivative work un...

Page 70: ...e since you have not signed it However nothing else grants you permission to modify or distribute the Program or its derivative works These actions are prohibited by law if you do not accept this Lice...

Page 71: ...st effectively convey the exclusion of warranty and each file should have at least the copyright line and a pointer to where the full notice is found One line to give the program s name and a brief id...

Page 72: ...NU General Public License This license the GNU Lesser General Public License applies to certain designated libraries and is quite different from the ordinary General Public License We use this license...

Page 73: ...ery part regardless of who wrote it Thus it is not the intent of this section to claim rights or contest your rights to work written entirely by you rather the intent is to exercise the right to contr...

Page 74: ...in a single library together with other library facilities not covered by this License and distribute such a combined library provided that the separate distribution of the work based on the Library a...

Page 75: ...RVICING REPAIR OR CORRECTION 16 IN NO EVENT UNLESS REQUIRED BY APPLICABLE LAW OR AGREED TO IN WRITING WILL ANY COPYRIGHT HOLDER OR ANY OTHER PARTY WHO MAY MODIFY AND OR REDISTRIBUTE THE LIBRARY AS PER...

Page 76: ...stre su producto en www samsung com global register Apunte aqu los n meros de serie y modelo para consultas futuras Modelo _______________ N serie _______________ Manual de instrucciones HL T5656W HL...

Page 77: ...este producto se suministra con licencia bajo las siguientes patentes de EE UU 5 991 715 5 740 317 4 972 484 5 214 678 5 323 396 5 539 829 5 606 618 5 530 655 5 777 992 6 289 308 5 610 985 5 481 643...

Page 78: ...DTV sobre TV anal gica no hay interferencias im genes duplicadas est ticas o audio rayado 3 C mo puedo conectar una antena en mi comunidad apartamento o piso La norma OTARD de la Comisi n Federal de...

Page 79: ...sonido autom ticos 34 Personalizaci n del sonido 35 Con guraci n de DNSe Digital Natural Sound engine Motor de sonido digital natural 36 Elecci n de una pista sonora multicanal MTS Digital 37 Elecci...

Page 80: ...ep relo de la pared m s de 10 cm para facilitar la ventilaci n Una ventilaci n inadecuada puede causar un aumento de la temperatura interna del producto que da como resultado que los componentes tenga...

Page 81: ...el sector Adem s posee las siguientes caracter sticas especiales Mando a distancia f cil de usar Men s din micos en los que es f cil desplazarse Sencillo sistema de men s en pantalla accesibles desde...

Page 82: ...l Los botones del panel inferior derecho controlan las funciones b sicas del televisor incluido el men en pantalla Para utilizar las funciones m s avanzadas debe usarse el mando a distancia El color y...

Page 83: ...arato no est bien cerrada Compruebe que no est obstruida la entrada de ventilaci n de la parte posterior del aparato dado que la temperatura interior es elevada se apagar el aparato Puede que la l mpa...

Page 84: ...nentes para imagen Y PB PR y sonido L AUDIO R 7 Entrada de alimentaci n Conexi n para el cable de alimentaci n suministrado 8 ANT 1 IN CABLE ANT 2 IN AIR Conector coaxial de 75 para antena o red por c...

Page 85: ...lselo para ver todas las fuentes de v deo disponibles Pulse para encender la luz de fondo de VOL CH y activar el bot n de fuente TV DVD CABLE STB VCR en el mando a distancia PRE CH Sintoniza el canal...

Page 86: ...ste aspecto consulte Antenas con cables planos dobles de 300 ohmios a continuaci n Si la antena tiene un cable con este aspecto consulte Antenas con cables coaxiales de 75 ohmios Si tiene dos antenas...

Page 87: ...icador de cable Este terminal puede estar marcado con la inscripci n ANT IN VHF IN o sencillamente IN 2 Conecte este cable al separador de se ales 3 Conecte un cable de antena entre un terminal OUTPUT...

Page 88: ...e del panel Cuando conecte un aparato de v deo debe hacer coincidir los colores del terminal de conexi n y del cable Conexi n de S V deo Este televisor Samsung se puede conectar a una toma S Video de...

Page 89: ...l televisor y las tomas COMPONENT OUT Y PB PR del reproductor de DVD decodificador 2 Conecte los cables de audio entre las tomas de COMPONENT IN 1 L AUDIO R o COMPONENT IN 2 L AUDIO R del televisor y...

Page 90: ...erfaz multimedia es la m s adecuada especialmente porque permite varios canales de sonido digital canales 5 1 La diferencia entre los dispositivos HDMI y DVI es que el HDMI es m s peque o tiene instal...

Page 91: ...ca y la transmite a trav s de fibra ptica S PDIF es un sistema de transmisi n de audio digital en el formato de una onda de luz que utiliza un conductor de vidrio Conexi n de un amplificador DVD para...

Page 92: ...I IN L AUDIO R del televisor y la toma de salida de audio de la tarjeta de sonido del ordenador Cada ordenador tiene una configuraci n diferente del panel Cuando conecte un ordenador debe hacer coinci...

Page 93: ...a memorizar todos los canales disponibles Una vez guardados todos los canales disponibles volver a aparecer el men Prog Auto Pulse el bot n ENTER cuando se complete la memorizaci n de canales Aparece...

Page 94: ...canales memorizados No ver los canales eliminados o no memorizados Consulte la p gina 22 para la memorizaci n de los canales Utilizaci n de los botones num ricos Utilice los botones num ricos para ca...

Page 95: ...sualizaci n de los men s 1 Con el aparato encendido pulse el bot n MENU El men principal aparece en la parte inferior de la pantalla Existen seis grupos de men s Imagen Sonido Canal Configuraci n Entr...

Page 96: ...parece en la parte inferior de la pantalla 2 Pulse los botones o para seleccionar Mapa de men s y pulse el bot n ENTER Aparece el mapa de men s 3 Pulse los botones para seleccionar un men y pulse el b...

Page 97: ...o para seleccionar la conexi n de la antena y pulse el bot n ENTER Aire se al de antena a rea Cable se al de antena por cable Aire Cable se ales de antena Aire y Cable Si la antena est conectada a AN...

Page 98: ...tres d gitos aunque el primero sea un 0 Si en la relaci n hay m s de un c digo introduzca el primero 5 Pulse el bot n POWER del mando a distancia El DVD deber a encenderse si el mando est correctamen...

Page 99: ...018 026 037 070 025 038 025 081 082 083 021 056 059 007 008 018 021 026 037 062 006 036 073 074 075 076 021 006 021 024 025 034 005 019 041 075 Marca MITSUBISHI MONTGOMERY WARD MTC MULTITECH NEC OPTI...

Page 100: ...CEPTOR DE TV DIGITAL DE SAMSUNG Marca ALPHASTAR ANAM CHANNEL MASTER CROSSDIGITAL CHAPARRAL DIRECT TV DAEWOO DISH NETWORK SYSTEM DISHPRO DRAKE DX ANTENNA ECHOSTAR EXPRESSVU GOI GE GENERAL INSTRUMENT HT...

Page 101: ...62 074 122 123 027 065 077 078 079 082 080 125 081 095 066 146 067 068 090 060 061 089 133 135 069 074 074 064 113 071 073 091 110 089 092 091 022 033 115 116 073 051 108 109 073 059 100 106 107 074 0...

Page 102: ...de entrada de esta manera ser m s f cil seleccionar el dispositivo de entrada 1 Pulse el bot n MENU Pulse los botones o para seleccionar Entrada y pulse el bot n ENTER Pulse los botones o para selecci...

Page 103: ...i n Color o Tinte y pulse el bot n ENTER 4 Pulse los botones o para reducir o aumentar el valor de una opci n concreta Pulse el bot n ENTER En el modo PC s lo se pueden seleccionar las opciones Contra...

Page 104: ...o Cancelar y pulse el bot n ENTER Pulse el bot n EXIT para salir Se puede reajustar cada modo de imagen Picture Ingresar Imagen Modo Contraste 100 Luminosidad 45 Definici n 75 Color 55 Tinte V50 R50 T...

Page 105: ...un contraste ptimo Gamma 3 3 Se puede ajustar la intensidad de los colores primarios Pulse los botones o hasta llegar al valor ptimo Balance de blanco 10 10 Se puede ajustar la temperatura del color...

Page 106: ...imagen en modo normal 4 3 S lo buscar Use esta funci n para ver la imagen completa sin cortes cuando la entrada de la se al sea DTV 1080i HDMI 1080i 1080p o Componente 1080i 1080p Puede seleccionar lo...

Page 107: ...n ENTER para seleccionar Imagen Pulse los botones o para seleccionar DNIe y pulse el bot n ENTER Esta funci n no se activa si la fuente de entrada es PC 2 Pulse los botones o para seleccionar Apagado...

Page 108: ...y pulse el bot n ENTER Pulse el bot n EXIT para salir Esta funci n no est disponible en el modo PC Cuando se selecciona Normal o Cine en el modo Imagen la opci n Color activo cambia autom ticamente a...

Page 109: ...seleccionar Modo y pulse el bot n ENTER 2 Pulse los botone o para seleccionar Modo y pulse el bot n ENTER Pulse los botones o para seleccionar el ajuste de sonido Normal M sica Cine Di logo o Favorito...

Page 110: ...ncreta y pulse el bot n ENTER Ajuste de balance de sonido I D Para ajustar el balance de sonido de los altavoces I D Ajuste del ancho de banda 100Hz 300Hz 1kHz 3kHz 10kHz Para ajustar el nivel de las...

Page 111: ...ccionar DNSe y pulse el bot n ENTER 2 Pulse los botones o para seleccionar Apagado o Encendido y pulse el bot n ENTER Pulse el bot n EXIT para salir Pulse el bot n DNSe del mando a distancia para sele...

Page 112: ...o por ejemplo traducciones simult neas del programa en otros idiomas La disponibilidad de estas multipistas adicionales depende del programa Idioma preferido 1 Pulse el bot n MENU Pulse los botones o...

Page 113: ...PC HDMI TV AV S Video Component PC HDMI Silencio interno apagado Altavoz disponible Altavoz disponible Altavoz disponible Altavoz disponible Altavoz disponible Sin salida de sonido Sin salida de soni...

Page 114: ...i n y borrado de canales Puede a adir o suprimir un canal para que se muestren los canales que desee Para utilizar la funci n Lista de canales antes se ha de ejecutar Prog Auto consulte las p ginas 21...

Page 115: ...nuaci n pulse el bot n ENTER 3 Pulse los botones para seleccionar un canal como favorito y pulse el bot n ENTER Pulse los botones CH y CH para mostrar la p gina siguiente de la lista de canales 4 Puls...

Page 116: ...las listas de canales Se pueden ver las listas de todos los canales de los a adidos y de los favoritos 1 Pulse el bot n MENU Pulse los botones o para seleccionar Canal y pulse el bot n ENTER Pulse los...

Page 117: ...tar manualmente un determinado canal a fin de que la recepci n sea ptima 1 Pulse el bot n MENU Pulse los botones o para seleccionar Canal y pulse el bot n ENTER Pulse los botones o para seleccionar Si...

Page 118: ...Noise Amplifier Amplificador de ruido bajo Si el televisor est funcionando en una zona con se al d bil la funci n LNA puede mejorar la recepci n un amplificador previo de bajo ruido refuerza la se al...

Page 119: ...los botones o para seleccionar Configuraci n y pulse el bot n ENTER Pulse los botones o para seleccionar Idioma y pulse el bot n ENTER 2 Pulse los botones o para seleccionar English Espa ol o Fran ais...

Page 120: ...stancia Ajuste del temporizador de desconexi n El temporizador de desconexi n apaga autom ticamente el televisor despu s de un per odo prefijado 30 60 90 120 150 y 180 minutos 1 Pulse el bot n MENU Pu...

Page 121: ...Aventura Proporciona im genes claras en las zonas oscuras del juego como en las cuevas y las habitaciones Deportes Sincroniza la imagen y el sonido en las im genes que se mueven r pidamente como en l...

Page 122: ...el n mero PIN actual de 4 d gitos El n mero PIN predeterminado del nuevo equipo de TV es 0 0 0 0 3 Aparecer el men V Chip Pulse los botones o para seleccionar Bloqueo V Chip Para activar la funci n V...

Page 123: ...diogo cambiado a continuaci n el PIN se memoriza Pulse el bot n EXIT para salir Si olvida el PIN pulse los botones del mando a distancia en la siguiente secuencia para reiniciar el c digo PIN a 0 0 0...

Page 124: ...ia muy joven incluidos ni os de edad entre los dos y seis a os Dirigido a ni os m s mayores Los temas y elementos de este programa pueden incluir violencia f sica o c mica suave o puede asustar a ni o...

Page 125: ...G las subclasificaciones L en TV 14 y TV MA se bloquear n autom ticamente Estas categor as se dividen en dos grupos TV Y y TV Y7 ni os peque os y ni os a partir de 7 a os y TV G a TV MA todos los dem...

Page 126: ...para modelos de Canad 11 Pulse los botones o para seleccionar Franc s Canadiense y pulse el bot n ENTER 12 Aparecer la pantalla Franc s Canadiense Pulse el bot n o para seleccionar la restricci n apro...

Page 127: ...l s mbolo Pulse el bot n EXIT para salir Perm Todo Se pulsa para desbloquear todos los programas de televisi n Bloq Todo Se pulsa para bloquear todos los programas de televisi n Los niveles de restric...

Page 128: ...ad de fondo no pueden ajustarse a la vez en Transparente Tama o Esta opci n se compone de Programado Peque o Normal y Grande Tipo de Letra Esta opci n se compone de Programado y Estilo0 Estilo7 Puede...

Page 129: ...os a ampliar la informaci n del programa CC3 Servicio de subt tulos secundarios sincronizados Datos alternativos de subt tulos relacionados con el programa t picamente subt tulos del segundo idioma CC...

Page 130: ...ones o para seleccionar Apagado o Encendido y pulse el bot n ENTER Pulse el bot n EXIT para salir La pantalla azul aparece cuando no existe se al desde un dispositivo externo independientemente del aj...

Page 131: ...pulse el bot n ENTER Pulse los botones o para seleccionar Melod a y pulse el bot n ENTER 2 Pulse los botones o para seleccionar Apagado Bajo Medio o Alto y pulse el bot n ENTER Pulse el bot n EXIT par...

Page 132: ...eleccionar Normal o Bajo y pulse el bot n ENTER Pulse el bot n EXIT para salir Esta funci n s lo est activa cuando se conecta una entrada externa a HDMI se ales RGB Setup Ingresar Pantalla Azul Melod...

Page 133: ...o para seleccionar Apagado o Encendido y pulse el bot n ENTER Pulse el bot n EXIT para salir El valor predeterminado de Funci n de Ayuda es Encendido Setup Ingresar Pantalla Azul Melod a Defect de col...

Page 134: ...tones o para seleccionar Actualizaci n del software y pulse el bot n ENTER Se muestra el mensaje Explorando USB Puede tardar hasta 30 segundos No desconecte la alimentaci n ni retire la unidad USB mie...

Page 135: ...trario p ngase en contacto con el fabricante del ordenador o con el distribuidor de Samsung 1 Primero haga clic en Panel de control en el men Inicio de Windows 2 Cuando aparezca la ventana del panel d...

Page 136: ...P 74 62 70 00 N N 76 82 72 00 N N 79 97 75 02 P P 1920 x 1080 66 58 60 00 P N Entrada HDMI DVI Se al de v deo Resoluci n Puntos por l nea Frecuencia horizontal kHz Frecuencia vertical Hz Polaridad ho...

Page 137: ...zar la sintonizaci n fina Cuando se hayan reducido las interferencias vuelva a ajustar la imagen de forma que est centrada en la pantalla Debe cambiar al modo PC en primer lugar 3 Pulse los botones o...

Page 138: ...r Imagen y pulse el bot n ENTER 9 Aparecer en pantalla el mensaje Reinicio imagen completado Visualizaci n de la resoluci n actual Puede conseguir informaci n sobre la resoluci n del PC Debe cambiar a...

Page 139: ...agen est ajustado en Normal o Cine como en el modo PC 1 Pulse el bot n MENU Pulse los botones o para seleccionar Configuraci n y pulse el bot n ENTER Pulse los botones o para seleccionar PC Home Cinem...

Page 140: ...cia ventana de transmisi n Compruebe los terminales de las pilas Pulse el bot n TV del mando a distancia para ponerlo en el modo TV Aseg rese de que el mando a distancia tenga pilas Compruebe que los...

Page 141: ...mpara ya que estar caliente No toque el cristal con las manos desnudas ni inserte objetos extra os dentro de la cubierta ya que puede reducir la calidad de la pantalla o producir descargas el ctricas...

Page 142: ...agua l quidos limpiadores cera ni productos qu micos Para obtener la mejor calidad de imagen no coloque componentes encima del televisor Este televisor DLP proyecta la imagen en una pantalla de gran...

Page 143: ...x 415 mm 55 3 x 38 6 x 17 6 pulg 1405 x 981 x 448 mm 62 4 x 44 3 x 19 1 pulg 1586 x 1124 x 486 mm Peso 33 3 Kg 36 Kg 49 8 Kg Consideraciones medioambientales Temperatura de funcionamiento Humedad de...

Page 144: ...Servicio de Atenci n al Cliente Country Customer Care Center Web Site Address CANADA 1 800 SAMSUNG 7267864 www samsung com ca Samsung Electronics Canada Inc Customer Service 55 Standish Court Mississa...

Reviews: