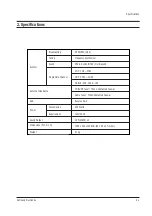


Alignment and Adjustments
3-10
Samsung Electronics
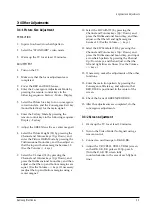
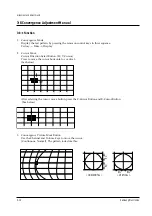
3-4-10 Convergence Module Adjustment
IFT ADJUSTMENT
1. Check T2 with the V-Sync rate.
2. Adjust IFT so that DC becomes 2.0V.
VR ADJUSTMENT
1. Check T1 with the H-Sync rate.
2. Adjust VR so that the left and right
waveforms are symmetrical.
3-4-11 Convergence Adjustment
1. Warm up the TV for at least 30 minutes.
2. Note: Make sure that both focus and screen
adjustments are completed.
3. Input a lion head pattern.
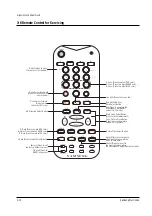
4. Enter the Convergence Mode by pressing the
remote-control keys in the following sequence:
Factory
®
Mute
®
Display.
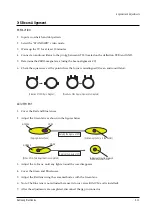
5. Cover the Red and Blue lenses.
Adjust the Green lens. Then the convergence
adjustment pattern is seen and the cursor
automatically moves up and to the left.
6. Superimpose the lion head pattern on the test
pattern by pressing the Normal/Test key. If
necessary, press the number (Ò1Ó) key to adjust
the horizontal test pattern.
7. Press both I-Date and Save key to save the
data.
8. Press the number (Ò8Ó) key to set to the screen
jig.
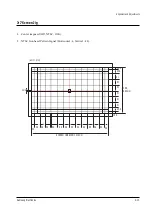
9. Use the Normal/Test key to make sure that the
horizontal margin is 6.5 and the vertical
margin is 4.5 (lion head pattern).
Also check for the picture linearity (crosshatch
pattern).
10. After the Green Convergence adjustments are
completed, press the Save key and replace the
screen. ??
11. Press the G,R,B-Mute key to mute the Blue
signal.
12. Press the number (Ò7Ó) key for the Red
Convergence Adjustment.
13. Redo adjustments 9~10.
14. After the Red Convergence adjustments are
completed, press the Save key.
15. Press the G,R,B-Mute key to mute the Red
signal.
16. Press the number (Ò9Ó) key for the Blue
Convergence Adjustment.
17. Redo adjustments 9~10.
18. After the Blue Convergence adjustments are
completed, press the Save key.
19. After all the adjustments are completed,
check the picture condition. If any
convergence drift is seen, repeat the
adjustments.
20. Press the Exit key to enter the TV mode.
2V
GND
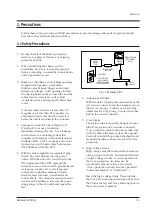
Summary of Contents for HCH551WX
Page 2: ...ELECTRONICS Samsung Electronics Co Ltd NOV 1998 Printed in Korea 3APT52A 5501 ...
Page 23: ...MEMO 3 16 Samsung Electronics ...
Page 62: ...8 2 Samsung Electronics MEMO ...
Page 67: ...Schematic Diagrams Samsung Electronics 9 5 9 5 3DCOMB1 Power Line Signal Line ...
Page 68: ...Schematic Diagrams 9 6 Samsung Electronics 9 6 IF_MODULE Power Line Signal Line ...
Page 73: ...Schematic Diagrams Samsung Electronics 9 11 9 11 CONTROL SUB Power Line ...


