background image

2

ENGLISH

CONTENTS

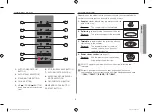
OVEN

1. 

VENTILATION HOLES

2. 

LIGHT

3. 

DISPLAY

4. 

DOOR LATCHES

5. 

DOOR

6. 

TURNTABLE

7. 

COUPLER

8. 

ROLLER RING

9. 

SAFETY INTERLOCK HOLES

10. 

CONTROL PANEL

Oven .......................................................................................................  2
Control panel ...........................................................................................  3
Accessories .............................................................................................  3
Using this instruction booklet ...................................................................  4
Important safety information  ...................................................................  4
Legend for symbols and icons .................................................................  4
Precautions to avoid possible exposure to excessive microwave energy...  4
Important safety instructions ....................................................................  5
Correct disposal of this product (waste electrical & electronic equipment).  7
Installing your microwave oven ................................................................  8
Installation instructions microwave oven ..................................................  8
Setting the time .......................................................................................11
What to do if you are in doubt or have a problem.....................................11
Cooking/Reheating ..................................................................................12
Power levels ............................................................................................12
Stopping the cooking ..............................................................................12
Adjusting the cooking time.......................................................................13
Using the deodorization feature ...............................................................13
Setting the energy save mode .................................................................13
Using the auto reheat feature ...................................................................13
Auto reheat settings .................................................................................14
Using the auto power defrost feature .......................................................14
Auto power defrost settings .....................................................................14
Using the auto power steam function .......................................................15
Auto power steam settings ......................................................................15
Manual steam cook settings ....................................................................16
Setting a standing time ............................................................................17
Using the memory feature ........................................................................17
Switching the beeper off ..........................................................................18
Safety-locking your microwave oven ........................................................18
Cookware guide ......................................................................................18
Cleaning your microwave oven ................................................................19
Storing and repairing your microwave oven..............................................20
Technical specifications ...........................................................................20

7

8

6

1

2

5

9

4

10

3

FW77SSTR_BWT_DE68-04135B-03_EN.indd   2

2014-07-16     5:00:06

Summary of Contents for FW77S

Page 1: ...r s Instructions Cooking Guide This manual is made with 100 recycled paper Please be advised that the Samsung warranty does NOT cover service calls to explain product operation correct improper installation or perform normal cleaning or maintenance FW77SSTR_BWT_DE68 04135B 03_EN indd 1 2014 07 16 5 00 05 ...

Page 2: ...e 11 What to do if you are in doubt or have a problem 11 Cooking Reheating 12 Power levels 12 Stopping the cooking 12 Adjusting the cooking time 13 Using the deodorization feature 13 Setting the energy save mode 13 Using the auto reheat feature 13 Auto reheat settings 14 Using the auto power defrost feature 14 Auto power defrost settings 14 Using the auto power steam function 15 Auto power steam s...

Page 3: ...f the oven Purpose The coupler rotates the turntable 2 Roller ring to be placed in the centre of the oven Purpose The roller ring supports the turntable 3 Turntable to be placed on the roller ring with the centre fitting to the coupler Purpose The turntable serves as the main cooking surface it can be easily removed for cleaning 4 Power steam cooker see page 15 Purpose Use the plastic steam cooker...

Page 4: ...the oven in a clean condition could lead to deterioration of the surface that could adversely affect the life of the appliance and possible result in a hazardous situation LEGEND FOR SYMBOLS AND ICONS WARNING Hazards or unsafe practices that may result in severe personal injury or death CAUTION Hazards or unsafe practices that may result in minor personal injury or property damage Warning Fire haz...

Page 5: ... gas leak such as propane gas LP gas etc ventilate immediately without touching the power plug Do not touch the power plug with wet hands Do not turn the appliance off by unplugging the power plug while an operation is in progress Do not insert fingers or foreign substances If any foreign substance such as water has entered the appliance unplug the power plug and contact your nearest service centr...

Page 6: ... Do not apply any creams oils or lotions Do not put the tray or rack in water shortly after cooking because it may cause breakage or damage of the tray or rack Do not operate the microwave oven for deep fat frying because the oil temperature cannot be controlled This could result in a sudden boil over of the hot liquid During use the appliance becomes hot Care should be taken to avoid touching hea...

Page 7: ... at arms length from the oven when opening the door to avoid getting scalded by escaping hot air or steam Do not operate the microwave oven when it is empty The microwave oven will automatically shut down for 30 minutes for safety purposes We recommend placing a glass of water inside the oven at all times to absorb microwave energy in case the microwave oven is started accidentally Do not use hars...

Page 8: ... Dispose of these materials in a responsible manner and in accordance with government regulations The authorities can provide you with infromation about how to dispose of discarded domestic appliances in a responsible manner Safety The appliance should only be connected by a qualified technician The microwave oven has been designed for domestic use You should use it exclusively for cooking food Th...

Page 9: ...9 ENGLISH Building in dimensions 380 595 50 362 in in 50 in 564 850 min 200 cm 550 Template CABINET FRONT A side FW77SSTR_BWT_DE68 04135B 03_EN indd 9 2014 07 16 5 00 12 ...

Page 10: ...abinet Fig2 3 Use the template to place the BKT Base 71mm away from A side of the cabinet Fig3 4 Use the 3mm drill to make holes Fix screws into BKT Base Fig4 5 Attach the surround Fig5 6 Make the electrical connection Check that the appliance work BKT Install Fig1 Fig4 Fig2 Fig5 FW77SSTR_BWT_DE68 04135B 03_EN indd 10 2014 07 16 5 00 13 ...

Page 11: ...press the button Is the door completely closed The food is not cooked at all Have you set the timer correctly and or pressed the button Is the door closed Have you overloaded the electric circuit and caused a fuse to blow or a breaker to be triggered The food is either overcooked or undercooked Was the appropriate cooking length set for the type of food Was an appropriate power level chosen Sparki...

Page 12: ...ver switch the microwave oven on when it is empty If you wish to heat a dish for a short period of time at maximum power 850 W simply press the 30s button once for each 30 seconds of cooking time The oven starts immediately POWER LEVELS You can choose among the power levels below Power level Output MWO HIGH 850 W MEDIUM HIGH 600 W MEDIUM 450 W MEDIUM LOW 300 W DEFROST 180 W LOW KEEP WARM 100 W If ...

Page 13: ... the Energy Save button To remove energy save mode open the door and then display shows current time The oven is ready for use USING THE AUTO REHEAT FEATURE The Auto Reheat feature has 3 pre programmed cooking time You do not need to set either the cooking times or the power level You can adjust the number of servings by pressing the and buttons First place the food in the centre of the turntable ...

Page 14: ... Defrost feature enables you to defrost meat poultry or fish The defrost time and power level are set automatically You simply select the programme and the weight Use only dishes that are microwave safe First place the frozen food in the centre of the turntable and close the door 1 Press the Power Defrost button 2 Select the food weight by pressing the and buttons It is possible to set up to a max...

Page 15: ...ice parboiled into the steam cooker Add 500 ml cold water when cooking 250 g rice and add 750 ml water for 375 g rice Close lid of steam cooker After cooking remove moisture in the cavity by using kitchen paper 2 Peeled Potatoes 100 150 g 200 250 g 300 350 g 400 450 g 500 550 g 2 3 min Recommendations Weigh the potatoes after peeling washing and cutting into similar size Put them into the steam co...

Page 16: ... minutes Jacket Potatoes 500 g 850 W 7 8 2 3 Instructions Weigh and rinse the potatoes and put them into steam bowl Add 3 tablespoons water Cover with lid Stew chilled 400 g 600 W 5 6 1 2 Instructions Put stew into the steam bowl Cover with lid Stir well before standing Food Portion Power Time min Standing time min Soup chilled 400 g 850 W 3 4 1 2 Instructions Pour into steam bowl Cover with lid S...

Page 17: ...es you can store the cooking times and power levels in the oven s memory so that you do not have to reset them each order You can store two different setting Storing the Setting 1 To programme the Then press the Memory button First setting Second setting Once Display is P1 Twice Display is P2 2 Set your cooking programme as usual cooking time and power level see if necessary 3 Press button Result ...

Page 18: ...r absorbed by the dish used Care must therefore be taken when choosing the cookware If the cookware is marked microwave safe you do not need to worry The following table lists various types of cookware and indicates whether and how they should be used in a microwave oven Cookware Microwave safe Comments Aluminum foil Can be used in small quantities to protect areas against overcooking Arcing can o...

Page 19: ...e cleaned regularly to prevent grease and food particles from building up Inside and outside surfaces Door and door seals Turntable and Roller rings ALWAYS ensure that the door seals are clean and the door closes properly Failure to maintain the oven in a clean condition could lead to deterioration of the surface that could adversely affect the life of the appliance and possibly result in a hazard...

Page 20: ...ts at all times Both the design specifications and these user instructions are thus subject to change without notice Model FW77S FW78S Power source 230 V 50 Hz Power consumption Microwave 1250 W Output power 100 W 850 W IEC 705 Operating frequency 2450 MHz Magnetron OM75P 31 Cooling method Cooling fan motor Dimensions W x H x D Outside Oven cavity 489 x 275 x 312 mm 330 x 211 x 291 mm Volume 20 li...

Page 21: ...21 ENGLISH MEMO MEMO FW77SSTR_BWT_DE68 04135B 03_EN indd 21 2014 07 16 5 00 18 ...

Page 22: ...сква Россия ул Воздвиженка 10 4 этаж RUSSIA 8 800 555 55 55 GEORGIA 0 800 555 555 ARMENIA 0 800 05 555 AZERBAIJAN 0 88 555 55 55 KAZAKHSTAN 8 10 800 500 55 500 GSM 7799 VIP care 7700 UZBEKISTAN 8 10 800 500 55 500 KYRGYZSTAN 8 10 800 500 55 500 TADJIKISTAN 8 10 800 500 55 500 MONGOLIA 7 495 363 17 00 BELARUS 810 800 500 55 500 MOLDOVA 0 800 614 40 UKRAINE 0 800 502 000 www samsung com ua support U...

Reviews: