background image

Extended functions

  41

Using shooting modes

Using the Movie mode

In Movie mode, you can record high-definition videos of up to 20 
minutes in length. The camera saves recorded videos as MP4 
(H.264) files.

• 

H.264 (MPEG-4 part10/AVC) is a high-compression video format 
established by the international standard organizations ISO-IEC and 
ITU-T.

• 

Some memory cards may not support high definition recording. If this 
occurs, set a lower resolution.

• 

Memory cards with slow write speeds will not support high-resolution 
videos and high-speed videos. To record high-resolution or high-
speed videos, use memory cards with faster write speeds.

• 

If you activate the OIS function, the camera may record the operating 
sound of the OIS function. 

On the Home screen, touch 

.

Touch 

m

, and then set desired options. (For a list of 

options, refer to page 54.)

Press [

Shutter

] or touch   to start recording.

• 

Press the front LCD button to record a movie while watching 
yourself.

Press [

Shutter

] again or touch   to stop recording.
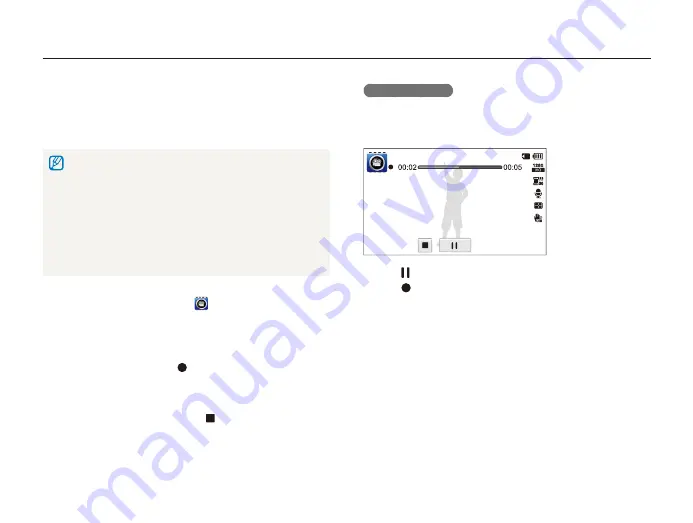
 Pause recording 

The camera allows you to temporarily pause a video while 
recording. With this function, you can record separate scenes as 
a single video.

• 

Touch   to pause while recording.

• 

Touch   to resume.

Summary of Contents for EC-ST700ZBPBUS

Page 1: ...e instructions for your camera Please read this manual thoroughly Basic troubleshooting Quick reference Contents Basic functions Extended functions Shooting options Playback Editing Settings Appendixes Index User Manual ST700 Ä Click a topic ...

Page 2: ...or charger and then contact a Samsung service center Health and safety information Always comply with the following precautions and usage tips to avoid dangerous situations and ensure peak performance of your camera Warning situations that could cause injury to yourself or others Do not disassemble or attempt to repair your camera This may result in electric shock or damage to the camera Do not us...

Page 3: ...juries caused by unauthorized batteries chargers cables or accessories Do not use batteries for unintended purposes This may cause a fire or electric shock Do not touch the flash while it fires The flash is very hot when fired and may burn your skin When you use AC charger turn off the camera before you disconnect the power to the AC charger Failing to do so may result in fire or electric shock Disconne...

Page 4: ...tion stored on the card may be damaged or erased Never use a damaged charger battery or memory card This may result in electric shock or camera malfunction or cause a fire Check that the camera is operating properly before use The manufacturer takes no responsibility for any loss of files or damage that may result from camera malfunction or improper use You must plug the end of the USB cable with th...

Page 5: ...are not allowed to reuse or distribute any part of this manual without prior permission For Open Source License information refer to the OpenSourceInfo pdf in the provided CD ROM Outline of the User Manual Basic functions 12 Learn about your camera s layout icons and basic functions for shooting Extended functions 33 Learn how to capture a photo record a video and voice memo by selecting a mode Sh...

Page 6: ...tions or menus you must select to perform a step for example Touch m Photo Size represents Touch m and then touch Photo Size Annotation Abbreviations used in this manual Abbreviation Definition AEB Auto Exposure Bracket AF Auto Focus DIS Digital Image Stabilization DPOF Digital Print Order Format EV Exposure Value ISO International Organization for Standardization OIS Optical Image Stabilization WB...

Page 7: ...l or still life Background the objects around the subject Composition the combination of a subject and background Composition Background Subject Exposure Brightness The amount of light that enters your camera determines the exposure You can alter the exposure with shutter speed aperture value and ISO sensitivity By altering the exposure your photos will be darker or lighter Normal exposure Overexp...

Page 8: ... the OIS function or half press Shutter to ensure the subject is focused p 30 Use the DUAL IS mode p 39 Photos are blurred when shooting at night As the camera tries to let in more light the shutter speed slows This can make it difficult to hold the camera steady enough to take a clear picture and may result in camera shake Select Night Shot mode p 37 Turn on the flash p 59 Set ISO sensitivity optio...

Page 9: ...EB to take 3 photos of the same scene with different exposures f 73 Applying effects to photos Magic Frame shot mode f 47 Photo Filter mode f 47 Vignetting mode f 50 Smart Filter effects f 74 Image Adjust to adjust Sharpness Contrast or Saturation f 77 Applying different effects to videos Movie Filter mode f 49 Vignetting mode f 50 Palette Effect Shot mode f 51 Reducing camera shake Optical Image ...

Page 10: ...sing the Movie Filter mode 49 Using the Vignetting mode 50 Using the Palette Effect mode 51 Recording voice memos 52 Recording a voice memo 52 Adding a voice memo to a photo 53 Basic functions 12 Unpacking 13 Camera layout 14 Inserting the battery and memory card 16 Charging the battery and turning on your camera 17 Charging the battery 17 Turning on your camera 17 Performing the initial setup 18 ...

Page 11: ...focus area 64 Using face detection 65 Detecting faces 65 Capturing a smile shot 66 Detecting eye blinking 66 Using Smart Face Recognition 67 Registering faces as your favorites My Star 68 Adjusting brightness and color 69 Adjusting the exposure manually EV 69 Changing the metering option 70 Selecting a light source White balance 71 Using burst modes 73 Applying effects Adjusting images 74 Applying...

Page 12: ...es with Intelli studio 101 Transferring files by connecting the camera as a removable disk 103 Disconnecting the camera for Windows XP 104 Transferring files to your Mac computer 105 Printing photos with a PictBridge photo printer 106 Settings 108 Settings menu 109 Accessing the settings menu 109 Sound 110 Display 110 Connectivity 111 General 112 Appendixes 115 Error messages 116 Camera maintenance ...

Page 13: ...h screen 21 Setting the touch screen and sound 23 Setting the display type for the touch screen 23 Setting the sound 23 Using the Home screen 24 Accessing the Home screen 24 Icons on the Home screen 24 Rearranging icons 26 Capturing photos 27 Turning on the front display 28 Zooming 28 Reducing camera shake OIS 30 Tips for getting a clearer photo 31 Basic functions Learn about your camera s layout ...

Page 14: ...ra AC adapter USB cable Rechargeable battery Strap Touch pen Cleaner User Manual CD ROM Quick Start Manual Optional accessories Camera case HDMI cable A V cable Battery charger Memory card Memory card adapter The illustrations may differ slightly from the items shipped with your product ...

Page 15: ...ur camera s parts and their functions Battery chamber cover Insert a memory card and battery Tripod mount Shutter button POWER button AF assist light Timer lamp Flash Lens USB and A V port Accepts USB cable and A V cable HDMI port Accepts HDMI cable Front LCD button Front display ...

Page 16: ...rinter or out of focus Steady When the camera is connecting to a computer or in focus Zoom button In Shooting mode Zoom in or out In Playback mode Zoom in on part of a photo or view files as thumbnails Playback button Main display Referred to as Touch screen in this manual Microphone x y Home button Attaching the strap Speaker ...

Page 17: ...e card gently until it disengages from the camera and then pull it out of the slot Rechargeable battery Slide the lock up to release the battery You can use the internal memory for temporary storage if a memory card is not inserted Battery lock Insert a memory card with the gold colored contacts facing up Memory card Insert the battery with the Samsung logo facing up Rechargeable battery ...

Page 18: ... Press Playback The camera turns on and immediately accesses Playback mode If you turn on your camera by pressing and holding Playback for about 5 seconds the camera does not emit any sounds Charging the battery Before you use the camera for the first time you must charge the battery Attach the USB cable to the AC adapter and then plug the end of cable with the indicator light into your camera Indi...

Page 19: ...ow to configure the camera s basic settings 4 Touch Home and then touch z or x to select a time zone When you travel to another country touch Visit and then select a new time zone London Time Zone 5 Touch o to save 6 Touch Date Time Set 1 Touch Language 2 Select a language and then touch o 3 Touch Time Zone ...

Page 20: ... Touch and then touch the up or down arrows to set the time Date Time Set Hr Min To set daylight saving time touch 9 Touch o to save 10 Touch Touch Calibration 11 Touch the target on the screen with your touch pen Touch Calibration Touch directly in the center of the target for optimal performance 12 Touch o to save settings ...

Page 21: ...lays on the screen change according to the mode you select or the options you set Icon Description Current time Aperture value Shutter speed Voice memo Timer Front display is on Auto focus frame Camera shake Zoom indicator Zoom ratio Photo resolution when Intelli zoom is on Grid lines 3 Status icons Icon Description Available recording time Available number of photos Memory card not inserted Inter...

Page 22: ...s pens or pencils to touch the screen You can damage the screen Flicking Gently flick the touch pen across the screen Touching Touch an icon to select a menu or option Smart Auto Smart Movie Self Shot Program Settings Album Pose Guide Children Dragging Touch and hold a part of the screen and then drag the touch pen Auto WB Daylight Cloudy Fluorescent_H White Balance ...

Page 23: ...touch screen may not work properly if you use the camera in extremely humid environments The touch screen may not work properly if you apply screen protection film or other accessories to the screen Depending on the viewing angle the screen may appear dim Adjust the brightness or viewing angle to improve the resolution Selecting an option Drag the option list up or down until you find the desired op...

Page 24: ...to Beep Sound to turn on or off the beep Setting the display type for the touch screen You can select a display type to show icons and options 1 On the Home screen touch 2 Touch 3 Select an option and then touch o Full Hide Guide Line Display Set Icon Description Full Icons are always displayed Hide Icons are hidden if you perform no operation for 5 seconds touch the screen to display the icons ag...

Page 25: ...the Home screen Icon Description Smart Auto Capture a photo with a scene mode selected automatically by the camera p 34 Program Capture a photo with settings you have adjusted manually p 38 Smart Movie Record a video with a scene mode selected automatically by the camera p 42 Self Shot Use the front display when you capture photos of yourself p 43 Children Attract children s attention with a short...

Page 26: ...options that are preset for a specific scene p 36 Vignetting Capture a photo or record a video with a vignetting effect p 50 Beauty Shot Capture a portrait with options to hide facial imperfections p 37 Magic Frame shot Capture a photo with various frame effects p 47 Photo Editor Edit photos with various effects p 95 Photo Filter Capture a photo with various filter effects p 47 Movie Filter Record a...

Page 27: ...art Auto Smart Movie Self Shot Program Settings Album Pose Guide Children 2 Drag it to a new location To move an icon to another page drag it to the left or right edge of the screen When you drop the icon to a new location the other icons will neatly slide out of the way Album Smart Movie Self Shot Program Settings Smart Auto Children Pose Guide ...

Page 28: ...utter to focus A green frame means the subject is in focus A red frame means the subject is out of focus 4 Press Shutter to capture a photo See page 31 for tips to get clearer photos 1 On the Home screen touch Smart Auto Smart Movie Self Shot Program Settings Album Pose Guide Children 2 Align your subject in the frame ...

Page 29: ...ourself In Shooting mode press the front LCD button You can tap the front display to turn it on and tap it again or press the front LCD button to turn it off When the front display turns on the touch screen will lock To unlock the touch screen touch and hold until reaches In Self Shot Children and Jump Shot modes the front display will activate automatically When you set timer options the front di...

Page 30: ...g the Intelli zoom Photo resolution varies according to the zoom rate if you use the Intelli zoom By using both the Optical zoom and Intelli zoom you can zoom in up to 20 times Photo resolution when the Intelli zoom is on Optical range Intelli range Zoom indicator The Intelli zoom is available only in Program and Scene except Text modes The Intelli zoom is not available with a Smart Filter effect ...

Page 31: ...e Adjust OIS OIS may not function properly when you move your camera to follow a moving subject you use the Digital zoom there is too much camera shake the shutter speed is slow for example when you capture night scenes the battery is low you capture a close up shot If you use the OIS function with a tripod the vibration of the OIS sensor may blur your images Deactivate the OIS function when you u...

Page 32: ...sition and half press Shutter again if the focus frame appears in red Reducing camera shake Set the Optical Image Stabilization option to reduce camera shake p 30 Select the DUAL IS mode to reduce camera shake both optically and digitally p 39 When h is displayed Camera shake When you shoot in the dark avoid setting the flash option to Slow Sync or Off The aperture remains open longer and it may be...

Page 33: ...e subject is too bright the subject is shiny or reflective the subject includes horizontal patterns such as blinds the subject is not positioned in the center of the frame Using the focus lock Half press Shutter to focus When the subject is in focus you can reposition the frame to change the composition When you are ready press Shutter to capture your photo When you capture photos in low light Turn...

Page 34: ...Program mode 38 Using the DUAL IS mode 39 Using the Pose Guide mode 40 Using the Movie mode 41 Using the Smart Movie mode 42 Capturing photos with the front display 43 Using the Self Shot mode 43 Using the Children mode 44 Using the Jump Shot mode 46 Using effect modes 47 Using the Magic Frame shot mode 47 Using the Photo Filter mode 47 Using the Movie Filter mode 49 Using the Vignetting mode 50 U...

Page 35: ...ively moving subjects Fireworks when using a tripod Using the Smart Auto mode In Smart Auto mode your camera automatically chooses the appropriate camera settings based on the type of scene it detects The Smart Auto mode is helpful if you are not familiar with the camera settings for various scenes 1 On the Home screen touch 2 Align your subject in the frame The camera automatically selects a scen...

Page 36: ...orrect scene depending on the shooting conditions such as camera shake lighting or distance to the subject Even if you use a tripod the camera may not detect the mode if the subject is moving In Smart Auto mode the camera consumes more battery power because it changes settings often to select appropriate scenes Using the Simple Shot mode In Simple Shot mode you can capture photos with simple adjus...

Page 37: ...unrise Backlight Capture backlit subjects Beach Snow Reduce underexposure of subjects caused by sunlight reflected from sand or snow Text Clearly capture text from printed or electronic documents 3 Align your subject in the frame and then half press Shutter to focus 4 Press Shutter to capture the photo Using the Close up Shot mode In Close up Shot mode you can capture close up photos of subjects su...

Page 38: ...then half press Shutter to focus 4 Press Shutter to capture the photo In Beauty Shot mode the focus distance will be set to Auto Macro Using the Night Shot mode In Night Shot mode you can use a slow shutter speed to extend the time the shutter stays open Increase the aperture value to prevent overexposure 1 On the Home screen touch 2 Drag the dials on the screen to the arrow directions below to ad...

Page 39: ... 2 Touch m and then set desired options For a list of options refer to page 54 3 Align your subject in the frame and then half press Shutter to focus 4 Press Shutter to capture the photo Setting My screen In Program mode you can add shortcuts for your favorite options to the left side of the screen 1 In Shooting mode touch m My screen o 2 Touch and hold one of the icons on the right OK Cancel Rese...

Page 40: ...OK Reset Cancel EV My screen 4 Touch o to save You can create up to 3 shortcuts Using the DUAL IS mode Reduce camera shake and prevent blurred photos with Optical and Digital Image Stabilization functions Before correction After correction 1 On the Home screen touch 2 Align your subject in the frame and then half press Shutter to focus ...

Page 41: ...era shake in other shooting modes p 30 Using the Pose Guide mode In Pose Guide mode the camera displays a guide for the posture that you have selected Align the subject with the guide before capturing the photo 1 On the Home screen touch 2 Select a pose guide and then touch 3 Align your subject with the guide that appears on the screen Icon Description View information about the pose Adjust the fa...

Page 42: ...esolution videos and high speed videos To record high resolution or high speed videos use memory cards with faster write speeds If you activate the OIS function the camera may record the operating sound of the OIS function 1 On the Home screen touch 2 Touch m and then set desired options For a list of options refer to page 54 3 Press Shutter or touch to start recording Press the front LCD button t...

Page 43: ...con will appear at the top left of the screen The icons are listed below Scene Icon Description Landscapes Sunsets Clear skies Forested areas 3 Press Shutter or touch to start recording 4 Press Shutter again or touch to stop recording If the camera does not recognize an appropriate scene mode it uses the default settings for Smart Movie mode The camera may not select the correct scene depending on...

Page 44: ...mera consumes less battery power and you can prevent others from viewing the touch screen The camera will turn off when you press the front LCD button again or press POWER The front display will turn off and the touch screen will turn on when you press HOME Using the Self Shot mode Conveniently capture photos of yourself with the front display 1 On the Home screen touch Your camera will automatica...

Page 45: ...ching Magnifier Half Shutter Icon Description Off No icon will appear on the front display Smile Icon Set an icon to appear that prompts the subject to smile Eyesight catching Set an icon to appear to attract the subject s attention to the lens Magnifier Touch an area to magnify it and show it on the front display Using the Children mode The Children mode attracts children by showing a short animati...

Page 46: ...hildren Sound and then select an option 4 Align your subject in the frame and then half press Shutter to focus 5 Press Shutter to capture the photo Recording a movie for playing on the front display 1 On the Home screen touch 2 Touch m Select Front Animation Movie Recording o 3 Press Shutter or touch to start recording 4 Press Shutter again or touch and then touch Yes to play back the movie on the...

Page 47: ...s Shutter The front display will start a countdown a few seconds before shooting 3 Jump when the jump icon appears on the front display The camera will capture 3 photos in succession If you are capturing photos using the jump shot timer in low light conditions or indoors photos may appear dark In Jump Shot mode the front display will activate and the touch screen will lock To unlock the touch scre...

Page 48: ...frame and then half press Shutter to focus 4 Press Shutter to capture the photo In Magic Frame shot mode the resolution is automatically set to Using the Photo Filter mode In Photo Filter mode you can apply various filter effects to your photos Miniature Vignetting Fish eye Sketch 1 On the Home screen touch 2 Touch a desired filter To view the original photo touch Before To view the photo with the fi...

Page 49: ...hutter to capture the photo To apply filter effects to saved photos touch When you select Sketch the resolution will change to and below Before After Option Description Miniature Apply a tilt shift effect to make the subject appear in miniature Vignetting Apply the retro looking colors high contrast and strong vignette effect of Lomo cameras Soft Focus Hide facial imperfections or apply dreamy effe...

Page 50: ...Apply a pen sketch effect Option Description Fish eye Distort close objects to imitate the visual effect of a fisheye lens Defog Make a video clearer Classic Apply a black and white effect Retro Apply a sepia tone effect Negative Apply a negative film effect 3 Press Shutter or touch to start recording 4 Press Shutter again or touch to stop recording If you select Miniature the speed of the video wil...

Page 51: ...to or movie 3 Drag the sliders or touch the sample photos to adjust Level Brightness and Contrast To view the original photo touch Before To view the photo with the vignetting effect touch After Level Before After Brightness Contrast 4 Align your subject in the frame and then half press Shutter to focus 5 Press Shutter to capture the photo To apply the vignetting effect to saved photos touch ...

Page 52: ...en touch 2 Touch a desired palette Option Description Palette Effect 1 Create a vivid look with sharp contrast and red color Palette Effect 2 Make scenes clean and clear by applying a soft blue tone Palette Effect 3 Apply a soft brown tone Palette Effect 4 Create a cold and monotone effect 3 Press Shutter or touch to start recording 4 Press Shutter again or touch to stop recording ...

Page 53: ...f memory is available 3 Press Shutter again or touch to stop recording To view the list of saved voice memos touch Recording voice memos Learn how to record a voice memo that you can play back later You can also add a voice memo to a photo to remind you of shooting conditions time of day circumstances etc You will get the best sound quality when you speak 16 in 40 cm from the camera ...

Page 54: ... Touch m and then touch the setting button next to Memo 3 Align your subject in the frame and then capture a photo The camera begins to record a voice memo right after you capture the photo 4 Record a short voice memo 10 seconds maximum Press Shutter to stop recording a voice memo before the 10 seconds are up You cannot add voice memos to photos in the burst mode ...

Page 55: ... faces 65 Capturing a smile shot 66 Detecting eye blinking 66 Using Smart Face Recognition 67 Registering faces as your favorites My Star 68 Adjusting brightness and color 69 Adjusting the exposure manually EV 69 Changing the metering option 70 Selecting a light source White balance 71 Using burst modes 73 Applying effects Adjusting images 74 Applying Smart Filter effects 74 Adjusting your photos ...

Page 56: ... Print on A4 paper 8 3 X 11 7 inches 1984 X 1488 Print on A5 paper 5 8 X 8 3 inches 1920 X 1080 Print on A5 paper in panorama ratio 16 9 or play back on an HDTV 1024 X 768 Attach to an email Selecting a resolution As you increase the resolution your photo or video will include more pixels so it can be printed on larger paper or displayed on a larger screen When you use a high resolution the file si...

Page 57: ... front display in Children mode When you play videos on a computer the resolution may change depending on the player you use Selecting image quality Set the photo and video quality settings Higher image quality settings will result in larger file sizes Setting the photo quality The camera compresses and saves the photos you capture in the JPEG format 1 In Shooting mode touch m Quality 2 Select an o...

Page 58: ...e videos you record in the MP4 H 264 format 1 In Shooting mode touch m Frame Rate 2 Select an option and then touch o As the frame rate increases action appears more natural but the file size also increases 30 FPS 15 FPS Frame Rate Icon Description 30 FPS Record 30 frames per second 15 FPS Record 15 frames per second ...

Page 59: ...ter to cancel the timer Depending on the Face Detection option you have selected the timer function or some of its options may not be available Timer options are not available if you set burst options 1 In Shooting mode touch m Timer 2 Select an option and then touch o Off 10 Sec 2 Sec Timer Icon Description Off The timer is not active 10 Sec Capture a photo after a 10 second delay 2 Sec Capture a...

Page 60: ...sh Icon Description Off The flash will not fire The camera will display the shake warning when you are shooting in low light Auto The flash will fire automatically when the subject or background is dark Preventing red eye If the flash fires when you capture a photo of a person in the dark a red glow may appear in the person s eyes To prevent this select Red eye or Red eye Fix Refer to flash options in Us...

Page 61: ...move until the flash fires a second time Fill in The flash always fires The camera automatically adjusts light intensity Slow Sync The flash fires and the shutter stays open longer This option is recommended when you want to capture ambient light to reveal more details in the background Use a tripod to prevent your photos from blurring The camera will display the shake warning when you are shooting in l...

Page 62: ...ivity you select the more sensitive to light your camera becomes With a higher ISO sensitivity you can get a better photo without using the flash 1 In Shooting mode touch m ISO 2 Select an option and then touch o Select Auto to have the camera select an appropriate ISO sensitivity automatically based on the brightness of the subject and lighting ISO 80 ISO 100 ISO 200 ISO Higher ISO sensitivities m...

Page 63: ...acro Focus Icon Description Normal AF Focus on a subject farther than 32 in 80 cm Macro Manually focus on a subject that is 2 32 in 5 80 cm from the camera 39 59 in 100 150 cm when you use the zoom Using macro Use macro to capture close up photos of subjects such as flowers or insects Try to hold the camera firmly to prevent blurry photos Turn off the flash if the distance to the subject is less than...

Page 64: ...as a white single line frame If the camera fails to track the subject you must reselect the subject to track If the camera fails to focus the focus frame will change to a red single line frame If you use this function you cannot set self timer options Face Detection options Smart Filter options and burst options Using smart touch focus Smart Touch AF allows you to track and auto focus on your subj...

Page 65: ...hen subjects are located at or near the center Multi AF Focus on one or more of 9 possible areas One Touch Shooting Focus on the subject and capture a photo by touching the image on the screen p 64 Smart Touch AF Focus on and track the subject that you touch on the screen p 63 Using one touch shooting You can focus on a subject and capture a photo with the touch of your finger 1 In Shooting mode to...

Page 66: ...detects a face it tracks the detected face automatically Face Detection may not be effective when the subject is far from the camera The focus frame will appear orange for Smile Shot and Blink Detection it is too bright or too dark the subject is not facing the camera the subject is wearing sunglasses or a mask the subject s facial expression changes drastically the subject is backlit or the light...

Page 67: ...s displayed on the screen If Blink Detection fails the Picture taken with eyes closed message appears Capture another photo Capturing a smile shot The camera automatically releases the shutter when it detects a smiling face 1 In Shooting mode touch m Face Detection 2 Select Smile Shot and then touch o 3 Compose your shot The camera automatically releases the shutter when it detects a smiling face ...

Page 68: ...ecognition The camera automatically registers faces that you frequently photograph The Smart Face Recognition feature will automatically prioritize the focus on those faces and on favorite faces The Smart Face Recognition feature is available only when you use a memory card 1 In Shooting mode touch m Face Detection 2 Select Smart Face Recognition and then touch o The nearest face appears in a whit...

Page 69: ...ister your favorite faces to prioritize the focus and exposure on those faces This feature is available only when you use a memory card 1 In Shooting mode touch m Smart FR Edit 2 Select My Star 3 Align your subject s face with the oval guideline and then press Shutter to register the face If the subject s face is not aligned with the oval guideline the white frame will not appear Capture photos of...

Page 70: ...to Exposure Bracket The camera will capture 3 consecutive photos each with a different exposure normal underexposed and overexposed p 73 Adjusting the exposure manually EV Depending on the intensity of the ambient light your photos may be too bright or dark In these cases you can adjust the exposure to get a better photo Darker Neutral 0 Brighter 1 In Shooting mode touch m EV 2 Select a desired va...

Page 71: ...e improperly exposed Suitable for a subject with backlighting Center weighted Your camera averages the meter reading of the entire frame with emphasis placed on the center Suitable for photos with subjects in the center of the frame Changing the metering option The metering mode refers to the way in which a camera measures the quantity of light The brightness and lighting of your photos will vary ...

Page 72: ...ght Cloudy Tungsten 1 In Shooting mode touch m White Balance 2 Select an option and then touch o White Balance Auto WB Daylight Cloudy Fluorescent_H Icon Description Auto WB Automatically set the White Balance based on the lighting conditions Daylight For outdoor photos on a sunny day Cloudy For outdoor photos on a cloudy day or in shadows Fluorescent_H For shooting under a daylight fluorescent or ...

Page 73: ... surface such as a piece of paper under the lighting conditions in which you intend to capture a photo The White Balance feature will help you reproduce the colors you see in the scene accurately in your photo 1 In Shooting mode touch m White Balance 2 Select Custom Set and then touch o 3 Aim the lens at a piece of white paper and then press Shutter ...

Page 74: ...ory card Motion Capture While you are pressing Shutter the camera captures VGA photos 6 photos per second maximum of 30 photos AEB Captures 3 consecutive photos each with a different exposure normal underexposed and overexposed Use a tripod to prevent blurry photos You can use the flash timer and Smart Filter only when you select Single When you select Motion Capture your camera will set the resolu...

Page 75: ...ns or apply dreamy effects Old Film 1 Apply vintage film effect 1 Old Film 2 Apply vintage film effect 2 Half Tone Dot Apply a halftone effect Sketch Apply a pen sketch effect Fish eye Distort objects to imitate the visual effect of a fisheye lens Defog Make a photo clearer Classic Apply a black and white effect Applying Smart Filter effects Apply various filter effects to your photos and videos to cr...

Page 76: ...to make the subject appear in miniature Vignetting Apply the retro looking colors high contrast and strong vignette effect of Lomo cameras Half Tone Dot Apply a halftone effect Sketch Apply a pen sketch effect Fish eye Distort close objects to imitate the visual effect of a fisheye lens Defog Make an image clearer Classic Apply a black and white effect Icon Description Retro Apply a sepia tone effe...

Page 77: ... are recording a video the speed of the video will increase If you select Miniature when you are recording a video the camera will not record sound If you select Miniature Vignetting Half Tone Dot Sketch Fish eye or Defog while recording a video the recording speed will be set to and the recording resolution will be set to less than If you set Smart Filter effects you cannot use the Face Recogniti...

Page 78: ...ness Description Soften the edges on your photos suitable for editing the photos on your computer Sharpen the edges to improve the clarity of your photos This may also increase the noise on your photos Contrast Description Decrease the color and brightness Increase the color and brightness Saturation Description Decrease the saturation Increase the saturation Select 0 if you do not want to apply a...

Page 79: ...tion to reduce the zoom noise 1 In Shooting mode touch m Voice 2 Select an option and then touch o Sound Alive On Sound Alive Off Mute Voice Icon Description Sound Alive On Turn on the Sound Alive function Sound Alive Off Turn off the Sound Alive function Mute Do not record sounds Do not block the microphone when you use the Sound Alive function Recordings made with Sound Alive may differ from act...

Page 80: ...O O O O O O O O O O Quality O O O O O O O O O Timer U O O O O O O O U Flash U U U U O U ISO sensitivity O Macro O O Focus area O Face detection U U U O U EV O O Metering O O White balance O O Drive O Smart filter O U Image adjust O O Sound Alive O Digital zoom U O Intelli zoom U O OIS U U U U U U O U U O Voice memo O U In these modes some options are limited or a certain option is set by default O ...

Page 81: ...U O U O Quality O O O O O O O O O O Timer U O O O U O U U Flash O U U U U ISO sensitivity O Macro O Focus Area U Face detection U O EV U O U O U U U U U Metering O White balance O O Drive U Smart filter O U O Image adjust O Sound Alive O O O O Digital zoom Intelli zoom OIS U O O U U U U U U U Voice memo O U In these modes some options are limited or a certain option is set by default O The option i...

Page 82: ...es on a TV or HDTV 98 Transferring files to your Windows computer 100 Transferring files with Intelli studio 101 Transferring files by connecting the camera as a removable disk 103 Disconnecting the camera for Windows XP 104 Transferring files to your Mac computer 105 Printing photos with a PictBridge photo printer 106 Playback Editing Learn how to play back photos videos or voice memos and edit photo...

Page 83: ...uch and hold the left end or right end of the screen to skip files quickly You can also drag the slider left or right to move to the previous or next file Starting Playback mode View photos or play videos and voice memos stored in your camera 1 Press Playback The most recent file will be displayed If the camera is off it will turn on and display the most recent file Press the front LCD button to play ...

Page 84: ...y change the orientation of the displayed photo p 113 To deactivate motion recognition in Playback mode touch m and then touch the setting button next to Gesture View If you want to view files stored in the internal memory remove your memory card The camera will not properly play back files of unsupported sizes or files that were captured with other cameras Viewing files with motion recognition You ca...

Page 85: ...art album touch m Face List Face List Display in Playback mode File Information File Location Icon Description Photo includes a voice memo Play videos p 91 or voice memos p 92 Folder name File name Video length Protected file Print order has been set DPOF Delete files p 88 Play a slide show p 90 View files as thumbnails p 86 To display file information on the screen touch m File Information an option ...

Page 86: ...vorite faces View files by the file type It may take some time for the camera to open Smart album change the category or reorganize files If you delete a category all files in the category will be deleted The front display may not activate after you access Smart Album 2 To change the rank of a face touch Yes and then drag the face to a new location Edit Ranking 3 Touch o to save your changes To delete...

Page 87: ... or right to move to the previous or next file Icon Description Play a slide show Touch the screen to pause the slide show and adjust the volume or mute the sound Touch to stop the slide show Return to the theme selection screen You can view only photos when you use the page flip effect Viewing files as thumbnails Scan thumbnails of files In Playback mode rotate Zoom to the left to view thumbnails 9 a...

Page 88: ... want to protect and then touch m 2 Touch the setting button next to Protect Delete Start Slide Show Protect Resize You cannot delete or rotate a protected file Touch a file to display it in full screen view Icon Description Delete files Photo includes a voice memo Video file Voice memo file Drag the screen up or down to move to the previous or next page of thumbnails ...

Page 89: ...rd 2 When the pop up message appears touch Yes Deleting files Select files to delete in Playback mode Deleting a single file You can select one file and then delete it 1 In Playback mode locate the file you want to delete and then touch 2 When the pop up message appears touch Yes You can also delete a file by touching m Delete Delete o Yes Deleting multiple files You can select multiple files and ...

Page 90: ...aximum zoom ratio differs depending on the photo resolution When you view photos that were captured by another camera the zoom ratio may differ Viewing photos Enlarge part of a photo or view photos as a slide show Enlarging a photo In Playback mode rotate Zoom to the right to enlarge a portion of the photo Rotate Zoom to the left to zoom out Drag the screen to see another part of the photo ...

Page 91: ... set a slide show effect All Play Icon Description Play Mode Set whether or not to repeat the slide show One Play Repeat Interval Set the interval between photos 1 sec 3 sec 5 sec 10 sec You must set the Effect option to Off to set the interval Music Set background audio Off Mist Drops Muse Trip Fall Effect Set a scene change effect between photos Off Calm Shine Relax Lively Sweet Select Off to ca...

Page 92: ... bar 4 Touch 5 When the pop up message appears touch Yes The original video should be at least 10 seconds long The camera will save the edited video as a new file Playing a video In Playback mode you can view a video and then capture or trim parts of the playing video You can save the captured or trimmed segments as new files 1 In Playback mode locate a video and then touch 2 View the video Icon Des...

Page 93: ...Description Scan backward Pause or resume playback Scan forward Adjust the volume or mute the sound Return to Playback mode Capturing an image from video 1 While viewing a video touch at the point where you want to capture an image 2 Touch 3 When the pop up message appears touch Yes The resolution of the captured image will be the same as the original video The captured image is saved as a new file...

Page 94: ...k mode Playing voice memos that are attached to photos 1 In Playback mode locate a photo that includes a voice memo and then touch 2 Listen to a voice memo Icon Description Pause or resume playback Adjust the volume or mute the sound Return to Playback mode ...

Page 95: ...esolution Rotated photos overwrite the original files 3 Touch o to save Available resize options differ depending on the original size of the photo Resizing photos Change the size of a photo and save it as a new file You can also select a photo to be displayed when the camera turns on 1 In Playback mode locate a photo and then touch m 2 Touch Resize and then select a size option Select Start Image t...

Page 96: ...will overwrite the original file Applying Smart Filter effects Apply special effects to your photos 1 On the Home screen touch The most recent file will be displayed 2 Touch a photo 3 Touch m Smart Filter 4 Select a filter To see available filter options refer to page 74 To view the original photo touch Before To view the photo with the filter effect touch After Before After Miniature 5 Touch V to save...

Page 97: ...original photo touch Before To view the adjusted photo touch After 5 Touch V to save your changes Adjusting your photos Learn how to adjust the brightness contrast or saturation or how to correct the red eye effect The camera will save an edited photo as a new file but may convert it to a lower resolution You can adjust brightness contrast and saturation and apply Smart Filter effects at the same t...

Page 98: ...e MISC folder on your memory card for convenient printing on DPOF compatible printers 1 In Playback mode locate a photo and then touch m 2 Touch DPOF 3 Touch to select the number of copies and then touch o You can take the memory card to a print shop that supports DPOF Digital Print Order Format or you can print photos directly through a DPOF compatible printer at home Photos with dimensions that ...

Page 99: ...en on your camera Depending on the TV model you may see some digital noise or part of an image may not appear Images may not be centered on the TV screen depending on your TV settings 1 On the Home screen touch 2 Touch Connectivity Video Out 3 Select a video signal output for your country or region p 112 4 Turn off your camera and TV 5 Connect your camera to your TV with the A V cable Video Audio ...

Page 100: ...ung HDTV the HDTV will turn on automatically and display the camera screen If you turn Anynet off the HDTV does not turn on automatically 7 View files using a remote control of your camera or HDTV If your HDTV supports the Anynet CEC profile turn Anynet on in the camera s settings menu p 111 to control the camera and TV with the TV s remote control Anynet lets you control all connected Samsung A V d...

Page 101: ...ct the camera as a removable disk Samsung is not responsible for any damage that results from using computers that do not meet the requirements or computers you have assembled yourself Requirements Item Requirements CPU Intel Pentium 4 3 2 GHz or higher AMD Athlon FX 2 6 GHz or higher RAM Minimum 512 MB RAM 1 GB or more recommended OS Windows XP SP2 Windows Vista or Windows 7 32 bit editions Hard ...

Page 102: ...ows Vista and Windows 7 select Run iStudio exe from the Auto Play window to start Intelli studio Transferring files with Intelli studio Intelli studio will start automatically when you connect the camera to your computer with the USB cable The battery will charge while the camera is connected to a computer with the USB cable 1 On the Home screen touch 2 Touch Connectivity and then turn on PC Softwa...

Page 103: ...you launch Intelli studio with your camera connected to your computer you can download short animations for use in Children mode Also you can use Intelli studio to edit videos you have captured and then play them on the front display If you install Intelli studio on your computer the program will launch more quickly To install the program select Tool Install Intelli studio on PC You cannot edit fil...

Page 104: ... folder on the camera View files as thumbnails or on a map Browse folders stored on the camera Browse folders stored on your computer Move to the previous or next folder Print files view files on a map store files in My Folder or register faces Transferring files by connecting the camera as a removable disk Connect the camera to your Windows computer as a removable disk 1 On the Home screen touch 2 Tou...

Page 105: ...right of your computer screen 3 Click the pop up message 4 Click the message box indicating safely removed 5 Remove the USB cable The camera may not disconnect safely while Intelli studio is running End the program before disconnecting the camera 5 Turn on the camera The computer recognizes the camera automatically If you set the USB option to Select Mode select Computer in the pop up window 6 On ...

Page 106: ... on the camera The computer recognizes the camera automatically and displays a removable disk icon If you set the USB option to Select Mode select Computer in the pop up window 3 Double click the removable disk icon 4 Drag or save files to your computer 1 Connect your camera to a Macintosh computer with the USB cable You must plug the end of the cable with the indicator light S into your camera If ...

Page 107: ...pears touch Yes to begin printing To cancel printing touch Cancel on the pop up window 1 On the Home screen touch 2 Touch Connectivity USB Printer 3 Turn on the printer and then connect your camera to the printer with the USB cable 4 If the camera is off press POWER or Playback to turn it on The printer recognizes the camera automatically 5 Select a file to print 6 Touch to select the number of cop...

Page 108: ...ype Quality Icon Description Size Set the print size Layout Set the number of photos to be printed on a single sheet of paper Type Set the type of paper Quality Set the print quality Date Set to print the date File Name Set to print the file name Reset Reset settings to their default values Some options may not be supported by some printers ...

Page 109: ...Settings menu 109 Accessing the settings menu 109 Sound 110 Display 110 Connectivity 111 General 112 Settings Refer to options to configure your camera s settings ...

Page 110: ...M YYYY Off 5 Touch to return to the previous screen Accessing the settings menu 1 On the Home screen touch 2 Touch a menu Settings Sound Display Connectivity General Icon Description Sound Set various camera sounds and the volume p 110 Display Customize the display settings p 110 Connectivity Set the connection options p 111 General Change the settings for the camera system such as memory format a...

Page 111: ...a Off 1 2 3 AF Sound Set to emit a sound when you half press the shutter button Off On Display Default Item Description Start Image Set a start image to display when the camera turns on Off Display no start image Logo Display a default image stored in the internal memory User Image Display a custom image p 94 The camera will save only one User Image in the internal memory at a time If you select a...

Page 112: ...mode the screen will dim 30 seconds after the last operation to save power Connectivity Default Item Description Anynet HDMI CEC Set whether or not to control the camera with a TV remote control when you connect it to an HDTV that supports the Anynet CEC profile Off View files without using an HDTV remote control On Control the camera with an HDTV remote control HDMI Size Set the resolution of photo...

Page 113: ...ter Connect your camera to a computer for transferring files Printer Connect your camera to a printer for printing files Select Mode Manually select the USB mode when you connect your camera to a device PC Software Set Intelli studio to launch automatically when you connect your camera to your computer Off On General Default Item Description Language Set a language for the display text Time Zone Set...

Page 114: ...tionally change file names the camera may not play back the files Item Description Auto Rotate Set to automatically rotate photos as you rotate the camera Off On Imprint Set to display the date and time on captured photos Off Date Date Time The date and time will be displayed on the bottom right corner of the photo Some printer models may not print the date and time properly If you select Text in Sc...

Page 115: ... you use a memory card formatted by another brand of camera a memory card reader or a computer Please format memory cards in the camera before using them to capture photos Reset Reset menus and shooting options except date and time language and video output settings Yes No Touch Calibration Calibrate the touch screen so that your camera will properly recognize your inputs Default ...

Page 116: ...a 117 Using or storing the camera 118 About memory cards 119 About the battery 121 Before contacting a service center 125 Camera specifications 128 Glossary 132 FCC notice 137 Index 138 Appendixes Get information about error messages specifications and maintenance ...

Page 117: ...DHC memory card DCF Full Error File names do not match the DCF standard Transfer the files on the memory card to your computer and then format the card File Error Delete the damaged file or contact a service center File system not supported Your camera does not support the FAT file structure of the inserted memory card Format the memory card on the camera Low Battery Insert a charged battery or recha...

Page 118: ...ons can damage the camera or cause it to malfunction Do not press on the lens cover or use a blower brush on the lens cover Cleaning your camera Camera lens and touch screen Use a blower brush to remove dust and wipe the lens gently with a soft cloth If any dust remains apply lens cleaning liquid to a piece of lens cleaning paper and wipe gently ...

Page 119: ...ts of the camera In this situation turn off the camera and wait for at least 1 hour If condensation forms on the memory card remove the memory card from the camera and wait until all moisture has evaporated before reinserting it Using or storing the camera Inappropriate places to use or store the camera Avoid exposing the camera to very cold or very hot temperatures Avoid using your camera in area...

Page 120: ...rs or damage to your camera Do not paint your camera as paint can clog moving parts and prevent proper operation Turn off the camera while not in use Your camera consists of delicate parts Avoid impacts to the camera Protect the display from external force by keeping it in the case when not in use Protect the camera from scratches by keeping it away from sand sharp implements or loose change Do no...

Page 121: ...Do not use memory cards that have been formatted by other cameras or by a computer Reformat the memory card with your camera Turn off the camera when you insert or remove the memory card Do not remove the memory card or turn off your camera while the lamp is blinking as this may damage your data When the lifespan of a memory card has expired you cannot store any more photos on the card Use a new m...

Page 122: ...above are measured using Samsung s standards Your results may vary depending on your actual usage Several videos were recorded in succession to determine the total recording time When you carry a memory card use a case to protect the card from electrostatic discharges Transfer important data to other media such as a hard disk CD or DVD When you use the camera for an extended period the memory card...

Page 123: ...ning on the camera again If you connect the camera to an external power source when the battery is depleted using some high energy consuming functions will cause the camera to turn off To use the camera normally recharge the battery Low battery message When the battery has fully charge has fully discharged the battery icon will turn red and the Low Battery message will appear Notes about using the...

Page 124: ...cable or remove the battery and insert it again If you charge the battery when the cable is overheated or the temperature is too high the indicator light may turn orange Charging will start when the battery cools down Overcharging batteries may shorten battery life After charging is finished disconnect the cable from your camera Do not bend or place heavy objects on the AC cable Doing so may damage...

Page 125: ...rolonged period When the device is switched on do not leave it in any confined space for a prolonged period Do not allow battery terminals to come in contact with metallic objects such as necklaces coins keys or watches Use only authentic manufacturer recommended Lithium ion replacement batteries Do not disassemble the battery or puncture it with any sharp object Avoid exposing the battery to high ...

Page 126: ...e the battery and insert it again The camera heats up While you use the camera it may heat up This is normal and should not affect your camera s lifespan or performance The flash does not work The flash option may be set to off p 59 You cannot use the flash in some modes Situation Suggested remedies Cannot turn on the camera Ensure that the battery is inserted Ensure that the battery is inserted corr...

Page 127: ...ng memory cards for more detail p 120 Cannot play back files If you change the name of a file your camera may not play the file the name of the file should meet the DCF standard If you encounter this situation play back the files on your computer Situation Suggested remedies The photo is blurry Make sure that the focus option you set is suitable for close up shots p 62 Make sure that the lens is clean ...

Page 128: ...transmission may be interrupted by static electricity Disconnect the USB cable and connect it again Your computer cannot play videos Videos may not play on some video player programs To play video files captured with your camera install and use the Intelli studio program on your computer p 101 Situation Suggested remedies Intelli studio is not functioning properly End Intelli studio and restart the...

Page 129: ...tering Multi Spot Center weighted Face Detection Compensation 2EV 1 3 EV Step ISO equivalent Auto ISO 80 ISO 100 ISO 200 ISO 400 ISO 800 ISO 1600 ISO 3200 Image sensor Type 1 2 33 Approximately 7 76 mm CCD Effective pixels Approximately 16 1 mega pixels Total pixels Approximately 16 4 mega pixels Lens Focal length Schneider KREUZNACH f 4 7 mm 23 5 mm 35 mm film equivalent 26 mm 130 mm F stop range ...

Page 130: ...lette Effect 2 Palette Effect 3 Palette Effect 4 Movie Filter Smart Filter Normal Miniature Vignetting Half Tone Dot Sketch Fish eye Defog Classic Retro Negative Custom RGB White Balance Auto WB Daylight Cloudy Fluorescent_H Fluorescent_L Tungsten Custom Set Date Imprinting Date Time Date Off Shooting Photos Modes Smart Auto Program Scene Simple Shot Magic Frame shot Beauty Shot Night Shot Close u...

Page 131: ...azine View Smart Album category Type Date Face Edit Resize Rotate Image Adjust Trim Smart Filter Effect Image Adjust Face Retouch Brightness Saturation Contrast Red eye Fix Smart Filter Miniature Vignetting Soft Focus Old Film 1 Old Film 2 Half Tone Dot Sketch Fish eye Defog Classic Retro Negative Custom RGB Voice recording Voice Recording Maximum 10 hours Voice Memo in a photo Maximum 10 sec Stor...

Page 132: ...itions and camera settings Interface Digital output connector USB 2 0 Audio input output Internal speaker Mono Microphone Mono Video output A V NTSC PAL selectable HDMI 1 4 NTSC PAL selectable DC power input connector 20 pin 4 2 V Power source Rechargeable battery Lithium ion battery BP70A 740 mAh Min 700 mAh The power source may differ depending on your region Dimensions W X H X D 98 5 X 55 0 X 1...

Page 133: ...er Format A format for writing printing information such as selected images and number of prints on a memory card DPOF compatible printers sometimes available at photo shops can read the information from the card for convenient printing ACB Auto Contrast Balance This feature automatically improves the contrast of your images when the subject is backlit or when there is a high contrast between your...

Page 134: ...tions Focal length The distance from the middle of the lens to its focal point in millimeters Longer focal lengths result in narrower angles of view and the subject is magnified Shorter focal lengths result in wider angles of view Histogram A graphical representation of the brightness of an image The horizontal axis represents the brightness and the vertical axis represents the number of pixels Hig...

Page 135: ...ects When using the macro feature the camera can maintain a sharp focus on small objects at a near life size ratio 1 1 Metering The metering refers to the way in which the camera measures the quantity of light to set the exposure MJPEG Motion JPEG A video format which is compressed as a JPEG image Noise Misinterpreted pixels in a digital image that may appear as misplaced or random bright pixels N...

Page 136: ... let light in and the photo becomes darker and more easily freezes subjects in motion Vignetting A reduction of an image s brightness or saturation at the periphery outer edges compared to the center of the image Vignetting can draw interest to subjects positioned in the center of an image White balance color balance An adjustment of the intensities of colors typically the primary colors red green...

Page 137: ...t be mixed with other commercial wastes for disposal Correct disposal of batteries in this product Applicable in the European Union and other European countries with separate battery return systems This marking on the battery manual or packaging indicates that the batteries in this product should not be disposed of with other household waste at the end of their working life Where marked the chemic...

Page 138: ...y one or more of the following measures Reorientate or relocate the receiving antenna Increase the distance between the equipment and receiver Connect the equipment into an outlet on a circuit different from that to which the receiver is connected Consult the dealer or an experienced radio TV technician for help CAUTION Changes or modifications not expressly approved by the manufacturer responsible...

Page 139: ...ash Auto 59 Fill in 60 Off 59 Red eye 60 Red eye fix 60 Slow sync 60 Focus area Center AF 64 Multi AF 64 One touch shooting 64 Smart Touch AF 64 Index A AF assist light location 14 settings 113 AF Lamp 113 Anynet 111 Aperture value 37 Auto Exposure Bracket AEB 73 A V port 14 B Battery caution 122 charging 17 inserting 16 Beauty Shot mode 37 Blink detection 66 Connecting to a computer Mac 105 Window...

Page 140: ...back mode 96 Shooting mode 77 sharpness 77 Image quality 56 Imprint 113 Intelli studio 102 Intelli zoom 29 ISO sensitivity 61 J Jump Shot mode 46 L Language settings 112 Learning icons 20 M Macro 62 Magic Frame Shot mode 47 Memory card caution 120 inserting 16 Metering Center weighted 70 Multi 70 Spot 70 Motion capture 73 Motion recognition 83 Movie Filter mode 49 Movie mode 41 My star ranking 84 ...

Page 141: ...de 43 Service center 125 Settings 109 Sharpness 77 Shooting portraits Beauty Shot mode 37 Blink detection 66 Face detection 65 Red eye 60 Red eye fix 60 Self Shot 43 Smart Face Recognition 67 Smile shot 66 Shutter button 14 Simple Shot mode 35 Slide show 90 Smart Album 85 Smart Auto mode 34 Smart Face Recognition 67 Smart Filter Playback mode 95 Shooting mode 74 Smart Movie mode 42 Smile shot 66 So...

Page 142: ...king 21 scrolling 21 touching 21 V Video playing 91 shooting 41 Viewing files page flip effect 86 slide show 90 Smart Album 85 thumbnails 86 TV 98 Vignetting mode 50 Voice memo playing 92 recording 52 W White balance 71 Z Zoom using the zoom 28 zoom button 15 zoom sound settings 78 Index ...

Page 143: ...Please refer to the warranty that came with your product or visit our website http www samsung com for after sales service or inquiries ...

Reviews: