background image

ENG-48

D V D   O

P E R AT I O N S

MP3/WMA Playback

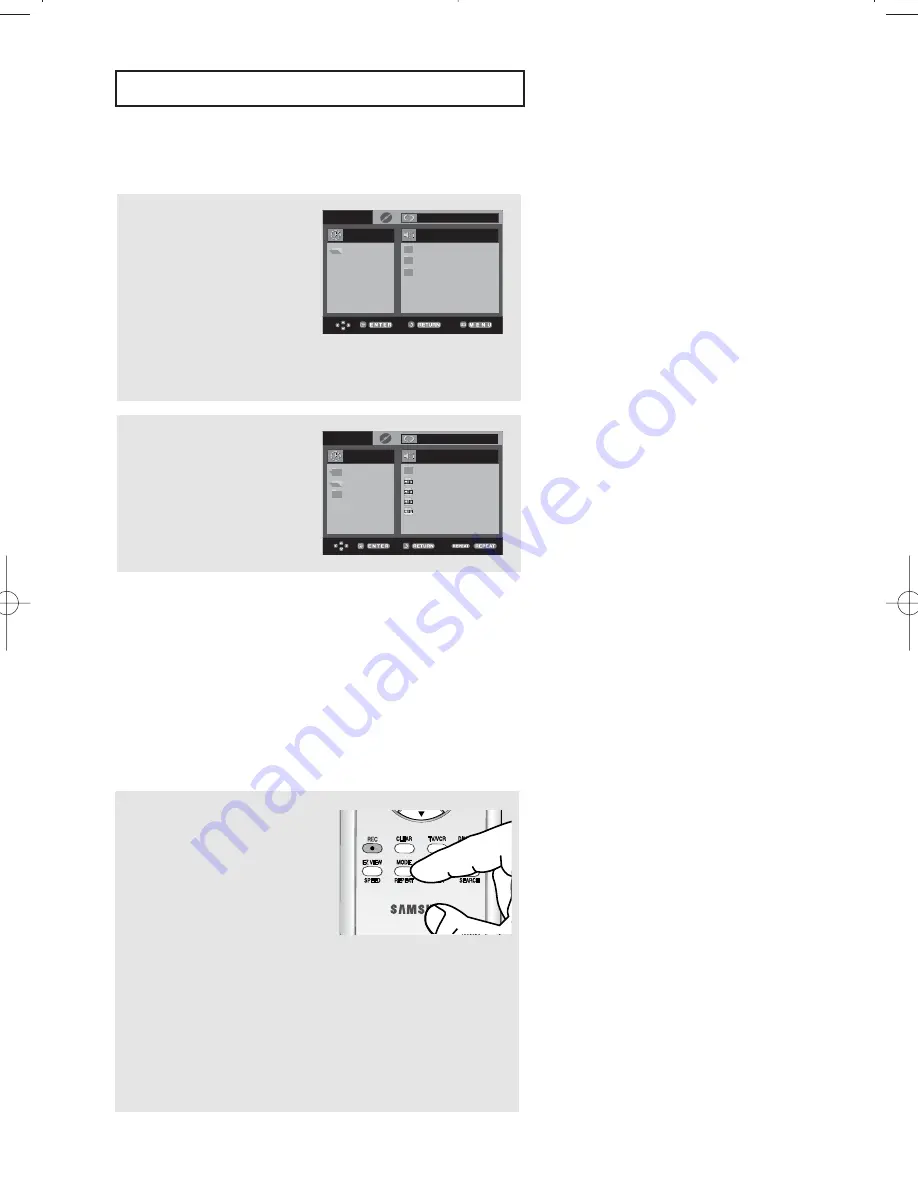
1

Open the disc tray.

2

Place the disc on the tray.

3

Close the tray.

When a disc or a folder contains both
MP3 and WMA files, only one type will
be played, not both.

4

Press the 

/

or 

œ

/

buttons to select a song file.

Press the 

ENTER

button to

begin playback of the song
file.

0 0 : 0 0 : 2 3

1 _ m p 3

O f f

B e c a u s e   Yo u

C a c t u s

S a d   D a y

W o n d e r f u l

Repeat/Random playback

During play, press the

REPEAT

button to change

the playback mode. There
are four modes. 

Off

Track

Folder

and

Random

.

- Off: Normal Playback
- Track: Repeats the current song file.
- Folder: Repeats the song files which have the

same extension in the current folder.

- Random: Song files which have the same

extension will be played in random order.

To resume normal play, press the 

CLEAR

button.

0 0 : 0 0 : 2 3

B e c a u s e   Y o u

O f f

. .

B e c a u s e   Y o u

C a c t u s

S a d   D a y u

W o n d e r f u l

R O O T

M P 3

W M A

0 0 : 0 0 : 2 3

1 _ m p 3

O f f

B e c a u s e   Yo u

C a c t u s

S a d   D a y

W o n d e r f u l

O f f

R O O T

M P 3

W M A

R O O T

Notes

- A DVD/CD cannot be played in the Memory Card mode. If you push the DVD/M.CARD or OPEN button in

M.CARD mode, the system will automatically enter the DVD/CD mode.

- Depending on the recording method, some MP3 CD-Rs may not be played.
- When pushing the DVD/M.CARD button to play disc again, the player doesn’t remember where you stopped.
- It is impossible to write MP3 or JPEG files to a Memory Card in this unit as it is read only.
- Only MP3/WMA Format files with the “ .mp3 and .wma” extensions can be played.

00743A V8600_eng2  3/11/05  2:17 PM  Page 48

Summary of Contents for DVD-V8600

Page 1: ...Instruction Manual DVD V8600 www samsung com ...

Page 2: ...at produce heat 9 Do not defeat the safety purpose of the polarized or grounding type plug A polarized plug has two blades with one wider than the other A grounding type plug has two blades and a third grounding prong The wide blade or the third prong is provided for your safety If the provided plug does not fit into your outlet consult an electrician for replacement of the obsolete outlet 10 Prot...

Page 3: ...ned correctly 3 Replace the battery cover If the remote control doesn t operate properly Check the polarity of the batteries Dry Cell Check if the batteries are drained Check if remote control sensor is blocked by obstacles Check if there is any fluorescent lighting nearby Remote Control AK59 00008X Batteries 2EA 1 5V AAA AC43 12002H Video Audio Cable AC97 01746A Antenna Cable AC39 42001J User s G...

Page 4: ...TV 13 Connection to a TV Video 13 Connection to a TV S Video 14 Connection to a TV Interlace 15 Connection to a TV Progressive 16 Connection to an Audio System 17 Connection to an Audio System 2 Channel Amplifier 17 Connection to an Audio System Dolby digital MPEG2 or DTS Amplifier 18 Connecting a Power Cord Auto Setup 19 Chapter 3 Initial Setup Selecting a Menu Language 20 Setting the Clock 21 Se...

Page 5: ... Up the Language Features 54 Setting Up the Audio Options 56 Setting Up the Display Options 58 Setting Up the Parental Control 60 Chapter 5 VCR Operations Inserting and Ejecting a Video Cassette Tape 63 Playing a Pre Recorded Video Cassette Tape 64 Special VCR Playback Features 65 Using Automatic Tracking 66 Selecting the Cassette Type 67 Setting the Auto Play 68 Setting the Auto Repeat 69 Using t...

Page 6: ...This product incorporates copyright protection technology that is protected by U S patents and other intellectual property rights Use of this copyright protection technology must be authorized by Macrovision and is intended for home and other limited viewing uses only unless otherwise authorized by Macrovision Reverse engineering or disassembly is prohibited COPY PROTECTION Many DVD discs are enco...

Page 7: ...rtion and less deterioration of audio quality over time AUDIO CD CD R CD RW and DVD RW R DVD RW R discs may not be playable in all cases due to the disc type or condition of the recording Disc Markings Region Number Both the DVD VCR and the discs are coded by region These regional codes must match in order for the disc to play If the codes do not match the disc will not play The Region Number for ...

Page 8: ...st forward a disc videotape 11 REC VCR Press to begin recording 12 Front Panel Display Operation indicators are displayed here 13 CHANNEL and Press to change channels 14 EZ VIEW The aspect ratio of a picture can easily be adjusted to your TV s screen size 15 DVD VCR Press to view DVD or VCR mode 16 P SCAN Press to select component video out progressive scan mode 17 LINE IN 2 Connect to the Video A...

Page 9: ... input jacks on your television 5 RF IN FROM ANT Connect the RF Antenna cable to your DVD VCR 6 S VIDEO OUT Use the S Video cable to connect this jack to the S Video input jack on your television for higher picture quality 7 DIGITAL AUDIO OUT COAXIAL Use a Coaxial digital audio cable to connect to a compatible Dolby Digital receiver Use a coaxial digital audio cable to connect to an A V Amplifier ...

Page 10: ...T button Allows you to repeat play a title chapter track or disc DVD Œ Œ ı ı ˇ ˇ Ø Ø Ô Ô Ú Ú ˆ ˆ Æ Æ Ò Ò Tour of the Remote Control 16 OPEN CLOSE button 17 SHUTTLE buttons Use to play a sequence at variable speeds VCR 18 AUDIO TV MUTE button Use this to access various audio functions on a disc DVD mode This operates as Sound Mute TV mode 19 TV button Use to operate TV 20 F ADV SKIP INPUT SEL butto...

Page 11: ...m twin flat leads use an external antenna connector 300 75 ohm adaptor not supplied to connect the antenna to the DVD VCR If you have two separate antennas one VHF and the other UHF use a UHF VHF combiner adaptor available at most electronics shops to connect the antenna to the DVD VCR The RF OUT TO TV jack of this product sends signals received through the antenna and outputs Audio Video signals ...

Page 12: ...g another channel Be sure that the cable box is turned on Method3 Antenna DVD VCR TV Cable box with a few scrambled channels You can record non scrambled channels by selecting the channel on the cable box You cannot record scrambled channels that require a cable box To RF IN Cable Box Wall To RF OUT Antenna cable To Antenna Input To RF IN Cable Box Wall To RF OUT Antenna cable To Antenna Input ...

Page 13: ...the input selector on your TV remote control until the Video signal from the DVD VCR appears on the TV screen Notes Noise may be generated if the audio cable is placed too close to the power cable If you want to connect to an Amplifier please refer to the Amplifier connection page See pages 17 to 18 The number and position of terminals may vary depending on your TV set Please refer to the user s m...

Page 14: ...hite OUT terminals on the rear of the DVD VCR to the AUDIO red and white IN terminals of your TV Turn on the DVD VCR and TV 3 With the unit in stop mode set the Alt video output to S Video in the Display Setup menu see pages 58 59 or press the P SCAN button on the front panel until S Video is output 4 Press the input selector on your TV remote control until the S Video signal from the DVD VCR appe...

Page 15: ...VCR and TV 3 With the unit in stop mode set the Alt video output to Component Interlace in the Display Setup menu see pages 58 59 or press the P SCAN button on the front panel until Interlace is output 4 Press the input selector on your TV remote control until the Component signal from the DVD VCR appears on the TV screen Notes If Video output is incorrectly set to S Video with the Component cable...

Page 16: ... press ENTER and progressive will be output 4 Press the input selector on your TV remote control until the Component signal from the DVD VCR appears on the TV screen Note What is Progressive Scan Progressive scan has twice as many scanning lines as the interlace output method Progressive scanning method provides better and clearer picture quality Progressive scan only works in DVD mode not VCR To ...

Page 17: ...s described on pages 14 to 16 3 Turn on the DVD VCR TV and Amplifier 4 Press the input select button of the Amplifier to select external input in order to hear sound from the DVD VCR Refer to your Amplifier s user manual to set the Amplifier s audio input Notes Please turn the volume down when you turn on the Amplifier Sudden loud sound may cause damage to the speakers and your ears Please set the...

Page 18: ...o Off sound will not be heard or there will be a loud sound Please turn the volume down when you turn on the Amplifier Sudden loud sound may cause damage to the speakers and your ears Please set the audio in the menu screen according to the Amplifier See pages 56 to 57 The position of terminals may vary depending on the Amplifier Please refer to the user s manual of the Amplifier Only audio from t...

Page 19: ... control or on the unit during Auto Setup While your DVD VCR is running Auto Setup Auto will blink When Auto Setup is complete the current time will be displayed on the front panel If Auto Setup fails to locate a channel to set the clock you should set the clock manually See page 22 to 23 2 Turn on the power by pressing the POWER button on the remote control or on the front panel 3 Turn on your TV...

Page 20: ...ish follow these steps 1 Press the MENU button 2 Press the buttons to select Setup then press the or ENTER button 5 Press the MENU button to exit 3 Press the buttons to select Language then press the or ENTER button 4 Press the buttons to select the appropriate language English Français or Español Press the ENTER button ...

Page 21: ...ect Setup then press the or ENTER button 3 Press the buttons to select Clock then press the or ENTER button 4 Press the buttons to select Auto Clock then press the or ENTER button 5 Select a channel that carries a time signal by using the or ENTER button Auto 1 2 125 Notes You must have the antenna connected to set the Auto Clock See pages 11 12 The Clock will be automatically set when you turn of...

Page 22: ... press the ENTER button Select Automatic to set the time zone automatically 8 Press the MENU button to exit 7 Press the buttons to select Daylight Saving then press the or ENTER button to select Yes No or Auto Note If your clock is set to the wrong Time Zone or Daylight Saving you can adjust these settings without turning off the Auto Clock Set function ...

Page 23: ...VCR s internal clock must be set correctly 1 Press the MENU button 2 Press the buttons to select Setup then press the or ENTER button 3 Press the buttons to select Clock then press the or ENTER button 4 Press the buttons to select Manual Clock then press the or ENTER button 5 Use the œ buttons to select each of the following options then use the buttons to set each option Press the ENTER button to...

Page 24: ...enna In jack during initial setup 1 Press the MENU button 2 Press the buttons to select Setup then press the or ENTER button 3 Press the buttons to select Channel then press the or ENTER button 4 Press the or ENTER button to select Antenna or Cable TV Antenna Select this if the DVD VCR is connected to an indoor or outdoor VHF UHF antenna Cable TV Select this if the DVD VCR is connected to Cable TV...

Page 25: ...nnels Manual Method Use this feature if Auto Channel Search missed a channel that you would like to add delete a channel you wish to remove 6 Press the buttons to select Channel Add Delete then press the or ENTER button 7 Press the CH buttons to tune in the channel number you wish to add or delete Use the number button to select the channel directly CHANNEL ADD DELETE Select channel 07 and press t...

Page 26: ...g RF antenna cable 4 Press the buttons to select RF Output CH then press the or ENTER button to select 3CH or 4CH 1 Press the MENU button 2 Press the buttons to select Setup then press the or ENTER button 3 Press the buttons to select Channel then press the or ENTER button 5 Press the MENU button to exit ...

Page 27: ...e MENU button 2 Press the buttons to select Setup then press the or ENTER button 3 Press the buttons to select Front Display then press the or ENTER button to select Auto Bright or Dim 4 Press the MENU button to exit Auto Front Panel Display will dim automatically during power off Bright Front Panel Display will be bright all the time Dim Front Panel Display will be dim all the time ...

Page 28: ...ress the MENU button to exit Off Auto power off is disabled 1Hr DVD VCR will auto shut off 1 hour after the last button is pressed or no signal is received 2Hr DVD VCR will auto shut off 2 hours after the last button is pressed or no signal is received Setting the Power Off Automatically This feature automatically turns off your DVD VCR if no signal is received and you do not press any buttons for...

Page 29: ...utton on your remote control or on the front panel Most discs will start to play back as soon as the tray closes 2 Place a disc gently into the tray with the disc s label facing up 4 Stopping Play Press the Stop button during play Stop Resume Press the Stop button once to stop playback To resume the DVD CD from the point where the disc stopped press the Play Pause button Press the Stop button twic...

Page 30: ...irection No sound is heard during slow mode Press the Play Pause button to resume normal play Reverse slow motion play will not work 8 To remove the Disc Press the OPEN CLOSE button 5 Pausing Play Press the Play Pause button on your remote control or on the front panel during play 6 Step Motion Play Except CD Press the F ADV button on the remote control during play 7 Slow Motion Play Except CD Pre...

Page 31: ...earing during search mode Except CD Skipping Tracks When playing a DVD if you press the Skip button it moves to the next chapter If you press the Skip button it moves to the beginning of the current chapter One more press makes it move to the beginning of the previous chapter During play press and hold the Search buttons on the remote control for more than 1 second During play press the Skip butto...

Page 32: ...rt the playback from a desired time 1 During play press the INFO button on the remote control 3 Press the œ buttons to make the desired setup and then press the ENTER button 4 To exit the menu press the INFO button again 2 Press the buttons to select the desired item ENG ENG MOVE DVD CD CD You can select Information in the DVD Function menu by pressing the INFO button ...

Page 33: ... film from a desired time You must enter the starting time as a reference The time search function does not operate on some discs Refers to the film s soundtrack language In the example the soundtrack is played in English 5 1CH A DVD disc can have up to eight different soundtracks Refers to the subtitle languages available in the disc You will be able to choose the subtitle languages or if you pre...

Page 34: ... displayed if there are at least two titles in the disc 2 Press the buttons to select Function then press the or ENTER button 3 Press the buttons to select DVD Function then press the or ENTER button 4 Press the buttons to select Title Menu or Disc Menu then press the or ENTER button 1 During playback of a DVD disc press the MENU button on the remote control MENU button can be used to access Disc ...

Page 35: ... See pages 36 to 37 EZ View See pages 39 to 40 1 During the playback of a DVD disc press the MENU button on the remote control 4 Press the buttons to select one of the five functions Then press the or ENTER button to access the function MENU button can be used to access DVD functions such as Information Zoom Bookmark Repeat and EZ view menu during DVD playback You can also directly select these fu...

Page 36: ...ts a segment of the disc that you select Note Depending on a disc the Repeat function may not work 1 During play press the REPEAT button on the remote control Repeat screen appears 2 Press the œ buttons to select Chapter Title or A B then press the ENTER button Off Off Chapter Title A B A B DVD Off Off Track Disc A B A B CD 3 To return to normal play press the REPEAT button again then press the œ ...

Page 37: ...f the segment you want to repeat Point A Once you select point A B will be selected Off Chapter Off Chapter Title A A B B DVD Off Track Off Track Disc A A B B CD 4 Mark the Ending Point Press the ENTER button again at the end of the segment you want to repeat Point B The segment will begin repeating in a continuous loop Off Chapter A Off Chapter Title A B B DVD Off Track A Off Track Disc A B B CD ...

Page 38: ...ff Chapter Off Chapter Title A A B B 4 Press the ENTER button at the point where you want repeat play to start A B is automatically selected Press the ENTER button at the point where you want the repeat play to stop B Off Chapter A Off Chapter Title A B B To set A B repeat set A first then set B after the following slow play time has elapsed 1 8x wait 40 seconds then press B 1 4x wait 20 seconds t...

Page 39: ...EN Displays the content of the DVD title in 16 9 aspect ratio SCREEN FIT The top and bottom portions of the screen are cut off When playing a 2 35 1 aspect ratio disc the black bars at the top and bottom of the screen will disappear The picture will look vertically stretched Depending on a type of disc the black bars may not disappear completely ZOOM FIT The top bottom left and right of the screen...

Page 40: ... of the screen is enlarged For 4 3 aspect ratio discs NORMAL SCREEN Displays the content of the DVD title in 4 3 aspect ratio SCREEN FIT The top and bottom portions of the screen are cut off and the full screen appears The picture will look vertically stretched ZOOM FIT The top bottom left and right portions of the screen are cut off and the central portion of the screen is enlarged ZOOM FIT The t...

Page 41: ...sented by abbreviations When playing a CD you can select among Stereo Right or Left ENG DOLBY DIGITAL 5 1CH DVD Stereo CD 2 To remove the AUDIO icon press the AUDIO CLEAR or RETURN button Notes To change the desired audio in the Disc Menu press the DISC MENU button This function depends on what audio languages are encoded on the disc and may not work on all DVDs A DVD disc can contain up to 8 audi...

Page 42: ...tedly The subtitle languages are represented by abbreviations ENG On 2 To remove the SUBTITLE icon press the SUBTITLE CLEAR or RETURN button Notes To change the desired subtitle in the Disc Menu press the DISC MENU button This function depends on what subtitles are encoded on the disc and may not be available on all DVDs A DVD disc can contain up to 32 subtitle languages To have the same subtitle ...

Page 43: ...angles of a particular scene you can use the ANGLE function Using the ANGLE button DVD If the disc contains multiple angles the ANGLE icon appears on the screen 1 During play press the MARK button on the remote control 2 When you reach the scene you want to mark press the ENTER button Up to three scenes may be marked at a time Using the Bookmark Function This feature lets you bookmark sections of ...

Page 44: ...tton to skip to the marked scene 2 Press the œ buttons to select a marked scene Recalling a Marked Scene 1 During play press the MARK button on the remote control 3 Press the CLEAR button to delete a bookmark number 2 Press the œ buttons to select the bookmark number you want to delete Clearing a Bookmark ...

Page 45: ... the buttons to select Function then press the or ENTER button 3 Press the buttons to select DVD Function then press the or ENTER button 4 Press the buttons to select Zoom then press the or ENTER button 5 Press the or œ buttons to select the part of the screen you want to zoom in on Press the ENTER button 1 During the playback of a DVD disc press the MENU button on the remote control ...

Page 46: ...mory Cards over 4GB use FAT 32 which may not be compatible with this unit If it is not fully inserted the Memory Card will not be detected If you remove the Memory Card during Memory Card operation the recorded data may become corrupted It is better to remove it after pressing DVD M CARD button to return to DVD CD Mode Some memory cards may not be compatible 3 Depending on the file type stored on ...

Page 47: ...Repeats the current track Folder Repeats the current folder Random Files in the disc will be played in random order MP3 file icon WMA file icon JPEG file icon Folder icon Current Folder icon Disc mode Memory Card Mode To select the Parent Folder Press the RETURN button to go the to parent folder or press the buttons to select and press the ENTER button to go to the parent folder To select the Peer...

Page 48: ...er Random Song files which have the same extension will be played in random order To resume normal play press the CLEAR button 0 0 0 0 2 3 B e c a u s e Yo u O f f B e c a u s e Yo u C a c t u s S a d D a y u W o n d e r f u l R O O T M P 3 W M A 0 0 0 0 2 3 1 _ m p 3 O f f B e c a u s e Yo u C a c t u s S a d D a y Wo n d e r f u l O f f R O O T M P 3 W M A R O O T Notes A DVD CD cannot be played...

Page 49: ...y give better sound quality Conversely files with decompression rates below 128 Kbps will not be played properly Use a decompression transfer rate of at least 64Kbps when recording WMA files Sound quality with WMA files basically depends on the rate of compression decompression you choose Getting CD audio sound requires an analog digital sampling rate that is conversion to WMA format of at least 6...

Page 50: ... the Program order If you delete the track press the CLEAR button The track added last will be deleted from the Program order 4 To finish programming and start playback press the button The disc will be played in programmed order Note If the disc tray is opened during programming program play will be canceled To Cancel Programming Press the REPEAT button The program will not be saved and the progr...

Page 51: ...essed the picture rotates 90 degrees clockwise Zoom Press the or œ buttons to select the part of the screen you want to zoom in on Press the ENTER button Each time the ENTER button is pressed the picture is enlarged up to 4X 2X 4X 2X Normal Slide Show The unit enters slide show mode Before beginning the Slide Show the picture interval must be set When this icon is selected and ENTER is pressed the...

Page 52: ...sc can be played If there is a blank segment in the multi session disc the disc can be played only up to the blank segment A maximum of 3000 images can be stored on a single CD Kodak Picture CDs are recommended When playing a Kodak Picture CD only the JPEG files in the pictures folder can be played Kodak Picture CD The JPEG files in the pictures folder can be played automatically Konica Picture CD...

Page 53: ...display options Parental Setup of the Parental Level Allows users to set the level necessary to prevent children from viewing unsuitable movies such as those with violence adult subject matter etc Note Depending on the disc some DVD Setup menu selections may not be available 2 Press the buttons to select DVD then press the or ENTER button 3 Press the buttons to access the different features Press ...

Page 54: ...up menu To make the DVD Setup menu disappear press the MENU button 2 Press the buttons to select DVD then press the or ENTER button 3 Press the buttons to select Language then press the or ENTER button 4 Press the buttons to select the desired item then press the or ENTER button 5 Press the buttons to select the desired language then press the or ENTER button 1 With the unit in Stop mode press the...

Page 55: ...t is not listed Some discs may not contain the language you select as your initial language in that case the disc will use its original language setting Disc Menu To set the Disc Menu Language to your preferred language follow these steps If your preferred language is available on a DVD your Disc Menu Language will automatically be set to the language you choose Audio To set the Audio Language to ...

Page 56: ...ttons to select DVD then press the or ENTER button 3 Press the buttons to select Audio then press the or ENTER button 4 Press the buttons to select the desired item then press the or ENTER button PCM Down Sampling On 1 With the DVD in Stop mode press the MENU button on the remote control To make the DVD Setup menu disappear press the MENU button ...

Page 57: ...n Dynamic Compression On To select dynamic compression Off To select the standard range PCM Down Sampling On Off On On PCM Down Sampling On Select this when the Amplifier connected to the player is not 96KHz compatible In this case the 96KHz signals will be down converted to 48KHZ Off Select this when the Amplifier connected to the player is 96KHz compatible In this case all signals will be output...

Page 58: ...the buttons to select DVD then press the or ENTER button 3 Press the buttons to select Display then press the or ENTER button 4 Press the buttons to select the desired item then press the or ENTER button 1 With the unit in Stop mode press the MENU button on the remote control To make the DVD Setup menu disappear press the MENU button ...

Page 59: ...onal size TVs when you want to see the central portion of the 16 9 screen Extreme left and right side of movie picture will be cut off 16 9 Wide You can view the full 16 9 picture on your wide screen TV Black Level The Black Level feature adjusts black reference level in the video signal to one of two choices On This will enhance the Black Level for increased brightness contrast when viewing DVDs ...

Page 60: ...NTER button 3 Press the buttons to select Parental then press the or ENTER button 4 Press the or ENTER button to select Yes if you want to use a password The Enter Password screen appears 0 9 5 Enter your password The Re enter Password screen appears to confirm the password Enter your password again The player is locked 0 9 Re enter new Password 1 With the DVD in Stop mode press the MENU button on...

Page 61: ...lect Rating Level then press the or ENTER button Yes 5 Press the buttons to select the Rating Level you want then press the or ENTER button e g Setting up in Level 6 1 With the unit in stop mode press the MENU button on the remote control To make the DVD setup menu disappear press the MENU button For example if you select up to Level 6 discs that contain Level 7 8 will not play Setting Up the Rati...

Page 62: ...TER button Yes 5 Enter your new password Re enter the new password again 0 9 1 With the unit in stop mode press the MENU button on the remote control To make the DVD setup menu disappear press the MENU button Changing the Password Note If you forgot your password press power on from a cold start with no disc in the unit Press the Skip buttons simultaneously on the front panel for 5 seconds The Res...

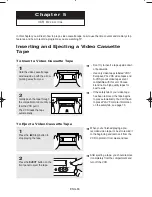
Page 63: ...to stop playing the tape Don t try to insert a tape upside down or backwards Use only video tapes labeled VHS European PAL VHS video tapes and S VHS pre recorded tapes aren t compatible with this unit Choose brand name high quality tapes for best results If the safety tab of your video tape has been removed the tape begins to play automatically You don t have to press PLAY For more information on ...

Page 64: ... doesn t begin to play automatically press the Play Pause button 3 Pausing Play While a tape is playing press the Play Pause button when you want to interrupt play The tape pauses temporarily Press the Play Pause button to resume playing the tape The VCR does not play sound while a video tape is paused If you see white lines on the screen see Using Automatic Tracking on page 66 ...

Page 65: ...e Forward or Rewind to review at two speeds Picture Search Press and release to advance the tape forward or backward at 5 times normal speed Jet Search Press and hold down the SEARCH button then release it to play back at the normal speed Skip In Play mode press the SKIP button to move ahead exactly 30 seconds Press the SKIP button repeatedly up to 4 times to move ahead 2 minutes Repeat In Play mo...

Page 66: ...t and play a video cassette tape As soon as the tape begins to play the VCR begins automatic tracking 2 If automatic tracking doesn t remove the streaks from the picture press and hold the TRK or TRK button until the streaks disappear Using Automatic Tracking The Tracking adjustment removes the white lines that sometimes appear during playback because of slight differences in recording decks The T...

Page 67: ...he remote control 4 Press the MENU button to exit Selecting the Cassette Type If you wish to use the tape counter to display the time remaining on a cassette you must indicate the type of cassette inserted Note This information is usually printed on the tape box The menu cycles through T 120 T 160 or T 180 Once the type of cassette is set the VCR can display the amount of time remaining on the tap...

Page 68: ...e control 4 Press the MENU button to exit Setting the Auto Play If you want your videotapes to play automatically when you insert them turn on Auto Play On The VCR will automatically begin playing a video tape when it is inserted as long as the safety tab of the cassette has been removed Off Auto play is disabled Note Only tapes that are missing the Record Safety Tab will play automatically when i...

Page 69: ...s the or ENTER button to select On or Off n 1 Press the MENU button on the remote control 4 Press the MENU button to exit Setting the Auto Repeat If you want your videotapes to play repeatedly turn on Auto Repeat On The VCR will play a tape repeatedly unless a tape control is activated stop fast forward or rewind Off Auto Repeat is disabled ...

Page 70: ...eginning of a sequence Press the INFO button twice to display the counter Press the CLEAR button when you want to set the tape counter to zero 2 When you are ready Start playback or Recording Press the Stop button To fast forward or rewind to the sequence at which the counter was set to zero press the the Forward or Rewind button Some DVD VCR information such as the counter can be displayed on the...

Page 71: ...at a specific position on the cassette while maintaining a very smooth scene change 2 Press the Play Pause button to start playback 3 When you reach the position from which you wish to start the new recording press the Play Pause button 4 Press the F ADV button as often as necessary to advance frame by frame until the exact recording position is located 1 Insert the cassette to be edited in your D...

Page 72: ...he sound is reproduced on the loudspeakers and AV outputs The following options are available Audio output mode Left Used to listen to the sound on the left Hi Fi channel Right Used to listen to the sound on the right Hi Fi channel Mono Used to listen to the sound on the normal mono channel Hi Fi Used to listen to Hi Fi stereo sound on the left and right channels When playing back tapes recorded i...

Page 73: ... index is automatically marked on the tape when recording starts The Search function allows you to fast forward or rewind to a specific index and start playback from that point Depending on the direction selected the indexes are numbered as follows This DVD VCR uses a standard indexing system VISS As a result it will recognize any indexes marked by other VCRs using the same system and vice versa e...

Page 74: ... to search for a blank position to record a program on a cassette The VCR will fast forward searching for a blank position and then automatically stop at that position If the VCR reaches the end of the tape during end search the tape will be ejected Go to 0 00 000 End Search Forward Intro Scan Reverse Intro Scan Scan and play Use scan and play when you don t know exactly where a program is located...

Page 75: ... a small piece of tape Warning Do not cover this opening unless you are sure you want to record over the tape Before You Begin Power on the DVD VCR Power on the TV Protecting a Recorded Cassette Video cassettes have a safety tab to prevent accidental erasure When this tab has been removed you cannot record on the tape Recording 1 Insert a blank VHS tape into the VCR deck Make sure the tape is long...

Page 76: ...ecording Press the Play Pause button Press the REC button again to resume 5 Stop Recording Press the Stop button Make sure that you connect the DVD VCR to the TV using an RF cable When you watching through the Antenna input during recording press the TV VCR button on the remote control Using your TV remote control change the channel you want to watch When you watching through Line input during rec...

Page 77: ...One Touch Recording OTR allows you to add recording time in 30 minute increments up to 4 hours at the touch of a button 1 Insert a blank VHS tape into the VCR deck 2 Use the Number buttons or the CH or buttons to select the desired channel or press the INPUT SEL button to select Line 1 or 2 if recording from an external device connected to the front or rear jacks respectively 3 Press the REC butto...

Page 78: ...sing REC button to add recording time in 30 minute increments up to 4 hours The DVD VCR stops recording automatically when the time has elapsed The DVD VCR will automatically be turned off when the OTR finished SP Record length 0 30 07 Selecting the Recording Speed You can slow down the recording speed from SP to SLP in order to fit six hours of programming on a T 120 tape Note The selected Record...

Page 79: ...ENTER button It can be displayed simply by pressing the TIMER button 3 Select Channel Number Press the button then press the buttons to set the channel Press the button to move to the next setting No Ch Start End Date Speed 1 2 3 4 5 6 7 07 4 Set Time Date Speed Repeat Step 3 above to set start time end time date and record speed Date can be set for one time daily or weekly recording No Ch Start E...

Page 80: ...ecting Auto Speed If the length of the videotape is not long enough for a timer recording in the SP mode set the recording tape speed to Auto Recording will start in the SP mode If the length is not long enough the tape speed will automatically change from SP mode to SLP mode Daily Weekly Date Programming Weekly sun s sat s Use this to record TV programs on the same channel at the same time every ...

Page 81: ...NASONIC 12 24 RCA 07 29 SANYO 05 20 SHARP 02 16 22 SONY 03 TELEFUNKEN 26 TOSHIBA 09 ZENITH 17 TV Codes Button Function POWER Used to switch the television on and off INPUT SEL Used to select an external source VOL or Used to adjust the volume of the television CH or Used to select the required channel TV MUTE Used to toggle the sound on and off Note If your television is compatible with the remote...

Page 82: ...stall batteries and try to operate the remote control again Ensure that the disc is installed with the label side facing up Check the region number of the DVD 5 1 channel sound is reproduced only when the following conditions are met 1 The DVD VCR is connected with the proper Amplifier 2 The disc is recorded with 5 1 channel sound Check whether the disc being played has the 5 1 ch mark on the outs...

Page 83: ... playback When the II button is pressed during playback the still picture has severe noise bars streaks Video Head Cleaning Check that the power plug is connected to a wall outlet A video cassette can only be inserted with the window side up and the safety tab facing you Check the DVD VCR antenna cable connections Is the DVD VCR tuner properly set Check if the safety tab is intact on the cassette ...

Page 84: ...omponent video output 75Ω Y 1 0Vp p Pb 0 7Vp p Pr 0 7Vp p RF Channel 3 or 4 VIDEO SYSTEM 1 2 inch VHS system 4 rotary head helical scanning FM azimuth luminance chrominance converted sub system phase shift AUDIO TRACK Normal 1 track Hi Fi 2 track PLAY RECORD TIME T 180 tape SP 3 hours SLP 9 hours VCR FF REW TIME T 120 tape 2 minutes HEADS Video DA 4 rotary Audio 2 rotary heads Hi Fi 1 stationary h...

Page 85: ...ENG 85 MEMO ...

Page 86: ... the purchaser must contact SAMSUNG for problem determination and service procedures SAMSUNG DOES NOT WARRANT UNINTERRUPTED OR ERROR FREE OPERATION OF THE PRODUCT All replaced parts and products become the property of SAMSUNG and must be returned to SAMSUNG Replacement parts and products assume the remaining original warranty or ninety 90 days whichever is longer This limited warranty covers manuf...

Page 87: ...DQUARTERS 105 Challenger Road Ridgefield Park NJ 07660 0511 TEL 1 800 SAMSUNG SERVICE DIVISION 400 Valley Road Suite 201 Mount Arlington NJ 07856 1 800 SAMSUNG 1 800 726 7864 www samsung com AK68 00743A 00 ...

Reviews: