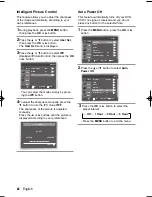
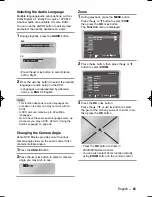
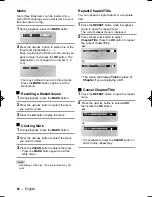
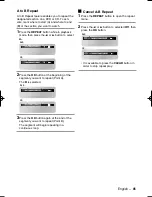
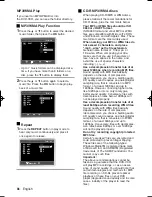
background image

32

English

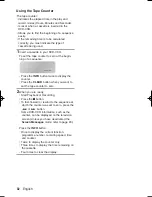
The tape counter:
• Indicates the elapsed time in the play and 

record modes (Hours, Minutes and Seconds).

• Is reset when a cassette is inserted in the

DVD-VCR.

• Allows you to find the beginning of a sequence 

easily.

• If the remaining time is to be calculated

correctly, you must indicate the type of
cassette being used.

1

Insert a cassette in your DVD-VCR.
To set the tape counter to zero at the begin-
ning of a sequence:

• Press the 

INFO

button twice to display the 

counter.

• Press the 

CLEAR

button when you want to 

set the tape counter to zero.

2

When you are ready,
• Start Playback or Recording.
• Press the 

button.

• To fast-froward or rewind to the sequence at 

which the counter was set to zero, press the

¥¥

or

ŠŠ

button.

• Some DVD-VCR information, such as the 

counter, can be displayed on the television
screen (Unless you have deactivated the 

Screen Messages

mode; refer to page 23).

Press the 

INFO

button:

• Once to display the current function,

programme number, recording speed, time 
and counter.

• Twice to display the counter only.
• Three times to display the time remaining on

the cassette.

• Four times to clear the display.

Using the Tape Counter

0:00:00

XEU ENG 4   11/2/06  4:45 AM  Page 32

Summary of Contents for DVD-V6700S

Page 1: ...User s Manual www samsung com uk DVD V6700 ...

Page 2: ...he mains jack and aerial This product incorporates copyright protection technology that is protected by method claims of certain U S patents and other intellectual property rights owned by Macrovision Corporation and other rights owners Use of this copyright protection technology must be authorized by Macrovision Corporation and is intended for home and other limited viewing uses only unless other...

Page 3: ...des do not match the disc will not be played The Region Number for this player is described on the rear panel of the player Disc Types Logos Recording Types Disc Size Max Playing Time Characteristics Single sided 240 min Double sided 480 min Audio Video AUDIO CD DVD DVD contains excellent sound and video due to Dolby Digital and MPEG 2 system Various screen and audio functions can be easily select...

Page 4: ... 22 Screen Messages 23 Selecting the Cassette Type 23 Repeat Play 23 Selecting the Recording Speed 24 Protecting a Recorded Cassette 24 Recording a Programme Immediately 24 Recording a Programme with Automatic Stop 25 Recording from Another VCR or Camcorder 25 Using the Assemble Edit Function 26 Using the Timer Programming Feature 26 Checking a Preset Recording 27 Cancelling a Preset Recording 28 ...

Page 5: ...N BUTTON 6 AUX VIDEO INPUT JACK 7 AUX AUDIO L R INPUT JACK 8 PROGRESSIVE SCAN MODE BUTTON 9 FRONT PANEL DISPLAY 10 PROGRAMME SELECTION BUTTON 11 DVD VCR SELECTION BUTTON 12 EZ VIEW BUTTON 13 RECORD BUTTON 14 REWIND SKIP BACK BUTTON 15 STOP BUTTON 16 PLAY STILL BUTTON 17 FAST FORWARD SKIP NEXT BUTTON 5 6 7 8 9 10 11 12 13 14 15 16 17 1 2 3 4 ...

Page 6: ...SCART EURO 21 JACK 8 DIGITAL AUDIO OUT JACKS COAXIAL 9 COMPONENT VIDEO OUT JACKS 10 S VIDEO OUT JACK 1 The DVD Deck is active 2 Disc is loaded 3 The time counter position current deck status is displayed 4 VHS tape is inserted 5 The VCR Deck is active 6 A Timer Recording is programmed or in progress 6 1 2 3 4 5 Rear View of the DVD VCR DVD V6700 Display Indicators 5 6 7 8 9 10 1 2 3 4 ...

Page 7: ...3 or equivalent batteries taking care to respect the polarities on the battery with on the remote control on the battery with on the remote control Do not mix different battery types manganese and alkaline for example 3 Replace the cover by aligning it with the base of the remote control and push it down Batteries for remote controls Remote Control Audio Video Cable RF Cable Owner s Instructions A...

Page 8: ... of the picture 16 INPUT SEL Used to select a external input signal 17 TV VCR Used to select TV or VCR 18 INFO Used to display the current setting or disc status 19 OPEN CLOSE Used to open and close the disc and video cassette tray 20 SHUTTLE Used to play a sequence at variable speeds 21 F ADV STEP Used to advance a sequence frame by frame 22 SPEED Used to select the recording speed 23 PLAY PAUSE ...

Page 9: ...e television You thus Obtain better quality sound and pictures Simplify the setting up procedure of your DVD VCR 1 Connect the Aerial Cable 2 Connect one end of the SCART cable to the AV1 EURO AV jack on the rear of the DVD VCR 3 Plug the other end into the appropriate connector on the television Connecting the Audio Output Cable You can connect your DVD VCR to a Hi Fi system Example You wish to t...

Page 10: ... VCR using the SCART cable if the appropriate outputs are available on the equipment chosen The following illustra tions give a few examples of the connection possibilities 1 AV2 EURO AV By means of 21 pin Scart Cable Plug the SCART Cable with satellite receiver or other equipment into the AV2 EURO AV jack on the rear of the DVD VCR After making this connection select the source by pressing the IN...

Page 11: ... appropriate input connectors on the televi sion Use the S Video connection method only for the DVD Connecting DVD VCR to the TV using the Component Video Cable DVD only Your TV must support progressive scan input to allow you to watch component video output You will enjoy high quality accurate colour repro duction images Component video seperates the picture element into black and white Y blue Pb...

Page 12: ...stopped completely before changing the mode To cancel the progressive scan mode press the P SCAN button in stop mode Do not press the P SCAN button if you are using a TV that does not support Progressive mode Nothing will be displayed on the screen if pressed To release the Progressive mode press the P SCAN button in stop mode See your TV User s Manual to find out if your TV supports Progressive S...

Page 13: ...ble supplied into the AUDIO input jacks on the front of the DVD VCR Take care to respect the colour coding of the left and right channels 4 Plug the other end of the audio cable into the appropriate output connectors on the other system VCR camcorder etc 2 3 1 4 Plug Auto Setup Your DVD VCR will automatically set itself up when it is plugged into the mains for the first time TV stations will be st...

Page 14: ...rrect press the RETURN button twice to exit the menu SETUP VCR PROG FUNC DVD Clock Set Now you only have to switch the DVD VCR on and it is ready for use Function for Plug Auto Set Up is fixed already So if you want to change this fixed one you can change refer to Presetting the Stations Manually page 17 Note Time Date Year 12 00 01 JAN 2007 MON Auto Clock On ...

Page 15: ...re using the RF cable To view pictures from your DVD VCR when a Scart cable is used the television must be set to the audio video mode AV 1 Switch on the television 2 Switch on the DVD VCR by pressing the I STANDBY ON on the front of the DVD VCR or STANDBY ON on the remote control 3 Select a programme position on the television to be reserved for use with your DVD VCR 4 Insert the video cassette i...

Page 16: ...button 2 Press the or button to select Install then press the OK or button The Install menu is displayed 3 Press the OK button A message is displayed indicating that any channels already preset on your DVD VCR will be deleted OK RETURN MENU English Français Deutsch Español Italiano Nederlands Language Set Setting the Clock Automatically 4 Press the or button to select Auto Clock Press the or butto...

Page 17: ...tation and so on When the automatic scanning procedure has finished the DVD VCR switches automatically to programme 1 If you wish to cancel the auto scanning before the end press the MENU button The number of stations automatically stored by the DVD VCR depends on the number of stations that it has found The time and date are set automatically from the broadcast signal If the signal is weak or gho...

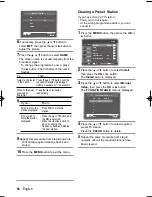
Page 18: ...ively To Then Clearing a Preset Station 6 If necessary press the or button to select MFT then press the or button to adjust the picture 7 Press the or button to select NAME The station name is set automatically from the broadcast signal To change the programme s name press the button The first letter of the name flashes 8 If you Then Wish to store the station displayed Do not wish to store the sta...

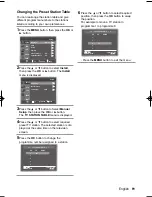
Page 19: ...all menu is displayed 3 Press the or button to Select Manual Setup then press the OK or button The TV STATION TABLE menu is displayed 4 Press the or button to select required preset TV station The selected station is dis played at the same time on the television screen 5 Press the OK button to change the programme number assigned to a station OK SETUP VCR PROG FUNC DVD Install RETURN MENU Auto Set...

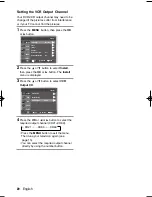
Page 20: ...splayed 3 Press the or button to select VCR Output CH 4 Press the OK or or button to select the required output channel CH21 CH69 CH21 CH60 CH69 Press the MENU button to exit the menu Then tune your television again see page 15 You can select the required output channel directly by using the number button OK SETUP VCR PROG FUNC DVD Setup Language English Clock Install User Set Auto Power Off Off S...

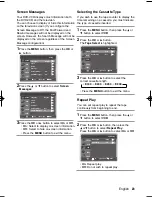
Page 21: ... VCR PROG FUNC DVD Setup Language English Clock Install User Set Auto Power Off Off Screen Messages On RETURN MENU NICAM programmes are divided into 3 types NICAM Stereo NICAM Mono and Bilingual trans mission in another language NICAM programmes are always accompanied by a standard mono sound broadcast and you can select the desired sound Please refer to page 29 1 Press the MENU button then press ...

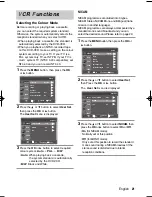
Page 22: ...On RETURN MENU Intelligent Picture Control This feature allows you to adjust the sharpness of the image automatically according to your own preferences 1 During playback press the MENU button then press the OK or button 2 Press the or button to select User Set then press the OK or button The User Set menu is displayed 3 Press the or button to select IPC Intelligent Picture Control then press the O...

Page 23: ...OK SETUP VCR PROG FUNC DVD Setup Language English Clock Install User Set Auto Power Off Off Screen Messages On RETURN MENU You can set repeat play to repeat the tape continously from beginning to end 1 Press the MENU button then press the or button to select VCR 2 Press the OK or button then press the or button to select Repeat Play Press the OK or button to select On or Off On Repeat play Off Do ...

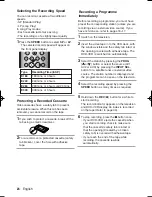
Page 24: ... recording via an external video source If you have not done so refer to pages 16 17 1 Switch on the television 2 Insert the video tape in to the VCR deck with the window visible and the safety tab intact or the opening covered with adhesive tape The DVD VCR is switched on automatically 3 Select the station by pressing the PROG or button or select the source AV1 AV2 or AUX by pressing the INPUT SE...

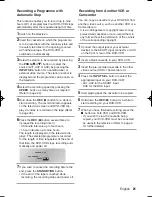
Page 25: ...stops automatically after the requested length of time 1 Switch on the television 2 Insert the cassette on which the programme is to be recorded with the window visible and the safety tab intact or the opening covered with adhesive tape The DVD VCR is switched on automatically 3 Select the station to be recorded by pressing the PROG or button or select the source AV1 AV2 or AUX by pressing the INP...

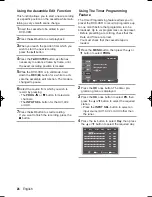
Page 26: ...X 7 Press the ll button to start recording If you want to finish the recording press the button Using The Timer Programming Feature The Timer Programming feature allows you to preset the DVD VCR to record a programme up to one month before that programme is to be broadcast Up to six programmes can be preset Before presetting a recording check that the Date and Time are correct You must check that ...

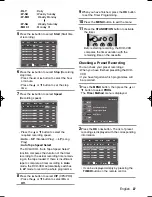
Page 27: ...want to set the timer program press the OK key 01 MO 01 13 25 19 57 SP Off DLY Daily W SU Weekly Sunday W MO Weekly Monday W SA Weekly Saturday MO 01 Monday 01 5 Press the button to select Start Start time of recording 6 Press the button to select Stop Recording stop time Press the or button to select the hour or minute Press the or button to set the stop time 7 Press the button to select Speed Re...

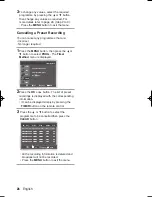
Page 28: ...the remote control 3 Press the or button to select the programme to be cancelled then press the CLEAR button All the recording information is deleted and broadcast will not be recorded Press the MENU button to exit the menu MENU RETURN OK SETUP VCR PROG FUNK DVD Timer Method If you want to set the timer program press the OK key 3 To change any values select the required programme by pressing the o...

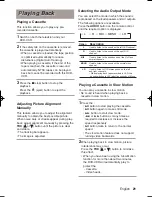
Page 29: ...ckwards 2 When playing back in slow motion picture interference may occur Press the TRK or button to minimize this effect When you have been using the Slow Motion function for more than about two minutes the DVD VCR will automatically play to protect the Cassette Video heads Selecting the Audio Output Mode Playing a Cassette in Slow Motion This function allows you to play any pre recorded cassette...

Page 30: ...Y X9 Playing a Sequence at Variable Speeds Each time you record a cassette on this DVD VCR an index is automatically marked on the tape when recording starts The Search function allows you to fast forward or rewind to a specific index and start playback from that point Depending on the direction selected the index es are numbered as follows This DVD VCR uses a standard indexing system VISS As a re...

Page 31: ... found the DVD VCR will playback the tape for 5 seconds after which it will continue searching for the next Index mark 5 If you want to watch the tape from a particular Index press the ll button twice End Search Use this feature when you want to search for a blank position to record a program on a cassette The VCR will fast forward searching for a blank position and then automatically stop at that...

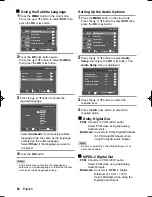
Page 32: ...counter Press the CLEAR button when you want to set the tape counter to zero 2 When you are ready Start Playback or Recording Press the button To fast froward or rewind to the sequence at which the counter was set to zero press the or button Some DVD VCR information such as the counter can be displayed on the television screen Unless you have deactivated the Screen Messages mode refer to page 23 P...

Page 33: ...e English SETUP DVD VCR PROG FUNC OK RETURN MENU DVD Setup Language Setup Audio Setup Display Setup Parental Setup DivX R Registration Using the Audio Language 1 Press the MENU button in the stop mode Press the or button to select DVD then press the OK or button 2 Press the OK or button again Press the or button to select Audio then press the OK or button 3 Press the or button to select the requir...

Page 34: ... language Select Others if the language you want is not listed 4 Press the OK button Some discs may not contain the language you select as your initial language in that case the disc will use its original language setting Language Setup OK RETURN MENU Disc Menu English Audio English Subtitle English SETUP DVD VCR PROG FUNC OK RETURN MENU DVD Setup Language Setup Audio Setup Display Setup Parental ...

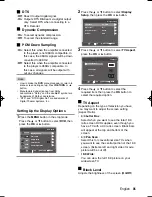
Page 35: ... Options SETUP DVD VCR PROG FUNC OK RETURN MENU DVD Setup Language Setup Audio Setup Display Setup Parental Setup DivX R Registration 2 Press the or button to select Display Setup then press the OK or button 3 Press the or button to select TV Aspect press the OK or button 4 Press the or button to select the required item then press the OK button to select the required option TV Aspect Depending on...

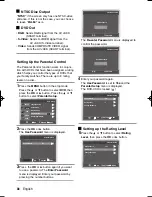
Page 36: ...ayed Enter your password by pressing the number buttons Setting Up the Parental Control The Re enter Password menu is displayed to confirm the password 4 Enter your password again The Use Password is set to Yes and the Parental Setup menu is displayed The DVD VCR is locked RETURN Create Password Enter Password RETURN Create Password Re enter Password Parental Setup OK RETURN MENU Use Password Yes ...

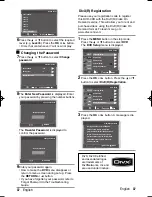
Page 37: ...1 Change Password RETURN Change Password Enter New Password RETURN Change Password Re enter Password Please use your registration code to register this DVD VCR with the DivX R Video On Demand service This will allow you to rent and purchase videos using the DivX R Video On Demand format To learn more go to www divx com vod 1 Press the MENU button in the stop mode Press the or button to select DVD ...

Page 38: ... DivX4 DivX5 GMC 1WP Supported file formats avi mpeg Supported audio formats AC3 MP3 WMA Supported caption formats SMI SRT SUB How to make an update disc Write the downloaded file onto a blank CD R disc using the following settings 1 Download the software update file from the Samsung Internet Site http www samsung com Support Product Support Download index aspx After checking your DVD VCR Model na...

Page 39: ... Search Forward Back While a disc is in play mode press the or button to visually search forward backward at 2X 4X 8X 16X 32X 128X speed Press the ll button to resume normal speed CD 2X 4X 8X 16X 32X Slow Motion During playback press the ll button to still the image Then press the l button to play in slow motion at variable speeds Each press increases the slow motion speed playback to 1 8 1 4 or 1...

Page 40: ...ounter position press the INFO button during DVD playback The display screen can also be used to quickly choose a title chapter track or playing time 1 View the Display During DVD CD playback press the INFO button To make the screen disappear press the INFO button again 2 Press the or button to select the desired item 3 Press the or button to make the desired setup then press the OK button You may...

Page 41: ...aspect ratio The picture will look horizontally stretched Screen Fit The top and bottom portions of the screen are cut off and the full screen appears The picture will look vertically stretched Zoom Fit The top bottom left and right portions of the screen are cut off and the central portion of the screen is enlarged To access the desired title when there is more than one in the disc For example if...

Page 42: ... screen are cut off and the full screen appears The picture will look vertically stretched Zoom Fit The top bottom left and right portions of the screen are cut off and the central portion of the screen is enlarged Selecting the Subtitle Language Some DVDs provide subtitles in one or more languages You can use the SUBTITLE button to quickly view and change settings 1 During playback press the SUBT...

Page 43: ... such as Dolby Digital 5 1 Dolby Pro Logic or LPCM 2 Channel audio are available on some DVDs You can use the AUDIO button to quickly view and select the options available on a disc 1 During playback press the AUDIO button Press the or button to select stereo Left or Right 2 Press the or button to select the desired language or audio setup on the DVD Languages are represented by abbrevia tions e g...

Page 44: ...to select the mark you want to delete 3 Press the CLEAR button to delete the mark Press the MARK button again to exit the mark menu 1 CLEAR 1 CLEAR Depending on the disc the mark function may not work 1 Repeat Chapter Title You can repeat a single chapter or a complete title 1 Press the REPEAT button while in playback mode to open the repeat menu The current repeat mode is displayed 2 Press the or...

Page 45: ...signated section on a DVD or CD To acti vate mark where to start A and where to end B of the section you want to watch 1 Press the REPEAT button while in playback mode then press the or button to select A 2 Press the OK button at the beginning of the segment you want to repeat Point A The B is selected 3 Press the OK button again at the end of the segment you want to repeat Point B The segment wil...

Page 46: ...rate of at least 128Kbps when recording MP3 files Sound quality with MP3 files basically depends on the rate of compression decompression you choose Getting audio CD quality sound requires an analog digital sampling rate that is conversion to MP3 format of at least 128Kbps and up to 160Kbps However choosing higher rates like 192Kbps or more only rarely give better sound quality Conversely files wi...

Page 47: ...EG Total 1 215 OK RETURN Photo 1 215 Program Random Play CD MP3 WMA You can listen to songs randomly or in the desired sequence Program Play 1 Press the MODE button in the stop mode Press the or button to select PROGRAM Press the OK button 2 Press the buttons to select the first track to add to the program Press the OK button The selection numbers are displayed in the Program Order box 3 Press the...

Page 48: ...ess the l or l button to display the previous or next 6 pictures Rotation Press the or button to select Each time the OK button is pressed the picture rotates 90 degrees clockwise Zoom Press the or button to select Each time the OK button is pressed the picture is enlarged up to 4X Normal 2X 4X Normal OK RETURN Photo 1 215 OK RETURN Photo 1 215 Album Photo 1 215 CD R JPEG Discs Only files with the...

Page 49: ... Still Press the ll button on the remote control during playback The picture will still and the audio will mute To resume playback press the ll button If the player is left in Still mode for 5 minutes it will stop automatically 2 Frame Advance Step While in playback mode press the F ADV STEP button on the remote control to advance one frame at a time Audio is muted during Frame Advance mode Press ...

Page 50: ...press the OK button Press the or button to select the part of the screen you want to zoom in on then press the OK button The screen will be enlarged to twice the normal size Auto Scaling CIF 100kbps D1 784kbps resolution If the file resolution is times automatically So you can see the more larger screen Function OK RETURN MENU SETUP DVD VCR PROG FUNC DVD Function VCR Function DVD Function OK RETUR...

Page 51: ...ront RCA jack RF Out UHF 21 69 Initial CH60 Audio DVD VCR RCA jack Euro Scart socket Audio DVD only COAXIAL RCA jack Video DVD VCR RCA jack Euro Scart socket Video DVD only S Video out Component RGB out Euro Scart socket Tape format VHS type video tape Colour system PAL NTSC4 43 NTSC playback on PAL TV Tuning system I Video S N Above 43dB standard recording Resolution Above 240 lines standard reco...

Page 52: ...g on the during playback the still picture condition of the tape Press the TRK or buttons has severe noise bars streaks during slow motion to minimize this effect Video Head Cleaning If poor pictures appear on a variety of cassettes the video heads may need cleaning This is not a common problem and unless it appears the heads should not be cleaned When cleaning the video heads read all instruction...

Page 53: ...ricts it 2 The DVD s software doesn t support the feature e g angles 3 The feature is not available at the moment 4 You ve requested a title or chapter number or search time that is out of range Some of the functions selected in the Setup menu may not work properly if the disc is not encoded with the corresponding function The screen ratio is fixed on your DVDs Make sure you have selected the corr...

Page 54: ...the prod ucts caused by such repair work will not be covered by this warranty 4 This product is not considered to be defec tive in materials nor workmanship by rea son that it requires adaptation in order to conform to national or local technical or safety standards in force in any Country other than the one for which the product was originally designed and manu factured This warranty will not cov...

Page 55: ... 14 Min www samsung de HUNGARY 06 80 SAMSUNG 7267864 www samsung com hu ITALIA 800 SAMSUNG 7267864 www samsung com it LUXEMBURG 0032 0 2 201 24 18 www samsung lu NETHERLANDS 0900 20 200 88 0 10 Min www samsung com nl NORWAY 231 627 22 www samsung com no POLAND 0 801 801 881 www samsung com pl PORTUGAL 80 8 200 128 www samsung com pt SLOVAKIA 0800 SAMSUNG 726786 www samsung com sk SPAIN 902 10 11 3...

Page 56: ...types of wastes and recycle it responsibly to promote the sustainable reuse of material resources Household users should contact either the retailer where they purchased this product or their local government office for details of where and how they can take this item for environmentally safe recycling Business users should contact their supplier and check the terms and conditions of the purchase ...

Reviews: