background image

15

14

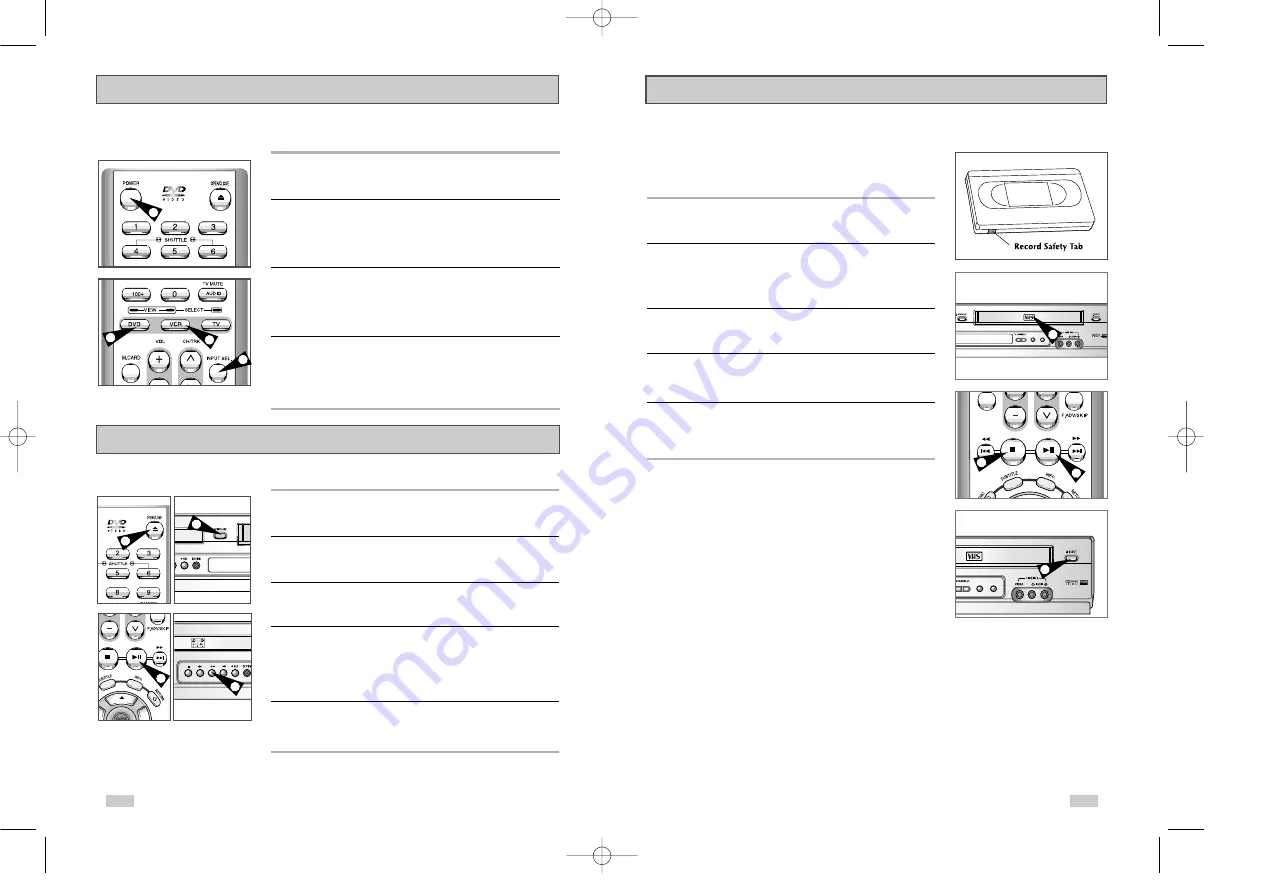
Basic VCR Operation

To play a standard VHS videotape, just insert it into the VCR deck
and press the Play button. You can turn on the Auto Play to enable
the VCR deck to play automatically when you insert a videotape
that is missing the Record Safety Tab.. See page 54.

1

Insert VHS Tape

Insert a standard VHS videotape into the VCR deck.
• When a videotape is inserted, power will turn on automatically.

2

Play Tape

Press the 

ll (PLAY/PAUSE) button on the remote control or on

the front panel of the unit. The videotape will begin to play 
automatically if it is missing the Record Safety Tab and Auto Play is 
turned on. See page 54 

3

Stop Playback

Press the 

(STOP) button on the remote control or on the front 

panel of the unit.

4

Eject Tape

Press the OPEN/CLOSE button on the remote control or the
EJECT button on the front panel of the unit.

5

Additional VCR Options

• See pages 53~55 for special VCR Playback features.
• See pages 56~58 for VCR Recording features.
• See page 59 for Timer Recording features.

EJECT

DVD/VCR

PROGRESSIVE

EJECT

DVD/VCR

PROGRESSIVE

1

2

3

4

The DVD-VCR uses one set of controls to operate both decks. The
following buttons are helpful in successfully controlling each deck. 

1

POWER Button

Press the POWER button on the remote control or front panel to 
turn on the DVD-VCR.

2

DVD Button

Press the DVD button on the remote control or front panel when 
you want to control the DVD deck.
• The DVD indicator will light on the Front Panel Display to show 

that the DVD deck is selected.

3

VCR Button

Press the VCR button on the remote control or front panel when 
you want to control the VCR deck.
• The VCR indicator will light on the Front Panel Display to show 

that the VHS deck is selected.

4

INPUT SEL. Button

Press the INPUT SEL. button repeatedly to cycle through all of 
your input sources, including the  Tuner (Ch##), Line 1 (rear AV 
input), and Line 2 (front AV input).
• Input select is only available when the VCR deck is selected.

Deck Control Buttons

2

3

4

1

1

1

4

Fllow the instructions below to playback a DVD.

1

Open the Disc Tray

Press the OPEN/CLOSE button on your remote control or on the 
front panel of the unit to turn on the power and open the disc tray.

2

Insert a Disc

Put a disc in the center of the tray, with the label-printed side facing
up.

3

Close the Disc Tray

Press the OPEN/CLOSE button on your remote control or on the 
front panel of the unit to close the disc tray. 

4

Play a DVD

Press the PLAY/PAUSE button on your remote control or on the 
front panel of the unit.
•  Most discs will start to playback as soon as the tray closes.
•  If a DVD has a MENU, the menu may pop up on TV screen.

5

Additional DVD Options

• See pages 25 ~ 35 for advanced DVD Setup options.
• See pages 36 ~ 52 for special DVD Playback features.

Basic DVD Operation

4

00222A DVD-V3800/XAA-Eng2  7/28/03 3:39 PM  Page 14

Summary of Contents for DVD-V3800

Page 1: ...Instruction Manual DVD V3800 www samsungusa com EJECT DVD VCR PROGRESSIVE MM C s c 00222A DVD V3800 XAA Eng1 7 28 03 3 38 PM Page 1 ...

Page 2: ...ected to the grounding system of the building as close to the point of cable entry as practical Copy Notification Federal law provides severe civil and criminal penalties for the unauthorized reproduction distribution or exhibition of copyrighted motion pictures and videotapes Title 17 United States Code Sections 501 and 506 Macrovision Notification This product incorporates copyright protection t...

Page 3: ...ack Features 53 Tracking 53 Auto Play 54 S VHS Playback 54 Variable Search System 55 4 Table of Contents Safety 2 Important Safety Instructions 2 Welcome 7 Feature Summary 7 Unpack 7 Disc Type and Characteristics 8 1 System Overview 9 Front Panel Overview 9 Rear Panel 10 Front Panel Display 10 Remote Control Overview 11 Insert Batteries into Remote 11 Using the TV Buttons on the Remote Control 12 ...

Page 4: ...ding Time remaining counter real time counter Note Discs which cannot be played with this player Ability to play back may depend on recording DVD ROM DVD RAM conditions CD ROM CDV DVD R CD RW CDI VCD DVD RW RW HD layer of Super Audio CD CDGs play audio only not graphics Unpack When you unpack the DVD VCR please check the following list of items is included in the packing case 6 7 Table of Contents...

Page 5: ...c Dolby Digital disc Stereo disc Digital Audio disc DTS disc MP3 disc Both the DVD player and the discs are coded by region These regional codes must match in order for the disc to play If the codes do not match the disc will not play The Region Number for this player is described on the rear panel of the player 5 31 2 Single sided 240 min Double sided 480 min Single sided 80 min Double sided 160 ...

Page 6: ...ETURN 28 ENTER 29 RIGHT 30 TV VCR 31 DISC MENU 32 MARK SEARCH 33 ANGLE TIMER 10 Front Panel Display STEREO 1 2 3 4 5 6 7 8 1 When the light is on DVD is operating 2 DVD or CD media is loaded 3 The time counter position time remaining or current deck status is indicated 4 VHS videotape is loaded 5 VCR is activated 6 A DVD with a DTS soundtrack is loaded 7 The Hi Fi track of a VHS videotape is playi...

Page 7: ...or on the front panel of the unit 5 Turn On your TV Turn on the TV by pressing the POWER button 6 Set the TV to Channel 3 4 or Line The same channel you selected in Step 2 above must be used If you are using the Line Connection method set your TV to its Line Input From Antenna or Cable To TV s Antenna Input 1 2 3 MM C s c 4 4 Using the TV Buttons on the Remote Control Your VCR remote control will ...

Page 8: ...Button Press the DVD button on the remote control or front panel when you want to control the DVD deck The DVD indicator will light on the Front Panel Display to show that the DVD deck is selected 3 VCR Button Press the VCR button on the remote control or front panel when you want to control the VCR deck The VCR indicator will light on the Front Panel Display to show that the VHS deck is selected ...

Page 9: ...s or the next channel 3 0 9 Buttons Use these buttons to select the desired channel directly 4 100 Button Press this button to tune to channels 100 and above First press the 100 button then use the numeric buttons 0 9 to enter the remaining digits of the channel number desired This button is activated only in Cable TV Mode 5 INFO Button Press this button to display the current channel This also wo...

Page 10: ...y 1 Open MENU Press the MENU button while the DVD is in Stop or Play mode 2 Select SETUP Using the UP DOWN buttons move the selection bar to SETUP then press ENTER to select 3 Select Clock Use the UP DOWN buttons to highlight Clock then press the ENTER button 4 Select Manual Clock Move the highlight to Manual Clock then press the ENTER button The Clock Set Adjust menu will change as shown 5 Set th...

Page 11: ...Output Channel 1 Open MENU With the DVD in Stop or Play mode press the MENU button 2 Select SETUP Using the UP DOWN buttons move the selection bar to SETUP then press ENTER to select 3 Select Channel Using the UP DOWN buttons move the selection bar to Channel then press ENTER to select 4 Select RF Output CH Move the selection bar to RF Output CH then press right to change 5 Change RF Output CH A m...

Page 12: ...hannel you wish to remove 1 Open MENU With the DVD in Stop or Play mode press the MENU button 2 Select SETUP Using the UP DOWN buttons move the selection bar to SETUP then press ENTER to select 3 Select Channel Using the UP DOWN buttons move the selection bar to Channel then press ENTER to select 4 Select Channel Add Delete Move the selection bar to Channel Add Delete then press ENTER to select 5 ...

Page 13: ... while the DVD is in Stop mode 2 Select DVD Use the UP DOWN buttons to highlight DVD then press the ENTER button 3 Select Language Move the selection bar to Language then press ENTER to select 4 Select Disc Menu Highlight Disc Menu then press the ENTER button 5 Set Disc Menu Language Preference Highlight your preferred language for disc menus then press the ENTER button 1 Open MENU With the DVD in...

Page 14: ...oder your DVD VCR can output Dolby Digital 5 1 sound but you MUST enable this feature in the menu system to prevent damage to your speakers NOTE Select Bitstream ONLY if you have connected a Dolby Digital equipped A V receiver to the Digital Output optical or coaxial on the DVD VCR back panel 1 Open MENU Press the MENU button while the DVD is in Stop mode 2 Select DVD Use the UP DOWN buttons to hi...

Page 15: ...ipped with a DTS decoder DTS PCM Down Sampling On Dynamic Compression Dynamic Compression restrains the dynamic range of sound i e the difference between the loud and quiet passages of a DVD audio track 1 Open MENU Press the MENU button while the DVD is in Stop mode 2 Select DVD Use the UP DOWN buttons to highlight DVD then press the ENTER button 3 Select Audio Highlight Audio then press the ENTER...

Page 16: ...e familiar way of watching DVD and VHS movies this method selectively crops by panning and scanning to keep the most important part of the picture visible wide screen movies to fit a standard 4 3 television screen Display Setup PCM Down Sampling If your amplifier is not capable of reproducing a 96kHz signal PCM downsampling should be set to on 1 Open MENU Press the MENU button while the DVD is in ...

Page 17: ...Scan mode will work Progressive Progressive Scan mode will work and Video and S Video will not work Press the Progressive button on the front panel if you have a Progressive scan TV only Otherwise the picture will be disturbed Black Level The Black Level feature adjusts the reference level of black in the video signal to one of two choices Off Standard NTSC black level Yields consistent contrast t...

Page 18: ... Use Password Highlight Use Password then press the RIGHT button to select one of the following options Off No password is necessary to view a DVD or to change the Rating Level No additional settings are necessary On A password is necessary to view a DVD and to view the Rating Level The menu will change as shown NOTES The first time Require Password is set to Yes you will be prompted to enter a ne...

Page 19: ...eginning of the current chapter track Press Skip Back again to jump to the beginning of the previous chapter track Search Forward Back While a disc is in Play mode press and hold the FORWARD BACK buttons on the remote control or front panel to visually search forward backward at 2X 4X 8X 16X 32X 128X speed Press ll PLAY PAUSE button to resume normal speed NOTE CD search speed 2X 4X 8X 4 Slow Motio...

Page 20: ...y depending on the screen setting in the initial setup menu To ensure correct operation of the EZ VIEW button you should set the correct aspect ratio in the initial setup See the page 31 2 If you are using a 16 9 TV For 16 9 aspect ratio discs Wide Screen Displays the content of the DVD title in 16 9 aspect ratio Screen Fit The top and bottom of the screen are cut off When playing a 2 35 1 aspect ...

Page 21: ...ect ratio discs 4 3 Letter Box Displays the content of the DVD title in 16 9 aspect ratio The black bars will appear at the top and bottom of the screen 4 3 Pan Scan The left and right of the screen are cut off and displays the central portion of the 16 9 screen Screen Fit The top and bottom of the screen are cut off and the full screen appears The picture will look vertically stretched Zoom Fit W...

Page 22: ... is On Press the ENTER button to confirm your selection Subtitle 1 ENG On ENG Off Angle View Some DVD Movies provide you with various camera angle views on the same scene while they are playing To activate the feature press the ANGLE Button 1 Check for the Angle Icon Press the Angle button you ll see the Angle Icon when watching a DVD with multi Angles available 2 View Angle Menu Options When the ...

Page 23: ...e title Repeat Chapter Title 1 A to B Repeat The A to B Repeat feature enables you to repeat a designated section on a DVD or CD To activate mark where to start A and where to end B of the section you want to watch 1 Select A B Repeat Function Press the REPEAT button while in Play mode then use the Left Right buttons to select A B Repeat When you select A B Repeat A will be highlighted NOTE The me...

Page 24: ...l change to a number 1 2 or 3 You may continue to set up to three bookmarks Press the MARK button when complete Depending on the disc the bookmark function may not work 4 Play Bookmark During playback press the MARK button on the remote control Use the LEFT RIGHT buttons to move to a previously set bookmark Press the PLAY PAUSE button to play the bookmark Press the CLEAR button to cancel the bookm...

Page 25: ...hat the DVD player will play MP3 recordings or as an assurance of sound quality You should note that certain technologies and methods for MP3 file recording on CD Rs prevent optimal playback of these files on your DVD player degraded sound quality and in some cases inability of the player to read the files It supports the MP3 file format in the range from 96BPS to 256BPS This unit can play a maxim...

Page 26: ...enu Bar is appeared and it is disappeared after 10 seconds Press the DISC MENU button to pop up again the Menu Bar Return to the Album Screen Each time the ENTER button is pressed the picture rotates 90 degrees clockwise Each time the ENTER button is pressed the picture is enlarged up to 4X Normal 2X 4X 2X Normal The unit enters slide show mode Press the DISC MENU button in Normal mode to see the ...

Page 27: ...RN CD R Memory Card JPEG Only JPG Format Files with the jpg and JPG extensions can be played If the CD R disc is not closed it will take longer to start playing and not all of the recorded files may be played Only CD R discs with JPEG files in ISO 9660 or Joliet format can be played Only Memory Card with FAT16 format can be played Memory Card The name of the JPEG file may not be longer than 8 char...

Page 28: ...Advance Skip Repeat and more Press the Play button again to resume normal playback 1 Still From Play mode press Play Pause to still a single frame 2 Frame Advance From still mode press F ADV SKIP to advance to the next frame 3 Cue Review From Play mode press F Forward or Rewind to cue review at two speeds Picture Search Press and release to advance the tape forward or backward at 5 times normal sp...

Page 29: ...o Scan then press the ENTER button Reverse Intro Scan Highlight Reverse Intro Scan then press the ENTER button Variable Search System Forward Reverse 54 If you want your videotapes to play automatically when you insert them turn on Auto Play NOTE Only tapes that are missing the Record Safety Tab will play automatically when inserted 1 Open the MENU With the DVD in Stop or Play mode press the MENU ...

Page 30: ...ure your videotape has a Record Safety Tab If the tab is missing you can cover the opening with a small piece of tape Warning Do not cover this opening unless you are sure you want to record over the tape Before You Begin Power on the DVD VCR Power on the TV Set the TV to channel 3 or 4 1 Insert Tape Insert a blank VHS tape into the VCR deck Make sure the tape is long enough to record the entire p...

Page 31: ...cord TV programs on the same channel at the same time every week Daily MO FR Use this to record TV programs on the same channel at the same time every day Monday through Friday If you want to set the timer program press the ENTER key Timer Program No Ch Start End Date Speed 1 2 3 4 5 6 7 Language English Front Display Auto Auto Power Off Off Record Speed You can slow down the recording speed from ...

Page 32: ...superior video quality can be obtained when watching a DVD on your DVD VCR if your TV is equipped with S Video or Component Video inputs 1 Connect S VIDEO OUT to TV Using an S Video cable connect the S VIDEO OUT on the back panel of your DVD VCR to the S Video Input on your TV 2 Connect Component Video Out to TV Using a component video cable connect the COMPONENT VIDEO OUT Y Pb Pr on the back pane...

Page 33: ... Audio Video Inputs 3 Stereo Connections You can connect your DVD VCR to your home stereo system or stereo TV and enjoy stereo sound when watching a movie or TV 1 Connect DVD VCR to Stereo Using RCA cables connect the Line Out Left and Right Audio jacks on the back panel of the DVD VCR to the Auxiliary Inputs on your stereo receiver Connect the Video Output also in case you are using a stereo TV 2...

Page 34: ...kHz S N RATIO 110 dB DYNAMIC RANGE 96 dB THD 0 003 POWER REQUIREMENT 120V AC 60 Hz 25 watts SYSTEM ENVIRONMENT 41 104 F 5 40 C 10 75 humidity WEIGHT NET 7 9 lbs DIMENSIONS WxHxD 16 93 x 3 32 x 10 83 inches 2 3 Connecting Other Video Equipment You can connect a wide variety of audio video equipment to your DVD VCR including An additional VCR Laser Disc Player DVD Player Camcorder Satellite Receiver...

Page 35: ... products equipment systems utilities services parts supplies accessories applications installations repairs external wiring or connectors not supplied and authorized by SAMSUNG or which damage this product or result in service problems incorrect electrical line voltage fluctuations and surges customer adjustments and failure to follow operating instructions cleaning maintenance and environmental ...

Reviews: