background image

ENGLISH

28

ENGLISH

Playing a Disc

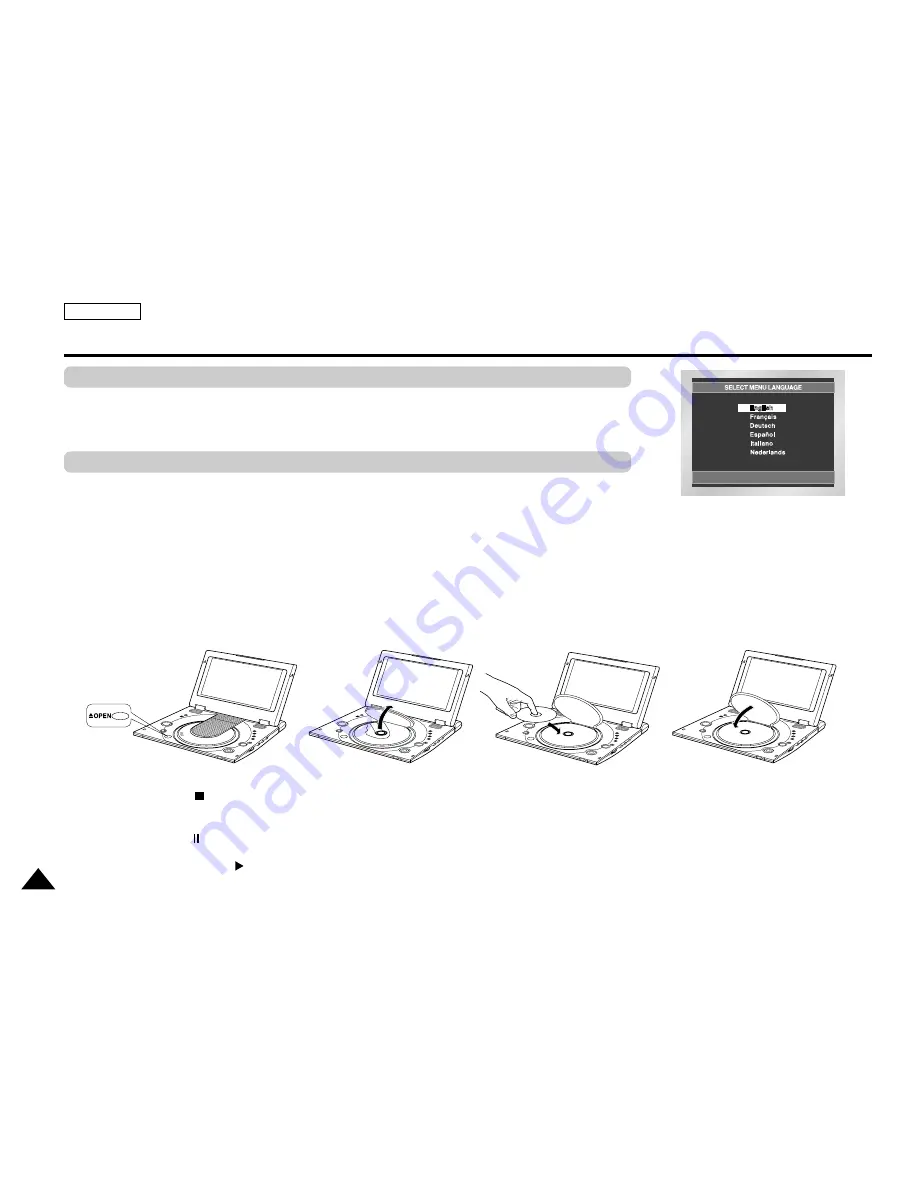
After plugging in the player, the first time you press the POWER button, this screen comes up:

Press the UP/DOWN buttons to select the language, and then press the ENTER button.

(This screen will only appear the very first time you plug in the player.)

1. Press the OPEN button to open the disc lid.

• The disc lid opens up to around a 60-degree angle.

Do not attempt to open the lid to an angle beyond this range. The lid may become damaged.

2. Place a disc gently into the tray.

• You should hear and feel the disc snap firmly into place.

Caution
• Place a disc into the tray with the disc’s label facing up.

3. Close the disc lid and then press the part marked “PUSH” until it clicks shut.

4. Stopping Play

• Press the STOP (     ) button during play.

5. Pausing Play

Press the PAUSE (    ) button on the remote during play.
- Screen stops, no sound.
- To resume, press PLAY (    ) button once again.  

Before Play

Play

Summary of Contents for DVD-L1200

Page 1: ...ADQUARTERS 105 Challenger Road Ridgefield Park N J 07660 0511 TEL 1 800 SAMSUNG SERVICE DIVISION 400 Valley Road Suite 201 Mount Arlington NJ 07856 1 800 SAMSUNG 1 800 726 7864 www samsungusa com AK68 00311A ...

Page 2: ...Portable DVD Player DVD L1200 ...

Page 3: ...perating and maintenance instructions should be followed 5 CLEANING Unplug this DVD from the wall outlet before cleaning Do not use liquid or aerosol cleaners Use a dry cloth used for dusting cabinets 6 ATTACHMENTS Do not use attachments not recommended by the DVD product manufacturer as they may be hazardous 7 WATER AND MOISTURE Do not use this DVD near water for example near a bathtub wash bowl ...

Page 4: ...g particular attention to cords or plugs convenient receptacles and the point where they exit from the unit 13 OUTDOOR ANTENNA GROUNDING If an outside antenna or cable system is connected to the DVD be sure the antenna or cable system is grounded to provide some protection against voltage surges and built up static charges Section 810 of the National Electrical Code ANSI NFPA No 70 1984 provides i...

Page 5: ...maged f When the DVD exhibits a distinct change in performance this indicates a need for service 20 REPLACEMENT PARTS When replacement parts are required be sure the service technician has used replacement parts specified by the manufacturer and having the same characteristics as the original part Unauthorized substitutions may result in fire electric shock or other hazards 21 SAFETY CHECK Upon co...

Page 6: ...nges from cold to hot When condensation forms inside the player the player may not operate correctly If this occurs leave the player at room temperature until the inside of the player becomes dry and operational Safety Information Assuring the Finest Performance Moisture Condensation Laser Safety Caution This product utilizes a laser Use of controls or adjustments or performance of procedures othe...

Page 7: ...an External Component Input Select 18 Viewing a Video from an External Component 19 Connecting to a TV 20 Connecting to a Stereo Component 21 Using the AC adapter 24 Using the battery pack 26 Battery level display 27 Playing a Disc 28 Using the Search Skip Functions 30 Using the Display Function 31 Using the Disc and Title Menu 32 Using the Function Menu 33 Repeat Play 34 Setup Connections Adapter...

Page 8: ...n 41 Using the Zoom 3D Sound Functions 42 Clips Menu for MP3 WMA JPEG 43 Folder Selection 44 MP3 WMA Play 45 Picture CD Playback 47 Using the Setup Menu 49 Setting Up the Language Features 50 Setting Up the Audio Options 52 Setting Up the Display Options 53 Setting Up the Parental Control 54 Cautionary Notes 55 Troubleshooting 60 Specifications 63 Warranty 64 Advanced Functions Changing Setup menu...

Page 9: ...Dolby Digital 5 1 CH audio and 2 DTS digital audio can be output through the optical digital output jack You can enjoy unsurpassed surround sound when a Dolby Digital DTS digital surround processor or amplifier is connect to this jack You can connect a VCR or camcorder to your DVD player using the AV input output jacks or you can connect to a TV for a larger screen 1 Manufactured under license fro...

Page 10: ...n the screen This manual only covers basic disc operations may appear during some operations This mark indicates that the disc in use does not currently support operations explained in this manual Lithium battery AC43 12002G Remocon AC Cord User s Manual AK68 00311A AD39 00076A AH59 01053F Battery pack AK97 00564A Audio cable AK39 00027A AC power Adapter AK44 00004A Video cable AK39 00028A ...

Page 11: ...layed with this player DVD ROM DVD RAM CD ROM CDV CDI HD layer of super Audio CD CDGs play audio only not graphics Ability to play back may depend on recording conditions DVD R CD RW DVD RW RW Picture CD It may not play CD R CD RW and DVD R in all cases due to the type of disc or condition of the recording AUDIO CD Disc Types Logos Recording Types Disc Size Max Playing Time Characteristics DVD Aud...

Page 12: ... this occurs your player will restore the image in 2 3 seconds About Copyrights Any kind of unauthorized and commercial duplication public performance broadcasting renting copying and making transmittable of the content of discs is strictly prohibited by law This product is equipped with anti copy protection device and connecting to a VCR for recording purpose results in a distorted picture This p...

Page 13: ...gnal components Outdoor The perfect mode for sunny outdoor conditions Increases the contrast and sharpness level to compensate for outdoor lighting conditions Low light The optimum mode for low light viewing situations If the viewing environment is very dark use this mode to decrease brightmess and increase contrast and edge sharpness 7 LCD 8 SPEAKER 9 INPUT 10 MENU 11 RETURN 12 CLEAR 13 ENTER DIR...

Page 14: ...A B C 2 VOLUME 3 CHARGING INDICATOR 4 REMOTE SENSOR 5 OPEN 6 STANDBY INDICATOR 1 2 4 5 6 3 1 2 3 4 1 AUDIO IN OUT DIGITAL OUT 2 VIDEO IN OUT S VIDEO OUT 3 DC IN 8 4V 4 BATTERY PACK Description Front Panel Right View Left View ...

Page 15: ...ATTERY PACK 2 RELEASE Battery pack separation switch 3 OPEN Press in the direction of the arrow Slide battery pack to the left then out 2 1 2 3 1 Description Front Panel Bottom View Battery pack separation method 1 2 ...

Page 16: ...ip the title chapter or track 9 CLEAR Button Use to remove menus or status displays from the screen 10 ANGLE Button Use to access various camera angles on a DVD 11 3D Button 12 ZOOM Button 13 BOOKMARK Button 14 LCD CON Button Changes the LCD display status 15 EZ VIEW Button Easy View can convert Letter Box images to full screen viewing on your screen 16 DISC MENU Button Brings up the Disc menu 17 ...

Page 17: ...reclty Important Do not subject the remote control unit to strong vibration or shock Keep the remote control unit free from moisture and water Caution After battery replacement your remote control unit may not work If this occurs remove the battery and re insert in about 5 minutes It may be difficult to operate the remote control unit if the remote control sensor on the DVD player is exposed to di...

Page 18: ...es to the DVD How to use headphones 1 Insert headphones into the A B or C PHONES jack This jack is a stereo mini jack Important Turn the headphone volume down to the minimum setting before connecting Caution Once you connect headphones to the DVD your DVD Player s speakers will be disconnected 2 Adjust the volume level by using the VOLUME control dial Not supplied PHONES ...

Page 19: ...efer to owner s manual of the components you are connecting for more information on those particular components NOTE NOTE In the INPUT mode the video input must be the standard NTSC When connecting to an external component Jack Plug Color Video Yellow Audio left White Audio right Red To AUDIO OUT To VIDEO OUT Audio Cable Video Cable VCR or other component equipped with external output connectors E...

Page 20: ...rn on the DVD player 4 Press the INPUT button to set the INPUT mode 5 Press the PLAY button on the external component Caution Power is not supplied from this device to the connected DVD player When not using your DVD player always remove all connecting cables from the video or audio input output jacks If no signal is input for more than 5 minutes while in the input mode this unit enters the standb...

Page 21: ...layback Caution If you wish to view video on your TV only close the display panel of your DVD player Playback will continue and audio to the speakers will be cut off but you still will be able to use the remote to control the DVD player For power saving press the LCD CON button to power off the LCD display Connecting to a TV Jack Plug Color Video Yellow Audio left White Audio right Red Connect to ...

Page 22: ...em you can listen to higher quality sound Analog Connection 21 ENGLISH Connecting to a Stereo Component 2 CH Audio Playback Jack Plug Color Audio left White Audio right Red Audio Cable Audio Amplifier Connect to input jacks ANALOG INPUT White Red L R ...

Page 23: ...ly DTS encoded audio tracks will produce distorted sound DVD Disc When playing a Linear PCM Audio encoded disc you must use the digital connection method shown above NOTE NOTE Only use an optical Digital Cable which has been designed for use with portable DVD Connecting to a Stereo Component ENGLISH Optical Digital Cable Sold Separately Audio component equipped with optical digital input jack Conn...

Page 24: ...disc menu screen or function adjustment screen After making the connections shown above Set the Digital Output to Bitstream see page 52 in Audio Setup Caution To play a DTS disc you need a DTS processor or amplifier If the DTS processor or amplifer you want to use does not have an optical digital input jack digital connection is not possible Refer to owner s manual of the processor or amplifier fo...

Page 25: ...sed for prolonged periods of time the adapter may heat up This is normal and is not a cause for concern When not using the adapter unplug it from the wall outlet Keep the AC adapter free from moisture cold and dust Otherwise this can result in a risk of fire or electric shock Warning Only use the AC adapter supplied with this player Be sure to unwind the AC adapter cable DC output cable before usi...

Page 26: ...Connecting the battery pack to the AC Adapter You can recharge the battery pack in the DVD player by turning off the player and connecting the AC adapter to the player Charge Time Approx 2 5 hours Charge time may be longer when using the battery pack in a cold environment DVD Continuous Playing Time with a Fully charged Battery pack with speaker Approx 2 5 hours DVD continuous playing time is a re...

Page 27: ...ter 2 Connect the DC cord to the DC IN jack on the left side of the DVD player 3 Plug the other end of the AC cord into an AC outlet Charging the battery pack Power Charge Lamp Green light will flash while charging When the battery pack is fully charged the light will stop blinking and remains green Blinking time Charging rate Once per second Less than 50 Twice per second 50 75 Three times per sec...

Page 28: ...vironment The continuous playing times in the operating instructions are measured using a fully charged battery pack at 77 F 25 C As the environmental temperature and conditions may differ when you actually use the DVD the remaining battery time may not be the same as the approximate continuous playing time given in these instructions NOTE NOTE When the operation time is noticeably shorter than no...

Page 29: ... to around a 60 degree angle Do not attempt to open the lid to an angle beyond this range The lid may become damaged 2 Place a disc gently into the tray You should hear and feel the disc snap firmly into place Caution Place a disc into the tray with the disc s label facing up 3 Close the disc lid and then press the part marked PUSH until it clicks shut 4 Stopping Play Press the STOP button during ...

Page 30: ... you press PLAY again it will pick up where you left off unless the disc is removed or the player is unplugged or if you pressed the STOP button twice Important Make sure that the disc is correctly placed Otherwise the disc and or the DVD player may be damaged If the disc is placed upside down in the disc tray or the region number of the DVD is not supported No Disc will appear on the screen NOTE ...

Page 31: ...Press the SKIP or button for more than 2 seconds to use the SEARCH feature During play press the NEXT SKIP or BACK SKIP button When playing a DVD if you press the NEXT SKIP button it moves to the next chapter If you press the BACK SKIP button it moves to the beginning of the chapter One more press makes it move to the beginning of the previous chapter When playing a CD if you press the NEXT SKIP b...

Page 32: ...playback of the film from a desired time You must enter the starting time as a reference Refers to the language of the film soundtrack In the example the soundtrack is played in English 5 1CH A DVD disc can have up to eight different soundtracks Refers to the subtitle languages available in the disc You will be able to choose the subtitle languages or if you prefer turn them off from the screen A ...

Page 33: ...ER button Using the Title Menu 1 Press the MENU button during playback 2 Select Title Menu using the UP DOWN buttons then press the RIGHT or ENTER button NOTE NOTE Depending on the disc the Title and Disc Menus may not work Title Menu will only be displayed if there are at least two titles in the disc You can also use the Disc Menu using the DISC MENU button on the remote ...

Page 34: ...n selection screen appears Info Zoom Bookmark Repeat and EZ View Info See Page 31 Zoom See Page 42 Bookmark See Page 41 Repeat See Page 34 EZ View See Page 36 37 4 Use the UP DOWN button to highlight one of the 5 functions Then press the RIGHT or ENTER button to access the function NOTE NOTE You can also directly select the parts of these functions using their respective buttons on the remote ...

Page 35: ...e repeat play to start A The B is automatically highlighted Press ENTER at the point where you want the repeat play to stop B To terminate the function press the CLEAR button or the REPEAT A B button again A B REPEAT does not allow you to set point B until at least 5 seconds has elapsed after point A has been set 3 Press ENTER 4 To return to normal play press REPEAT again then press the LEFT RIGHT...

Page 36: ...ion play for 1 8 1 4 or 1 2 of normal speed 3 Press the REPEAT A B button to select the point where the function starts A 4 Press the REPEAT A B button to select the point where the function ends B NOTE NOTE The disc will play from A to B repeatedly at the speed you chose To terminate the function press the CLEAR button or the REPEAT A B button again A B REPEAT does not allow you to set point B un...

Page 37: ...top and bottom of the screen will disappear The picture will look vertically stretched Depending on the type of disc the black bars may not disappear completely Zoom Fit The top bottom left and right of the screen are cut off and the central portion of the screen is enlarged For 4 3 aspect ratio discs Normal Wide Displays the content of the DVD title in 16 9 aspect ratio The picture will look hori...

Page 38: ...and the full screen appears The picture will look vertically stretched Zoom Fit The top bottom left and right of the screen are cut off and the central portion of the screen is enlarged For 4 3 aspect ratio discs Normal Screen Displays the content of the DVD title in 4 3 aspect ratio Screen Fit The top and bottom of the screen are cut off and the full screen appears The picture would look vertical...

Page 39: ...udio languages are represented by abbreviations 3 Use the LEFT RIGHT buttons to select Stereo RIGHT or LEFT On CD NOTE NOTE This function depends on what languages are encoded on the disc and may not work with all DVDs A DVD disc can contain up to 8 audio languages How to have the same audio language come up whenever you play a DVD Refer to Setting Up the Language Features on page 51 Using the Aud...

Page 40: ... whether or not the subtitle will be displayed Initially the subtitle will not appear on screen The subtitle languages are represented by abbreviations NOTE NOTE This function depends on what languages are encoded on the disc and may not work with all DVDs A DVD disc can contain up to 32 subtitle languages How to have the same subtitle language come up whenever you play a DVD Refer to Setting Up t...

Page 41: ...o see if an ANGLE mark is present at the upper left hand corner of the screen 1 When an ANGLE mark is shown press the ANGLE button then an ANGLE select icon will appear at the upper left hand corner of the screen 2 Use the LEFT RIGHT buttons to select the desired screen angle 3 To turn off the display press the ANGLE button again Using the ANGLE button ...

Page 42: ...n off the display 1 During play press the BOOKMARK button on the remote 2 Use the LEFT RIGHT buttons to select a marked scene 3 Press the PLAY button to skip to the marked scene 1 During play press the BOOKMARK button on the remote 2 Use the LEFT RIGHT buttons to select the bookmark number you want to delete 3 Press the CLEAR button to delete a bookmark number Press the BOOKMARK button to turn off...

Page 43: ...d quality and produce a greater surround effect This feature is useful when you are using the DVD player with a two channel stereo through the analog outputs Discs which are recorded with LPCM or DTS will not work 1 During play press the 3D button The 3D SOUND mark will be displayed on screen 2 Press the UP DOWN buttons to turn the 3D Sound feature on or off NOTE NOTE 3D Sound is possible only on ...

Page 44: ...ying Current Playback Time Current Playback Mode There are 4 modes toggle by the REPEAT button Off Normal Playback Track Repeat the current track Folder Repeat the current folder Random Files in the disc will be played in random order MP3 file icon JPEG file icon WMA file icon Folder icon Current Folder icon 00 00 23 1_mp3 B e c a u s e Yo u C a c t u s S a d D a y O f f Parent Folder Current Fold...

Page 45: ...t folder To select the Peer Folder Use the LEFT RIGHT buttons to highlight left window Use the UP DOWN buttons to select the desired folder then press ENTER To select the Sub Folder Use the LEFT RIGHT buttons to highlight right window Use the UP DOWN buttons to select the desired folder then press ENTER Root WMA JPEG MP3 SONG FILE 3 KORN SONG FILE 1 SONG FILE 2 1st 2nd Parent Folder Current Folder...

Page 46: ... Press ENTER to begin playback of the song file Press the REPEAT button to change playback mode There are 4 modes Off Track Folder and Random Off Normal Playback Track Repeats the current song file Folder Repeats the song files which have the same extention in the current folder Random Song files which have the same extension in disc will be played in random order To resume normal play press the C...

Page 47: ...d quality Conversely files with decompression rates below 128 Kbps will not be played properly Use a decompression transfer rate of at least 64Kbps when recording WMA files Sound quality with WMA files basically depends on the rate of compression decompression you choose Getting audio CD quality sound requires an analog digital sampling rate that is conversion to WMA format of at least 64Kbps and ...

Page 48: ... to 4X Normal 2X 4X 2X Normal The unit enters slide show mode Before the Slide Show begin the picture interval must be set When this icon is selected and ENTER is pressed the pictures change automatically with about 6 seconds interval The pictures change automatically with about 12 seconds interval The pictures change automatically with about 18 seconds interval Depending on the file size each int...

Page 49: ... to the blank segment A maximum of 500 images can be stored on a single CD When playing a Kodak Picture CD only the JPEG files in the pictures folder can be played Kodak Picture CD The JPEG files in the pictures folder can be played automatically Konica Picture CD If you want to see the Picture select the JPEG files in the clips menu Fuji Picture CD If you want to see the Picture select the JPEG f...

Page 50: ...select which type of screen you want to watch and several display options Parental Setup Setup of the Parental Level Allows users to set the level necessary to prevent children from viewing unsuitable movies such as those with violence adult subject matter etc 2 Use the UP DOWN buttons on the remote to access the different features 3 Press the ENTER button to access the sub features To make the se...

Page 51: ...nd the screen returns to Setup menu To make the Setup menu disappear press the RETURN or LEFT button This function changes the text language only on the disc menu screens 1 With the unit in Stop mode press the MENU button 2 Select Setup using UP DOWN buttons then RIGHT or ENTER button 3 Select Language Setup using UP DOWN buttons then press the RIGHT or ENTER button 4 Select Disc Menu using UP DOW...

Page 52: ... 3 Select Language Setup using UP DOWN buttons then press the RIGHT or ENTER button 4 Select Subtitle using UP DOWN buttons then press the RIGHT or ENTER button 5 Use the UP DOWN buttons to select English Select Automatic if you want the subtitle language to be the same as the language selected as the audio preference Select Others if the language you want is not listed Some discs may not contain ...

Page 53: ...using the Digital Audio Output NOTE NOTE Be sure to select the correct Digital Output or no audio will be heard DTS 1 Off Doesn t output digital signal 2 On Outputs DTS Bitstream via digital output only Select DTS when connecting to a DTS Decoder Dynamic Compression 1 On To select dynamic compression 2 Off To select the standard range NOTE NOTE How to make the Setup menu disappear or return to men...

Page 54: ...h you have a TV with a 4 3 ratio screen Black bars will appear at the top and bottom of the screen 2 4 3 Pan Scan Select this for conventional size TVs when you want to see the central portion of the 16 9 screen Extreme left and right side of movie picture will be cut off 3 16 9 Wide You can view the full 16 9 picture on your widescreen TV Still Mode These options will help prevent picture shake i...

Page 55: ... password Enter your password again The Parental Control screen appears About the Rating Level The Rating Level will work only when Use Password is set to Yes To unlock the player use UP DOWN to select No Use RIGHT or ENTER to select Rating Level Press ENTER Use UP DOWN to select the level e g Level 6 and press ENTER Discs that contain Level 7 will now not play To cancel the rating level use RIGHT...

Page 56: ...is product can be operated within temperature range of 50 F 86 F and humidity range of 30 80 Do not expose this product to direct sunlight or in a car with its windows closed Doing so may result in deformation of casing and circuitry as well as cause fire or bodily injury Do not let water sand dust or other foreign objects in the player Avoid using or storing the player in a place where there is s...

Page 57: ...ng Power It is recommended that you turn off the power to the DVD player when not use If you are not going to use it for prolonged period of time unplug the power cord from the wall outlet Maintenance of LCD Screen To keep the screen clean turn off the power and then wipe with a soft cloth About LCD Screen This LCD panel is designed with the latest technology ensuring 99 99 of active pixels When M...

Page 58: ... The battery pack may leak fluid that is harmful to your eyes If this fluid gets in your eyes wash eyes immediately with large amounts of running water and get medical attention immediately If the fluid gets on your skin or clothing wash immediately with water Caution 1 When not using the battery pack remove it and store in a cool place 2 Do not use the AC adapter or battery pack for a prolonged p...

Page 59: ...k becomes warm during recharge or use This is normal and is not a cause for concern A hot battery pack may take longer to charge or may not be charged at all Wait until the battery pack cools down before charging Battery pack Life and Use Low Temperature The lifetime of the battery pack is limited Power is slowly drained even when not using Though it varies for differing storage conditions the bat...

Page 60: ...oss of capacity AC Adapter The supplied AC adapter is compatible with 50 60Hz electrical system 110V 240V range Use of the AC adapter depends on the specific voltage requirements and electrical outlet design Using the AC adapter near a radio may cause poor reception Do not let any type of flammables liquid or metal objects in the adapter The adapter is covered with an outer plastic sheath Do not p...

Page 61: ...curely connected Check that the disc is a DVD region number 1 or all DVD RW AUDIO CD Do not use a disc that has scratches or dirt Check that the label side of the disc is facing up The pick up lens of the DVD player may be dirty Contact the service center for lens cleaning Check that the TV channel is set to VIDEO or AV if viewing with a TV Press power on from a cold start with no disc in the unit...

Page 62: ...ck Speakers cannot be used with the headphones Check that the DVD player is in the DVD mode and not in the INPUT mode Use a disc without scratches or dents Check that the video or audio cable is securely connected Make sure the S Video cable is used for output only Check that the DVD player is in the INPUT mode and not in the DVD mode No picture No sound No picture and sound Distorted video or sou...

Page 63: ...th a fully charged battery pack or use the AC adapter Replace with a fully charged battery pack or use the AC adapter If the DVD player is overheated and the battery pack s internal temperature goes up to a certain level you will not be able to charge the battery pack In this occurs remove the battery pack After the battery pack has sufficiently cooled down charging will begin automatically Check ...

Page 64: ...x D 10 4 in 50 F to 86 F 30 to 80 Reading Speed 11 45 ft sec Approx Play Time Single Sided Single Layer Disc 135 min Reading Speed 3 9 to 4 6 ft sec Maximum Play Time 74 min Reading Speed 3 9 to 4 6 ft sec Maximum Play Time 20 min 1 channel 1 0 Vp p 75 Ω load Luminance Signal 1 0 Vp p 75 Ω load Chrominance Signal 0 286 Vp p 75 Ω load L 1 L R 2 R 48 kHz Sampling 4 Hz to 22 kHz 96 kHz Sampling 4 Hz ...

Page 65: ... the purchaser must contact SAMSUNG for problem determination and service procedures SAMSUNG does not warrant uninterrupted or error free operation of the product All replaced parts and products become the property of SAMSUNG and must be returned to SAMSUNG Replacement parts and products assume the remaining original warranty or ninety 90 days whichever is longer This limited warranty covers manuf...

Reviews: