background image

TV Guide

English - 161

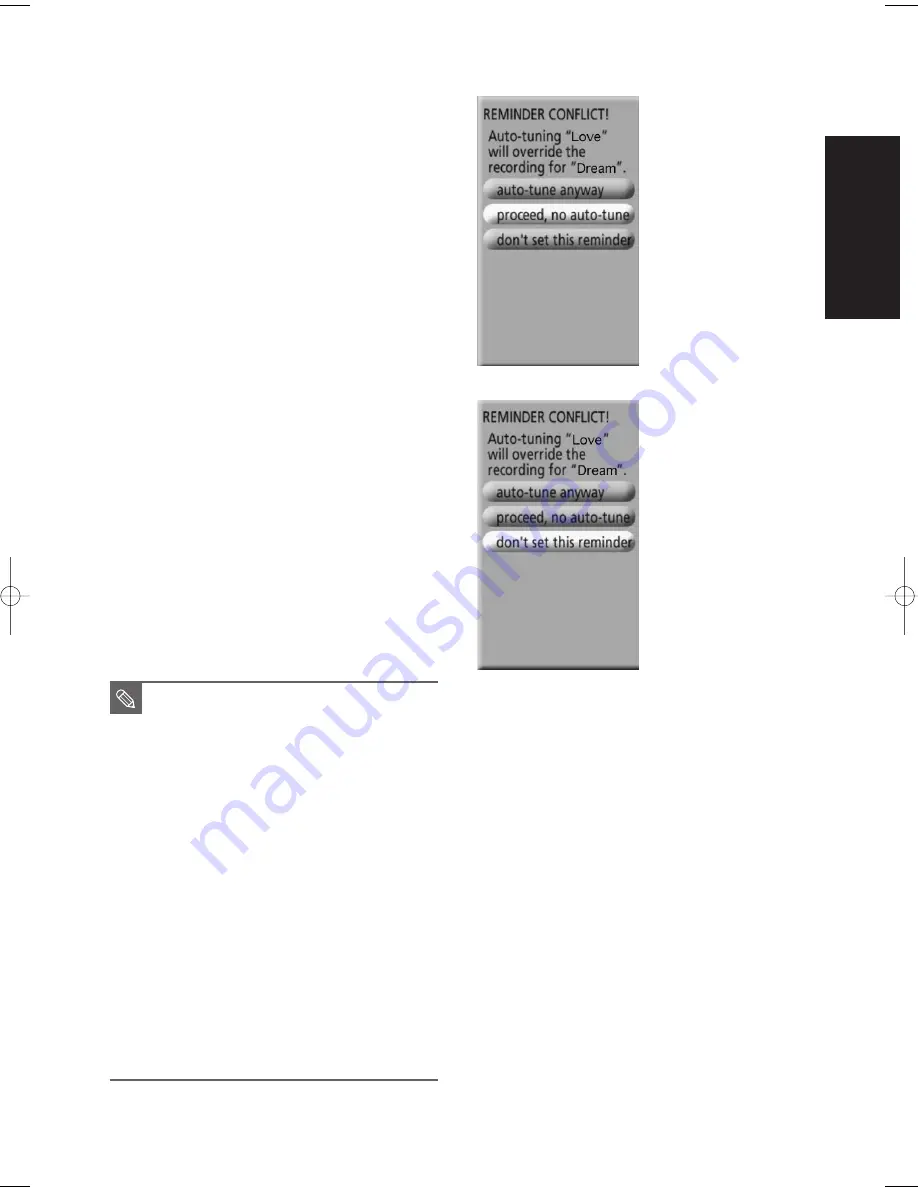
• proceed, no auto-tune - set the show as a 

Reminder but do not auto-tune

• don’t set this reminder - cancel the Reminder

Screen 2-1

Screen 2-2

Panel Menu Navigation

■ 

Press the INFO button to display a Help
screen. Press the INFO button again to
close the screen.

■ 

The up and down arrows move the
highlight among the options within a
Panel Menu. The number buttons on the
remote are used to input information.

■ 

An odometer option has arrows on both
sides.  Use the left and right arrows to
cycle through the different options.

■ 

Press ENTER from an option to highlight
the default command button (e.g., Watch
Now, Set Reminder, Schedule Reminder).
Press ENTER again to execute the action
and close the Panel Menu.

■ 

Select Cancel and press ENTER to close
the menu and return to the previous
screen, or press Menu on the remote to
cancel any changes, and close the menu.

NOTE

DVD-HR720_XAA_TV GUIDE127~167  2005.9.28  11:50 AM  Page 161

Summary of Contents for DVD-HR720/

Page 1: ...Instruction Manual DVD HR720 www samsung com TV Guide On Screen User s Manual is attached as an appendix English AK68 00758B 01 ...

Page 2: ... It cannot be used elsewhere This HDD DVD recorder is designed and manufactured to respond to the Region Management Information If the Region number of a DVD disc does not correspond to the Region number of this HDD DVD recorder the HDD DVD recorder cannot play the disc This device is protected by U S Patent Nos 4 631 603 4 577 216 4 819 098 4 90 7 093 and 6 516 132 This product incorporates copyr...

Page 3: ...have fallen into the apparatus the apparatus has been exposed to rain or moisture does not operate normally or has been dropped Precaution Handling Cautions Before connecting other components to this HDD DVD RECORDER be sure to turn them all off Do not move the HDD DVD RECORDER while a disc is being played or the disc may be scratched or broken the HDD DVD RECORDER s internal parts may be damaged ...

Page 4: ...function of the unit Once a DVD RW R recorded in Video Mode is finalized it becomes DVD Video Audio CD An audio disc on which 44 1kHz PCM Audio is recorded Plays CD DA format audio CD R and CD RW discs The unit may not be able to play some CD R or CD RW discs due to the condition of the recording Do not place the HDD DVD RECORDER on top of a heat source Do not disconnect the AC power cord while th...

Page 5: ... information after recording finishes This product optimizes the DVD R for each recording Optimizing is carried out when you start recording after inserting the disc or turning on the unit Recording onto the disc may become impossible if optimizing is carried out too many times Playback may be impossible in some cases due to the condition of recording This unit can play back DVD R discs recorded a...

Page 6: ...g DVD RAM discs come with or without a cartridge For this product we recommend DVD RAM discs that come without cartridges Ensure that the recording mode is set to VR mode Otherwise this product will not be able to play the recording You cannot play a DVD RAM in most DVD players due to compatibility issues Only DVD RAM standard Version 2 0 discs can be played in this unit DVD RAM recorded on this u...

Page 7: ...p 4 Connecting External devices 26 Connecting an external device to the AV 1 IN or AV 2 IN jacks 26 Connecting a Camcorder to the DV IN jack 27 Connecting a Cable box to the G Link jack 28 Step 5 Connecting the Power Cord 29 System Setup System Setup On Screen Menu Navigation 30 OSD Language Setup 31 Auto Clock Set 31 Manual Clock Set 33 Auto Channel Memory 34 Manual Channel Set 35 Auto Power Off ...

Page 8: ...Multiple Titles at One Time 106 Deleting an Undesired Title from the Copy List 108 Previewing a Selected Title from the Copy List 108 Selecting Record Mode of Each Title from the Copy List 109 Changing Record Mode of All Titles from the Copy List 109 Copying from DVD to HDD 110 Copying MP3 or JPEG Files from a Disc to HDD 111 File Copy 111 Folder Copy 112 Disc Manager 113 Editing the Disc Name 113...

Page 9: ...made on the same DVD or on the HDD High quality digital audio and video recording and playback Record up to 16 hours of video with a double sided 9 4 GB DVD RAM disc up to 8 hours of video with a 4 7 GB DVD RAM RW R disc up to 208 hours of video with the HDD depending on the recording mode Selectable Recording Mode You can set your HDD DVD RECORDER to one of four different recording speeds each va...

Page 10: ...ormatting is complete you can record on the disc You can play these type of discs on various DVD components only when they have been finalized Before Reading the User s Manual Make sure to check the following terms before reading the user manual Icons that will be used in manual Icon Term Definition HDD This involves a function available on the HDD This involves a function available DVD on DVD or ...

Page 11: ...dit menu you can operate various edit functions such as delete copy rename lock etc on a recorded title Creating a playlist DVD RAM RW in VR mode HDD With this HDD DVD RECORDER you can create a new playlist on a disc and edit it without the original pre existing recording You can only use either the VR or Video mode on a DVD RW but not both at the same time You can change the DVD RW to another for...

Page 12: ...remote sensor is blocked by obstacles Check if there is any fluorescent lighting nearby Video Audio Cable AC39 00073A RF Cable for TV AC39 42001J IR Blaster cable AK39 00055A Batteries for Remote Control AAA Size AC43 12002H Remote Control AK59 00023L Instruction Manual AK68 00758B TV Guide Setup Quick Guide AK68 00827D Quick Guide AK68 00827B Setting the Remote Control You can control certain fun...

Page 13: ...television brand try each one in turn until you find one that works If you replace the remote control s batteries you must set the brand code again NOTE BRAND BUTTON SELECO 74 SHARP 36 37 38 39 48 SIEMENS 71 SINGER 57 SINUDYNE 57 SONY 35 48 TELEAVA 73 TELEFUNKEN 67 73 75 76 THOMSON 72 73 75 THOMSON ASIA 80 81 TOSHIBA 47 48 49 50 51 52 WEGA 57 YOKO 06 ZENITH 63 BRAND BUTTON AIWA 82 ANAM 10 11 12 13...

Page 14: ...H BUTTONS Select TV preset Channels Same as CH button on the remote control 9 AV 2 INPUT Connect external equipment 10 DV INPUT Connect external digital equipment with a DV jack such as a camcorder 11 OPEN CLOSE BUTTON Opens and closes the disc tray 12 PLAY PAUSE BUTTON Plays a disc or pauses playback or recording 13 P SCAN BUTTON Selects the progressive scan mode 14 REC BUTTON Starts recording De...

Page 15: ...ing an S Video cable 6 COMPONENT VIDEO OUT best video quality Connects to equipment having Component video input jacks 7 AV 1 AUDIO IN Connects the output of external equipment using audio cables 8 AV 1 VIDEO IN Connects the output of external equipment using a video cable 9 AV 1 S VIDEO IN Connects the output of external equipment using an S Video cable 10 ANT IN ANT OUT TO TV Connects antenna ca...

Page 16: ... MENU Button Use this to return to the Title menu or to view the recorded files list 29 ANYKEY Button Allows access to common functions of the recorder 30 CANCEL Button 31 SUBTITLE Button Press this to switch the DVD s subtitle language 32 TV GUIDE When watching TV enters the Guide and highlights a show listing When in the Guide returns to display the current broadcast 33 MARKER Button Use this to...

Page 17: ...Step 5 Connecting the Power cord Quick Overview 17 Step 1 Connecting the Antenna Cable 18 Step 2 Connecting the Video cable 20 Step 3 Connecting the Audio cable 23 Step 4 Connecting External devices 26 Step 5 Connecting the Power Cord 29 Note to CATV system installer This reminder is provided to call CATV system installer s attention to Article 820 40 of the National Electrical Code Section 54 of ...

Page 18: ...T OUT TO ANT INPUT Wall Antenna HDD DVD RECORDER TV No Cable box You can record non scrambled channels by selecting the channel on the HDD DVD RECORDER Also use this Method if you watch channels without cable box The VHF UHF RF OUT jack of this product sends only signals received through the antenna It does not output Audio video signals You must connect audio video cables to view Video from the u...

Page 19: ...ng the channel on the cable box You cannot record one channel while watching another channel Be sure that the cable box is turned on The VHF UHF RF OUT jack of this product sends only signals received through the antenna It does not output Audio video signals You must connect audio video cables to view Video from the unit i e DVD playback NOTE ...

Page 20: ...deo signals You must use one of the following audio video connections on this unit Yellow Red White R L AUDIO VIDEO LINE IN Audio Video Cable Connecting to a Video input jack Connect a video yellow cable between the VIDEO yellow OUT jack on the HDD DVD RECORDER and VIDEO yellow IN jack on the TV or AV amplifier You will enjoy regular quality images Connect audio cables white and red between the AU...

Page 21: ...e element into black and white Y and color C signals to present clearer images than regular video input mode Connect audio cables white and red between the AUDIO OUT jacks on the HDD DVD RECORDER and AUDIO IN jacks on your TV or AV amplifier See pages 23 25 S Video and Component video outputs are available only if your TV supports S Video input or Component video input respectively If S Video or C...

Page 22: ...arates the picture element into black and White Y blue PB red PR signals to present clear and clean images Connect audio cables white and red between the AUDIO OUT jacks on the HDD DVD RECORDER and AUDIO IN jacks on your TV or AV amplifier See pages 23 25 Compared to standard interlaced video progressive scan doubles the amount of video lines fed to your TV resulting in a more stable flicker free ...

Page 23: ...ing the Audio cable There are several ways to connect your HDD DVD RECORDER Select the audio connection that best suits you below Audio Cable LINE IN Yellow Red White R L AUDIO VIDEO Connecting to your TV This connection will use your TV s speakers ...

Page 24: ...ting up LINE IN ANALOG AUDIO R L Audio Cable Front L speaker Front R speaker Red White Connecting to a stereo amplifier with analog input jacks If your stereo amplifier only has AUDIO INPUT jacks L and R use the AUDIO OUT jacks ...

Page 25: ...If your AV amplifier has a Dolby Digital or DTS decoder and a digital input jack use this connection To enjoy Dolby Digital or DTS sound you will need to set up the audio settings See pages 42 43 Manufactured under license from Dolby Laboratories Dolby and the double D symbol are trademarks of Dolby Laboratories DTS and DTS Digital Out are trademarks of Digital Theater Systems Inc ...

Page 26: ...UDIO Camcorder VIDEO S VIDEO CABLE BOX R L S Video Cable not supplied Audio Video Cable LINE OUT or Connecting an external device to the AV 1 IN or AV 2 IN jacks Connect a external device to AUDIO VIDEO AV 1 IN jacks or AV 2 IN jacks of the HDD DVD RECORDER You can record from connected equipment VCR STB DVD Cable Box or Camcorder Copy protected content cannot be recorded NOTE ...

Page 27: ...e input is not selected automatically press the INPUT button on the remote to select proper input NOTE Connecting a Camcorder to the DV IN jack If your camcorder has a DV output jack connect it to the DV input jack of your HDD DVD RECORDER ...

Page 28: ...ter cable as shown This connection enables you to control the cable box s power and channels Getting Connected 1 Find and Connect the included G Link cable into the G LINK jack of the HDD DVD Recorder 2 Find the Cable Box IR Sensor To control cable box recording find the IR sensor A Turn the cable box Off B Hold the cable box s remote so that it touches the front of the device see Figure 1 C Move ...

Page 29: ... being set The setup may take a few minutes When the HDD DVD RECORDER operates normally the current time is automatically set and displayed in the front panel display After the current time is set automatically HDD DVD RECORDER will perform Auto Channel Memory for about 3 minutes If power is turned on while Auto Channel Memory is in process Auto Channel Memory will stop In this case do Auto Channe...

Page 30: ...tings 4 RETURN Button Press this button on the remote control to return to the Previous menu screen displayed or to exit the on screen menu On Screen Menu Navigation 30 OSD Language Setup 31 Auto Clock Set 31 Manual Clock Set 33 Auto Channel Memory 34 Manual Channel Set 35 Auto Power Off Setting 36 CM Skip Time Setting 37 EP Mode Time Setting 38 Setting up the Front Display Options 39 Automatic Ch...

Page 31: ... remote control and the Guide screen will disappear NOTE Press 1 for English Touche 2 pour Français Pulse 3 para Español Auto Clock Set This menu is used to set the current time You need to set the time to use timer recording 1 With the unit in Stop mode press the MENU button 2 Press the buttons to select Setup then press the ENTER or button 3 Press the buttons to select System then press the ENTE...

Page 32: ...to the wrong time zone or daylight saving you can adjust these settings without turning off the Auto Clock Set function NOTE Clock Data CH Select a channel that carries a time signal using the buttons then press the ENTER button Select Auto to set the clock data channel automatically Time Zone Select the time zone of your area using the buttons then press the ENTER or button Select Automatic to se...

Page 33: ...R button When the current time is stored in memory and then the set is powered off the current time will appear in the front panel display Sets the value You can set the value using the number buttons œ Moves to items HDD MOVE SELECT RETURN EXIT Title Music Photo Timer Record Setup Clock Set Auto Clock Set Manual Clock Set HDD MOVE SELECT RETURN EXIT Title Music Photo Timer Record Setup Setup Syst...

Page 34: ...m then press the ENTER or button System menu will be displayed Auto Channel Memory HDD MOVE SELECT RETURN EXIT Title Music Photo Timer Record Setup Setup System Language Audio Video Parental Control HDD MOVE SELECT RETURN EXIT Title Music Photo Timer Record Setup System Clock Set Channel Set Auto Power Off Off CM Skip Time 15 Sec EP Mode Time 6 Hour Front Display Auto Dim Chapter Creator Off HDD M...

Page 35: ... first performed Auto Channel Memory Use the Manual Channel Setting to delete unnecessary channels after using the Auto Channel Memory 1 With the unit in Stop mode press the MENU button 2 Press the buttons to select Setup then press the ENTER or button 3 Press the buttons to select System then press the ENTER or button System menu will be displayed 4 Press the buttons to select Channel Set then pr...

Page 36: ...If the turn off time set with the Auto Power off function is reached during playback or recording the device will operate until the playback or recording is finished This feature automatically turns off your HDD DVD RECORDER if you do not press any button for 2 or 6 hours Auto Power Off Setting HDD MOVE SELECT RETURN EXIT Title Music Photo Timer Record Setup Setup System Language Audio Video Paren...

Page 37: ... time set is more than a remaining time of a current title The next title is played from the beginning When the time set is more than a remaining time of a play list the next scene is played CM Skip does not work in still picture mode When a set time is greater than the remaining time of a scene last title or last track that is currently displayed a prohibition mark appears CM Skip releases Repeat...

Page 38: ... MODE button repeatedly EP mode is one of four REC modes XP SP LP EP In EP Extended Play mode you can set recording time to 6 or 8 hours with this setting HDD MOVE SELECT RETURN EXIT Title Music Photo Timer Record Setup Setup System Language Audio Video Parental Control HDD MOVE SELECT RETURN EXIT Title Music Photo Timer Record Setup System Clock Set Channel Set Auto Power Off Off CM Skip Time 15 ...

Page 39: ... Bright Makes the Front Panel Display bright Dim Makes the Front Panel Display dim Auto Dim Makes the Front Panel Display dim automatically when the set is powered off HDD MOVE SELECT RETURN EXIT Title Music Photo Timer Record Setup Setup System Language Audio Video Parental Control HDD MOVE SELECT RETURN EXIT Title Music Photo Timer Record Setup System Clock Set Channel Set Auto Power Off Off CM ...

Page 40: ...79 about how to set recording speed The message Do you want to create the chapter menu after this recording is displayed 7 Press the œ buttons to select Yes and press the ENTER button A new chapter is created according to the selected recording mode A chapter will be about 5 minutes long in XP and SP and about 15 minutes long in LP and EP mode Do you want to create the chapter menu after this reco...

Page 41: ...tions If you set the On Screen menu disc menu audio and subtitle language in advance they will come up automatically every time you watch a movie If the selected language is not recorded on the disc the original pre recorded language is selected 1 With the unit in Stop mode press the MENU button 2 Press the buttons to select Setup then press the ENTER or button 3 Press the buttons to select Langua...

Page 42: ...ubtitles Disc Menu For the disc menu contained on the disc On Screen Menu For the on screen menu of your HDD DVD RECORDER 5 Press the buttons to select the desired language then press the ENTER or button HDD MOVE SELECT RETURN EXIT Title Music Photo Timer Record Setup Language Audio Original Subtitle Automatic Disc Menu English On Screen menu English Original English Français Deutsch Español Itali...

Page 43: ... On When Movie soundtracks are played at low volume or from smaller speakers the system can apply appropriate compression to make low level content more intelligible and prevent dramatic passages from getting too loud Digital Output 1 PCM Select this when your equipment is not Dolby Digital compatible 2 Bitstream Outputs Dolby Digital or MPEG 2 audio as bitstream Select this when your AV receiver ...

Page 44: ...ct Video then press the ENTER or button Video setup menu will be displayed 4 Press the buttons to select the desired video option then press the ENTER or button This function allows you to setup the TV screen settings This function depends on disc type It may not work for some disc types HDD MOVE SELECT RETURN EXIT Title Music Photo Timer Record Setup Video TV Aspect 16 9 Wide Input Level Lighter ...

Page 45: ...CAN button on the front of the HDD DVD RECORDER The message Press Yes to confirm Progressive scan mode Otherwise press No will appear Press the œ buttons to select Yes and then press the ENTER button 2 The message Please set your TV to Progressive input To deactivate press STOP key will appear Press the ENTER button If your TV supports Progressive Scan press the P SCAN button on the front of the H...

Page 46: ...t Mode Interlace Scan will appear Video Output Mode Interlace Scan Do not press the P SCAN button if you are using a TV that does not support Progressive mode as nothing will be displayed on the screen If you press the P SCAN button by mistake when your TV does not support Progressive mode the mode will then need to be released To release the Progressive mode press the P SCAN button on the front p...

Page 47: ...ed Enter your password again 5 Press the ENTER or button to select Password 6 Press the buttons to select On or Off then press the ENTER or button If you forgot your password 1 Remove the disc 2 Press and hold the PLAY and STOP buttons simultaneously on the front panel for 5 seconds or more Press the RETURN or œ button to return to the previous menu Press the MENU button to exit the menu NOTE HDD ...

Page 48: ... discs that contain Level 7 8 will not play A larger number indicates that the program is intended for adult use only See page 47 if you forgot your password NOTE HDD MOVE SELECT RETURN EXIT Title Music Photo Timer Record Setup Parental Control Password On Rating Level Level 1 Kids Change Password HDD MOVE SELECT RETURN EXIT Title Music Photo Timer Record Setup Parental Control Password On Rating ...

Page 49: ...he Disc Menu Title Menu 51 Using the Search Skip Functions 51 Slow Motion Play Step Motion Play 52 About ANYKEY 53 Playing the Title List 55 Navigation Menu 56 Using the Markers 59 Using the Bookmarks 61 Selecting the Subtitle Language 63 Selecting the Soundtracks Audio Channels 64 Changing the Camera Angle 65 Repeat Play 65 Zooming In 67 Select Media 68 Playing an Audio CD MP3 68 Playing a Pictur...

Page 50: ... allow the disc to become dirty or scratched finger prints dirt dust scratches or deposits of cigarette smoke on the recording surface may make it impossible to use the disc for recording DVD RAM RW R discs may not be able to play on some DVD players depending on the player disc and the condition of the recording Discs with PAL programs recorded on them cannot be recorded using this product NOTE W...

Page 51: ...tton to move to the disc s title menu of the disc Press this button if the disc contains more than one title Some discs may not support the title menu functionality Some type of discs contain a dedicated menu system that allows you to select special functions for title chapter audio track subtitle film preview information on characters etc HDD DVD VIDEO DVD RAM RW R AUDIO CD CD DA Fast X 2 Fast X ...

Page 52: ...mode If you press the SKIP button it moves to the next chapter track or marker HDD DVD RAM RW VR mode Slow Motion Play Step Motion Play Slow Motion Play In pause or step mode press the SEARCH buttons on the remote control If you press the SEARCH button Slow 1 8 Slow 1 4 Slow 1 2 If you press the SEARCH button Slow 1 8 Slow 1 4 Slow 1 2 To return to normal speed playback press the PLAY button Press...

Page 53: ...e ANYKEY button during playback 2 Press the buttons to select Search then press the ENTER or button Search Navigation Marker Subtitle Audio Repeat Zoom Select Media Disc Manager HDD 1 10 00 01 45 Title Time MOVE CHANGE DVD Video 1 10 1 40 00 01 45 Title Chapter Time MOVE CHANGE Step Motion Play Press the STEP buttons on the remote control in the pause mode Each time the button is pressed a new fra...

Page 54: ... buttons to select Time 4 Enter the time in the sequence of hours minutes and seconds using the number buttons then press the ENTER button Search Navigation Marker Subtitle Audio Repeat Zoom Select Media Disc Manager HDD 1 10 00 01 45 Title Time MOVE CHANGE DVD Video 1 10 1 40 00 01 45 Title Chapter Time MOVE CHANGE This may not work for some discs When an audio CD CD DA or an MP3 disc is inserted...

Page 55: ...g the INFO button three times Current playback information screen appears Displays information of Playback Name Title Created Time Length Playing Time Audio and if the disc protection is activated 3 To stop title play press the STOP button To return the title list screen press the TITLE LIST button HDD MOVE SELECT RETURN EXIT Title Music Photo Timer Record Setup Title Press ENTER or Right button f...

Page 56: ...t to play from Title List then press the ANYKEY button 3 Press the buttons to select Navigation then press the ENTER or button 4 Press the buttons to select Scene Navigation then press the ENTER or button 5 Press the œ œ buttons to select desired scene then press the ENTER or PLAY button HDD No Title Length MOVE SELECT RETURN EXIT Title List 001 JAN 18 2005 12 15A 00 10 21 002 JAN 19 2005 12 15A 0...

Page 57: ...button 4 Press the œ œ buttons to select desired scene then press the ENTER or PLAY button Search Navigation Marker Subtitle Audio Repeat Zoom Select Media Disc Manager Search Navigation Marker Subtitle Audio Repeat Zoom Select Media Disc Manager Scene Navigation Time Navigation MOVE SELECT RETURN EXIT Scene Navigation HDD Title List No 1 01 00 00 16 01 00 05 16 1 1 Page Scene Navigation will not ...

Page 58: ...Navigation Time Navigation Cursor does not move if the selected recorded title is shorter than 1 minute The Navigation function may not work on a disc that has not been recorded by this device An edited title may not display the exact search time NOTE HDD No Title Length MOVE SELECT RETURN EXIT Title List 001 JAN 18 2005 12 15A 00 10 21 002 JAN 19 2005 12 15A 00 40 03 003 JAN 20 2005 12 15A 00 20 ...

Page 59: ...nd the scene is memorized 3 Press the œ buttons to move to the next position 4 Press the ENTER button again when the desired scene appears The number 02 is displayed and the scene is memorized HDD DVD RAM or DVD RW VR Mode discs have the Marker function instead of the Bookmark function The Marker function allows you to mark up to 99 scenes Since the scenes may be displayed as many different pages ...

Page 60: ...to the next marker MOVE PLAY CANCEL RETURN Marker 01 02 N 2 MOVE PLAY CANCEL RETURN Marker 01 02 N 2 Search Navigation Marker Subtitle Audio Repeat Zoom Select Media Disc Manager Clearing a marker Using the MARKER button 1 Press the MARKER button during playback Using the ANYKEY button Press the ANYKEY button during playback Press the buttons to select Marker then press the ENTER or button 2 Press...

Page 61: ...y one and the 8th marker becomes the 7th V mode MOVE SELECT RETURN Bookmark 2 Press the ENTER button when the desired scene appears The number 1 is displayed and the scene is memorized 3 Press the œ buttons to move to the next position 4 Press the ENTER button again when the desired scene appears The number 2 is displayed and the scene is memorized Repeat above to bookmark other positions You can ...

Page 62: ...ene Search Bookmark Audio Subtitle Angle Repeat Zoom Select Media MOVE PLAY CANCEL RETURN Bookmark 1 2 Clearing a bookmark Using the MARKER button 1 Press the MARKER button during playback Using the ANYKEY button Press the ANYKEY button during playback Press the buttons to select Bookmark then press the ENTER or button 2 Press the œ buttons to select a bookmarked scene 3 Press the CANCEL button to...

Page 63: ...age Using the ANYKEY button 1 Press the ANYKEY button during playback 2 Press the buttons to select Subtitle then press the ENTER or button 3 Press the buttons to select the desired subtitle language then press the ENTER or button The subtitle display may be different depending on the disc type Some discs allow you to select the language for the disc menu only If the subtitles overlap disable the ...

Page 64: ...e HDD DVD RAM RW DVD VIDEO Dolby Digital 2 0 L R Audio ENG Dolby Digital 5 1CH Audio Using the ANYKEY button 1 Press the ANYKEY button during playback 2 Press the buttons to select Audio then press the ENTER or button 3 Press the buttons to select the desired soundtracks or audio channel then press the ENTER or button Search Navigation Marker Subtitle Audio Repeat Zoom Select Media Disc Manager Se...

Page 65: ...le 2 Angle 3 Angle 4 Angle 5 Angle 6 Search Bookmark Audio Subtitle Angle Repeat Zoom Select Media Search Bookmark Audio Subtitle Angle Repeat Zoom Select Media This function is disc dependent and may not work on all DVDs This function does not work when a DVD has not been recorded with a multi camera angle system NOTE Playing Repeatedly Repeat Playback Using the REPEAT button 1 Press the REPEAT b...

Page 66: ...Zoom Select Media Disc Manager Repeat Off Repeat A B Repeat Title Search Navigation Marker Subtitle Audio Repeat Zoom Select Media Disc Manager HDD DVD RAM RW VR mode unfinalized DVD R and unfinalized DVD RW V mode discs will not repeat a chapter NOTE Repeat A B Using the REPEAT A B button 1 Press the REPEAT A B button during playback 2 Press the ENTER button at the point where you want the repeat...

Page 67: ...he buttons to select Zoom then press the ENTER or button will be displayed 3 Press œ buttons to move to the area you want to enlarge 4 Press the ENTER button The screen will be enlarged to twice the normal size The screen size will be enlarged to four times the normal size Zooming In Search Navigation Marker Subtitle Audio Repeat Zoom Select Media Disc Manager If you set point B before five second...

Page 68: ...ess the buttons to select the track song you want to hear and then press the ENTER button MOVE SELECT RETURN EXIT Music List TRACK 1 TRACK 2 TRACK 3 TRACK 4 TRACK 5 TRACK 6 TRACK 7 1 3 Page CD DA 01 15 04 57 CDDA CDDA CDDA CDDA CDDA CDDA CD TRACK 1 02 10 Audio CD CD DA Screen Elements 1 Current track song Displays the number of the track currently being played 2 Displays the current play index tot...

Page 69: ...ayed and the tracks songs are played automatically 2 Press the buttons to select the track you want to hear and then press the ENTER button MP3 Screen Elements 1 Current track song Displays the name of the track being played 2 Displays the current folder play index and current track size 3 Displays available buttons 4 This shows the operating state of a disc and a playback time corresponding to a ...

Page 70: ...splayed Copy Play Mode Go To Playlist New Playlist or Select Media Repeat CD CD DA MP3 Using the REPEAT button 1 Press the REPEAT button during playback 2 Press the REPEAT button repeatedly to select the repeat mode you want Repeat Track CD CD DA MP3 Repeat Folder MP3 Repeat All CD CD DA MP3 Random CD CD DA MP3 The random option plays a disc s track in random order Normal CD CD DA MP3 Track on a d...

Page 71: ...DA CDDA CDDA CDDA CD CDDA 01 TRACK 1 02 TRACK 3 03 TRACK 7 04 TRACK 4 Using the ANYKEY button 1 Press the ANYKEY button during the Music List playback 2 Press the buttons to select Play Mode then press the ENTER or button 3 Press the buttons to select desired play mode then press the ENTER or button Normal CD CD DA MP3 Tracks on a disc are played in the order in which they were recorded on the dis...

Page 72: ...ss the ENTER button The selected tracks are played automatically MOVE SELECT RETURN EXIT Music List TRACK 1 TRACK 2 TRACK 3 TRACK 4 TRACK 5 TRACK 6 TRACK 7 1 3 Page CD DA 01 15 04 57 CDDA CDDA CDDA CDDA CDDA CDDA CD TRACK 1 02 10 Play Mode Go To Playlist New Playlist MOVE SELECT RETURN EXIT Make Playlist TRACK 1 TRACK 2 TRACK 3 TRACK 4 TRACK 5 TRACK 6 TRACK 7 1 3 Page CDDA CDDA CDDA CDDA CDDA CDDA...

Page 73: ...e ENTER or button 5 Press the œ œ buttons to select Yes then press the ENTER button The selected Playlist is deleted MOVE SELECT RETURN EXIT Music List TRACK 1 TRACK 2 TRACK 3 TRACK 4 TRACK 5 TRACK 6 TRACK 7 1 3 Page CD DA 01 15 04 57 CDDA CDDA CDDA CDDA CDDA CDDA CD TRACK 1 02 10 Play Mode Go To Playlist New Playlist MOVE SELECT RETURN EXIT Playlist Playlist 1 Playlist 2 1 1 Page PLAYLIST 00 00 C...

Page 74: ...1 3 Page CDDA CDDA CDDA CDDA CDDA CDDA CDDA CD 01 TRACK 1 02 TRACK 3 03 TRACK 7 04 TRACK 4 1 1 Page MOVE Add RETURN EXIT Edit Playlist TRACK 1 TRACK 2 TRACK 3 TRACK 4 TRACK 5 TRACK 6 TRACK 7 1 3 Page CDDA CDDA CDDA CDDA CDDA CDDA CDDA CD 01 TRACK 1 02 TRACK 3 03 TRACK 7 04 TRACK 4 1 1 Page Go To Music List 1 Press the ANYKEY button during the Playlist playback 2 Press the buttons to select Go To M...

Page 75: ... 01 15 4 0 MB MP3 MP3 MP3 MP3 MP3 CD flower mp3 02 10 Copy Play Mode Go To Playlist New Playlist Select Media Viewing a Picture 1 Insert a JPEG disc or Mixed disc JPEG MP3 into the disc tray 2 Press the buttons to select Photo then press the ENTER or button 3 Press the œ buttons to select a picture To see the next 8 pictures press the SKIP button To see the previous 8 pictures press the SKIP butto...

Page 76: ...ge Slow Normal Fast Copy Slide Show Select Media To stop the Slide Show 1 Press the ANYKEY button 2 Press the buttons to select Slideshow Off then press the ENTER or button Slideshow Slideshow Off Go To Photo List Rotate To set up follow steps 1 3 on page 75 4 Press the ENTER button to select the picture you want to see then press the ANYKEY button 5 Press the buttons to select Rotate then press t...

Page 77: ... 1 Press the ANYKEY button 2 Press the buttons to select Zoom Off then press the ENTER or button Slideshow Rotate Zoom Go To Photo List Zoom Off Go To Photo List Go To Photo List To set up follow steps 1 3 on page 75 4 Press the ENTER button to select the picture you want to see then press the ANYKEY button 5 Press the buttons to select Go To Photo List then press the ENTER or button Slideshow Rot...

Page 78: ...alized not finalized finalized not finalized Not recordable Recordable Not recordable Recordable Not recordable Not recordable Not recordable Recordable Not recordable Not recordable Not recordable Recordable finalized not finalized Recordable Recordable DVD RW DVD R HDD DVD RAM DVD RW DVD R Before Recording 78 Recording the current TV program you are watching 80 Recording from external equipment ...

Page 79: ...disc Yes No Uninitialized Disc Do you want to initialize this disc Yes No Recording Mode Select one of four recording modes by pressing the REC MODE button repeatedly while the unit is in Stop mode for the desired recording time and picture quality In general picture quality improves as the recording time decreases Unrecordable video Video with copy protection cannot be recorded on this HDD DVD RE...

Page 80: ...Copy Once Copy Never DVD RW Ver 1 1 O DVD RW Ver 1 1 with CPRM VR mode O O V mode O DVD R O DVD RAM Ver 2 0 O O Signal type RecordingthecurrentTV programyouarewatching Check that the disc has enough available space for the recording Adjust the recording mode 1 Press the HDD or DVD button If you select DVD Press the OPEN CLOSE button and place a recordable disc on the disc tray Press the OPEN CLOSE...

Page 81: ...a recording in progress When using DVD RAM RW R discs the message Updating the information of disc Please wait for a moment is displayed You cannot change the recording mode and the channel while recording Recording will stop automatically if there is no free space left for recording Up to 99 titles can be recorded onto a disc DVD RAM RW R Up to 999 titles can be registered on the HDD HDD recordin...

Page 82: ... changes in the following sequence CH Number AV 1 AV 2 DV If you connect a digital camcorder press the INPUT button to select DV See page 83 3 Press the REC MODE button repeatedly or press the REC MODE button then press the buttons to select the recording speed quality SP LP EP XP 4 Press the REC button Information concerning the external input mode is displayed on the screen then recording begins...

Page 83: ...k record menu that enables camcorder control appears on the top of the screen 5 Select the Play icon on the upper part of the screen to playback the camcorder and find the starting position to copy You can press the PLAY button of the remote control to play the camcorder 6 To start recording use the œ buttons to select Record icon in the top side of the screen then press the ENTER button You can p...

Page 84: ...p recording is displayed Press the œ buttons to select Yes then press the ENTER button Or press the STOP button again About INFO button During recording press the INFO button once the system information screen appears Displays Active Status Background Status and Main Screen information Pressing the INFO button twice Disc information screen appears Displays Total numbers of Titles and Playlists Rec...

Page 85: ...le that you are currently recording from the beginning Stopping Playback Recording 1 Press the STOP button Playback screen disappears and the recording in progress screen appears 2 Pressing the STOP button once more will stop the recording Play No sound is heard during search mode DVD disc playback is available during HDD recording However JPEG and MP3 files in the disc cannot be played back HDD p...

Page 86: ...ot available while timer recording is active NOTE Using the TITLE LIST button 1 With the unit in recording mode press the TITLE LIST button The Title List screen is displayed 2 Press the SKIP buttons to select the title you want to play ENTER or PLAY button Selected title list will be played back Play HDD No Title Length MOVE SELECT RETURN EXIT Title List 008 JAN 18 2005 02 15A 00 10 21 009 JAN 19...

Page 87: ... List is a list of previously recorded programs If a title is deleted that title cannot be played again Play List This refers to a list of user selected titles When one playlist is played only the scene selected by the user will play and then stop Even if the playlist is deleted the original recording will remain VR mode only Recording or editing might not be completed if an error such as a sudden...

Page 88: ... all the character inputs Save Registers the character inputs 5 Press the œ buttons to select Save and then press the ENTER button The changed title name is displayed on the title item of the selected entry HDD MOVE SELECT RETURN EXIT Rename JAN 1 8 2005 12 15 AM CH 11 Back Space Space Delete Clear Save HDD MOVE SELECT RETURN EXIT Rename Sports A1 Back Space Space Delete Clear Save HDD No Title Le...

Page 89: ...locked status HDD MOVE SELECT RETURN EXIT Title List Title Protection JAN 18 2005 12 15 AM CH11 JAN 18 2005 12 15 AM SP On Off HDD No Title Length MOVE SELECT RETURN EXIT Title List 001 JAN 18 2005 12 15A 00 10 21 002 JAN 19 2005 12 15A 00 40 03 003 JAN 20 2005 12 15A 00 20 15 004 JAN 25 2005 12 15A 00 50 16 1 1 Page JAN 18 2005 12 15 AM CH11 JAN 18 2005 12 15 AM SP Rename Protection Copy Delete E...

Page 90: ...e is displayed 4 Press the œ buttons to select Yes then press the ENTER button HDD Title List Deleting Please wait JAN 18 2005 12 15 AM CH11 JAN 18 2005 12 15 AM SP HDD No Title Length MOVE SELECT RETURN EXIT Title List 001 JAN 19 2005 12 15A 00 40 03 003 JAN 20 2005 12 15A 00 20 15 004 JAN 25 2005 12 15A 00 50 16 1 1 Page JAN 19 2005 12 15 AM CH11 JAN 19 2005 12 15 AM SP HDD MOVE SELECT RETURN EX...

Page 91: ... in the Title Protection menu See page 89 When the Disc Protection has been set to Protected you cannot delete titles See page 114 Once an entry is deleted from the Title List it cannot be recovered Once DVD RW R is finalized it cannot be deleted NOTE HDD No Title Length MOVE SELECT RETURN EXIT Title List 001 JAN 18 2005 12 15A 00 10 21 002 JAN 19 2005 12 15A 00 40 03 003 JAN 20 2005 12 15A 00 20 ...

Page 92: ...XIT Split 00 00 00 Title List No 001 Split 1 00 00 00 Split 2 00 00 00 Select Split Return HDD JAN 18 2005 12 15 AM CH11 MOVE SELECT RETURN EXIT Split 00 05 21 Title List No 05 Split 1 00 00 00 Split 2 00 05 21 Select Split Return This title cannot be recovered after spliting Do you want to split No Yes HDD No Title Length MOVE SELECT RETURN EXIT Title List 001 JAN 18 2005 12 15A 00 10 21 002 JAN ...

Page 93: ...ELECT RETURN EXIT Partial Delete 00 01 00 Title List No 001 Start 00 00 00 End 00 00 00 Start End Delete Return HDD JAN 18 2005 12 15 AM CH11 MOVE SELECT RETURN EXIT Partial Delete 00 01 00 Title List No 001 Start 00 01 00 End 00 00 00 Start End Delete Return HDD No Title Length MOVE SELECT RETURN EXIT Title List 001 JAN 18 2005 12 15A 00 10 21 002 JAN 19 2005 12 15A 00 40 03 003 JAN 20 2005 12 15...

Page 94: ... 5 seconds you will be prompted with the message The range is too short If the end time precedes the starting time you will be prompted with the message End point cannot be marked earlier than start point The section cannot be deleted when it includes a still picture Press the MENU button after the operation has finished The Title List screen will disappear NOTE HDD JAN 18 2005 12 15 AM CH11 MOVE ...

Page 95: ... at the end point The image and end point time are displayed in the End window The yellow colored selection bar moves to the Make item VR mode HDD New Playlist MOVE SELECT RETURN EXIT Make Playlist 00 00 10 Scene No 001 Start 00 00 00 End 00 00 00 Start End Make Return HDD New Playlist MOVE SELECT RETURN EXIT Make Playlist 00 00 10 Scene No 001 Start 00 00 10 End 00 00 00 Start End Make Return Tit...

Page 96: ...ith the unit in Stop mode Playback mode press the MENU button Press the buttons to select Title then press the ENTER or button The Title List screen is displayed Press the ANYKEY button Press the buttons to select Playlist then press the ENTER or button Press the buttons to select Go To Playlist then press the ENTER or button 2 Press the buttons to select the playlist you want to play then press t...

Page 97: ... in Renaming the Title See page 88 The maximum number of characters that can be entered is 31 All 31 characters can be displayed by pressing the INFO button 5 Press the œ buttons to select Save then press the ENTER button The changed title is displayed in the title field of the selected playlist entry VR mode HDD No Title Length MOVE SELECT RETURN EXIT Playlist 001 Dolphin 00 10 21 002 JAN 19 2005...

Page 98: ...elect the scene you want to play then press the ANYKEY button The playlist entry to be played is selected 5 Press the buttons to select Play then press the ENTER or button The selected scene is played To stop scene play press the STOP button VR mode Playing a Selected Scene HDD Playlist No 1 MOVE SELECT RETURN EXIT Edit Playlist HDD No Title Length MOVE SELECT RETURN EXIT Playlist 001 JAN 16 2005 ...

Page 99: ...ene you want to modify is changed with the selected section The yellow colored selection bar moves to the Change item Modifying a Scene Replacing a Scene HDD New Playlist MOVE SELECT RETURN EXIT Modify Scene 00 00 20 Scene No 001 Start 00 00 20 End 00 00 00 Start End Change Cancel HDD New Playlist MOVE SELECT RETURN EXIT Modify Scene 00 00 30 Scene No 001 Start 00 00 20 End 00 00 30 Start End Chan...

Page 100: ...osition of a Scene HDD Playlist No 1 MOVE SELECT RETURN EXIT Edit Playlist Cancel 01 00 00 26 02 00 00 07 03 00 00 04 04 00 00 03 05 00 00 26 06 00 01 07 1 1 Page HDD Playlist No 1 MOVE SELECT RETURN EXIT Edit Playlist Cancel 01 00 00 26 02 00 00 07 03 00 00 04 04 00 00 03 01 00 00 26 02 00 00 07 1 1 Page HDD Playlist No 1 MOVE SELECT RETURN EXIT Edit Playlist Return 01 00 01 07 02 00 00 07 03 00 ...

Page 101: ...16 2005 12 15AM MOVE SELECT RETURN EXIT Add Scene 00 00 15 Scene No 001 Start 00 00 15 End 00 00 00 Start End Add Cancel HDD JAN 16 2005 12 15AM MOVE SELECT RETURN EXIT Add Scene 00 00 00 Scene No 001 Start 00 00 00 End 00 00 00 Start End Add Cancel Title List 1 7 Title List 1 7 7 Press the ENTER button at the end point of the scene The image and end point time are displayed in the End window To c...

Page 102: ...Stop mode Playback mode press the MENU button Press the buttons to select Title then press the ENTER or button The Title List screen is displayed Press the ANYKEY button Press the buttons to select Playlist then press the ENTER or button Press the buttons to select Go To Playlist then press the ENTER or button 2 Press the buttons to select the title you want to edit from the Playlist then press th...

Page 103: ... the HDD to a DVD RAM at the following times Note The dubbing times are approximate and depend on the disc and data conditions XP SP LP EP You can select the recording quality you want to dub to You cannot dub a lower quality mode i e EP to a higher quality mode i e XP Record time of title to be copied Copy start button Record mode setup button Remaining time and space on the current disc in DVD R...

Page 104: ...ng see page 106 8 Press the ENTER or button to select Start then press the ENTER button About Using COPY button Press the buttons to select title you want to copy from the title list and then press the COPY button on the remote control You can go to the copy screen During Playback you can also copy the title by pressing the COPY button HDD No Title Length MOVE SELECT RETURN EXIT Title List 001 JAN...

Page 105: ...ted the title to be copied is displayed at its playback speed while copying To cancel the copying in progress press the CANCEL button 11 1 After a successful copy The title is successfully copied message is displayed HDD 1 DVD If you want to stop copy press CANCEL key HDD 1 DVD If you want to stop copy press CANCEL key The title is successfully copied High speed copy This means that you can transf...

Page 106: ...tton 1 Press the OPEN CLOSE button and place a recordable disc on the disc tray 2 Press the OPEN CLOSE button to close the disc tray Wait until LOAD disappears from the front panel display Check that the disc has enough available space for the recording 3 Select the HDD by pressing the HDD button on the front panel of the HDD DVD RECORDER or on the remote control 4 With the unit in Stop mode Playb...

Page 107: ...ibed on page 105 NOTE HDD Copy To HDD DVD MOVE SELECT RETURN EXIT Copy 1 JAN 18 2005 12 15A LP HS 00 10 21 No Title Rec Mode Length Add to list Start Rec Mode DVD Available LP 04 00 16 4 48 GB 00 10 21 0 25 GB Total DVD Available LP 04 00 16 4 48 GB 00 56 03 1 88 GB Total HDD Copy To HDD DVD MOVE SELECT RETURN EXIT Copy 1 JAN 18 2005 12 15A LP HS 00 10 21 2 JAN 19 2005 13 15A LP HS 00 15 21 3 JAN ...

Page 108: ...5A LP HS 00 30 21 No Title Rec Mode Length Add to list Start Rec Mode DVD Available LP 04 00 16 4 48 GB 00 56 03 1 88 GB Total HDD Copy To HDD DVD MOVE SELECT RETURN EXIT Copy 1 JAN 18 2005 12 15A LP HS 00 10 21 2 JAN 19 2005 13 15A SP LS 00 15 21 3 JAN 20 2005 15 15A SP HS 00 30 21 No Title Rec Mode Length Add to list Start Rec Mode DVD Available LP 04 00 16 4 48 GB 00 56 03 1 88 GB Total HDD Cop...

Page 109: ...copying process can be performed as described in pages 104 to 105 HDD Copy To HDD DVD MOVE SELECT RETURN EXIT Copy 1 JAN 18 2005 12 15A LP HS 00 10 21 2 JAN 19 2005 13 15A SP LS 00 15 21 3 JAN 20 2005 15 15A SP HS 00 30 21 No Title Rec Mode Length Add to list Start Rec Mode DVD Available LP 04 00 16 4 48 GB 00 56 03 1 88 GB Total HDD Copy To HDD DVD MOVE SELECT RETURN EXIT Copy 1 JAN 18 2005 12 15...

Page 110: ...st and then press the COPY button on the remote control The Copy screen will appear with the selected title added During Playback you can also copy the title by pressing the COPY button 7 Press the ENTER or buttons to select Start then press the ENTER button DVD 1 HDD If you want to stop copy press CANCEL key DVD RAM VR Copy To DVD HDD MOVE SELECT RETURN EXIT Copy 1 JAN 18 2005 12 15A LP HS 00 10 ...

Page 111: ...s not available Record mode cannot be changed when you copy a title from DVD to HDD NOTE Copying MP3 or JPEG Files from a Disc to HDD File Copy 1 Insert a JPEG disc or MP3 disc into the disc tray 2 Press the OPEN CLOSE button to close the disc tray Wait until LOAD disappears from the front panel display Check that the disc has enough available space for the recording 3 Press the buttons to select ...

Page 112: ...umber 1 1 Copying File Name Bryan Adams mp3 43 Folder Copy 1 Insert a Disc JPEG or MP3 in to the tray 2 Press the buttons to select Music or Photo then press the ENTER or button The MP3 or JPEG folder is displayed 3 Press the buttons to select the MP3 or JPEG folder you want to copy then press the ANYKEY button 4 Press the buttons to select Copy then press the ENTER or button Folder copy begins Su...

Page 113: ...om a disc to the HDD File size on a disc and the copied file in the HDD may be slightly different due to the file system NOTE Editing the Disc Name Follow these instructions to give a name to a disc 1 With the unit in Stop mode press the ANYKEY button 2 Press the buttons to select Disc Manager then press the ENTER or button Disc Manager DVD RAM VR MOVE SELECT RETURN EXIT Disc Manager Search Scene ...

Page 114: ...perations 1 With the unit in Stop mode press the ANYKEY button 2 Press the buttons to select Disc Manager then press the ENTER or button 3 Press the œ buttons to select Protection then press the ENTER button 4 Press the œ buttons to select On then press the ENTER button Search Scene Navigation Time Navigation Marker Rec Mode Select Madia Disc Manager DVD RAM VR MOVE SELECT RETURN EXIT Disc Manager...

Page 115: ...t DVD VR DVD V DVD RAM DVD RW DVD RW DVD R DISC DVD RW VR MOVE SELECT RETURN EXIT Disc Manager Disc Name Used Space Available Space 00 10 32 01 29 SP Not Protected VR Mode Disc Protection Info Current Rec Mode Protection Rename Delete All Finalize Format DVD V DVD VR Choose the recording format for DVD RW HDD MOVE SELECT RETURN EXIT Disc Manager Title Partition Used Space Available Space 00 10 32 ...

Page 116: ...ace Available Space 00 10 32 054 20 SP 0006MB 10034MB Delete All Format Music Photo Partition Used Space Available Space HDD MOVE SELECT RETURN EXIT Disc Manager Title Partition Used Space Available Space 00 10 32 054 20 SP 0006MB 10034MB Delete All Format Music Photo Partition Used Space Available Space HDD MOVE SELECT RETURN EXIT Disc Manager Title Partition Used Space Available Space 00 10 32 0...

Page 117: ...01 06 SP Disc Protection Info Not Protected Rename Protection Delete All Format DVD RAM VR MOVE SELECT RETURN EXIT Disc Manager Disc Name Used Space Available Space 00 11 56 00 11 56 SP Disc Protection Info Not Protected Rename Protection Delete All Format No Yes Do you want to delete all title lists When Protected Entry exists The Delete All Title List function will not operate If there is a titl...

Page 118: ...Yes Do you want to finalize disc If you select Yes you will be prompted again with the message Disc will be finalized Do you want to continue 4 Press the œ buttons to select Yes then press the ENTER button The disc is finalized Once a disc is finalized you cannot delete entries from the record list After being finalized the DVD R DVD RW video mode operates in the same manner as a DVD Video Dependi...

Page 119: ...pace Available Space 00 00 00 00 00 SP DVD V Current Rec Mode unfinalize Format No Yes Do you want to unfinalize disc DVD RW VR F MOVE SELECT RETURN EXIT Disc Manager Disc Name Used Space Available Space 00 00 00 00 00 SP DVD V Current Rec Mode unfinalize Format No Yes Disc will be unfinalized Do you want to continue 4 Press the œ buttons to select Yes then press the ENTER button The disc is unfin...

Page 120: ...elow before contacting a Samsung authorized service center Power Recording The HDD DVD RECORDER requires some time to initialize and the input will be displayed for approx 10 seconds after it is turned on Checkpoint 1 Check whether the power cord is securely plugged into the power outlet Did you set the HDD DVD RECORDER channel settings correctly Check the free space on your HDD DVD RAM RW R discs...

Page 121: ...ettings configured in the settings menu may not work properly Checkpoint 1 Play mode settings are different from the settings configured in the Settings menu The aspect ratio is fixed for DVD discs See page 44 Checkpoint 1 Cannot change the aspect ratio The angle operation is available only when the disc contains images captured from different angles Checkpoint 1 The angle operation does not work ...

Page 122: ... is properly set See pages 44 46 Check whether there is damage to or any foreign material on your disc Some low quality discs may not play properly If scenes change from dark to bright suddenly the screen may shake vertically temporarily but this is not a fault Checkpoint 1 Checkpoint 2 Checkpoint 3 Checkpoint 4 The disc revolves but no image or bad quality images are displayed Remote Control Unit...

Page 123: ...isc is played with only the subtitle and the audio signal which were selected during recording Checkpoint 1 Is it possible to change a subtitle and an audio signal on a recorded disc Other Press and hold the PLAY and STOP button on the front panel of the HDD DVD RECORDER for more than 5 seconds with no disc in the unit All settings including the password will revert to the factory settings Do not ...

Page 124: ...ected movie You cannot record This disc is protected This disc cannot be formatted the disc is protected This disc cannot be renamed the disc is protected The disc cannot be finalized the disc is protected This Menu is not available the disc is protected The disc cannot be played Please check the regional code of the disc This disc cannot be formatted Please check the disc You cannot format the di...

Page 125: ...rom the device Make sure the DV device is connected properly to the DV connection Jack If it is connected properly turn it off and on once again Problem Error is detected on the disc System error is found Please try it again after turning off the power The DV device is not connected If you are unable to solve the problem after reading the above instructions note The model and serial number on the ...

Page 126: ... kg 17in 43 cm W x 10in 25 5 cm D x 3 1in 7 9 cm H 41 F to 95 F Keep level when operating Less than 75 operating humidity 1 0 V p p at 75Ω load sync negative S Video input Y 1 0Vp p C 0 286Vp p at 75Ω load Max Audio Input Level 2Vrms IEEE 1394 4p compatible jack Regular TV broadcasting VHF 2 13 UHF 14 69 Cable TV broadcasting 1 125 Analog output jacks 1 2 Optical Coaxial digital audio output Full ...

Page 127: ...d Questions FAQs Screen Components Troubleshooting TV Guide On Screen Glossary Notice 128 TV Guide On Screen Overview 128 Guide Setup for a DVD Recorder 129 Screen Component 134 Panel Menu 137 Guide Navigation 138 Remote Control 138 Listing 139 Search 140 Recordings 143 Schedule 145 Setup 147 Record 153 Remind 157 Frequently Asked Questions FAQs 162 Troubleshooting 163 TV Guide On Screen Glossary ...

Page 128: ... or availability of the program schedule information or other data in the TV Guide On Screen system TV Guide on Screen Overview Congratulations your new TV contains the TV Guide On Screen Interactive Program Guide This Guide has features and services that help you get the most out of your viewing experience Your Guide has the following features Three 30 minute time periods program listings in a 16...

Page 129: ...up or down arrow buttons to highlight an option and press ENTER Or press the Guide button to begin setup The Welcome Screen lists features in the Guide Press ENTER to display Screen 1 Screen 1 Country This screen asks you the location of your DVD Recorder Use the up or down arrow button to highlight a country Press ENTER to display Screen 2 Welcome Screen Reminder Screen Guide Setup for a DVD Reco...

Page 130: ...rrow button to move to another field Press ENTER to display Screen 3 If you selected Canada in Screen 1 you see the Postal Code screen You input characters by using the up or down arrow button and then the left or right arrow button to move to another field Press ENTER to display Screen 3 Screen 3 Do you have Cable If you select Yes you will see Screen 4 If you select No you will see Screen 12 Scr...

Page 131: ...nnel used for the cable box Press ENTER to display Screen 7 Screen 7 Cable Box Configuration Diagram The diagram shows the correct way to install the G LINK cable from the back of the DVD Recorder to the cable box Make sure the G LINK cable is properly installed Press ENTER to display Screen 8 Screen 8 Cable Box Brand Name Use the up and down arrows to select a cable box brand Press ENTER to displ...

Page 132: ...reen 10 Cable Box Code Testing When testing is done Screen 11 displays automatically Screen 11 Cable Box Tuned to Channel 9 If you select Yes you will see Screen 12 If you select No a different code is tested in Screen 10 If you select Test this code again the same code is tested again in Screen 10 Many Cable Boxes require testing more than one code NOTE ...

Page 133: ...een 13 Screen 13 Are the settings correct If you select Yes end setup you see Screen 14 If you select No repeat setup process you will see Screen 1 Screen 14 Congratulations You have successfully completed Setup Press ENTER and you will see Screen 15 Screen 15 Helpful Information This screen tells you valuable information on using your Guide Press Enter to watch TV If you selected No in Screen 3 t...

Page 134: ...fies network Record Remind Icons indicates a show is set to Record or set as a Reminder Panel Ad location where show or product specific information appears and also where Panel Menu appears Channel Ad location where show specific information appears Service Bar provides access to the main Guide Services Current Service Label indented to indicate current Service displayed Screen Components TV GUID...

Page 135: ... a show service ad or provides general help A Show Listing Info Box can have up to three sizes Small Large and No The default size of the Info Box is Last Used Press the Info Button to cycle among the sizes The user may change the default size in the Setup Service Info Button The Info button appears on the button bar if the Info box size can change and or if there are additional Info screens Press...

Page 136: ...r the show Show is set to Record Once Other frequencies are Daily Regularly and Weekly Indicates the program is set to record Daily manual record setting only Show is set to Record but is currently Off show remains in Schedule Show is Suspended due to a schedule conflict show remains in Schedule Recording resumes when the conflict no longer exists Show is set to Remind Once Other frequencies are D...

Page 137: ... option changes made during this session reverts to previous settings and returns the highlight to the parked tile Screen Panel Menu Highlight Parked Highlight Odometer Number Entry Box A Panel Menu appears when the MENU or ENTER context dependent button is pressed on a highlighted tile and additional options are available When a Panel Menu appears the highlighted tile is parked changes color The ...

Page 138: ...layed in the Video Window NOTE Guide Navigation The following table describes remote control actions related to the Guide Remote Control Button Description When watching TV enters the Guide and highlights a show listing When in the Guide returns to watching TV and displays the show in the video window Provides directional control Makes a selection or executes an action With a currently airing show...

Page 139: ...O button to display a Help screen Press the INFO button again to close the screen Use the up down left right arrow buttons to move the highlight within LISTINGS to View show listings for today plus 7 days 8 days total Read show descriptions Tune directly to a show currently airing Set a show to Remind Set a show to Record Lock and unlock the Video Window Access Panel and Channel Ads Screen 1 ...

Page 140: ...O button to display a Help screen 2 Press the INFO button again to close the screen 3 From Search use the down arrow to highlight Movies Search lets you find shows by category HDTV Movies Sports Children Educational News Variety Series Keyword or Alphabetical Screen 1 Screen 2 Screen 3 Search ...

Page 141: ...arly weekly start time automatically power On and auto tune the TV automatically power On and auto tune the TV Cancel closes the menu changes no information and returns to the highlighted show Screen 4 Screen 5 Screen 6 This option displays Watch Now if the show is currently airing NOTE Panel Menu Navigation Press the Info button to display a Help screen Press the Info button again to close the sc...

Page 142: ...inished use the down arrow to highlight Enter Keyword 3 The keyboard is displayed Use the arrow buttons to highlight a character and press ENTER to display it When complete highlight Done and press ENTER 4 A list of all matching shows for that keyword is displayed Like the Category Search Example you can highlight a show and press ENTER to display all airings You can then highlight a specific show...

Page 143: ...tion and returns to the highlighted show Screen 5 Screen 5 1 Screen 1 Screen 2 Recordings displays list of previously recorded or currently recording shows 1 With Recordings highlighted press the INFO button to display a Help screen Press the INFO button again to close the screen 2 Press the buttons to highlight the show and then pressing the MENU button to display the Recordings Options menu Use ...

Page 144: ...e recorded shows along with the episode list Press ENTER again to close the episode list 5 Highlight a specific episode and press the Menu button to display the Episode Options menu To view an episode you can do one of the following highlight an episode and press ENTER to view it now The episode either starts from where it was last stopped if viewed previously or from the beginning Highlight an ep...

Page 145: ...menu NOTE Screen 1 Screen 1 1 Schedule lets you review edit or delete Record and Remind events that you set previously 1 With SCHEDULE highlighted press the INFO button to display a Help screen Press the INFO button again to close the screen An icon identifies the event type Record Once records the show one time Regularly the show title appears on any day of the week on the same channel and is at ...

Page 146: ...NU button for Schedule Options Go to Service Bar closes the menu changes no information and returns to the Schedule Service Bar Tune to Channel exits the Guide and tunes to the channel of the highlighted show show airs in the future Set Recording opens a menu from which you can set a recording for the show Reminder is not cancelled Delete Reminder removes the Reminder from the Schedule after a Con...

Page 147: ...ult command button e g Done Press ENTER again to execute the action and close the Panel Menu Select Cancel and press ENTER to close the menu and return to the previous screen or press Menu on the remote to cancel any changes and close the menu NOTE Setup After you initially complete Guide Setup you can make changes to existing Guide settings in the following areas Change System Settings Change Cha...

Page 148: ...f the options press ENTER and follow the on screen instructions Refer to page 157 about Guide Setup Change Channel Display 1 Change Channel Display lets you edit channel information that appears in Listings With Change Channel Display you can Switch a channel On the channel is always displayed in Listings Off the channel is never displayed in Listings Auto Hide the channel is only displayed when p...

Page 149: ... number of channels in Listings 2 Press ENTER to display the CHANNEL EDITOR screen 3 When finished press ENTER to highlight Done Press ENTER again to close the menu and accept the changes Screen 2 Press the INFO button to display a Help screen Press the INFO button again to close the screen NOTE If you do not wish to save the changes Highlight Go Back to Setup and press ENTER to close the menu cha...

Page 150: ...FO button is pressed while in the Guide Choices are No only Small only Large only No Small No Large Small Large All default No only No Info Box Small only Small Info Box Large only Large Info Box No Small You can toggle between No or a Small Info Box No Large You can toggle between No or a Large Info Box Small Large You can toggle between a Small or Large Info Box All default You can toggle betwee...

Page 151: ... to keep a record event if applicable The Quality of the recording if applicable 2 Highlight Record Defaults and press the MENU button to display the Record Defaults menu Press the INFO button to display a Help screen Press the INFO button again to close the screen NOTE Press the INFO button to display a Help screen Press the INFO button again to close the screen NOTE If you do not wish to save th...

Page 152: ...n time Default 1 min early 2 Highlight Remind Defaults and press the MENU button to display the Remind Defaults menu 3 When finished press ENTER to highlight Done Press ENTER again to close the menu and accept the changes Screen 1 Screen 2 Press the INFO button to display a Help screen Press the INFO button again to close the screen NOTE If you do not wish to save the changes Highlight Go to Servi...

Page 153: ...he record frequency but not the default settings among Once default Regularly Weekly and then Cancel Using a Panel Menu 1 Highlight a show and press the MENU button to display the Episode Options menu Screen 1 Record The applicable Record icon appears on the show title as the REC button is pressed NOTE If you do not wish to save the changes Highlight Go to Service Bar and press ENTER to close the ...

Page 154: ...rd event if applicable The Quality SP LP EP XP of the recording if applicable 2 When finished press ENTER to highlight Schedule Recording Press ENTER again to close the menu You see a Record icon for the selected frequency next to the show title Highlight Cancel to close the menu change no information and return to the highlighted show Once records the show one time Regularly the show title appear...

Page 155: ...information Recorder choice Keep Until for a record event if applicable The Quality of the recording if applicable Use the left and right arrows to choose Frequency between Once Daily Weekly and Off as follows Once records the time channel input recorder combination one time Daily records the time channel input recorder combination Monday through Friday Weekly records for the channel time combinat...

Page 156: ...cancel recording If the TV is not On the recording occurs as scheduled If there is no activity for 3 minutes the notification screen automatically closes and completes the highlighted item Record Conflict A conflict message appears for the following reasons a show set to Record overlaps with any part of another show previously set to Record a show set to Record overlaps with a show previously set ...

Page 157: ...u The number buttons on the remote are used to input information An odometer option has arrows on both sides Use the left and right arrows to cycle through the different options Press ENTER from an option to highlight the default command button e g Set Recording Set Reminder Schedule Recording Done Press ENTER again to execute the action and close the Panel Menu Select Cancel and press ENTER to cl...

Page 158: ... 00 10 00 program Off keeps the show in the list but will not remind until the frequency is changed Auto Tune Automatically tune TVto the channel when a Reminder is scheduled Choices are Yes and No default When to display the reminder screen Choices are 30 seconds to 15 minutes early to 30 seconds to 15 minutes late to On time Default 1 min early 3 When finished press ENTER to highlight Schedule R...

Page 159: ...ombination one time Daily reminds for the time channel input reminder combination Monday through Friday Weekly reminds for the channel time combination on a specific day of the week Off not cancel keeps the time channel input reminder combination in the list without reminding until the frequency is changed Auto tune Automatically tune to the channel when a Reminder is scheduled Choices are Yes and...

Page 160: ...w closes for the show or shows but does not affect other Reminders you set Remind Conflict 1 A conflict message appears for the following reasons a show set with an Auto Tune Reminder has the same start time as an existing Auto Tune Reminder a show set with an Auto Tune Reminder overlaps with a Recording already scheduled 2 Select one of these options auto tune anyway this show will override an ex...

Page 161: ...ns within a Panel Menu The number buttons on the remote are used to input information An odometer option has arrows on both sides Use the left and right arrows to cycle through the different options Press ENTER from an option to highlight the default command button e g Watch Now Set Reminder Schedule Reminder Press ENTER again to execute the action and close the Panel Menu Select Cancel and press ...

Page 162: ...hannel lineup What should I do Frequently Asked Questions FAQs No Setup information is stored in TV Guide On Screen Checkpoint 1 If I have a power outage do I need to complete Setup again These stars are a broadcast industry rating system used to inform you of a show s quality The more stars the better the rating Checkpoint 1 After some show titles I have noticed from 1 to 4 stars What does that m...

Page 163: ...by category HDTV Movies Sports Children Educational News Variety Series Keyword or Alphabetical Checkpoint 1 How can I look for a specific show in the Guide After initial Setup it can take up to a week to populate the full 8 days of listings Once populated 8 days of information should always be available Checkpoint 1 I got listings after my initial Setup however some days read No Listings You shou...

Page 164: ...ess the Menu button on the remote Use the down arrow to highlight Edit Reminder and press ENTER Verify the Power On TV option reads Yes The DVD RECORDER must be Off at the scheduled time for Power On TV Checkpoint 1 Checkpoint 2 Checkpoint 3 I set a show with the Power On TV option and it did not TV Guide on Screen Glossary 1394 High speed port that is used to transfer certain types of data in rea...

Page 165: ...apabilities if Setup in not completed initially the Setup Reminder Screen appears next time Interactive Program Guide IPG a design from TV Guide On Screen that provides channel lineup and 8 days of show listings from which you can Sort by category or keyword and set shows to Record or Remind IR Cable A connection or device that sends remote commands to a separate cable box Keyword Search The abili...

Page 166: ...ecorded or currently recording shows on a DVR or the currently inserted DVD in a DVD Recorder Remind You can set a Remind event for a show or Channel Ad or Panel Ad linked to a show and also customize the remind options start time frequency auto tune etc Reminder Conflict A message that appears for the following reasons a show set with a Reminder has the same start time as an existing Reminder a s...

Page 167: ...r problem determination and service procedures SAMSUNG does not warrant uninterrupted or error free operation of the product All replaced parts and products become the property of SAMSUNG and must be returned to SAMSUNG Replacement parts and products assume the remaining original warranty or ninety 90 days whichever is longer This limited warranty covers manufacturing defects in materials and work...

Page 168: ...ELECTRONICS AK68 00758B 01 Samsung Electronics America lnc 105 Challenger Road Ridgefield Park NJ 07660 0511 TEL 1 800 SAMSUNG 7267864 www samsung com English ...

Reviews: