background image

SETUP

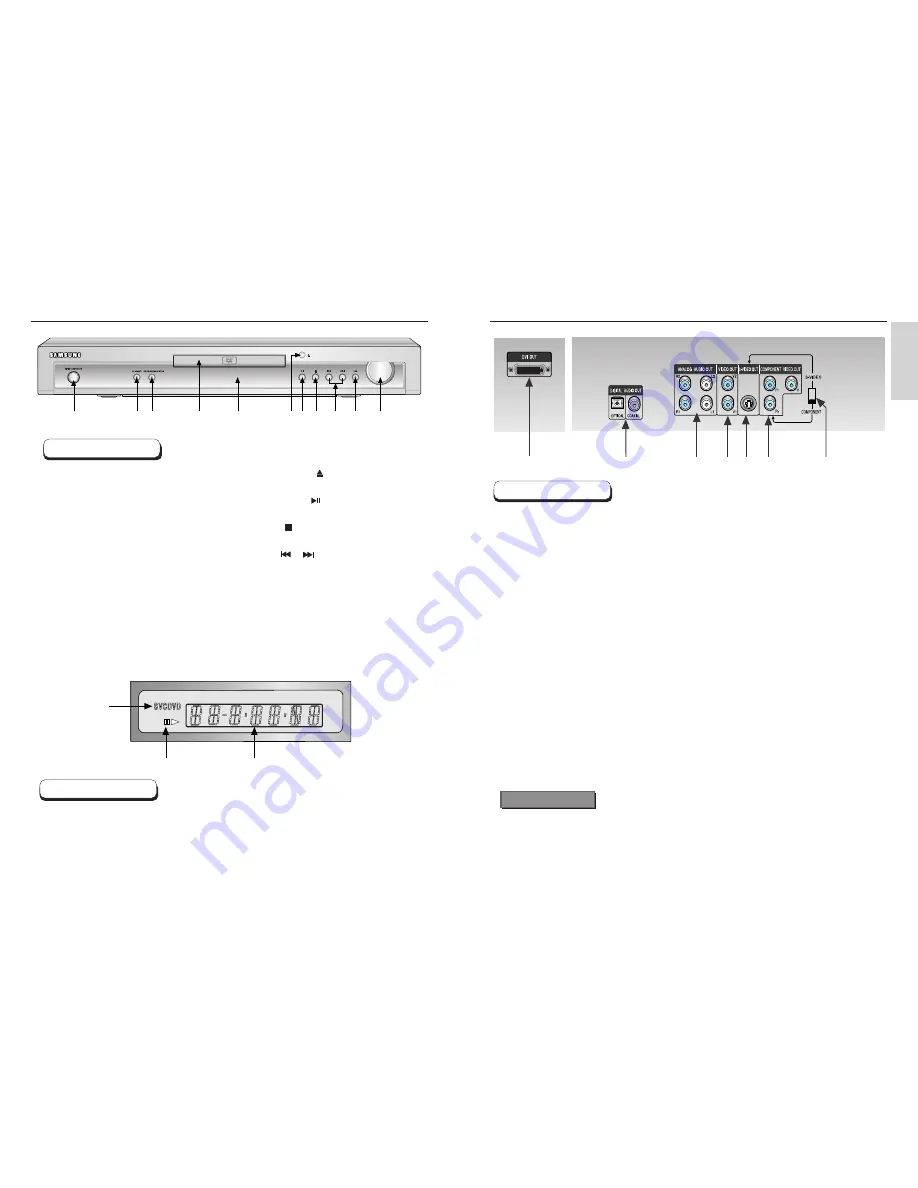
Description-Front Panel

8

9

1. Disc type indicators

2. Play / Pause / Forward play

3. Displays various messages concerning operations such as PLAY, STOP, LOAD ...

no DISC

: No disc loaded.

OPEN

: The disc tray is open.

LOAD

: Player is loading disc information.

1

2

3

Front Panel Display

Rear Panel

Description-Rear Panel

1. DVI OUT JACK

• Use the DVI cable to connect this jack to the DVI jack on your television for a higher quality picture.

2. DIGITAL AUDIO OUT JACKS

• Use either an optical or coaxial digital cable to connect to a compatible Dolby Digital receiver.
• Use to connect to an A/V Amplifier that contains a Dolby Digital or DTS decoder.

3. ANALOG AUDIO OUT JACKS

• Connect to the Audio input jacks of your television, audio/video receiver.

4. VIDEO OUT JACK

• Use a video cable to connect to the VIDEO input jack on your television.
• The PROGRESSIVE SCAN button must be set to off.

5. S-VIDEO JACK

• Use the S-Video cable to connect this jack to the S-Video jack on your television for a higher

quality picture. The S-Video must be selected in the VIDEO OUT SELECT.

• The PROGRESSIVE SCAN button must be set to off.

6. COMPONENT VIDEO OUT JACKS

• Use these jacks if you have a TV with Component Video in jacks. These jacks provide Pr, Pb and

Y video. Along with Component Video provides the best picture quality.

• If PROGRESSIVE SCAN button is set to on, progressive scan mode will work.
• If PROGRESSIVE SCAN button is set to off, interlace scan mode will work.
• If Component is selected, S-Video output will not work.

7. VIDEO OUT SELECT SWITCH

• Use the switch to set video out.  

If S-Video is selected, Component will not work.

1

2

3

4

5

6

7

1

2 3

4

5

6 7 8

9 10

11

1. STANDBY/ON

• When the unit is first plugged in, the indicator

lights. When STANDBY/ON is pressed on again,
the light goes out and the player is turned on.

2. DVI VIDEO

• The button  will change color each time it is 

pressed to indicate the mode. 576p/480p(Red), 
720p(Blue) and 1080i(Green) modes are 
supported.

3. PROGRESSIVE SCAN

• When this button is blue, the component jacks

output progressive scan(576p/480p) to your TV.

4. DISC TRAY

• Load the disc here.

5. DISPLAY

• Operation indicators are displayed here.

6. OPEN/CLOSE (       )

• Press to open and close the disc tray.

7. PLAY/PAUSE (       )

• Begin or pause disc play.

8. STOP (       )

• Stops disc play.

9. SKIP (        /        )

• Use to skip a scene or music.

10. JOG

• This button enables step playback using the 

JOG dial.

11. JOG DIAL

• Turn the dial after with pressing the JOG button

(Light turns blue) to perform step playback.

Turn the dial without pressing the JOG button to
perform fast search.

Front Panel Controls

• Consult your TV User’s Manual to find out if your TV supports Progressive Scan. 

If Progressive Scan is supported, follow the TV User’s Manual’s instructions regarding Progressive
Scan settings in the TV’s menu system.

• 

If PROGRESSIVE SCAN button is set to on, VIDEO and S-VIDEO will not work.

• 

Make sure to stop DVD playback before enabling the PROGRESSIVE SCAN function.

Important Note

Summary of Contents for DVD-HD938

Page 1: ...DVD Player DVD HD938 AK68 00168T ENG...

Page 2: ...uld cause noise during playback Batteries The battery used in this product contains chemicals that are harmful to the environment Do not dispose of batteries in the general domestic waste It is recomm...

Page 3: ...on 20 Using the Disc and Title Menu 21 Using the Function Menu 22 Repeat Play 23 Advanced Functions Adjusting the Aspect Ratio EZ View 24 Slow Repeat play 26 Selecting the Audio Language 27 Selecting...

Page 4: ...roduct incorporates copyright protection technology that is protected by methods claims of certain U S patents and other intellectual property rights owned by Macrovision Corporation and other rights...

Page 5: ...l work If PROGRESSIVE SCAN button is set to off interlace scan mode will work If Component is selected S Video output will not work 7 VIDEO OUT SELECT SWITCH Use the switch to set video out If S Video...

Page 6: ...13 3D SOUND button Press this to listen to 3D surround sound through two existing stereo speakers 14 SUBTITLE button Press this to switch the DVD s subtitle language 15 AUDIO button Use this button t...

Page 7: ...those particular components Analog Audio Out Digital Audio Out 2ch Amplifier Audio Input Jacks Dolby Digital Decoder Digital Audio Input Jacks Basic Video Good picture Method 3 Better picture Basic Au...

Page 8: ...n interface to enable the digital transmission of video signals between various digital devices Using DVI the DVD player transmits a digital video signal and displays a vivid picture on a TV having a...

Page 9: ...PROGRESSIVE SCAN button PAL disc play 1 The 576p will be enabled at the component output when the blue light comes on 2 The 576i will be enabled at the component output when the light turns off When y...

Page 10: ...faster speed on the DVD VCD CD Playing a Disc RESUME function When you stop disc play the player remembers where you stopped so when you press PLAY again it will pick up where you left off unless the...

Page 11: ...ote control to directly access a title chapter or to start the playback from the desired time To make the screen disappear press the INFO button again To access the desired title when there is more th...

Page 12: ...mal play press REPEAT again then press the LEFT RIGHT buttons to select Off Press ENTER NOTE DVD repeats play by chapter or title CD and VCD repeat play by disc or track Depending on the disc the Repe...

Page 13: ...The screen size changes when the button is pressed repeatedly The screen zoom mode operates differently depending on the screen setting in the initial setup menu To ensure correct operation of the EZ...

Page 14: ...p the Language Features on page 40 DVD VCD CD 1 2 3 26 27 Slow Repeat play When playing a DVD During play press the PLAY PAUSE button Press and hold the button to choose the play speed between 1 8 1 4...

Page 15: ...may not work with all DVDs A DVD disc can contain up to 32 subtitle languages How to have the same subtitle language come up whenever you play a DVD Refer to Setting Up the Language Features on page 4...

Page 16: ...nction DVD VCD During play press the BOOKMARK button on the remote The Bookmark icons will be displayed Use the LEFT RIGHT buttons to move to the desired bookmark icon When you reach the scene you wan...

Page 17: ...he disc the Zoom and 3D Sound function may not work 1 2 3 1 2 MP3 WMA Play When the first song file is playing the music folder menu will appear on the right side of the screen Up to 8 music folders c...

Page 18: ...ing copyright protected MP3 files Certain securized files are encrypted and code protected to prevent illegal copying These files are of the following types Windows MediaTM registered trade mark of Mi...

Page 19: ...y with about an 18 second interval Depending on the file size each interval between images may take longer or shorter than the manual suggests Open the disc tray Load the disc on the tray Load the dis...

Page 20: ...may not work 1 2 3 Setting Up the Language Features Using the Player Menu Language Using the Disc Menu Language If you set the player menu disc menu audio and subtitle language in advance they will co...

Page 21: ...Using the Audio Language Using the Subtitle Language 1 2 3 5 4 6 1 2 3 4 5 6 Setting Up the Audio Options With the unit in Stop mode press the MENU button Select Setup using UP DOWN buttons then RIGHT...

Page 22: ...have a TV with a 4 3 ratio screen Black bars will appear at the top and bottom of the screen 2 4 3 Pan Scan Select this for conventional size TVs when you want to see the central portion of the 16 9...

Page 23: ...e Password is set to Yes To unlock the player use UP DOWN to select No Use RIGHT or ENTER to select Rating Level Press ENTER Use UP DOWN to select the level e g Level 6 and press ENTER Discs that cont...

Page 24: ...ess the MENU button on the remote control to select the Parental Mode The Parental Mode is now unlocked as indicated on the display Press the DOWN button to select Parental Press ENTER and the Create...

Page 25: ...o 1 4 m sec Maximum Play Time 74 min Video Audio 2 channel 1 0 Vp p 75 load Y 1 0 Vp p 75 load Pr 0 70 Vp p 75 load Pb 0 70 Vp p 75 load Luminance Signal 1 0 Vp p 75 load Chrominance Signal 0 3 Vp p 7...

Reviews: