background image

SETUP

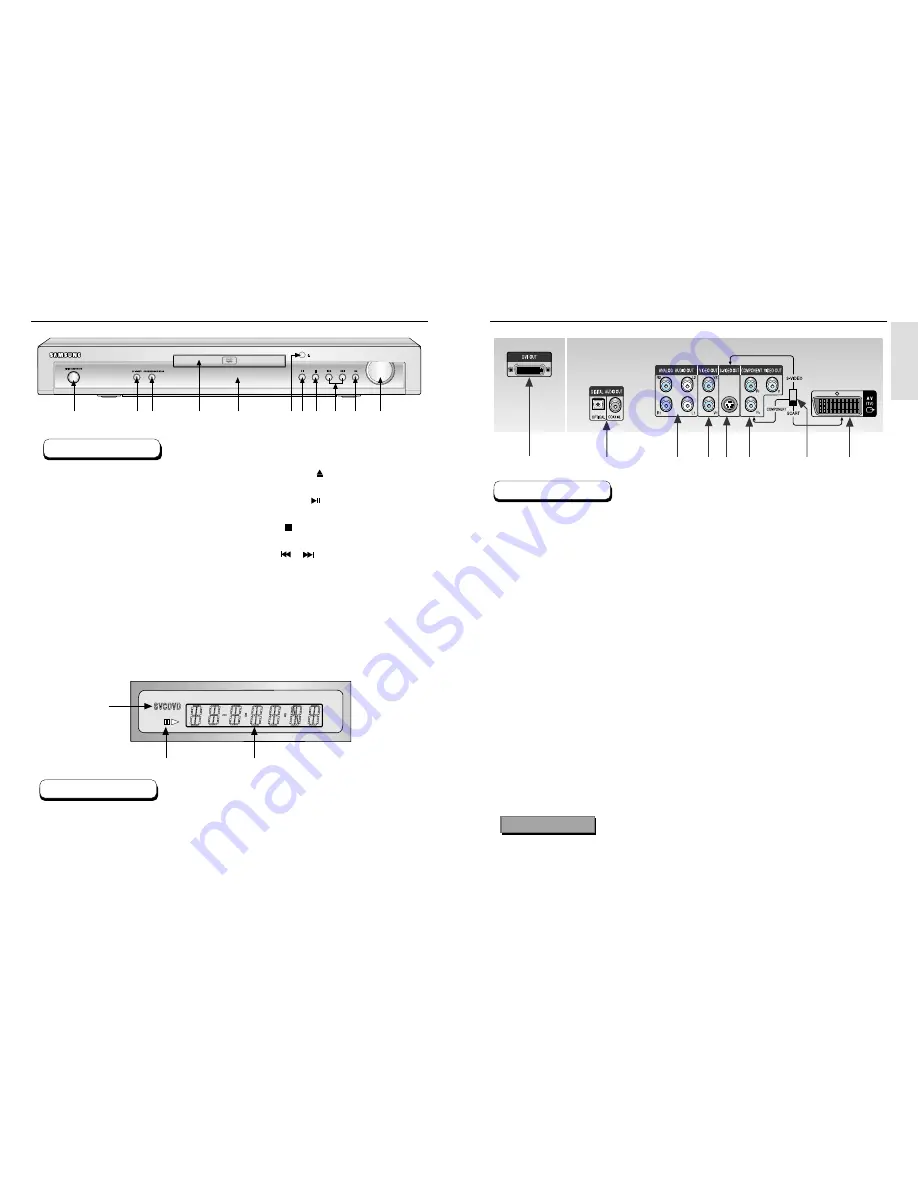
Description-Front Panel

8

9

1. Disc type indicators

2. Play / Pause / Forward play

3. Displays various messages concerning operations such as PLAY, STOP, LOAD ...

no DISC : No disc loaded.

OPEN : The disc tray is open.

LOAD : Player is loading disc information.

1

2

3

Front Panel Display

Rear Panel

Description-Rear Panel

1. DVI OUT JACK

• Use the DVI cable to connect this jack to the DVI jack on your television for a higher quality picture.

2. DIGITAL AUDIO OUT JACKS

• Use either an optical or coaxial digital cable to connect to a compatible Dolby Digital receiver.
• Use to connect to an A/V Amplifier that contains a Dolby Digital or DTS decoder.

3. ANALOG AUDIO OUT JACKS

• Connect to the Audio input jacks of your television, audio/video receiver, or VCR.

4. VIDEO OUT JACK

• Use a video cable to connect to the VIDEO input jack on your television.
• The PROGRESSIVE SCAN button must be set to off.

5. S-VIDEO JACK

• Use the S-Video cable to connect this jack to the S-Video jack on your television for a higher

quality picture. The S-Video must be selected in the VIDEO OUT SELECT.

• The PROGRESSIVE SCAN button must be set to off.

6. COMPONENT VIDEO OUT JACKS

• Use these jacks if you have a TV with Component Video in jacks. These jacks provide Pr, Pb and

Y video. Along with Component Video provides the best picture quality.

• If PROGRESSIVE SCAN button is set to on, progressive scan mode will work.
• If PROGRESSIVE SCAN button is set to off, interlace scan mode will work.
• If Component is selected, S-Video output will not work.

7. VIDEO OUT SELECT SWITCH

• Use the switch to set video out. If Scart jack is selected, S-Video may not work. 

If S-Video is selected, Component will not work.

8. SCART AV JACK

• Connect to a TV with scart input jack.
• The PROGRESSIVE SCAN button must be set to off.

1

2

3

4

5

6

7

8

1

2 3

4

5

6 7 8

9 10

11

1. STANDBY/ON

• When the unit is first plugged in, the indicator

lights. When STANDBY/ON is pressed on again,
the light goes out and the player is turned on.

2. DVI VIDEO

• The button  will change color each time it is 

pressed to indicate the mode. 576p/480p(Red), 
720p(Blue) and 1080i(Green) modes are 
supported.

3. PROGRESSIVE SCAN

• When this button is blue, the component jacks

output progressive scan(576p/480p) to your TV.

4. DISC TRAY

• Load the disc here.

5. DISPLAY

• Operation indicators are displayed here.

6. OPEN/CLOSE (       )

• Press to open and close the disc tray.

7. PLAY/PAUSE (       )

• Begin or pause disc play.

8. STOP (       )

• Stops disc play.

9. SKIP (        /        )

• Use to skip a scene or music.

10. JOG

• This button enables step playback using the 

JOG dial.

11. JOG DIAL

• Turn the dial after with pressing the JOG button

(Light turns blue) to perform step playback.

Turn the dial without pressing the JOG button to
perform fast search.

Front Panel Controls

• Consult your TV User’s Manual to find out if your TV supports Progressive Scan. 

If Progressive Scan is supported, follow the TV User’s Manual’s instructions regarding Progressive
Scan settings in the TV’s menu system.

• If PROGRESSIVE SCAN button is set to on, VIDEO, S-VIDEO and SCART will not work.
• Make sure to stop DVD playback before enabling the PROGRESSIVE SCAN function.

Important Note

Summary of Contents for DVD-HD935

Page 1: ...UK DVD Player DVD HD935 AK68 00168F ...

Page 2: ...ould cause noise during playback Batteries The battery used in this product contains chemicals that are harmful to the environment Do not dispose of batteries in the general domestic waste It is recommended that the replacement of the battery should be done by a technician Disposal of old equipment and packaging Old equipment and packaging should not be disposed of as domestic waste but in accorda...

Page 3: ... Using the Disc and Title Menu 21 Using the Function Menu 22 Repeat Play 23 Advanced Functions Adjusting the Aspect Ratio EZ View 24 Slow Repeat play 26 Selecting the Audio Language 27 Selecting the Subtitle Language 28 Changing the Camera Angle 29 Using the Instant Replay Skip Function 30 Using the Bookmark Function 31 Using the Zoom 3D Sound Functions 32 MP3 WMA Play 33 Program Play Random Play ...

Page 4: ...product incorporates copyright protection technology that is protected by methods claims of certain U S patents and other intellectual property rights owned by Macrovision Corporation and other rights owners Use of this copyright protection technology must be authorized by Macrovision Corporation and is intended for home and other limited viewing uses only unless otherwise authorized by Macrovisio...

Page 5: ...work If Component is selected S Video output will not work 7 VIDEO OUT SELECT SWITCH Use the switch to set video out If Scart jack is selected S Video may not work If S Video is selected Component will not work 8 SCART AV JACK Connect to a TV with scart input jack The PROGRESSIVE SCAN button must be set to off 1 2 3 4 5 6 7 8 1 2 3 4 5 6 7 8 9 10 11 1 STANDBY ON When the unit is first plugged in t...

Page 6: ...e 13 3D SOUND button Press this to listen to 3D surround sound through two existing stereo speakers 14 SUBTITLE button Press this to switch the DVD s subtitle language 15 AUDIO button Use this button to access various audio functions on a disc 16 TV POWER button Turns the TV s power on or off 17 CLEAR button Use to remove menus or status displays from the screen 18 I SKIP button This function skip...

Page 7: ...gital Decoder Digital Audio Input Jacks Basic Video Good picture Method 3 Better picture Better picture Basic Audio Audio Output Jacks OR OR OR OR AV Cable S Video Cable Video Cable Scart Cables not included Video Output Jack S Video Jack Component Video Jacks Scart Jack DVD Player TV with Video Input Jack DVD Player TV with S Video Input Jack If S Video is selected in the VIDEO OUT SELECT DVD Pla...

Page 8: ...is an interface to enable the digital transmission of video signals between various digital devices Using DVI the DVD player transmits a digital video signal and displays a vivid picture on a TV having a DVI jack Description of the DVI connection DVI D connector digital signal only DVI I connector digital and analog signal Though the player is using DVI I connector the output from a DVI I is only ...

Page 9: ...s the PROGRESSIVE SCAN button PAL disc play 1 The 576p will be enabled at the component output when the blue light comes on 2 The 576i will be enabled at the component output when the light turns off When you press the PROGRESSIVE SCAN button NTSC disc play 1 The 480p will be enabled at the component output when the blue light comes on 2 The 480i will be enabled at the component output when the li...

Page 10: ... faster speed on the DVD VCD CD Playing a Disc RESUME function When you stop disc play the player remembers where you stopped so when you press PLAY again it will pick up where you left off unless the disc is removed the STOP button is pressed twice or the player is unplugged If the player is left for 5 minutes in pause mode it will stop If the player is left in the stop mode for more than 30 minu...

Page 11: ...e number buttons of the remote control to directly access a title chapter or to start the playback from the desired time To make the screen disappear press the INFO button again To access the desired title when there is more than one in the disc For example if there is more than one movie on a DVD each movie will be identified Most of DVD discs are recorded in chapters so that you can quickly find...

Page 12: ...Off Press ENTER Off Chapter Title A B ENTER Off Track Disc A B ENTER NOTE DVD repeats play by chapter or title CD and VCD repeat play by disc or track Depending on the disc the Repeat function may not work When in VCD 2 0 mode Menu On mode this function does not work DVD VCD CD 1 2 3 4 22 23 Repeat Play Using the Function Menu Press the MENU button during playback Use the UP DOWN buttons to highli...

Page 13: ... The screen size changes when the button is pressed repeatedly The screen zoom mode operates differently depending on the screen setting in the initial setup menu To ensure correct operation of the EZ VIEW button you should set the correct aspect ratio in the initial setup See page 43 For 16 9 aspect ratio discs Wide Screen Displays the content of the DVD title in 16 9 aspect ratio Screen Fit The ...

Page 14: ...Up the Language Features on page 40 DVD VCD CD 1 2 3 26 27 Slow Repeat play When playing a DVD During play press the PLAY PAUSE button Press and hold the button to choose the play speed between 1 8 1 4 and 1 2 of normal during PAUSE or STEP mode Press the REPEAT button to select the point where the function starts A See page 23 Press the REPEAT button to select the point where the function ends B ...

Page 15: ...disc and may not work with all DVDs A DVD disc can contain up to 32 subtitle languages How to have the same subtitle language come up whenever you play a DVD Refer to Setting Up the Language Features on page 40 1 2 3 28 29 Changing the Camera Angle Press the ANGLE button to see if an ANGLE mark is present at the upper left hand corner of the screen When an ANGLE mark is shown press the ANGLE butto...

Page 16: ... DVD VCD During play press the BOOKMARK button on the remote The Bookmark icons will be displayed Use the LEFT RIGHT buttons to move to the desired bookmark icon When you reach the scene you want to mark press the ENTER button The icon will change to a number 1 2 or 3 Press the BOOKMARK button to turn off the display Recalling a Marked Scene During play press the BOOKMARK button on the remote Use ...

Page 17: ...m and 3D Sound function may not work 1 2 3 1 2 MP3 WMA Play When the first song file is playing the music folder menu will appear on the right side of the screen Up to 8 music folders can be displayed at a time If you have more than 8 folders on a disc press the LEFT RIGHT buttons to bring them up on the screen Use the UP DOWN buttons to select the desired music folder then press ENTER Use the UP ...

Page 18: ...ncrypted and code protected to prevent illegal copying These files are of the following types Windows MediaTM registered trade mark of Microsoft Inc and SDMITM registered trade mark of The SDMI Foundation You cannot copy such files Important The above recommendations cannot be taken as a guarantee that the DVD player will play MP3 recordings or as an assurance of sound quality You should note that...

Page 19: ...with about an 18 second interval Depending on the file size each interval between images may take longer or shorter than the manual suggests Open the disc tray Load the disc on the tray Load the disc with the labeled side up Close the tray The tray closes and you should get a screen that looks like the one to the right 1 2 3 NOTE If no buttons on the remote controller pressed for 10 seconds the me...

Page 20: ...ures Using the Player Menu Language Using the Disc Menu Language If you set the player menu disc menu audio and subtitle language in advance they will come up automatically every time you watch a movie With the unit in Stop mode press the MENU button Select Setup using UP DOWN buttons then RIGHT or ENTER button Select Language Setup using UP DOWN buttons then press the RIGHT or ENTER button Select...

Page 21: ...io Language Using the Subtitle Language 1 2 3 5 4 6 1 2 3 4 5 6 Setting Up the Audio Options AUDIO SETUP MPEG 2 Digital Out PCM DTS Off Dynamic Compression On PCM Down Sampling On Dolby Digital Out PCM With the unit in Stop mode press the MENU button Select Setup using UP DOWN buttons then RIGHT or ENTER button Select Audio Setup using UP DOWN buttons then press the RIGHT or ENTER button Use the U...

Page 22: ...l appear at the top and bottom of the screen 2 4 3 Pan Scan Select this for conventional size TVs when you want to see the central portion of the 16 9 screen Extreme left and right side of movie picture will be cut off 3 16 9 Wide You can view the full 16 9 picture on your widescreen TV Still Mode These options will help prevent picture shake in still mode and display small text clearer 1 Auto Whe...

Page 23: ...Press ENTER Use UP DOWN to select the level e g Level 6 and press ENTER Discs that contain Level 7 will now not play To cancel the rating level use RIGHT or ENTER to select No in Use Password About the Change Password Use UP DOWN to select Change Password Press ENTER The Change Password screen appears Enter your new password Re enter the new password again CREATE PASSWORD Enter Password 0 9 RETURN...

Page 24: ... the MENU button on the remote control to select the Parental Mode The Parental Mode is now unlocked as indicated on the display Press the DOWN button to select Parental Press ENTER and the Create Password display will appear You can now set your rating level and change your password to a new number Go to the contents and find the section of the instruction book that contains the explanations rega...

Page 25: ... Vp p 75 Ω load R Red 0 7 Vp p 75 Ω load G Green 0 7 Vp p 75 Ω load B Blue 0 7 Vp p 75 Ω load Composite Video 1 0 Vp p 75 Ω load Y 1 0 Vp p 75 Ω load Pr 0 70 Vp p 75 Ω load Pb 0 70 Vp p 75 Ω load Luminance Signal 1 0 Vp p 75 Ω load Chrominance Signal 0 3 Vp p 75 Ω load Digital Visual Interface 50 Ω load 2 Channel L 1 L R 2 R L 1 L R 2 R 48 kHz Sampling 4 Hz to 22 kHz 96 kHz Sampling 4 Hz to 44 kHz...

Page 26: ...uired you should return the product to the retailer from whom it was purchased However Samsung Authorised Dealers and Authorised Service Centers in other EC Countries will comply with the warranty on the terms issued to purchasers in the country concerned In case of difficulty details of our Authorised Service Centers are available from Samsung Electronics U K Ltd Euro Service Centre Stafford Park...

Reviews: