background image

5

Install batteries in the Remote 

Control

1. 

Open the battery cover on the back of the 


remote control.

2. 

Insert two AAA batteries. Make sure that the 

polarities  (+ and -) are aligned correctly.

3. 

Replace the battery cover.

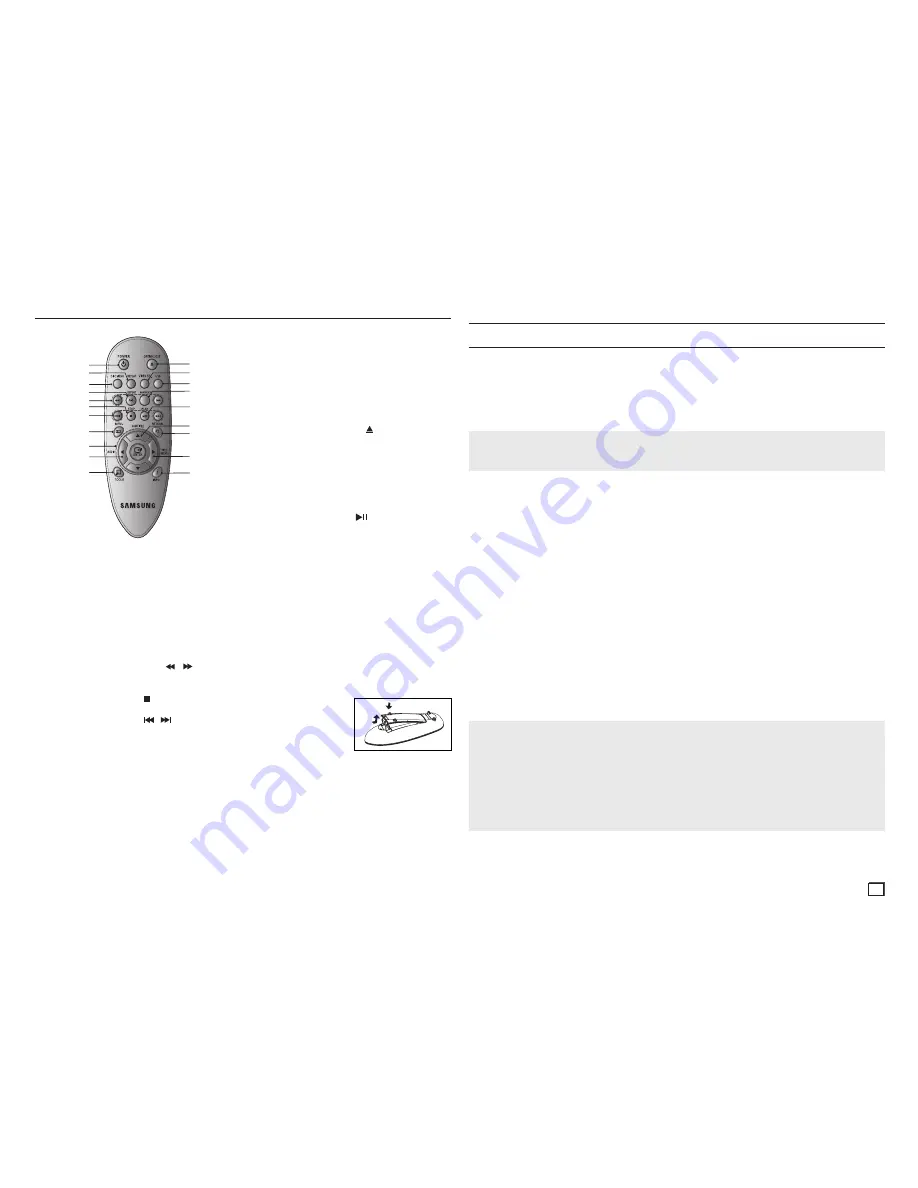
Tour of the Remote Control

1
2

3

4

5

6
7

8

9

10

11

12

15

16

17

18

19

14
13

20

1. 

DVD POWER button


Turns the power on or off.

2. 

REPEAT button


Allows you to repeat play a title, chapter, track, 
or disc.

3. 

DISC MENU button


Brings up the Disc menu.

4. 

REPEAT A-b button


Allows you to repeat a chosen section 
(A-B) on a disc.

5. 

SEARCH buttons (

/

)


Allows you to search forward/backward 
through a disc.

6. 

STOP button (

)


To stop the disc

7. 

SKIP buttons (

/

)


Use to skip the title, chapter or track. 

8. 

MENU button


Brings up the DVD player’s menu.

9. 

ENTER/

π

/

,

/

®

 buttons


This button functions as a toggle switch.

10.  AUDIO button (

)


Use this button to access various audio 
functions on a disc. Use this button to select 
an available TV source (mode TV).

11.  TOOLS button
 

Displays the current disc mode. It also 
lets you access the Display function.

12.  OPEN/CLOSE (

) button


To open and close the disc tray.

13. 

MARKER


Quickly find bookmark sections of a DVD.

14.  USb button


To change device which access to USB device.

15.  VIDEO SEL. button 


 Changes video output mode.

16.  PLAY button (

)


Begins disc play.

17.  SUbTITLE/(

π

) button

18.  RETURN button


Returns to a previous menu.

19.  TITLE MENU button (

®

)  


Brings up the Title menu.

20.  INFO button


Displays the current playback information.


Connections

Choosing a Connection

The following text explains how to make connections commonly used to connect the DVD player with a TV 
and other components. A diagram showing these connections is to the right.

before Connecting the DVD Player

- Always turn off the DVD player, TV, and other components before you connect or disconnect any cables.
- Refer to the user’s manual of the components (such as a TV) you are connecting for more information on 

those particular components.

A. Connecting to a TV Using the Video Jack (Video)

1. 

Using Video/Audio cables, connect the 

VIDEO


(yellow)/AUDIO (red and white) OUT

 jacks on the 

rear of the DVD player to the 

VIDEO (yellow)/AUDIO (red and white) IN

 jacks of your TV.

2. 

Turn on your DVD player and TV.

3. 

Press the input selector button on your TV remote control until the Video signal from the DVD player 
appears on the TV screen.

b. Connecting to a TV Using the Component Jacks (Progressive/ 

Interlace)

-  Connecting through the Component jacks lets you view video at the 480p (Progressive Scan) resolution.
- What is "Progressive Scan"?
  Progressive scan has twice as many scanning lines per frame as interlaced (480i) output and provides 

better and clearer picture quality.

1. 

Using Component video cables (not included), connect the 

COMPONENT VIDEO OUT

 (PR, PB and 

Y) jacks on the rear of the DVD player to the 

COMPONENT IN

 (PR, PB and Y) jacks of your TV.

2. 

Using the audio cables, connect the 

AUDIO (red and white) OUT

 jacks on the rear of the DVD 

player to the 

AUDIO (red and white) IN

 jacks of your TV. Turn on the DVD player and TV.

3. 

Set the Video Output to 

P-SCAN/I-SCAN

 in the Display Setup menu. You can also use the 

VIDEO 

SEL.

 button to change the Video Output mode. 

4. 

Press the input selector button on your TV remote control until the Component signal from the DVD 
player appears on the TV screen.

Notes

-  Noise may be generated if the audio cable is placed too close to the power cable. 

-  If you want to connect to an Amplifier, please refer to the Amplifier connection section below. 
-  The number and position of the jacks on your TV may vary depending on your TV set. Please refer to 

the user's manual of your TV.

-  If there is one audio input terminal on the TV, connect it to the [AUDIO OUT] [left] (white) jack of the 

DVD player.

-  If you press the VIDEO SEL. button when the DVD Player is in stop mode or no disc is inserted, 

the Video Output mode changes in the following sequence : I-SCAN 

➝ 

P-SCAN (Interlaced 

➝ 

Progressive). 

Notes
-  The first time you turn on your DVD player, the Language Selection screen appears. See 

Selecting a Language on page 6 for details. 

Summary of Contents for DVD-E360

Page 1: ... E360 ENGLISH DVD Player User Manual imagine the possibilities Thank you for purchasing this Samsung product To receive more complete service please register your product at www samsung com global register ...

Page 2: ...ulations FDA Laser Complies with 21CFR 1040 10 except for deviations pursuant to Laser Notice No 50 dated June 24 2007 CALIFORNIA USA ONLY This Perchlorate warning applies only to primary CR Maganese Dioxide Lithium coin cells in the product sold or distributed ONLY in California USA Perchlorate Material special handling may apply See www dtsc ca gov hazardouswaste perchlorate CLASS 1 LASER produc...

Page 3: ...Be careful not to damage the disc because the data on these discs is highly vulnerable to the environment Do not keep under direct sunlight Keep in a cool ventilated area Store vertically Keep in a clean protection jacket If you move your player suddenly from a cold place to a warm place condensation may occur on the operating parts and lens and cause abnormal disc playback If this occurs unplug t...

Page 4: ...ent Video in jacks These jacks pro vide PR PB and Y video If P SCAN is set to ON in Video Output of the General Menu progressive scan mode will work If I SCAN is set to ON in Video Output of the General Menu interlaced scan mode will work Rear Panel DVD E360 Note These disc formats cannot be played on this player DVD ROM DVD RAM CD ROM CDV CDI CVD The ability to play back the following disc format...

Page 5: ...r components A Connecting to a TV Using the Video Jack Video 1 Using Video Audio cables connect the VIDEO yellow AUDIO red and white OUT jacks on the rear of the DVD player to the VIDEO yellow AUDIO red and white IN jacks of your TV 2 Turn on your DVD player and TV 3 Press the input selector button on your TV remote control until the Video signal from the DVD player appears on the TV screen B Conn...

Page 6: ...unction may be different from the actual playback speed No sound is heard during search mode Except CD Skipping Tracks During play press the SKIP or button When playing a DVD if you press the SKIP button it moves to the next chapter If you press the SKIP button it moves to the beginning of the chapter Pressing the Skip button twice makes the DVD move to the beginning of the previous chapter When p...

Page 7: ...he A B Repeat function 3 Press the buttons to make the desired setup 4 To make the screen disappear press the TOOLS button again A Press the REPEAT A B button on the remote control B Press the REPEAT A B at the point where you want repeat play to start A C Press the REPEAT A B at the point where you want repeat play to stop B 3 To return to normal play press the REPEAT button until the display sho...

Page 8: ...e 1 During play press the MARKER button on the remote control 2 Press the or π buttons to select a marked scene 3 Press the PLAY button to skip to the marked scene Clearing a Bookmark 1 During play press the MARKER button on the remote control 2 Press the or π buttons to select the bookmark number you want to delete 3 Press the ENTER button to delete a bookmark number Using the Zoom Function Using...

Page 9: ... the disc tray Place the disc on the tray Close the tray 2 Press the buttons to select a Music folder and then press ENTER Press the π to select a song file and then press ENTER Press π to begin playback of the song file and then press the ENTER button Repeat Random playback 1 Press the REPEAT button to change the playback mode There are four modes Off Track Folder and Random Off 1 Normal Playback...

Page 10: ...Drive Devices that support USB 2 0 or USB 1 1 You may experience a difference in playback quality when you connect a USB 1 1 device USB card Reader One slot USB card reader and Multi slot USB card reader Depending on the manufacturer the USB card reader may not be supported If you install multiple memory devices into a multi card reader you may experience problems If you use a USB extension cable ...

Page 11: ...an be played automatically CD R JPEG Disc Konica Picture CD If you want to see the Picture select the JPEG files in the clips menu Fuji Picture CD To see pictures select the JPEG files in the clips menu QSS Picture CD The unit may not play a QSS Picture CD If the number of files in one Disc is over 500 only 500 JPEG files can be played If the number of folders in one Disc is over 500 only JPEG fil...

Page 12: ...press the or ENTER button Notes After you select the language the screen returns to the Language Setup Page To make the Setup menu disappear press the MENU button If the language you selected is not recorded on the disc the player selects the original pre recorded language Select Original if you want the default soundtrack language to be the original language the disc is recorded in Select Automat...

Page 13: ...nfirm The Security menu re appears Note If you have forgotten your password see Forgot Password in the Troubleshooting section Reference Notes The CD should be burned following the specs below File System CD ROM ISO Level Character set ISO 9660 The burned CD has to be Finalized Please burn the CD at a low speed Please make sure the filename is E360K BIN Please make sure the root folder rename is M...

Page 14: ...with no disc inside All settings will revert to the factory settings Forgot password Press the button on the front panel for more than 5 seconds with no disc inside All settings including the password will revert to the factory settings 0000 Don t use this unless absolutely necessary Troubleshooting Before requesting service please check the following General Power Requirements AC 120V 60 Hz Power...

Page 15: ...ror free operation of the product All replaced parts and products become the property of SAMSUNG and must be returned to SAMSUNG Replacement parts and products assume the remaining original warranty or ninety 90 days whichever is longer This limited warranty covers manufacturing defects in materials and workmanship encountered in normal noncom mercial use of this product and shall not apply to the...

Page 16: ...MSUNG 172678 022 607 93 33 www samsung com pl Portugal 80820 SAMSUNG 726 7864 www samsung com pt Slovakia 0800 SAMSUNG 726 7864 www samsung com sk Spain 902 1 SAMSUNG 902 172 678 www samsung com es Sweden 0771 726 7864 SAMSUNG www samsung com se U K 0845 SAMSUNG 7267864 www samsung com uk Eire 0818 717 100 www samsung com ie Austria 0810 SAMSUNG 7267864 0 07 min www samsung com at Switzerland 0848...

Reviews: