background image

ENG

ENG

2

3

Precautions

Precautions

1

2

3

4

5

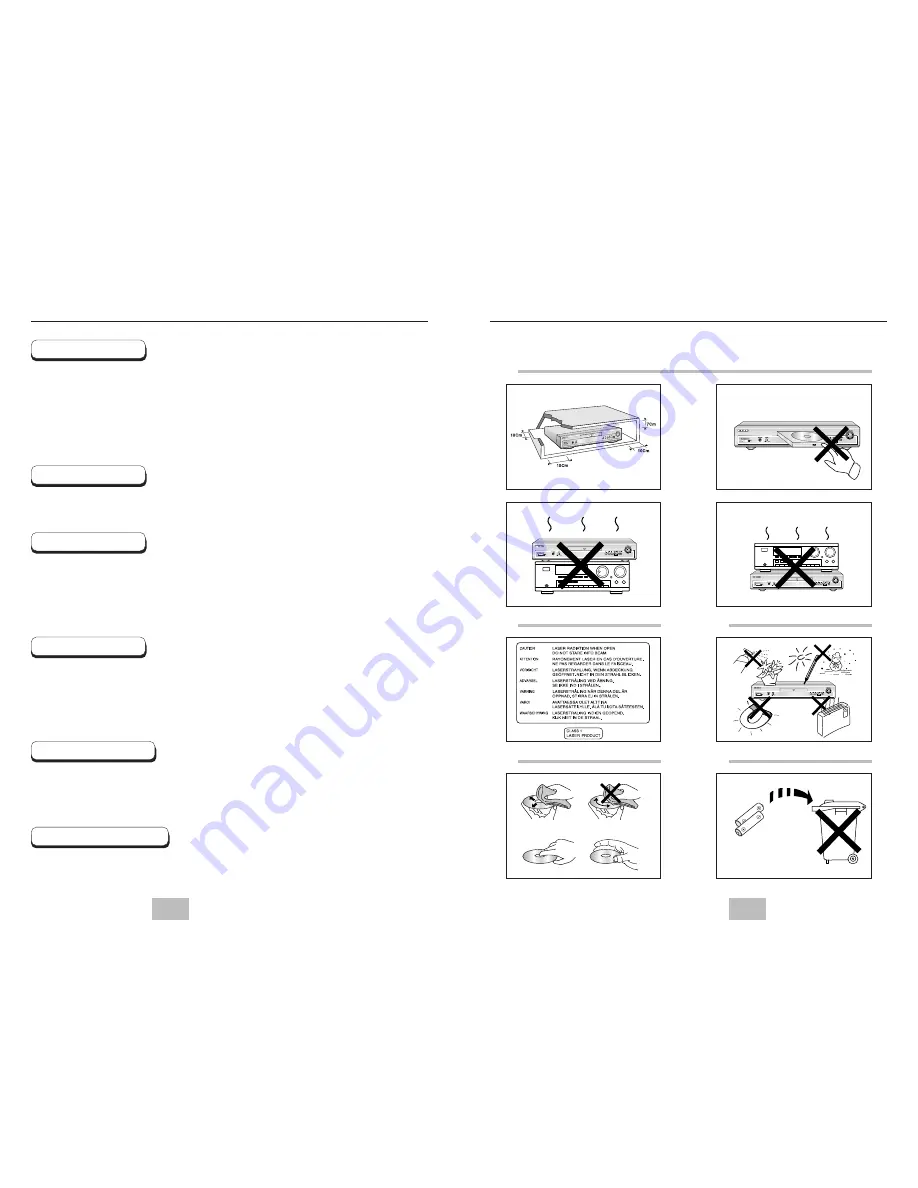
Ensure that the mains supply in your house complies with that indicated on the identification sticker
located at the back of your play. Install  your player horizontally, on a suitable base (furniture), 
with enough space around it for ventilation (7~10cm). Make sure the ventilation slots are not
covered. Do not stack other, or heavy devices on top of the player. Do not place the player on
amplifiers or other equipment which may become hot. Before moving the player ensure the disc
tray is empty. This player is designed for continuous use. 
Switching off the DVD player to the stand-by mode does not disconnect the electricity supply in
order to separate the player completely from the mains, it has to be disconnected by unplugging the
main plug, especially when left unused for a long period of time.     

Be careful handle your discs with care. Hold a disc with finger on the border or hole. Always place
disc with the label facing upward (in case of a single side disc). Always use a soft cloth to clean
disc if necessary, wipe from the centre to the border. Always put disc back into their cases after
playing and store in vertical position. Always place the disc properly into the tray using the proper
guide area. Never use record cleaning sprays, benzine, static electricity liquids or any other solvent,
if the disc surface is dirty. Wipe gently with a soft damp (water only) cloth, never wipe the disc in a
circular motion, since circular scratches are likely to occur and could cause noise during playback.

Batteries: The battery used in this product contains chemicals that are harmful to the environment. 
Do not dispose of batteries in the general domestic waste. It is recommended that the replacement of
the battery should be done by a technician.
Disposal of old equipment and packaging: Old equipment and packaging should not be disposed of as
domestic waste, but in accordance with the appliable regulations.

For safety reasons, be sure to disconnect the AC power cord from the AC outlet.
• Do not use benzene, thinner, or other solvents for cleaning.
• Wipe the cabinet with a soft cloth.

1. Setting up

4. Disc

5. Environmental info

6. Maintenance of Cabinet

Never open the player or any of its components. It can be dangerous for you or certain fragile
components. You could receive an electric shock or touch the laser beam. Do not place your eyes
close to the opening of the disc tray or any other opening to look inside the player.

2. For your safety

Protect the player from moisture (dripping or splashing and objects filled with liquids), and excess
heat (e.g.fireplace) or equipment creating strong magnetic or electric fields (i.e.speakers...).
Disconnect the power cable from the mains electricity supply if the player malfunctions. 
Your player is not intended for industrial use but  for domestic purposes only. Use of this product is
for personal use only. If your player or disc has been stored in a cold atmosphere for example
during transportation in the winter, wait for approximately 2 hours until they have reached room
temperature, before use.

3. Caution

CAUTION : USE OF ANY CONTROLS, ADJUSTMENTS, OR PROCEDURES OTHER THAN
SPECIFIED HEREIN MAY RESULT IN HAZARDOUS RADIATION EXPOSURE.

Summary of Contents for DVD-E232A

Page 1: ...nd could cause noise during playback Batteries The battery used in this product contains chemicals that are harmful to the environment Do not dispose of batteries in the general domestic waste It is recommended that the replacement of the battery should be done by a technician Disposal of old equipment and packaging Old equipment and packaging should not be disposed of as domestic waste but in acc...

Page 2: ...unctions 16 Using the Display Function 17 Using the Disc and Title Menu 18 Using the Function Menu 19 Repeat Play 20 Advanced Functions Adjusting the Aspect Ratio EZ View 21 Slow Repeat play 23 Selecting the Audio Language 24 Selecting the Subtitle Language 25 Changing the Camera Angle 26 Using the Instant Replay Skip Function 27 Using the Bookmark Function 28 Using the Zoom 3D Sound Functions 29 ...

Page 3: ...intellectual property rights owned by Macrovision Corporation and other rights owners Use of this copyright protection technology must be authorized by Macrovision Corporation and is intended for home and other limited viewing uses only unless otherwise authorized by Macrovision Corporation Reverse engineering or disassembly is prohibited Discs which cannot be played with this player DVD ROM DVD R...

Page 4: ...n LOAD Player is loading disc information 1 2 3 Front Panel Display R L 1 2 3 4 5 6 1 DIGITAL AUDIO OUT JACKS Use either an optical or coaxial digital cable to connect to a compatible Dolby Digital receiver Use to connect to an A V Amplifier that contains a Dolby Digital MPEG 2 or DTS decoder 2 ANALOG AUDIO OUT JACKS Connect to the Audio input jacks of your television audio video receiver 3 VIDEO ...

Page 5: ... open and close the disc tray 14 3D Button 15 I SKIP Button This function skips playback ahead 10 seconds 16 PLAY PAUSE Button Begin Pause disc play 17 SKIP Buttons Use to skip the title chapter or track 18 RETURN Button Returns to a previous menu 19 INFO Button Displays the current disc mode 20 ENTER DIRECTION Button UP DOWN or LEFT RIGHT Buttons This button functions as a toggle switch 21 ANGLE ...

Page 6: ...re information on those particular components R L Analog Audio Out Digital Audio Out 2ch Amplifier Audio Input Jacks Dolby Digital Decoder Digital Audio Input Jacks Good picture Better picture Best picture Basic Audio R L Audio Output Jacks OR OR OR AV Cable S Video Cable Scart Cables not included Video Output Jack S Video Jack Scart Jack DVD Player TV with Video Input Jack DVD Player TV with S Vi...

Page 7: ...ly DVD Press the button on the remote during PAUSE or STEP mode By pressing the button you can select slow motion play for 1 8 1 4 or 1 2 of normal speed No sound is heard during slow mode Press PLAY PAUSE to resume normal play Reverse slow motion play will not work 7 8 14 15 Playing a Disc Before Play Play Turn on your TV and press the TV VIDEO button to select the video mode Turn on your Audio S...

Page 8: ...available in the disc You will be able to choose the subtitles language or if you prefer turn them off from the screen A DVD disc can have up to 32 different subtitles A surround sound effect is generated using only two front speakers 1 2 3 4 DVD Title Time Audio Chapter Subtitle 01 02 0 00 13 ENG 5 1CH Off Off ENTER 3DSound CD Track Time 3D Sound 01 0 00 48 Off ENTER DVD CD Title Chapter Time Aud...

Page 9: ...eat EZ View ENTER RETURN MENU 18 19 Using the Disc and Title Menu DVD Setup Press ENTER key for Disc Menu Title Menu Function Disc Menu ENTER RETURN MENU DVD Setup Disc Menu Title Menu Function ENTER RETURN MENU Press ENTER key for Title Menu Using the Title Menu During the playback of a DVD disc press the MENU button on the remote Select Title Menu using the UP DOWN buttons then press the RIGHT o...

Page 10: ...ll look vertically stretched Zoom Fit The top bottom left and right of the screen are cut off and the central portion of the screen is enlarged Vertical Fit When a 4 3 DVD is viewed on a 16 9 TV black bars will appear at the left and right of the screen in order to prevent the picture from looking horizontally stretched ENG Repeat the current track chapter title a chosen section A B or all of the ...

Page 11: ...Ratio EZ View For 16 9 aspect ratio discs 4 3 Letter Box Displays the content of the DVD title in 16 9 aspect ratio The black bars will appear at the top and bottom of the screen 4 3 Pan Scan The left and right of the screen are cut off and displays the central portion of the 16 9 screen Screen Fit The top and bottom of the screen are cut off and the full screen appears The picture will look verti...

Page 12: ...r to Setting Up the Language Features on page 37 DVD CD 1 2 3 24 25 Selecting the Subtitle Language You can select a desired subtitle quickly and easily with the SUBTITLE button Using the SUBTITLE button Press the SUBTITLE button Use the LEFT RIGHT buttons to select the desired subtitle language Use the UP DOWN buttons to determine whether or not the subtitle will be displayed Initially the subtit...

Page 13: ...ntains multiple angles of a particular scene you can select the Angle function Using the ANGLE button 1 2 3 Using the Instant Replay Skip Function If you miss a scene you can see it again using this function If you press the I REPLAY button the current scene moves backward about 10 seconds and plays back Depending on the disc the Instant Replay function may not work Using the Instant Replay functi...

Page 14: ... 3D Sound Functions Using the Zoom Function DVD During play or pause mode press the ZOOM button on the remote A zoom mark will be displayed on screen Use the UP DOWN or LEFT RIGHT buttons to select the part of the screen you want to zoom in on Press the ENTER button During DVD play press ENTER to zoom in 2X 4X 2X Normal in order Using the 3D Sound Function The simulated surround effect depends on ...

Page 15: ...e make sure that you use 8 characters or less have no spaces in the name and avoid the use of special characters including Use a decompression transfer rate of at least 128 Kbps when recording MP3 files Sound quality with MP3 files basically depends on the rate of compression decompression you choose Getting audio CD quality sound requires an analog digital sampling rate that is conversion to MP3 ...

Page 16: ...atically with about an 18 second interval Depending on the file size each interval between images may take longer or shorter than the manual suggests Open the disc tray Load the disc on the tray Load the disc with the labeled side up Close the tray The tray closes and you should get a screen that looks like the one to the right 1 2 3 NOTE Press the TITLE MENU button to return to the album screen P...

Page 17: ...r of folders in 1 Disc is over 300 only JPEG files in 300 folders can be played CD R JPEG Discs Using the Setup Menu The Setup menu lets you customize your DVD player by allowing you to select various language preferences set up a parental level even adjust the player to the type of television screen you have To make the setup screen disappear after setting up press the MENU button again With the ...

Page 18: ...eturns to SETUP menu 1 2 3 4 5 6 1 2 3 4 5 6 With the unit in Stop mode press the MENU button Select Setup using UP DOWN buttons then RIGHT or ENTER button Select Language Setup using UP DOWN buttons then press the RIGHT or ENTER button Select Audio using UP DOWN buttons then press the RIGHT or ENTER button Press the UP DOWN buttons to select English Select Original if you want the default soundtr...

Page 19: ...tream Converts to MPEG 2 Digital Bitstream 5 1CH or 7 1CH Select Bitstream when using the Digital Audio Output DTS 1 Off Doesn t output digital signal 2 On Outputs DTS Bitstream via digital output only Select DTS when connecting to a DTS Decoder Dynamic Compression 1 On To select dynamic compression 2 Off To select the standard range PCM Down Sampling 1 On Select this when the amplifier connected ...

Page 20: ...ds COMPOSITE VIDEO signal from the AV JACK SCART terminal The Parental Control function works in conjunction with DVDs that have been assigned a rating which helps you control the types of DVDs that your family watches There are up to 8 rating levels on a disc With the unit in Stop mode press the MENU button Select Setup using UP DOWN buttons then RIGHT or ENTER button Select Parental Setup using ...

Page 21: ...rain the microprocessor inside the remote to reset it Reinstall batteries and try remote again Ensure that the disc is installed with the label side facing up Check the region number of the DVD 5 1 channel sound is reproduced only when the following conditions are met 1 The DVD player is connected with the proper amplifier 2 The disc is recorded with 5 1 channel sound Check whether the disc being ...

Page 22: ... E EU UR RO OE EL LE EC CT TR RI IC C S S A A Agaphtoiv pelavteı Saı eucaristouvme gia thn empistosuvnh pou deivxate sthn SAMSUNG me thn agorav authvı thı suskeuhvı To proi ovn autov thı SAMSUNG eivnai egguhmevno gia perivodo dwvdeka 12 mhnwvn apov thn pragmatikhv hmeromhniva agoravı tou gia antallaktikav kai ergatikav Sthn perivptwsh pou qa creiasteiv episkeuhv to proi ovn autov thı SAMSUNG qa pr...

Reviews: