background image

8_


maintenance

maintenance

 _9

03 M

AINTENAN

c

E

Maintenance

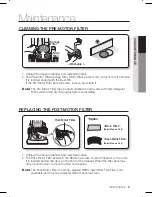
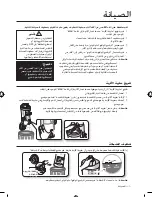
clEANINg THE pRE-MOTOR FIlTER

Note:  

The Pre-Motor Filter may be hand washed in cold water with mild detergent. 

           Rinse well and air dry thoroughly before re-installing.

 1. Unplug the Vacuum Cleaner from electrical outlet.

2.  The Pre-Motor Filter(Sponge Filter, Micro Filter) protects the motor from dirt particles.

    It is located underneath the Dust Bin. 

    If the Pre-Motor Filter becomes dirty, remove and clean it.

post-Motor Filter

REplAcINg THE pOST-MOTOR FIlTER

Note:   

The Post-Motor Filter is a white, pleated HEPA media filter. This filter is not 

washable and must be replaced when it becomes dirty.

1.  Unplug the Vacuum Cleaner from electrical outlet.

2.  The Post-Motor Filter assists in the filtration process to return clean air to the room. 

It is located behind the door on the front of the Cleaner. When the filter becomes 

dirty, open the door, remove the filter and replace.

<Micro Filter>

(Select Models Only)

<Hepa Media Filter>

(Select Models Only)

*Option

< washable >

Sponge 

Filter

Micro 

Filter

Summary of Contents for DJ68-00450F

Page 1: ...ing this unit please read the instructions carefully For indoor use only imagine the possibilities Thank you for purchasing a Samsung product To receive a more complete service please register your product at www samsung com register Code No DJ68 00450F REV 0 0 ...

Page 2: ...leaner Use extra care when cleaning on stairs Do not use to pick up flammable or combustible materials such as gasoline or fine wood fine wood sandings or use in areas where they may be present Store your vacuum cleaner indoors in a cool and dry area Avoid picking up hard sharp objects with the cleaner They may damage the cleaner Always turn off this appliance before connecting or disconnecting th...

Page 3: ...ct View 05 Attach Handle to Vacuum 05 Attach Dust Bin to Vacuum 05 Attach Vacuum Hose and Tools OpeRATING The CleANeR 06 06 Power Switch 06 Handle Positions 06 Height Adjustment 06 Transporting Cleaner 07 Special On Board Tools 07 Power Cord Storage maintenance 08 08 Empty Dust Bin 08 Cleaning the Grille 09 Cleaning the Pre motor Filter 09 Replacing the Post Motor Filter 10 Check Rotating Brush an...

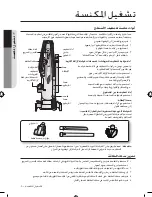
Page 4: ...n Bracket Brush Select Models Only option Mini Turbo Brush Select Models Only Carrying Handle Grille Cyclone Dust Bin Powerfoot Height Adjustment Knob Post Motor Filter Post Motor Filter is located behind the door Product View CAUTION Do not plug in your vacuum cleaner until you are familiar with all instructions and operating procedures WARNING Plastic film can be dangerous To avoid danger of suf...

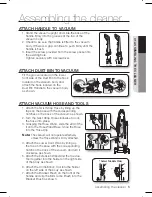
Page 5: ...n 7 Attach the Bracket Brush on the front of the handle and clip the Mini Turbo Brush into the Bracket Brush as shown Note The vacuum will not operate effectively unless the Hose Wand is firmly attached Attach Handle To Vacuum 1 Stand the vacuum upright and slide the base of the handle firmly into the grooves at the top of the vacuum body 2 Check to be sure the handle is fitted to the vacuum body ...

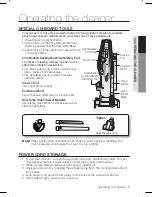
Page 6: ...ner back on its rear wheels and push forward 2 The cleaner can also be moved by using the Carrying Handle located on the top of the Dust Bin pOwer Switch The Power Switch is located on the side of the vacuum Push the rocker switch ON to vacuum and OFF when cleaning is complete 1 Upright For storage and above floor cleaning with tools 2 Normal Cleaning Press handle release pedal once Position used ...

Page 7: ...ed tool Use Brush side to dust furniture blinds books lamps shelves and baseboards Use Upholstery side for curtains draperies cushions fabrics Crevice Tool Use in tight narrow spaces Extension Wand Use with desired attachment for a longer reach Mini Turbo Brush Select Models Use rotating brush action for small areas such as stairs and upholstery Power Cord Storage 1 To use your vacuum remove the c...

Page 8: ...uctions on the following pages to perform these simple maintenance steps Empty Dust Bin The Dust Bin needs to be emptied when the dirt reaches the MAX line on the side of it 1 Unplug cleaner from electrical outlet 2 To remove the Dust Bin from the vacuum body push the Dust Bin release button as shown 3 Hold dust bin and push down bin release empty button to empty dirt into garbage container as sho...

Page 9: ...er becomes dirty remove and clean it Post Motor Filter ReplAciNg THE POST MOTOR FILTER Note The Post Motor Filter is a white pleated HEPA media filter This filter is not washable and must be replaced when it becomes dirty 1 Unplug the Vacuum Cleaner from electrical outlet 2 The Post Motor Filter assists in the filtration process to return clean air to the room It is located behind the door on the ...

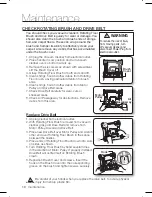
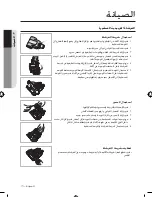
Page 10: ... attention to brush ends 6 Clean strings hair and other debris from Motor Pulley and Drive Belt areas 7 Check Drive Belt carefully for wear cuts or stressed areas 8 Check Air Passageway for obstructions Remove debris from this area Replace Drive Belt 1 Unplug cleaner from electrical outlet 2 With Rotating Floor Brush removed from vacuum cleaner grasp old Drive Belt and remove from Motor Pulley Dis...

Page 11: ...acing down slide end plates of brushbar into slots on the tool 6 To replace bottom plate insert the four tabs on edge of bottom plate into slots on front of tool Pivot bottom plate down and snap closed Belt Replacement 1 Grasp turbine and pull firmly to remove 2 Remove a screw and lift the cover belt off 3 Remove belt from turbine pulley Replace with new belt 4 With flat sides of turbine retainers...

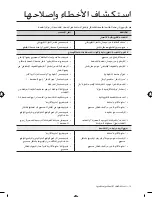
Page 12: ...brush roll Adjust Powerfoot to correct height setting Firmly push Hose Wand onto the suction opening Make sure Twist Snap Hose is snapped into locked position Check Hose and replace if needed Replace Drive Belt see pg 10 Replace Brush Remove brush and clean debris from brush ends Clear clog see pg 8 9 Empty Dust Bin Position correctly and lock in place Check Pre motor and Post motor filters Mainta...

Page 13: ...memo _13 Memo ...

Page 14: ...14_ memo Memo ...

Page 15: ...memo _15 Memo ...

Page 16: ......

Page 17: ...Country U A E Customer Care Center 800SAMSUNG 7267864 Web Site www samsung com ae ةلئسأ ا ل ةقالع تاجتنملل جنوسماس ىجري لاصتإلا ةمدخب ءالمع ةكرش جنوسماس ...

Page 18: ...15_ مذكرة مذكرة ...

Page 19: ... النقل سير باستبدال قم ٍ بال الدوارة األرضية بالفرشاة املوجود اخلشن الشعر الفرشاة باستبدال قم ة ّ ر الدوا األرضية فرشاة إنحشار من الفرشاة أطراف بتنظيف قم ثم الفرشاة بإزالة قم اخمللفات الكهربائية باملكنسة انسداد 9 8 الصفحة راجع االنسداد من املكنسة بتنظيف قم ممتلئة األتربة حاوية األتربة حاوية بتفريغ قم صحيح بشكل بة ّ مرك غير األتربة حاوية باملكان اقفلها ثم الصحيح املكان في بوضعها قم نظيفة غير املرشح...

Page 20: ...دة الفتحات داخل الفرشاة اللوحة بحافة املوجودة األربعة األلسنة بإدخال قم السفلية اللوحة الستبدال 6 اللوحة بتدوير قم األداة من األمامي اجلزء على املوجودة الفتحات داخل السفلية مطبقة وهي إغالقها يتم بحيث األسفل إلى السفلية السير استبدال إلزالتها بإحكام واسحبها بالتربينة باإلمساك قم 1 ألعلى الغطاء سير وارفع اللولبي املسمار بإزالة قم 2 جديد بسير واستبدله التربينة بكرة من السير بإزالة قم 3 مثبت كل بإزالق...

Page 21: ...م 7 ممزقة أو مقطوعة بإزالة قم بها انسداد وجود من ا ً ب حتس الهوائي املمر بفحص قم 8 املنطقة بتلك مخلفات أي النقل سير استبدال الكهربائي التيار مأخذ عن املكنسة افصل 1 قم الكهربائية املكنسة من الدوارة األرضية فرشاة إزالة مع 2 املوتور بكرة من بإزالته قم ثم القدمي النقل بسير باإلمساك القدمي النقل سير من تخلص الطرف مبد قم ثم املوتور بكرة فوق اجلديد النقل سير بوضع قم 3 اخلشن الشعر بني ما املسافة في الدوار...

Page 22: ... ا جيد اشطفه املوتور خلف الواقع املرشح تبديل الكهربائي التيار مأخذ عن الكهربائية املكنسة افصل 1 على الباب خلف يقع الغرفة داخل النقي الهواء الستعادة التنقية عملية في املوتور خلف الواقع املرشح ساعد ُ ي 2 واستبداله املرشح بإزالة قم ثم الباب بفتح قم املرشح يتسخ عندما املكنسة من األمامي اجلانب مرشحات الكفاءة عالية الهواء مرشحات أنواع من مثني اللون أبيض مرشح هو املوتور خلف الواقع املرشح مالحظة استبداله ...

Page 23: ...اخلط إلى األتربة تصل عندما تفريغها يتم أن إلى األتربة حاوية حتتاج الكهربائي التيار مأخذ عن املكنسة افصل 1 موضح هو كما املكنسة حاوية حترير زر بدفع قم املكنسة جسم من األتربة حاوية إلزالة 2 كما القمامة حاوية في األوساخ لتفريغ أسفل إلى احلاوية بتحرير اخلاص التفريغ مفتاح وادفع األتربة بحاوية أمسك 3 موضح هو قم اخلفيف التنظيف سائل استخدام مع دافئ ماء في األتربة غسل حاوية ميكن مالحظة ثانية ً ة مر استخدامه...

Page 24: ...ا بها ترغب ملحقة أداة أي مع ُستخدم ت أطول مسافات إلى املناسب الطراز اختر الصغيرة التربينية الفرشاة مثل الصغيرة املناطق في التدوير فرشاة أداء استخدم املنجدة واملفروشات الساللم من مستوى أفضل على احلصول لضمان استخدامها حني الصغيرة التربينة الفرشاة على برفق اضغط مالحظة الدوران عن توقفها إلى الفرشاة على الزائد الضغط يؤدي قد حيث التنظيف الطاقة سلك تخزين السريع للتحرير سلك لفة هناك لراحتك الكهربائي التيا...

Page 25: ...كني الوضع هذا ستخدم ُ ي ثانية ً ة مر ة ّ ر واألس والكراسي الطاوالت مثل املنخفضة االرتفاع ضبط األرضيات أسطح من العديد لتنظيف الطاقة إمداد بقدم اخلاصة ة ّ ر الدوا األرضية فرشاة ضبط ميكن بالضبط قم التنظيف في األداء من األمثل املستوى على للحصول مالحظة األمام إلى الدفع املكنسة على الصعب من كان إذا األدنى العملي الوضع على التالي األعلى الوضع على بالضبط فقم به املرغوب للوضع االرتفاع ضبط مقبض أدر 1 األدنى...

Page 26: ...يل قم 1 مع القاعدة على املوجودة األلسنة من لسان كل ضبط طريق هو كما الكهربائية املكنسة من اخللفي باجلزء املقابل ّ ز احل موضح اجتاه في اإلطباقي امللفوف اخلرطوم بتدوير قم 2 مكانه في اخلرطوم لقفل الساعة عقارب بإزالق قم ثم اخلرطوم بعصا باإلمساك قم 3 في اخلرطوم بإطباق قم اخلرطوم عصا قاعدة في طرفها اخلرطوم مشبك توصيل مت إذا إال بكفاءة املكنسة تعمل لن مالحظة بإحكام اخلرطوم عصا طريق عن السفلية السلك لفة بت...

Page 27: ...للزونية احللقة للشبكة األتربة حاوية إمداد قدم الطاقة االرتفاع ضبط مقبض خلف الواقع املرشح املرشح يوجد املوتور املوتور خلف الواقع الباب خلف األسالك وصلة اخلرطوم وصلة املد خرطوم ما تنظيف أداة الشقوق بني اإلطالة عصا اخلرطوم عصا عصا قاعدة اخلرطوم السلك لفة السفلية تنبيه وإجراءات اإلرشادات بكافة دراية على تكون حتى الكهربائي بالتيار الكهربائية املكنسة بتوصيل تقم ال التشغيل حتذير ً ا بعيد واألطفال الرضع إ...

Page 28: ...ة خرطوم توصيل 7 املكنسة تشغيل 8 الطاقة مفتاح 8 املقبض أوضاع 8 االرتفاع ضبط 8 املكنسة نقل 8 األسطح لتنظيف خاصة أدوات 9 الطاقة سلك تخزين 9 الصيانة 10 األتربة حاوية تفريغ 10 الشبكة تنظيف 10 املوتور أمام الواقع املرشح تنظيف 11 املوتور خلف الواقع املرشح تبديل 11 النقل وسير ة ّ ر الدوا الفرشاة فحص 12 الصغيرة التربينية الفرشاة 13 وإصالحها األخطاء استكشاف 14 ...

Page 29: ...في املستخدمة الرموز خطيرة إصابة أو وفاة حالة حدوث إلى يؤدي قد خطر وجود إلى يشير ما ٍ ة ملاد تلف أو شخصية إصابة حدوث خطر وجود إلى يشير حتذير حتذير حتذير تنبيه الكهربائي بالتيار موصل غير أو اإليقاف وضع في الطاقة مفتاح يكن لم إذا على الكهربائية املكنسة استخدام أثناء الدوران في األرضية فرشاة فستستمر السجاد أو األرضية مرفوعة وهي الدوران في األرضية فرشاة ستستمر األعلى من األرضية لتنظيف األرض عن ً قليال ...

Page 30: ...خلدمة عميل أو ّعة ن ص ُ مل ا اجلهة من استبداله يجب بالطاقة التغذية لسلك تلف حدث إذا أخطار حدوث لتجنب مماثل نحو على مؤهل اإلرشادات بهذه احتفظ فقط املنزلي لالستخدام الكهربائية املكنسة هذه تصميم مت فقط املتحدة اململكة في للمقيمني من عتمد ُ مل ا أمبير 13 الفيوز كان إذا إال بأسالك للتجهيز القابل غير BS 1363 بقابس ا ً د مزو كان إذا اجلهاز استخدام عدم يجب يجب األسباب من سبب ألي بالقابس مفاجئ طل ُ ع حدث إ...

Page 31: ...ة املكنسة متسك ال أو األتربة من خالية الفتحات على حافظ مسدودة فتحة أي وهناك املكنسة تستخدم ال الفتحات في شيء أي تضع ال الهواء تدفق إعاقة في يتسبب قد شيء أي أو الشعر أو اخليوط نسالة املتحركة واألجزاء الفتحات عن ا ً د بعي اجلسم أجزاء وكافة واألصابع الفضفاضة واملالبس الشعر إبقاء على احرص الرماد أو الثقاب أعواد أو السجائر مثل دخان يصدر أو يحترق شيء أي التقاط في الكهربائية املكنسة تستخدم ال الساخن املر...

Page 32: ...ك اخلدمة من كامل مستوى على للحصول على لديك املنتج تسجيل الرجاء www samsung com register الكهربائية املكنسة املستخدم دليل اإلجنليزية SU33 SERIES بعناية اإلرشادات قراءة الرجاء الوحدة هذه تشغيل في الشروع قبل فقط الداخلي لالستخدام DJ68 00450F REV 0 0 الكود رقم ...

Reviews: