


System Menu Setting
✤
Clock setup works in Camera/Player/M.Cam/M.Player modes.
✤
The Date/Time is automatically recorded onto a tape.
Before recording, please set the Date/Time.
1. Set the
Power
switch to
CAMERA
or
PLAYER
.
2. Set the
Mode
switch to
TAPE
or
MEMORY
.
(VP-D453(i)/D454(i)/D455(i) only)
3. Press the
MENU
button.
■
The menu list will appear.
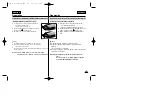
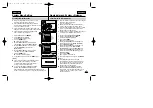
4. Move the
Menu selector
to the left or right to select
System
, then press the
Menu selector
.
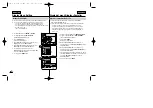
5. Move the
Menu selector
to the left or right to select
Clock Set
, then press the
Menu selector
.
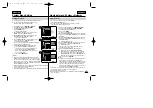
■
The year will highlight first.
6. Move the
Menu selector
to the left or right to set the
current Year, then press the
Menu selector
.
■
The month will be highlighted.
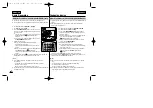
7. You can set the month, day, hour and minute following the
same procedure for setting the year.
8. Press the
Menu selector
after setting the minutes.
■
The message
Complete !
will be displayed.
■
To adjust the clock, select the Year, Month, Day,
Hour or Min by pressing the
Menu selector
,
then move the
Menu selector
to the left or right
to set respective values.
9. To exit, press the
MENU
button.
[ Notes ]
■
Date/Time is memorized and maintained by the built-in
Lithium battery installed in the camcorder. If you don’t use
the camcorder for a long period of time, charge the Lithium
battery at least once a month. To charge the built-in Lithium
battery, supply power to the camcorder and set the Power
Switch to CAMERA or PLAYER.
■
After the Lithium battery loses its charge (after about 3 months), the date/time
appears on the screen as 00:00 1.JAN.2005.
■
You can set the year up to 2037.
■
If the built-in lithium battery is not charged, any input data will not be backed up.
Setting the Clock
ESPAÑOL
ENGLISH
27
27
Ajuste del menú System <Sistema>
✤
La configuración del reloj funciona en las modalidades
Camera/Player/M.Cam/M.Player.
✤
La fecha y la hora se graban de manera automática en la cinta.
Antes de grabar, ajuste la fecha y la hora.
1. Coloque el interruptor
Power
en
CAMERA
o
PLAYER
.
2. Coloque el interruptor
Mode
en
TAPE
o
MEMORY
.
(Sólo VP-D453(i)/D454(i)/D455(i))
3. Pulse el botón
MENU
.
■
Aparece la lista del menú.
4. Mueva el
Selector de menú
a la izquierda o a la derecha
hasta seleccionar
System <Sistema>
y pulse el
Selector
de menú
.
5. Mueva el
Selector de menú
a la izquierda o a la derecha
hasta seleccionar
Clock Set <Ajuste Reloj>
y pulse el
Selector de menú
.
■
Primero parpadea el año.
6. Mueva el
Selector de menú
a la izquierda o a la derecha
hasta fijar el año y pulse el
Selector de menú
.
■
El mes parpadeará.
7. Fije el mes, día, hora y minutos siguiendo el mismo
procedimiento que para el año.
8. Pulse el
Selector de menú
tras fijar los minutos.
■
Aparecerá el mensaje
Complete! <Completo!>
.
■
Para ajustar el reloj, seleccione Year <Año>, Month
<Mes>, Day <Día>, Hour <Hora> o Min pulsando el
Selector de menú
y mueva el
Selector de menú
a la
izquierda o derecha para fijar los valores respectivos.
9. Para salir, pulse el botón
MENU
.
[ Notas ]
■
La fecha y la hora se memorizan y mantienen mediante la
batería de litio incorporada que está instalada en la
videocámara. Si no utiliza la videocámara durante un largo
período de tiempo, cargue la batería de litio al menos una
vez al mes. Para cargar la batería de litio incorporada,
enchufe la videocámara a una toma eléctrica y coloque el
interruptor Power en CAMERA o PLAYER.
■
Una vez que se haya agotado la batería de litio (unos 3 meses), aparece la
fecha/hora en pantalla con el formato 00:00 1.JAN.2005.
■
Puede definir el año hasta 2037.
■
Si no se instala la batería de litio, no se realizará copia de seguridad de los
datos de entrada.
Ajuste del reloj
Adjust
Select
Exit
MENU
Camera Mode
Back
Clock Set
Beep Sound
USB Version
Language
Demonstration
1 JAN
2005
00 : 00
…
†
Move
Select
Exit
MENU
Camera Mode
Back
Clock Set
Beep Sound
USB Version
Language
Demonstration
1 JAN 2005
10 : 30
Complete!
5
8
Camera Mode
√
System
Clock Set
Beep Sound
USB Version
Language
Demonstration
√
On
√
USB 2.0
√
English
√
On
Move
Select
Exit
MENU
4
00840J VP-D451 UK+ESP ~085 4/8/05 9:20 AM Page 27


