background image

English - 19

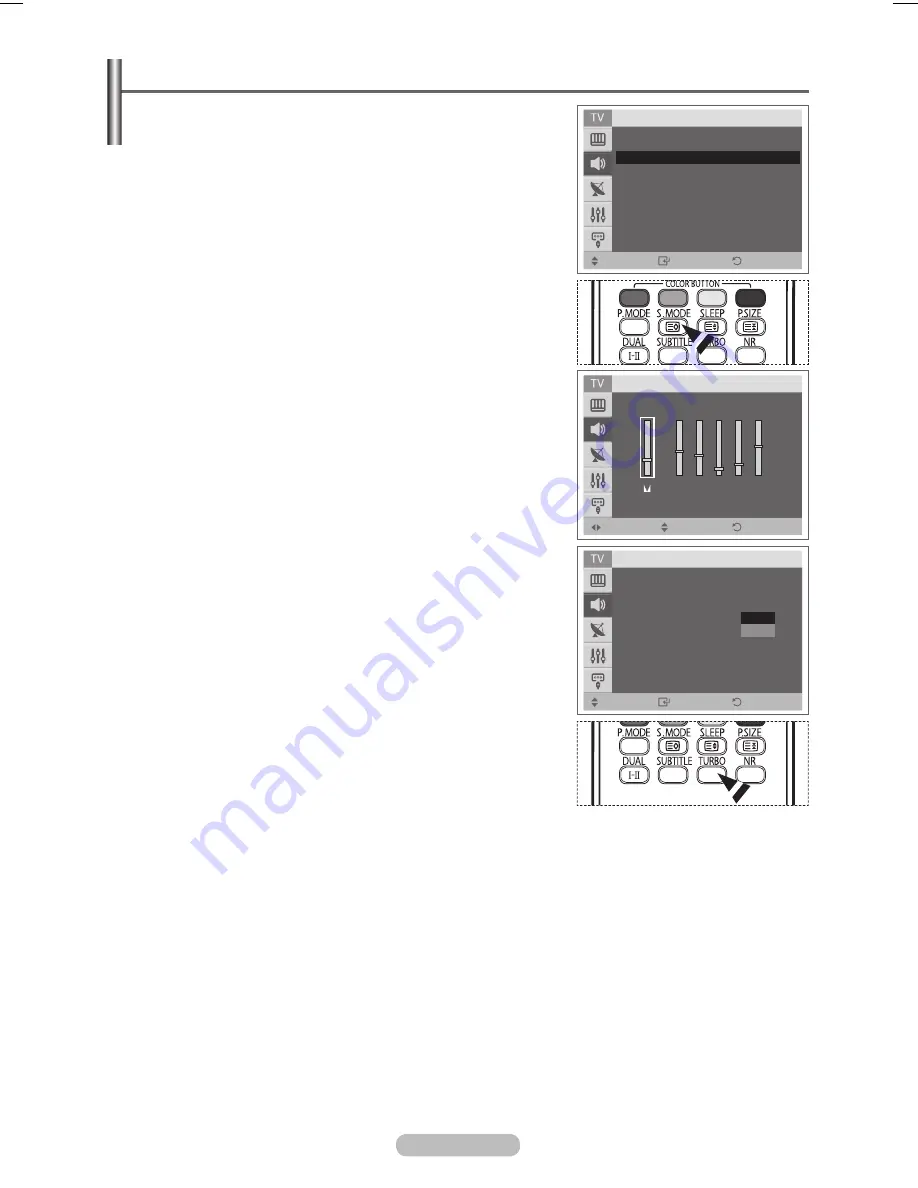
Sound Features

1

  Press the 

MENU

 button to display the menu.

2

  Press the ▲ or ▼ button to select 

Sound

, then press the 

ENTER

 button.

3

  Select the required option by pressing the ▲ or ▼ button, then 

press the 

ENTER

 button.


Available options: 

Mode

Equalizer

Auto Volume

Pseudo 

Stereo

Turbo Sound

4

  When you are satisfied with your setting, press the 

ENTER


button.

5

  Press the 

EXIT

 button to exit.

 

Mode

Standard/Music/Movie/Speech/Custom

You can select the type of special sound effect to be used when 

watching a given broadcast.

➢ 

You can select these options simply by pressing the  


S .

MODE

 button on the remote control.

 

Equalizer

Balance/100/300/1K/3K/10K

The television has several settings which allow you to control 

the sound quality.

➢ 

If you make any changes to these settings, the sound 

mode is automatically switched to 

Custom

.

 

Auto Volume

Off/On

Each broadcasting station has its own signal conditions, and 

so it is not easy to adjust the volume every time the channel is 

changed. This feature lets you automatically adjust the volume 

of the desired channel by lowering the sound output when the 

modulation signal is high or by raising the sound output when 

the modulation signal is low.

 

Pseudo Stereo

Off/On

Pseudo Stereo feature converts a monaural sound signal into 

two identical left and right channels. Once the 

Pseudo Stereo


is set to On or Off, these settings apply to the sound effects 

such as 

Standard

Music

Movie

, and 

Speech

.

 

Turbo Sound

Off/On

This feature suitably emphasizes both higher and lower bands 

of sound (and includes other effects). You can enjoy more 

magnificent and dynamic sound when watching music, movie 

or other channels.

➢ 

You can select these options simply by pressing the 

TURBO

 button on the remote control.

Move 

 Enter 

 Return

Sound

Mode 

:


Custom 

Equalizer 


Auto Volume 


:  Off 

Pseudo Stereo 


:  Off 

Turbo Sound 


:  Off 

Move 

Adjust 

 Return

Equalizer

R

L

100 300 1K 3K 10K

Move 

 Enter 

 Return

Sound

Mode 

:


Custom 


Equalizer 


Auto Volume 


:  Off 

Pseudo Stereo 


:  Off 


Turbo Sound 


:  Off 


Off

On

BN68-03956A-00Eng.indd   19

2007-10-18   ¿ÀÈÄ 1:23:06

Summary of Contents for CW-21Z573B

Page 1: ...ur Model and Serial number here for future reference Model _______________ Serial No _______________ DIGITAL TELEVISION Owner s Instructions Before operating the unit please read this manual thoroughly and retain it for future reference ON SCREEN MENUS TELETEXT Option ...

Page 2: ...er week Additionally viewing other stationary images and text such as stock market reports video game displays station logos web sites or computer graphics and patterns should be limited as described above for all televisions Displaying any stationary images that exceed the above guidelines can cause uneven aging of picture tubes CRTs that leave subtle but permanent burned in ghost images in the t...

Page 3: ...matically 13 Storing Channels Manually 14 Adding Channels 15 Sorting the Stored Channels 16 Assigning Names to Channels 16 Picture Control Changing the Picture Standard 17 Customizing the Picture Settings 17 Selecting the Picture Size 18 Digital NR 18 Sound Control Sound Features 19 Selecting the Sound Mode depending on the model 20 Function Description Time Features 21 Child Lock 22 Language Blue...

Page 4: ...ons as you use the and buttons on the remote control and also use decrease and increase buttons as the functions of return and enter respectively 3 C P Press to change channels In the on screen menu use the C P buttons as you use the and buttons on the remote control 4 Remote Control Sensor Aim the remote control towards this spot on the TV 5 Power Indicator Blinks and turns off when the power is ...

Page 5: ... as a camcorder or VCR 2 Headphones jack You can connect a set of headphones if you wish to watch a television programme without disturbing the other people in the room Prolonged use of headphones at a high volume may damage your hearing 2 1 The product colour and shape may vary depending on the model ...

Page 6: ...s Scramble Signal is displayed on the screen The pairing information containing a telephone number CI CARD ID Host ID and other information will be displayed in about 2 3 minutes If an error message is displayed please contact your service provider When the channel information configuration has finished the message Updating Completed is displayed indicating that the channel list is now updated Ins...

Page 7: ...tion Refer to page 17 Sound effect selection Sound mode selection Digital subtitle display Available source selection Previous channel DTV menu display Electronic Program Guide EPG display Next channel Previous channel Exit the on screen menu a Control the cursor in the menu b Use to see information on the current broadcast d Picture size selection e Automatic Power off f Digital NR on off g Turbo...

Page 8: ...n in the figure Remove the batteries and store them in a cool and dry place if you won t be using the remote control for a long time The remote control can be used up to about 23 feet from the TV Assuming typical TV usage the batteries last for about one year If the remote control doesn t work Check the following 1 Is the TV power on 2 Are the plus and minus ends of the batteries reversed 3 Are th...

Page 9: ...on and the frequency is 50 or 60Hz 2 Press the I Power button On Off on the front of the television or press the POWER button on the remote control to switch the television on The programme that you were watching last is reselected automatically If you have not yet stored any channels no clear picture appears Refer to Storing Channels Automatically on page 13 or Storing Channels Manually on page 1...

Page 10: ... accidentally set to Shop mode and you want to return to Dynamic Home mode press the Volume button and then hold down the MENU button for five seconds on the TV panel 5 Make sure that the antenna is connected to the TV Press the ENTER button The Country menu is displayed 6 Select your country or area by pressing the or button Press the ENTER button The message Some DTV functions may not be availab...

Page 11: ...utomatically After all the available digital channels are stored the screen to select a time zone is displayed depending on the country To stop the search before it has finished press the ENTER button with Stop selected If the DTV channel is updated the Source in the source list of the Input menu is automatically changed to DTV For detailed descriptions about DTV channel update refer to page 26 of...

Page 12: ...n the rear panel or EXT 2 AV IN on the side panel DTV You can select these options simply by pressing the SOURCE button on the remote control To watch television programme again press the TV DTV button and select the channel number required If you want to reset this feature 1 Press the MENU button to display the menu 2 Press the or button to select Setup then press the ENTER button 3 Press the ENT...

Page 13: ...on then press the ENTER button Even though you have changed the country setting in this menu the country setting for DTV is not changed Use the Plug Play function to change the country setting for DTV Refer to Pages 10 to 11 5 Press the or button to select Auto Store then press the ENTER button 6 Press the ENTER button again to start the search The search will end automatically To stop the search ...

Page 14: ...e channel numbers Press the ENTER button to start the search The tuner scans the frequency range until the first channel or the channel that you selected is received on the screen Channel When you know the number of the channel to be stored Press the or button to select C Air channel or S Cable channel Press the button then press the or button to select the required number You can also select the ...

Page 15: ... press the ENTER button 4 Press the or button to select the channel to add or erase If necessary select Added or Deleted by pressing the ENTER button 5 Repeat Step 4 for each channel to be added or erased You can select these options simply by pressing the CH LIST button on the remote control Only in DTV signal Move Enter Return Channel Country United Kingdom Auto Store Manual Store Add Delete Sor...

Page 16: ...essing the or button 8 Press the EXIT button to exit Assigning Names to Channels Not available in DTV or external input mode Channel names will be assigned automatically when channel information is broadcast These names can be changed allowing you to assign new names 1 Press the MENU button to display the menu 2 Press the or button to select Channel then press the ENTER button 3 Press the or butto...

Page 17: ...de and colour tone Changing the Picture Standard You can select the type of picture which best corresponds to your viewing requirements 1 Press the MENU button to display the menu 2 Press the ENTER button to select Picture 3 Press the ENTER button again to select Mode 4 Select the required mode by pressing the or button then press the ENTER button Available modes Dynamic Standard Movie The setting...

Page 18: ...icture size simply by pressing the P SIZE button on the remote control Digital NR 1 Press the MENU button to display the menu 2 Press the ENTER button to select Picture 3 Press the or button to select Digital NR then press the ENTER button 4 Select Off or On by pressing the or button then press the ENTER button 5 Press the EXIT button to exit Digital NR Off On If the signal received by the televis...

Page 19: ...conditions and so it is not easy to adjust the volume every time the channel is changed This feature lets you automatically adjust the volume of the desired channel by lowering the sound output when the modulation signal is high or by raising the sound output when the modulation signal is low Pseudo Stereo Off On Pseudo Stereo feature converts a monaural sound signal into two identical left and ri...

Page 20: ... indication NICAM Stereo Regular broadcast Standard audio Mono Normal use Regular NICAM Mono NICAM Mono Normal NICAM Stereo NICAM stereo Mono Normal NICAM DUAL I II NICAM dual 1 NICAM dual 2 Mono Normal A2 Stereo Regular broadcast Standard audio Mono Normal use Bilingual or DUAL I II Dual I Dual II Stereo Stereo Mono Forced mono If the receiving conditions deteriorate listening will be easier if t...

Page 21: ... You can select these options simply by pressing the SLEEP button on the remote control If the sleep timer is not yet set Off is displayed If it is already set the remaining time before which the television switches to standby mode is displayed On Timer Off Timer You can set the On Off timers so that the television will switch on or off automatically at the time you select You must set the clock f...

Page 22: ...to select the On If you want to unlock a channel set to Off 6 Press the ENTER button 7 Press the or button to select the Prog Select the number of the channel to be locked by pressing the or button 8 Press the or button to select Lock 9 Press the ENTER button Locked is displayed 10 Press the EXIT button to exit If any channel is locked you can not enter the Channel menu by using the control button...

Page 23: ...r the signal is very weak a blue screen automatically replaces the noisy picture background If you wish to continue viewing the poor picture you must set the Blue Screen to Off Melody Off On The TV power on off melody sound can be adjusted Move Enter Return Setup Plug Play Language English Time Child Lock Blue Screen On Melody On Move Enter Return Setup Plug Play Language English Time Child Lock B...

Page 24: ... adjust the various settings available refer to the following illustration Press the D MENU button to display the menu Guide Now Next Guide Full Guide Scheduled List Default Guide Now Next Full Guide Channel Auto Store Manual Store Edit Favourite Channels Channel List All Favourites Default All Setup Favourites Menu Transparency High Medium Low Opaque Parental Lock Parental Rating Change PIN Subti...

Page 25: ...e viewing a channel additional information about the current programme may be displayed While viewing a programme press the INFO button The programme information is displayed The information is displayed Parental Rating Video Type SD HD Radio Audio Type Mono Stereo Dual Dolby Digital Existence of Teletext or DVB Subtitle Audio Language To exit from banner information press the INFO button Audio La...

Page 26: ...op the scan before it has finished press the ENTER button with Stop selected If the signal status is poor the message No service found Check the aerial connection is displayed 1 2 Manual Store You can specify the channel for a fast channel search Channel Press the or numeric buttons 0 9 to select a channel The available channels are 5 10 and 21 69 The corresponding frequency for the selected chann...

Page 27: ... channels refer to the previous section To add all channels to the favourites channel list press the red button To remove all channels press the green button Preview Displays a currently selected channel s Press the CH LIST button to display the favourite channel list Renumber In the Edit Favourite Channels menu press the or button to select the required channel Press the green button The space fo...

Page 28: ... as new information becomes available Now Next Guide For the six channels indicated in the left hand column displays the Current programme and the Next programme information Full Guide Displays the programme information as time ordered One hour segments Two hours of programme information is displayed which may be scrolled forwards or backwards in time Press the or button to select Now Next Guide o...

Page 29: ...cheduled programme select a programme by pressing the or button then press the green button If necessary select the programme to be deleted by pressing the or button then press the blue button When watching analog TV the reserved DTV channel cannot be changed The channel is only changed automatically to the reserved channel when you are watching DTV Scheduling programme only functions with the tel...

Page 30: ...he message No Data will be displayed and you will not be able to change the channel even if you press the ENTER button When the message No Data appears and you cannot change the channel press the channel number directly using the numeric buttons 3 Language This menu consists of 4 sub menus Audio Language Subtitle Language Teletext Language and Preference 3 1 Audio Language Subtitle Language Telete...

Page 31: ...ge the language setting the Audio Language Subtitle Language and Teletext Language of the Language menu refer to page 30 are automatically changed to the selected language The Audio Language Subtitle Language and Teletext Language of the Language menu show a list of languages supported by the current channel and the selection is highlighted If you change this language setting the new selection is ...

Page 32: ...s displayed Press the ENTER button Press the or button to select the age rating you want to lock out then press the ENTER button If you want to change the PIN code press the or button to select Change PIN then press the ENTER button Enter your new PIN code by using the numeric buttons 0 9 The message Confirm New PIN is displayed Re enter your new PIN code to confirm by using the numeric buttons 0 ...

Page 33: ...s Group An International standard for data encoding systems used in multimedia and hypermedia This is at a higher level than the MPEG system which includes data linking hypermedia such as still images character service animation graphic and video files as well as multimedia data MHEG is user runtime interaction technology and is being applied to various fields including VOD Video On Demand ITV Int...

Page 34: ...de Software Inforamtion Press the ENTER button then the current software version is shown To display the software version information press the ENTER button again Manual Upgrade Press the ENTER button to search for new software from the currently broadcasting channels Standby Mode upgrade On Off Press the ENTER button To continue software upgrade with master power on Select On by pressing the or b...

Page 35: ...ed on the PC Card menu Reset You can reset the values stored to the factory default values The Reset operation deletes all channel information and user preferences returning all values to their default factory state Press the ENTER button with Reset selected The Enter PIN is displayed Enter your current 4 digit PIN code by using the numeric buttons 0 9 The warning message is displayed All values w...

Page 36: ... page 8 cancel Used to display the broadcast when searching for a page 9 reveal Used to display the hidden text answers to quiz games for example To display normal screen press it again 0 teletext on mix Press to activate teletext mode after selecting the channel providing the teletext service Press it twice to overlap the teletext with the current broadcasting screen Coloured buttons red green ye...

Page 37: ... identify the electrical appliance that is affecting the television then move it further away Plug the television into a different main socket Blurred or snowy picture distorted sound Check the direction location and connections of your aerial This interference often occurs due to the use of an indoor aerial Remote control malfunctions Replace the remote control batteries Clean the upper edge of t...

Page 38: ...understands that there is no warranty for this free software If the software is modified by someone else and passed on we want its recipients to know that what they have is not the original so that any problems introduced by others will not reflect on the original authors reputations Finally any free program is threatened constantly by software patents We wish to avoid the danger that redistributo...

Page 39: ...ight to control the distribution of derivative or collective works based on the Program In addition mere aggregation of another work not based on the Program with the Program or with a work based on the Program on a volume of a storage or distribution medium does not bring the other work under the scope of this License 3 You may copy and distribute the Program or a work based on it under Section 2...

Page 40: ...ense 8 If the distribution and or use of the Program is restricted in certain countries either by patents or by copyrighted interfaces the original copyright holder who places the Program under this License may add an explicit geographical distribution limitation excluding those countries so that distribution is permitted only in or among countries not thus excluded In such case this License incor...

Page 41: ...Foundation Inc 59 Temple Place Suite 330 Boston MA 02111 1307 USA Also add information on how to contact you by electronic and paper mail If the program is interactive make it output a short notice like this when it starts in an interactive mode Gnomovision version 69 Copyright C year name of author Gnomovision comes with ABSOLUTELY NO WARRANTY for details type show w This is free software and you...

Page 42: ...we copyright the library and 2 we offer you this license which gives you legal permission to copy distribute and or modify the library To protect each distributor we want to make it very clear that there is no warranty for the free library Also if the library is modified by someone else and passed on the recipients should know that what they have is not the original version so that the original au...

Page 43: ...l compilation and installation of the library Activities other than copying distribution and modification are not covered by this License they are outside its scope The act of running a program using the Library is not restricted and output from such a program is covered only if its contents constitute a work based on the Library independent of the use of the Library in a tool for writing it Wheth...

Page 44: ...d a work that uses the Library Such a work in isolation is not a derivative work of the Library and therefore falls outside the scope of this License However linking a work that uses the Library with the Library creates an executable that is a derivative of the Library because it contains portions of the Library rather than a work that uses the library The executable is therefore covered by this L...

Page 45: ...utomatically terminate your rights under this License However parties who have received copies or rights from you under this License will not have their licenses terminated so long as such parties remain in full compliance 9 You are not required to accept this License since you have not signed it However nothing else grants you permission to modify or distribute the Library or its derivative works...

Page 46: ...sion For software which is copyrighted by the Free Software Foundation write to the Free Software Foundation we sometimes make exceptions for this Our decision will be guided by the two goals of preserving the free status of all derivatives of our free software and of promoting the sharing and reuse of software generally NO WARRANTY 15 BECAUSE THE LIBRARY IS LICENSED FREE OF CHARGE THERE IS NO WAR...

Page 47: ... of the GNU Lesser General Public License as published by the Free Software Foundation either version 2 1 of the License or at your option any later version This library is distributed in the hope that it will be useful but WITHOUT ANY WARRANTY without even the implied warranty of MERCHANTABILITY or FITNESS FOR A PARTICULAR PURPOSE See the GNU Lesser General Public License for more details You sho...

Page 48: ...This page is intentionally left blank ...

Page 49: ...This page is intentionally left blank ...

Page 50: ...This page is intentionally left blank ...

Page 51: ...or human health from uncontrolled waste disposal please separate this from other types of wastes and recycle it responsibly to promote the sustainable reuse of material resources Household users should contact either the retailer where they purchased this product or their local government office for details of where and how they can take this item for environmentally safe recycling Business users ...

Page 52: ...msung com hu ITALIA 800 SAMSUNG 726 7864 www samsung com it LUXEMBURG 0035 0 2 261 03 710 www samsung com be NETHERLANDS 0900 20 200 88 0 10 Min www samsung com nl NORWAY 815 56 480 www samsung com no POLAND 0 801 801 881 022 607 93 33 www samsung com pl PORTUGAL 80 8 200 128 www samsung com pt REPUBLIC OF IRELAND 0818 717 100 www samsung com ie SLOVAKIA 0800 SAMSUNG 726 7864 www samsung com sk SP...

Reviews: