background image

Playback/Editing

  72

Playing back

To delete all files,

In Playback mode, select 

M

.

Select 

Delete


“


All


“


Yes

.

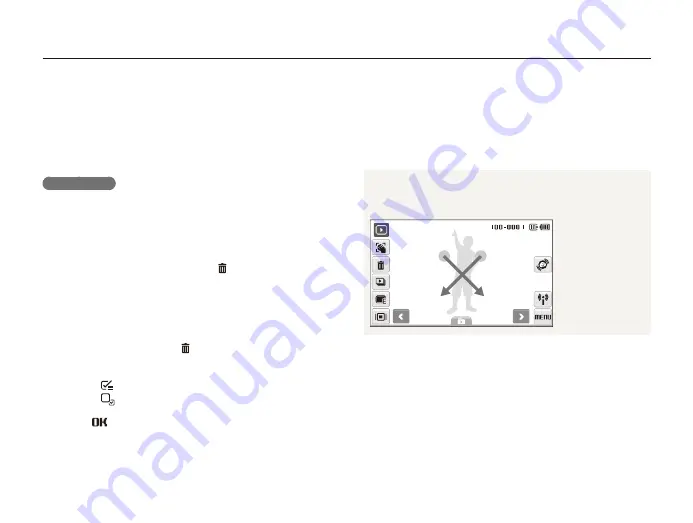
Alternate way to delete a file

While viewing a file in Playback mode, draw an X on the 
screen. 

To protect all files,

In Playback mode, select 

M

.

Select 

Protect 

“

All 

“

Lock

.

  Deleting files  

Delete single files or all files at once. You cannot delete protected 
files.

To delete a single file,

In Playback mode, select a file 

“

  .

Select 

Yes

 to delete the file.

To delete multiple files,

In Playback mode, select 


“


Multiple Delete

.

Select files you want to delete. 

Select 

t

 to select all files on the current screen.

Select 

t

 to cancel your selection.

Select 


“


Yes

.

Summary of Contents for CL80

Page 1: ...ructions for your camera Please read this manual thoroughly Ä Click a topic User Manual CL80 Common questions Quick reference Contents Basic functions Extended functions Shooting options Playback Editing Wireless network Bluetooth Appendixes Index ...

Page 2: ... close proximity closer than 1 m 3 ft to people or animals Using the flash too close to your subject s eyes can cause temporary or permanent damage Handle and dispose of batteries and chargers with care Use only Samsung approved batteries and chargers t Incompatible batteries and chargers can cause serious injuries or damage to your camera Never dispose of batteries in a fire Follow all local regula...

Page 3: ...n with a soft cloth before inserting in your camera Do not allow liquids dirt or foreign substances to come in t contact with the memory card slot Doing so may cause the camera to malfunction Safety precautions Handle and store your camera carefully and sensibly Do not allow your camera to get wet liquids can cause serious t damage Do not handle your camera with wet hands Water damage to your came...

Page 4: ...lt the manufacturers of your electronic devices to solve any interference problems you experience Turn off the camera when inserting or removing the memory t card Do not bend drop or subject memory cards to heavy impact t or pressure Do not use memory cards that have been formatted by other t cameras or by a computer Reformat the memory card with your camera Never use a damaged charger battery or ...

Page 5: ...o not allow unqualified personnel to service the camera or attempt to service the camera yourself Any damage that results from unqualified service is not covered by your warranty Ensure maximum battery and charger life Overcharging batteries may shorten battery life After charging is t finished disconnect the cable from your camera Over time unused batteries will discharge and must be t recharged bef...

Page 6: ...prior notice due to upgrade of camera functions We recommend using your camera within a country where you purchase it For Open Source License information refer to the OpenSourceInfo pdf in the provided CD ROM Organization of the user manual Basic functions 13 Learn about your camera s layout icons and basic functions for shooting Extended functions 32 Learn how to take a photo by selecting a mode ...

Page 7: ...n Function Additional information Safety warnings and precautions Camera buttons for example Shutter represents the shutter button Page number of related information The order of options or menus you must select to perform a step for example Select represents Select and then Annotation Abbreviations used in this manual Abbreviation Definition ACB Auto Contrast Balance AEB Auto Exposure Bracket AF A...

Page 8: ...nimal or still life Background t the objects around the subject Composition t the combination of a subject and background Subject Background Composition Expressions used in this manual Exposure Brightness The amount of light that enters your camera determines the exposure You can alter the exposure with shutter speed aperture value and ISO speed By altering the exposure your photos will be darker ...

Page 9: ... to make sure the subject is focused p 30 Use the t d mode p 37 Photos are blurred when shooting at night As the camera tries to let in more light the shutter speed slows This can make it difficult to steady the camera and may result in camera shake Select t Night in the s mode p 36 Turn on the flash p t 47 Set ISO speed options p t 48 Use a tripod to prevent your camera from shaking t Subjects come...

Page 10: ...ust exposure t f 57 ACB to compensate for subjects against bright t backgrounds f 58 Metering t f 59 AEB to take 3 photos of the same scene with different t exposures f 62 Applying a different effect Photo styles to apply tones t f 63 Smart filter effects t f 64 Image adjustment to adjust saturation sharpness or t contrast f 65 Reducing camera shake Optical Image Stabilization OIS t f 29 d t mode f...

Page 11: ...tion and quality 43 Selecting a resolution 43 Selecting image quality 44 Using the timer 45 Basic functions 13 Unpacking 14 Camera layout 15 Inserting the battery and memory card 17 Charging the battery and turning your camera on 18 Charging the battery 18 Turning on your camera 18 Performing the initial setup 19 Learning icons 21 Using the touch screen 22 Selecting a shooting mode 24 Selecting a ...

Page 12: ... color 57 Adjusting the exposure manually EV 57 Compensating for backlighting ACB 58 Changing the metering option 59 Selecting a light source White balance 60 Using burst modes 62 Improving your photos 63 Applying photo styles 63 Applying smart filter effects 64 Adjusting your photos 65 Playback Editing 66 Playing back 67 Starting Playback mode 67 Viewing photos 73 Playing a video 75 Playing a voic...

Page 13: ...Camera specifications 126 FCC notice 130 Index 131 Transferring files to your computer for Windows 86 Transferring files using Intelli studio 87 Transferring files by connecting the camera as a removable disk 89 Disconnecting the camera for Windows XP 90 Transferring files to your computer for Mac 91 Printing photos with a photo printer PictBridge 92 Wireless network Bluetooth 94 Connecting to a WLAN a...

Page 14: ...ing icons 21 Using the touch screen 22 Selecting a shooting mode 24 Selecting a shooting mode using motion recognition 25 Setting the touch screen and sound 26 Setting the display type for the touch screen 26 Setting the sound 26 Taking photos 27 Zooming 28 Reducing camera shake OIS 29 Tips for getting a clearer photo 30 Basic functions Learn about your camera s layout icons and basic functions fo...

Page 15: ...attery 4302 001226 Strap Sliver AD63 02596A Black AD63 02604A User Manual CD ROM AD46 00309A Quick Start Manual AD68 04779A Cradle AD97 18838A Touch pen AD75 00070A Optional accessories Camera case Memory card microSDTM A V cable AD39 00146A Battery charger AD44 00164A HDMI cable AD39 00179A The illustrations may differ from your actual items ...

Page 16: ...ur camera s parts and their functions Shutter button POWER button Lens Flash AF assist light timer lamp Microphone Battery chamber cover Insert a memory card and battery Tripod mount Speaker Internal antenna Avoid contact with the internal antenna while using the wireless network ...

Page 17: ...of focus connecting to a WLAN sending a photo or turning on the Bluetooth feature Steady t When connecting to a computer or in focus Zoom button Zoom in or out t Zoom in on part of a photo or view files t as thumbnails Playback button Touch screen 1 2 HDMI port Accepts HDMI cable USB and A V port Accepts USB cable or A V cable ...

Page 18: ...d Push gently until the card disengages from the camera and then pull it out of the slot Push the lock up to release the battery The internal memory can be used as a temporary storage device when the memory card is not inserted Memory card Battery Battery lock Insert a memory card with the gold colored contacts facing up Insert the battery with the Samsung logo facing down ...

Page 19: ...de Press Playback The camera turns on and accesses Playback mode immediately When you turn on your camera by pressing and holding Playback for about 5 seconds the camera does not emit any camera sounds Charging the battery Before using the camera for the first time you must charge the battery Attach the USB cable to the AC adapter and then plug the end of cable with the indicator light into your ca...

Page 20: ...rs to allow you to configure the camera s basic settings Select a time zone and select 4 To set the daylight saving time select t Select 5 Date Time Date Time Set the date and time select a date format and select 6 Select 1 Language Select a language 2 Select 3 Time Zone Time Zone ...

Page 21: ...orming the initial setup Select 7 Calibration Calibration Tap the target on the screen with your touch pen 8 Calibration Tap directly in the center of the target for optimal performance Select 9 to switch to the Shooting mode ...

Page 22: ...ther row of options Learning icons The icons displayed will change according to the mode you select or the options you set A Status icons Icon Description p Shooting mode Aperture and shutter speed Photo resolution Video resolution Metering Optical Image Stabilization OIS Frame rate Exposure value ISO speed White balance Face detection Burst mode Image adjustment sharpness contrast saturation Icon...

Page 23: ...n you touch or drag on the screen discolorations will occur It is t not a malfunction but a characteristic of the touch screen Touch or drag lightly to reduce these annoying effects The touch screen may not recognize your touches correctly when t you touch multiple items at the same time you use the camera in high humidity environments you use the camera with an LCD protection film or another LCD a...

Page 24: ...creen Using gestures Perform certain functions by drawing commands on the touch screen Gesture Description Draw a horizontal bar to right or left to view the next or previous file Draw an X to delete a photo Draw a circle to rotate a photo ...

Page 25: ...tects p 33 a Auto Take a photo quickly and easily with minimal settings p 27 p Program Take a photo by setting options p 38 s Scene Take a photo with options preset for a specific scene p 34 d DUAL IS Take a photo with options suitable for reducing camera shake p 37 D Smart Scene Detection Record a video by letting the camera select a scene mode as it detects p 40 v Movie Record a video p 38 Select...

Page 26: ...camera parallel to the ground as shown below Selecting a shooting mode using motion recognition Your camera features a built in motion sensor that allows you to quickly switch the shooting mode by tilting the camera In Shooting mode tilt the camera while touching and holding Access the Movie mode p 38 Access the Program mode p 38 ...

Page 27: ...turn to the previous mode Setting the display type for the touch screen In Shooting mode select 1 In Playback mode select Select an option 2 Full Option Description Full Display the name of an option when you select an icon Basic Display icons without the name of an option This option is available only in Playback mode Hide Hide icons on the screen if you perform no operations for 3 seconds touch ...

Page 28: ...ode Make sure that the camera is in the 1 a mode Auto the camera s default shooting mode If not select the mode icon t a Align your subject in the frame 2 Half press 3 Shutter to focus A green frame means the subject in focus t Press 4 Shutter to take a photo See page 30 for tips to get clearer photos ...

Page 29: ... in Zoom out Zoom ratio The zoom ratio available for videos differs Digital zoom If the zoom indicator is in the digital range your camera is using the digital zoom The picture quality may deteriorate when you use the digital zoom Optical range Zoom indicator Digital range The digital zoom is not available when using t S d s in some scenes v and D modes and when used with Face Detection and Smart ...

Page 30: ...red t by the vibration of the OIS sensor Deactivate the OIS function when you use a tripod If the camera is impacted the display will be blurry In this case turn t off the camera and turn it on again to use the OIS function correctly In some scene modes the OIS function is unavailable t Reducing camera shake OIS Reduce camera shake optically in Shooting mode Before correction After correction In S...

Page 31: ...the frame and t half press Shutter again if displayed in red Reducing camera shake Set the Optical Image Stabilization option to t reduce camera shake optically p 29 Select the t d mode to reduce camera shake both optically and digitally p 37 When h is displayed Camera shake When shooting in the dark avoid setting the flash option to Slow Sync or Off The aperture remains open longer and it may be h...

Page 32: ...nd the subject is too bright the subject is shiny the subject includes horizontal patterns such as blinds the subject is not positioned in the center of the frame Use the focus lock Half press Shutter to focus When the subject is in focus you can reposition the frame to change the composition When you are ready press Shutter to take your photo When you take photos in low light t Turn on the flash p...

Page 33: ... the exposure in the Night mode 36 Using the DUAL IS mode 37 Using the Program mode 38 Recording a video 38 Using the Smart Scene Detection mode 40 Recording voice memos 41 Recording a voice memo 41 Adding a voice memo to a photo 41 Extended functions Learn how to take a photo by selecting a mode and how to record a video or voice memo ...

Page 34: ... the camera and subject are stable for a while This is available only when you are shooting in the dark Appears when taking photos of actively moving subjects Appears when taking photos of fireworks This is available only when you use a tripod Using the Smart Auto mode In this mode your camera automatically chooses the appropriate camera settings based on a detected type of scene It will be helpful...

Page 35: ...e on page 36 Align your subject in the frame and half press 3 Shutter to focus Press 4 Shutter to take the photo Half press 3 Shutter to focus Press 4 Shutter to take the photo If the camera does not recognize a proper scene mode t S will not change and the default settings will be used Even if there is a face detected the camera may not select a portrait t mode depending on the subject s position...

Page 36: ...e frame and half press 4 Shutter to focus Press 5 Shutter to take the photo The focus distance will be set to Auto Macro Using the Beauty Shot mode Take a photo of a person with options to hide facial imperfections In Shooting mode select 1 a s To make the subject s skin tone appear lighter face 2 only select f an option Select a higher setting to make skin tone appear lighter t Level 2 ...

Page 37: ...n 3 Using the frame guide When you want another person to take a photo of you you can compose the scene with the frame guide feature The frame guide will help the other person take a photo of you by showing the part of the pre composed scene In Shooting mode select 1 a s Align your subject in the frame and press 2 Shutter Transparent guides will appear on the left and right of the t frame Cancel F...

Page 38: ...mode t The camera will correct photos optically only when you take them with t a light source that is brighter than fluorescent light If your subject is moving rapidly the photo may be blurry t Set the Optical Image Stabilization option to reduce camera shake in t different shooting modes p 29 Select 4 f Shutter Speed 1 0 2 0 4 0 8 0 16 0 Shutter Speed Aperture Select a value to adjust the shutter ...

Page 39: ... zoom sound may be recorded if you use the zoom while t recording a video In Shooting mode select 1 a v Select 2 f a frame rate the number of frames per second As the number of frames increases action appears more t natural but the file size is increased 30 FPS is available only when the video resolution is 320 X 240 Using the Program mode Set various options except for shutter speed and aperture v...

Page 40: ...s a single video Select to pause while recording Select to resume Stop Shutter Select 3 a sound option Option Description Off Record a video without sound On Record a video with sound Zoom Mute Record a video without sound while zooming Set other options as desired For options refer to 4 Shooting options Press 5 Shutter to start recording Press 6 Shutter again to stop recording ...

Page 41: ...istance to the subject Using the Smart Scene Detection mode In this mode your camera automatically chooses the appropriate camera settings based on a detected type of scene In Shooting mode select 1 a D Align your subject in the frame 2 The camera selects a scene automatically An appropriate t mode icon will appear at the top left of the screen Icon Description Appears when recording videos of lan...

Page 42: ...tedly Memo Align your subject in the frame and take a photo 2 You will begin recording a voice memo right after taking the t photo Record a short voice memo 10 seconds maximum 3 Press t Shutter to stop recording a voice memo Recording a voice memo In Shooting mode select 1 f In some modes select f repeatedly Record Press 2 Shutter to record Select t to pause and to resume The available recording t...

Page 43: ...ction 52 Detecting faces 52 Taking a self portrait shot 53 Taking a smile shot 53 Detecting eye blinking 54 Using smart face recognition 54 Registering faces as your favorites My Star 55 Adjusting brightness and color 57 Adjusting the exposure manually EV 57 Compensating for backlighting ACB 58 Changing the metering option 59 Selecting a light source White balance 60 Using burst modes 62 Improving...

Page 44: ...8 Print on A3 paper 2560 X 1920 Print on A4 paper 2048 X 1536 Print on A5 paper 1920 X 1080 Print on A5 paper in panorama ratio 16 9 or play back on an HDTV 1024 X 768 Attach to an email Selecting a resolution As you increase the resolution your photo or video will include more pixels so it can be printed on larger paper or displayed on a larger screen When you use a high resolution the file size w...

Page 45: ...X 720 Play back on an HDTV 640 X 480 Play back on a general TV 320 X 240 Post on a web page For Sharing Post on a website using the wireless network 30 seconds maximum Selecting image quality Photos you take are compressed and saved in JPEG format Higher quality images will result in larger sizes In Shooting mode select 1 f In some modes select f Select an option 2 Fine Option Description Super Fi...

Page 46: ...to cancel the timer Depending on the selected face defection option the timer is not t available or some timer options are not available In Shooting mode select 1 Select an option 2 Off Option Description Off The timer is not active 10 Sec Take a photo in 10 seconds 2 Sec Take a photo in 2 seconds Double Take a photo in 10 seconds and take another in 2 seconds Motion Timer Detect your movement and...

Page 47: ...you are more than 3 m away from the camera t your movements are too subtle t there is too much light or backlight t Using the motion timer In Shooting mode select 1 Press 2 Shutter Stand within 3 m from the camera within 6 seconds after 3 pressing Shutter Make a motion such as waving your arms to activate 4 the timer The AF assist light timer lamp will start to blink rapidly when t the camera dete...

Page 48: ...n Off The flash will not fire t Camera shake warning t will be displayed when shooting in low light Auto The camera will select a proper flash setting for the detected scene in the S mode Auto The flash fires automatically when the subject or background is dark S a p s Preventing red eye If the flash fires when you take a photo of a person in the dark a red glow may appear in the eyes To prevent this sel...

Page 49: ...s red eyes t Fill in The flash always fires t Light intensity is adjusted automatically t Slow Sync The flash fires and the shutter stays open longer t Select this when you want to capture ambient light t to reveal more details in the background Use a tripod to prevent your photos from blurring t Red eye Fix The flash fires when the subject or background is t dark The camera corrects red eyes through it...

Page 50: ... farther than 80 cm farther than 150 cm when using zoom Auto Macro Focus on a subject farther than 5 cm farther than 70 cm when using zoom Macro Focus on a subject 5 80 cm 70 150 cm when using zoom The options may differ depending on the shooting mode a p d v D Using macro Use macro to take close up photos of subjects such as flowers or insects Refer to macro options in Using auto focus Try to hold...

Page 51: ...u must reselect the subject t to track If the camera fails to fix the focus the focus frame will change to a red t single line frame If you use this function you cannot set face detection photo style t options and smart filter effects Using smart touch focus Smart Touch AF allows you to track and auto focus on your subject even when you are moving In Shooting mode select 1 f Touch the subject you wa...

Page 52: ...t to take the photo Smart Touch AF Focus on and track the subject that you touch on the screen p 50 The options may differ depending on the shooting mode a p s d Using one touch shooting You can focus on your subject and take a photo with a touch of your finger In Shooting mode select 1 f Touch a subject to focus 2 Touch and hold the subject to take the photo 3 Touch and hold until the level indica...

Page 53: ...n is unavailable t Face detection may not be effective when t the subject is far from the camera The focus frame will appear orange for Smile Shot and Blink Detection it is too bright or too dark the subject is not facing the camera the subject is wearing sunglasses or a mask the subject is in backlighting or the lighting condition is unstable the subject s facial expression changes remarkably Fac...

Page 54: ...lect f When your subject smiles broadly your camera can detect the smile more easily Taking a self portrait shot Take photos of yourself The focus distance will be set to close up and your camera will emit a beep In Shooting mode select 1 f When you hear a quick beep press 2 Shutter To turn the beep on or off select Self Portrait in the sound settings p 113 ...

Page 55: ... nearest face appears in a white focus frame and the rest of the faces appear in gray focus frames t Indicate favorite faces To register favorite faces see page 55 t Indicate faces that the camera automatically registers Detecting eye blinking If your camera detects closed eyes it will automatically take 2 photos in succession In Shooting mode select f Hold your camera still while t Capturing is d...

Page 56: ...ite frame will not appear You can take photos of a subject s face directly from the front t to the left side to the right side from above or from below Take photos of one person at a time when registering faces t The camera may recognize and register faces incorrectly depending t on lighting conditions remarkable changes in the subject s pose or face and whether or not the subject is wearing glass...

Page 57: ...an register up to 6 favorite faces t The flash option will be set to t Off If you register the same face twice you can delete one of the faces t in the face list Viewing your favorite faces In Shooting mode select f In some modes select f Select t to change the ranking of your favorite faces See page 69 for more information about the face list ...

Page 58: ... 1 0 2 2 1 0 0 2 1 EV p d v D Adjusting brightness and color Learn how to adjust the brightness and color for better image quality Select 3 The adjusted exposure value will appear as shown below t Once you adjust the exposure the setting will remain the same You t may need to change the exposure value later to avoid overexposure or underexposure If you cannot decide on an appropriate exposure sele...

Page 59: ... when t Continuous Motion Capture or AEB is in use Compensating for backlighting ACB When the light source is behind your subject or there is high contrast between your subject and the background your subject is likely to appear dark in the photo In this case set the Auto Contrast Balance ACB option Without ACB With ACB In Shooting mode select 1 f Select an option 2 Off p ...

Page 60: ...ame with emphasis placed on the center Suitable for photos with subjects in the center of t the frame Changing the metering option The metering mode refers to the way in which a camera measures the quantity of light The brightness and lighting of your photos will vary depending on the metering mode you select In Shooting mode select 1 f In the v and D modes select f Select an option 2 Multi Option...

Page 61: ...ht Fluorescent_L Select when shooting under white fluorescent light Tungsten Select when taking indoor photos under incandescent bulbs or halogen lamps Custom Set Use your pre defined settings p 61 Selecting a light source White balance The color of your photo depends on the type and quality of the light source If you want the color of your photo to be realistic select an appropriate lighting condit...

Page 62: ...an customize the white balance by taking photos of a white surface such as a piece of paper This will help you to match the colors in your photo with the actual scene according to your lighting condition In Shooting mode select 1 f Aim the lens at a piece of white paper 2 Press 3 Shutter ...

Page 63: ...erexposed Use a tripod to prevent blurry photos t The options may differ depending on the shooting mode You can use the flash timer and ACB only when you select t Single When you select t Motion Capture the resolution will be set to VGA and the ISO speed will be set to Auto Depending on the selected face detection option some burst t options are not available In Shooting mode select 1 f once or twi...

Page 64: ... Blue 2 Adjust the amount of the selected color 3 Custom RGB Select 4 Applying photo styles Apply different styles to your photos such as Soft Vivid or Forest Soft Vivid Forest In Shooting mode select 1 f once or twice Select an option 2 Select t to define your own RGB tone Normal When you select t Sketch the photo will be automatically resized to or smaller If you use this function you cannot set ...

Page 65: ...ye lens Fish eye 2 Blacken the edges of the frame and distort objects to imitate the visual effect of a fisheye lens If you select t Miniature when recording a video the miniature recording time is displayed with the icon and is shorter than the real recording time If you select t Miniature when recording a video the sound will not be recorded When you apply a smart filter effect while recording a v...

Page 66: ...on you cannot set the smart filter effects t Adjusting your photos Adjust the sharpness saturation and contrast of your photos In Shooting mode select 1 f twice Select an adjustment option 2 t Sharpness t Contrast t Saturation Select a value to adjust the selected item 3 2 1 2 2 1 2 1 0 Sharpness Sharpness option Description Soften the edges on your photos suitable for editing the photos on your co...

Page 67: ...g a print order DPOF 82 Viewing files on a TV or HDTV 84 Transferring files to your computer for Windows 86 Transferring files using Intelli studio 87 Transferring files by connecting the camera as a removable disk 89 Disconnecting the camera for Windows XP 90 Transferring files to your computer for Mac 91 Printing photos with a photo printer PictBridge 92 Playback Editing Learn how to play back photos...

Page 68: ...tivate this function select t M Gesture View Off in Playback mode Starting Playback mode View photos or play videos and voice memos stored in your camera Press 1 Playback The most recent file you have taken or recorded will be t displayed If the camera is off it will turn on t Draw a horizontal bar left or right to scroll through files 2 Select t to view the previous file Hold to view files quickly Se...

Page 69: ...a menu by tilting the camera In Playback mode tilt the camera while touching and holding Set the current photo as your favorite photo will appear on the top of the file Lock or unlock the current file will appear on the top of the file You cannot set files as favorites for videos or voice memos photos with errors or locked photos photos taken with cameras from other manufacturers photos taken using th...

Page 70: ...ilable only when you use a memory card In Playback mode select 1 1 2 1 2 3 4 5 6 Face List Select t to cancel your favorite faces Select t to view your favorite faces or view all faces Display in Playback mode Information Icon Description Photo includes a voice memo v Video file Print order has been set DPOF Protected file Photo includes a registered face Available only when you use a memory card Fa...

Page 71: ... hold t or to scroll through dates file types weekdays colors or faces Select 3 or to scroll through files Select 4 to return to the normal view Once you select a category and a menu that displays thumbnails such as deleting multiple files or protecting selected files the camera will display all files sorted by category or only those that match the category option Select 2 a face 1 2 3 4 Edit Ranking S...

Page 72: ...u want to protect 3 Select t to select all files Select t to cancel your selection Select 4 Viewing files as thumbnails Scan thumbnails of files In Playback mode rotate Zoom left to display 9 or 16 thumbnails rotate Zoom right to return to the previous mode 29 6 1 7 20 To Do this Scroll through files Select or View a file Select a thumbnail Delete files Select p 72 Select a category Select ...

Page 73: ... Playback mode select 1 M Select 2 Protect All Lock Deleting files Delete single files or all files at once You cannot delete protected files To delete a single file In Playback mode select a file 1 Select 2 Yes to delete the file To delete multiple files In Playback mode select 1 Multiple Delete Select files you want to delete 2 Select t to select all files on the current screen Select t to cancel your sel...

Page 74: ... of being deleted permanently This applies to single files or selected files only if you choose to delete all files those files will not be sent to the recycle bin To activate the recycle bin In Playback mode select 1 M Select 2 Recycle Bin On To restore files from the recycle bin In Playback mode select 1 M Select 2 Recycle Bin Retrieve This function does not work for videos or voice memos t It may ta...

Page 75: ...interval between photos This will be available when t is selected in the Effect menu When used with an effect option other than t the interval will be set to 1 sec Enlarging a photo In Playback mode rotate Zoom right to enlarge a photo rotate Zoom left to reduce a photo The enlarged area and zoom ratio are indicated on the top of the screen The maximum zoom ratio may vary depending on the resoluti...

Page 76: ... Scan backward Pause or resume playback Stop playback Scan forward Adjust volume or mute sound Option Description Music Select background audio Effect Select a transition effect t Select t for no effects Select 3 to start the slide show Touch on the screen except for option icons to pause the t slide show Select t to adjust the volume of background audio or to mute the sound Select t to switch to ...

Page 77: ...ck Select 1 at the point where you want the new video to begin and select Select 2 to resume playback Select 3 at the point where you want the new video to end and select Select 4 Yes The original video should be at least 10 seconds long t The edited video will be saved as a new file t Capturing an image during playback Select 1 at the point where you want to save a still image Select 2 Select 3 Ye...

Page 78: ...o Use the following icons to control playback 2 Icon Description Pause or resume playback Stop playback Adjust volume or mute sound Adding a voice memo to a photo In Playback mode select a photo 1 M Select 2 Voice Memo On Press 3 Shutter to record a short voice memo 10 seconds maximum Press t Shutter to stop recording a voice memo ...

Page 79: ...otos that are t or larger they will be automatically resized to a lower resolution except when rotating or resizing photos Resizing photos In Playback mode select a photo 1 Select 2 an option Select t to save the photo as a start image p 113 1920 X 1080 Select 3 Available options differ depending on the size of the selected photo Rotating a photo In Playback mode select a photo 1 Select 2 an optio...

Page 80: ...ect a color R Red G Green B Blue 2 Adjust the amount of the color 3 Custom RGB Select 4 Applying photo styles Apply a different color tone to the photo such as Soft Vivid or Forest Soft Vivid Forest In Playback mode select a photo 1 Select 2 an option Select t to define your own RGB tone Soft Select 3 ...

Page 81: ...iting a photo Applying smart filter effects Apply various filter effects to your photos to create unique images Miniature Vignetting Fish eye 1 Fish eye 2 In Playback mode select a photo 1 Select 2 an effect Miniature Select 3 ...

Page 82: ...m 3 less or more Select 4 Adjusting ACB Auto Contrast Balance In Playback mode select a photo 1 Select 2 Select 3 Applying a special effect Apply special effects to the photo such as color filters or noise effects In Playback mode select a photo 1 Select 2 an option Elegant Option Description Color Filter Change background colors to black and white to make the main subject stand out Elegant Apply e...

Page 83: ...f your photos You cannot set the DPOF for the photos stored in the internal memory t In Playback mode select 1 M Select 2 DPOF Select To print all files select t All and skip to step 5 Select photos to print 3 Select t to select all files Select t to cancel your selection Select 4 Editing photos of portraits You can improve your photos by hiding facial imperfections and removing red eye Hiding facia...

Page 84: ...escription Select whether to print the photos as thumbnails Select to print photos as thumbnails Specify the size of the print Select 6 or to set the number of copies Select 7 If you specify the print size you can print photos only with DPOF 1 1 compatible printers ...

Page 85: ...V screen select on the camera screen On some TVs digital noise may occur or part of an image may not t appear Images may not appear centered on the TV screen depending on t your TV settings You can capture photos or videos while the camera is connected t to a TV In Shooting or Playback mode select 1 M Select 2 twice Video Out Select a video signal output according to your country or 3 region p 115...

Page 86: ... the settings menu p 115 to control all connected Samsung A V devices with the TV remote control Viewing files on an HDTV You can view high quality and uncompressed photos or videos on an HDTV using the optional HDMI cable HDMI High Definition Multimedia Interface is supported by most HDTVs In Shooting or Playback mode select 1 M Select 2 twice HDMI Size Select an HDMI resolution 3 Turn off your c...

Page 87: ... t You must use Windows XP Vista 7 or Mac OS 10 4 or later to t connect the camera as a removable disk Using a self assembled PC or a PC and OS that are not supported may void your warranty Requirements for Intelli studio Item Requirements CPU Intel Pentium 4 3 2 GHz or higher AMD AthlonTM FX 2 6 GHz or higher RAM Minimum 512 MB RAM 1 GB and above recommended OS Windows XP SP2 Vista 7 Hard disk ca...

Page 88: ...dows Vista select Run iStudio exe from the AutoPlay window Transferring files using Intelli studio Intelli studio will start automatically when you connect the camera to your computer with the USB cable The battery will be charged while the camera is connected to a computer with the USB cable In Shooting or Playback mode select 1 M Select 2 twice PC Software On Turn off the camera 3 Connect the cam...

Page 89: ...If you install Intelli studio on your computer the program will launch more quickly To install the program select t Tool Install Intelli studio on PC You cannot edit files directly on the camera Transfer files to a folder on your computer before editing t You cannot copy files in your computer to the camera t Intelli studio supports the following formats t Videos MP4 Video H 264 Audio AAC WMV WMV 7 8...

Page 90: ...data Icon Description 1 Open menus 2 Display files in the selected folder 3 Change to the Photo edit mode 4 Change to the Video edit mode 5 Change to the Sharing mode You can send files by email or upload files to websites such as Flickr or YouTube 6 Enlarge or reduce the thumbnails in the list 7 Select a file type 8 View files of the selected folder on your computer 9 Show or hide files of the connecte...

Page 91: ...tom right of your PC screen Click the pop up message 3 Remove the USB cable 4 The camera may not be removed safely when Intelli studio is running End the program before disconnecting the camera Turn on the camera 4 The computer recognizes the camera automatically t If you set the USB option to Select Mode select Computer from the pop up window On your computer select 5 My computer Removable Disk D...

Page 92: ...era 2 The computer recognizes the camera automatically and a t removable disk icon will be displayed If you set the USB option to Select Mode select Computer from the pop up window Double click the removable disk icon 3 Transfer photos or videos to the computer 4 Connect your camera to a Macintosh computer with the 1 USB cable You must plug the end of the cable with the indicator light S into your...

Page 93: ...ing print settings on page 93 Select an option 6 Option Description Current Photo Print the currently selected photo Skip to step 8 Selected Photos Print the photos you want All Photos Print all photos Skip to step 8 In Shooting or Playback mode select 1 M Select 2 twice USB Printer With the printer on connect your camera to the printer 3 with the USB cable Turn on your camera 4 The printer recogn...

Page 94: ...ers Select 7 or to scroll to a photo to print Select 8 or to set the number of copies and select If you selected to print the photos you want repeat steps 7 8 t for all photos to print Select 9 Yes to confirm Printing starts Select t Cancel to cancel printing Configuring print settings Option Description Size Specify the size of the print Layout Create thumbnail prints Type Select the type of paper ...

Page 95: ... or video sharing websites 101 Accessing a website 101 Uploading photos or videos 102 Sending photos via email 103 Viewing photos or videos on the DLNA devices 104 Viewing photos or videos on a TV screen 104 Viewing photos or videos on another device renderer 105 Sending or receiving photos or videos with a camera 107 Sending photos or videos to another camera 107 Receiving photos or videos from a...

Page 96: ...he next step Connecting to a WLAN automatically In Shooting or Playback mode select 1 N n Select 2 AP Setting The camera will search for and display available AP devices t Select an AP device 3 AP Setting Samsung 1 Samsung 2 Samsung 3 Connecting to a WLAN and configuring network settings Learn to connect via an access point AP when you are in a range of a WLAN You can also configure network settings...

Page 97: ... Gateway Enter the gateway DNS Server Enter the DNS address Enter values and select 6 OK When you are finished select 7 OK The camera will connect to the WLAN t Select network profiles and options 4 Option Description Authentication Select a network authentication Data Encryption Select an encryption type Select the password input field 5 Enter a password and select 6 OK For information about enterin...

Page 98: ...k using Auto IP make an t autoip txt file and copy it to the inserted memory card Network connection tips Some AP devices will not allow your camera to connect to the t network If you are far from the AP device it may take long to connect to t the network If there is any electronic equipment nearby that uses the same t radio frequency RF signals the camera may not connect to the AP device If the AP...

Page 99: ...e email address Select t to delete the email address Select 3 Enter a name and email address 4 When you are finished select 5 OK Storing your information Store your name and email address to send emails or to find out your camera on another device In Shooting or Playback mode select 1 N n Select 2 User Setting Select the name input field and enter your name 3 For information about entering text refer...

Page 100: ...ed email addresses recently sent email addresses and all personal information will be deleted to protect user information Setting the file size to share Set the file size you will share with other DLNA authorised devices You can select either the original size or In Shooting or Playback mode select 1 N n Select 2 DLNA Image Size Select a size 3 Configuring the WPS setting Configure this setting to pre...

Page 101: ...e the last letter Enter numbers and symbols Store the displayed text You can enter text only in English regardless of the display language Changing the password Change the password if necessary In Shooting or Playback mode select 1 N n Select 2 Change Password Enter the current password 4 digits 3 Enter a new password 4 digits 4 Enter the new password 4 digits again 5 Checking information Check th...

Page 102: ...revious page Next page Stop Refresh Home Close Accessing a website In Shooting or Playback mode select 1 N The camera automatically connects to the WLAN via the last t connected AP device If the camera has not connected to the WLAN it automatically t searches for available AP devices p 95 Select a website 2 Enter your login ID and password and select 3 Login Create your login ID and password on a ...

Page 103: ...fer depending on the t selected website If you cannot access a website because of firewall or user t authentication settings contact your network administrator or network service provider When you are not able to upload photos or videos due to server t errors select Titles for photos or videos you are uploading could be the date they t are captured The speed of your internet connection may affect h...

Page 104: ...ings The maximum photo resolution you can send is t and if the selected photo resolution is higher than it will be automatically resized to a lower resolution If you cannot send an email because of firewall or user authentication t settings contact your network administrator or network service provider When there are no photos in the camera memory you cannot use t this feature In Shooting or Playba...

Page 105: ... the user setting t p 98 For information about searching for the camera and browsing t the photos or videos on the TV refer to the TV user manual AP Viewing photos or videos on a TV screen View your photos or videos on a TV that supports the DLNA authorized Digital Media Player DMP In Shooting or Playback mode select 1 N The camera automatically connects to the WLAN via the last t connected AP dev...

Page 106: ...k may be slowed t The photos will be shared according to the size you set p t 99 The videos will be shared in their original sizes You can use this feature only with a DLNA authorised Digital Media t Players DMPs Shared photos or videos will not be stored on the TV but they can be t stored according to the TV specifications Transferring photos or videos to the TV may take some time t depending on t...

Page 107: ...n use this feature only with a DLNA authorised renderer t The shared photos or videos will not be stored on the device but they t can be stored according to the device specifications Transferring photos or videos to the device may take some time t depending on the network connection and the file size You can transfer files one by one t When there are no photos or videos in the camera memory you t can...

Page 108: ... the sending t camera When the sending camera transmits photos or videos they t will appear on the receiving camera Sending photos or videos to another camera In Shooting or Playback mode select 1 N Select 2 Send The camera generates a password and displays it on the t screen while waiting for a connection with the receiving camera On the receiving camera select the name of the sending 3 camera Th...

Page 109: ...e disconnected after some time It may take some time to send or receive photos or videos depending t on the file size and the ad hoc network connection You can transfer files one by one t If you fail to receive or send a photo or videos it will not be saved on t the receiving camera When there are no photos in the camera memory you cannot use t this feature You can send and receive photos or videos ...

Page 110: ... Select Images Date The photos will be sent to the selected device t The photo size will be changed to 640 X 480 VGA t In Shooting or Playback mode select 1 N The Bluetooth feature turns on However other Bluetooth t enabled devices cannot find your camera To search for and display Bluetooth enabled devices 2 select Yes If you have searched for the Bluetooth enabled devices a list t of Bluetooth ena...

Page 111: ... be transferred Delete some photos to free up some memory and try sending again You cannot connect to several Bluetooth enabled devices at one time t Place the camera and the Bluetooth enabled device reasonably close t to one another The camera may cause interference with other devices that use or t produce radio waves When there are no photos in the camera memory you cannot use t this feature You...

Page 112: ...ra settings 114 Error messages 117 Camera maintenance 118 Cleaning your camera 118 About memory cards 119 About the battery 120 Before contacting a service center 123 Camera specifications 126 FCC notice 130 Index 131 Appendixes Refer to settings error messages specifications and maintenance tips ...

Page 113: ...previous screen Accessing the settings menu In Shooting or Playback mode select 1 M Select a menu 2 1 2 Volume Beep Sound Shutter Sound Start Sound AF Sound Medium On 1 Off On Icon Description Sound settings Set various camera sounds and volume p 113 Display settings Customize the display settings such as brightness p 113 Camera settings Change the settings for the camera system such as memory for...

Page 114: ...ect a type of the grid lines that help you to compose a scene 2 X 2 3 X 3 X Display Brightness Adjust the brightness of the screen Auto Dark Normal Bright Normal is fixed in Playback mode even if Auto is selected Sound settings Default Item Description Volume Adjust the volume of any sound Off Low Medium High Beep Sound Select a sound to be emitted when touching on the screen or switching modes Off...

Page 115: ...that can be stored in t one folder is 9999 The camera defines file names according to the t Digital rule for Camera File system DCF standard If you change the names of files intentionally the camera may not play back the files Item Description Quick View Set the duration for reviewing a captured image before returning to Shooting mode Off 0 5 sec 1 sec 3 sec Power Save If you perform no operations for...

Page 116: ...et whether to display the date and time on your photos when printing Off Date Date Time The date and time will be displayed on the bottom t right corner of the photo in yellow The date and time may not be printed on some t printer models If you select t Text in the s mode the date and time will not be displayed Auto Power Off Set the camera to automatically turn off when you are not using it Off 1...

Page 117: ...er for transferring files Printer t Connect your camera to a printer for printing files Select Mode t Select a USB mode when you connect your camera to another device PC Software Set Intelli studio to start automatically when you connect your camera to your computer Off On Calibration Calibrate the screen so that your camera will properly recognize the input Default ...

Page 118: ...memory card p t 114 Card not supported The inserted memory card is not available with your camera Insert a microSDTM memory card Connection failed The camera cannot connect to the network t using the selected access point Select another and try again The camera fails to connect to another t Bluetooth enabled device or a camera of the same model Try connecting again DCF Full Error File names do not...

Page 119: ...olutions can damage the camera or cause it to malfunction Do not press on the lens cover or use a blower brush on the lens t cover Cleaning your camera Camera lens and touch screen Use a blower brush to remove dust and wipe the lens gently with a soft cloth If any dust remains apply lens cleaning liquid to a piece of cleaning paper and wipe gently ...

Page 120: ...8 409 160 312 454 206 401 588 211 409 594 335 637 908 510 936 1 314 762 1 373 1 931 1 626 2 575 3 090 V i d e o s Approx 13 30 Approx 23 36 Approx 15 20 Approx 32 33 Approx 37 50 Approx 67 30 Approx 79 13 Approx 138 19 Approx 237 41 Approx 138 19 The recordable time may vary if you use the zoom Several videos were recorded in succession to determine the total recording time About memory cards Memo...

Page 121: ... or out 3 Perform steps 1 and 2 for 30 seconds and repeat for 5 minutes Then turn off the camera for 1 minute 4 Repeat steps 1 to 3 Videos Approx 80 min Record videos at 1280 X 720 HQ resolution and 30 fps The figures above are measured by Samsung s standards and may differ t depending on actual usage Several videos were recorded in succession to determine the total recording t time About the batte...

Page 122: ...ks in orange or does not illuminate reconnect t the cable or remove the battery and insert it again If you charge the battery when the cable is overheated or the t temperature is too high the indicator light may turn orange Charging will start when the battery cools down Notes about charging with a computer connected Use only the provided USB cable t The battery may not be charged when t you use a...

Page 123: ...sly or improperly For your safety follow these instructions for proper battery handling The battery can ignite or explode if not handled properly If t you notice any deformities cracks or other abnormalities in the battery immediately discontinue use of the battery and contact your manufacturer Use only authentic manufacturer recommend battery t chargers and adapters and charge the battery only by...

Page 124: ...fires unexpectedly The flash may fire due to static electricity This is not a malfunction of the camera The date and time are incorrect Set the date and time in the display settings menu p 114 The touch screen or buttons do not work Remove the battery and insert it again Situation Suggested remedies Cannot turn on the camera Make sure that the battery is inserted t Make sure that the battery is inser...

Page 125: ...y static electricity Disconnect the USB cable and connect it again Situation Suggested remedies The camera screen works poorly If you use your camera at very low temperatures it may cause the camera screen to malfunction or discolor For better performance of your camera screen use your camera in moderate temperatures The memory card has an error The memory card has not been reset Format the card p...

Page 126: ...SB cable is t connected correctly Intelli studio is not functioning properly End Intelli studio and restart the program t You cannot use Intelli studio on t Macintosh computers Make sure that the t PC Software is set to On in the settings menu p 116 Depending on your computer s t specification and environments the program may not launch automatically In this case click Start My Computer Intelli stu...

Page 127: ...n OIS Digital Image Stabilization DIS Image sensor Type 1 2 3 Approx 7 76 mm CCD Effective pixels Approx 14 2 mega pixels Total pixels Approx 14 5 mega pixels Lens Focal length Schneider KREUZNACH lens f 5 6 39 2 mm 35 mm film equivalent 31 217 mm F stop range F3 3 W F5 5 T Digital zoom Still image mode 1 0X 7 0X t Play mode 1 0X 13 5X depending on image size t Display Type WVGA AMOLED Feature 3 7 ...

Page 128: ...otate Photo Style Selector Image Adjust Smart Filter Special Effect Face Effect Effect Shooting mode Photo Style Selector t Normal Soft Vivid Forest Retro Cool Calm Classic Negative Sketch Defog Custom RGB Smart Filter t Normal Miniature Vignetting Fish eye 1 Fish eye 2 Image Adjust t Sharpness Contrast Saturation White Balance Auto WB Daylight Cloudy Fluorescent_H Fluorescent_L Tungsten Custom Se...

Page 129: ...uetooth Version 2 0 t QD ID B016336 t Effect Photo Style Selector t Normal Soft Vivid Forest Retro Cool Calm Classic Negative Sketch Defog Custom RGB Image Adjust t ACB Brightness Contrast Saturation Smart Filter t Normal Miniature Vignetting Fish eye 1 Fish eye 2 Special Effect t Color Filter Elegant Add Noise Face Effect t Face Retouch Red eye Fix Voice recording Voice Recording Max 10 hours t V...

Page 130: ...ctable t DC power input connector 20 pin 4 4V Power source Rechargeable battery Lithium ion battery SLB 11A 1130 mAh The power source may differ depending on your region Dimensions W x H x D 103 8 x 58 3 x 19 6 mm Weight 161 1 g without battery and memory card Operating temperature 0 40 C Operating humidity 5 85 Software Intelli studio Specifications are subject to change without prior notice ...

Page 131: ... Class B digital device pursuant to part 15 of the FCC Rules These limits are designed to provide reasonable protection against harmful interference in a residential installation This equipment generates uses and can radiate radio frequency energy and if not installed and used in accordance with the instructions may cause harmful interference to radio communications However there is no guarantee t...

Page 132: ...type 26 DLNA 104 DPOF 82 Dragging 22 DUAL IS mode 37 E Editing 78 Email Address 98 Sending photo 103 B Battery Charging 121 Life 120 Specifications 120 Beauty Shot mode 35 Blink detection 54 Bluetooth 109 Burst Auto Exposure Bracket AEB 62 Continuous 62 Motion capture 62 C Calibration 20 116 Camera shake 30 Capturing an image 76 Cleaning Body 118 Display 118 Lens 118 A ACB in Playback mode 81 in Sh...

Page 133: ...recognition in Playback mode 68 in Shooting mode 25 Motion timer 46 Movie mode 38 Muting Camera 18 Video 39 My Star Ranking 69 Registering faces 55 H Half pressing 7 HDMI size 115 HDTV 85 I Icons 21 Imprint 115 Intelli studio 88 ISO speed 48 L Light source White balance 60 Long time shutter 36 M Macro 49 Maintenance 118 Focus area Center AF 51 Multi AF 51 One touch shooting 51 Smart Touch AF 51 Fo...

Page 134: ...ac 91 for Windows 86 V Video Playing 75 Recording 38 Service center 123 Settings Accessing 112 Camera 114 Display 113 Sound 113 Shooting mode Auto 27 DUAL IS 37 Movie 38 Program 38 Scene 34 Smart Auto 33 Shutter speed 36 Slide show 74 Smart Album 70 Smart Auto mode 33 Smart face recognition 54 Smart filter effect in Playback mode 80 in Shooting mode 64 R Recording Video 38 Voice memo 41 Recycle bin...

Page 135: ...Please refer to the warranty that came with your product or visit our website http www samsung com for after sales service or inquiries ...

Reviews: