background image


English


Setup

Setting Up a Wired Connection - Auto

If you selected 

Auto

, the Network Function 

acquires and fills in the values for IP Address, 

Subnet Mask, etc., automatically.

NOTE

This process can take up to five minutes.

After the Network Function has acquired the 

network values, press the 

RETURN

 button. 

Then, run a Network Test to ensure the 

product has connected to your network (See 

page 45).
If the Network Function does not acquire the 

network values or you selected Manual, go to 

the directions for Manual Setup.

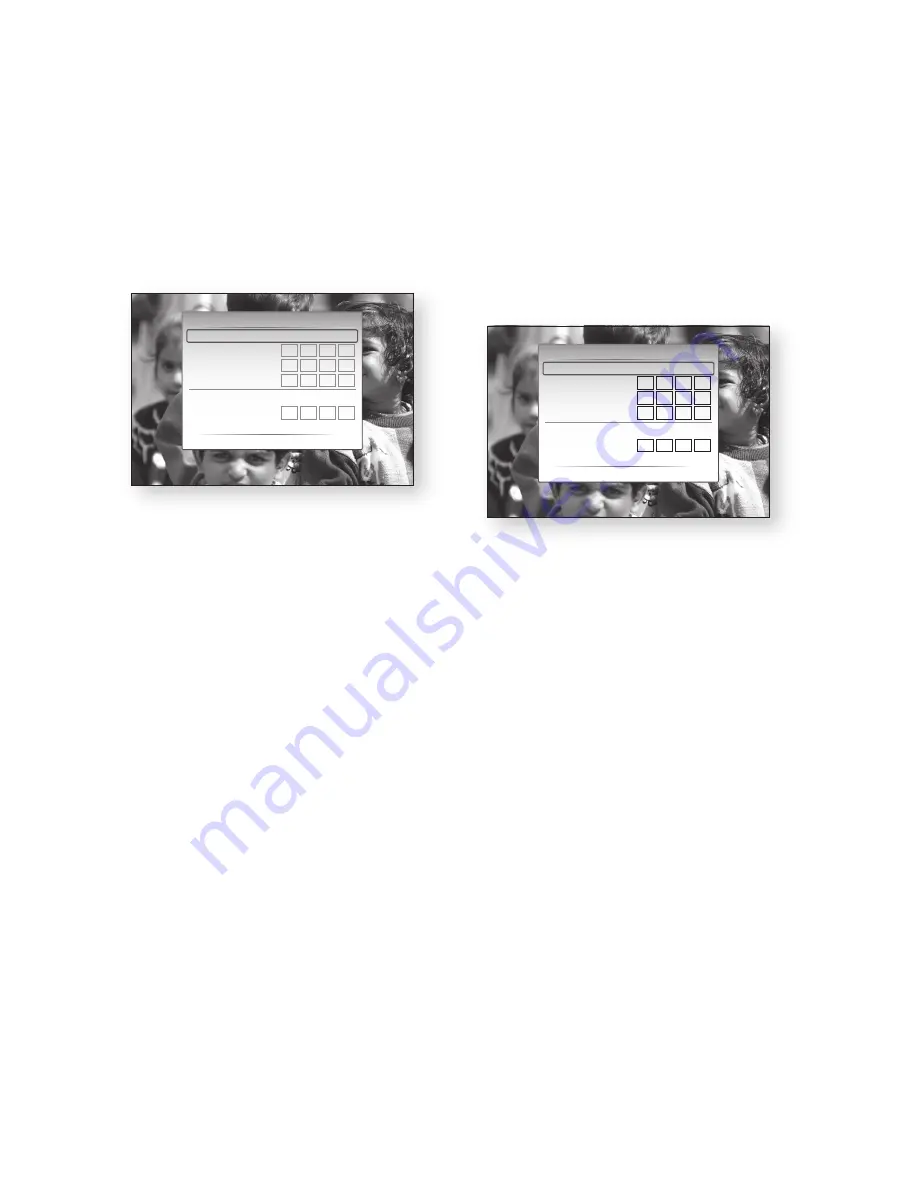
Setting Up a Wired Connection - Manual

If the Auto Setting does not work, you’ll need to 

set the Network Setting values manually.

To get the Network setting values from most 

Windows computers, follow these steps:

Right click the Network icon on the bottom 

right of the screen.
In the pop-up menu, click Status.
On the dialog that appears, click the Support 

tab.
On the Support tab, click the Details button. 

The Network settings are displayed.

1.

2.

3.

1.

2.
3.

4.

To enter the Network settings into your product, 

follow these steps:

On the Internet Protocol Setup screen, press 

the 

ENTER

 button.

Press the ▲▼ buttons to select 

Manual

, and 

then press the 

ENTER

 button.

Press the ▼ button to go to the first entry field 

(IP Address).

Use the number buttons on your remote to 

enter numbers.
When done with each field, use the ► button 

to move successively to the next field. 

You can also use the other arrow buttons to 

move up, down, and back.
Enter the 

IP Address

Subnet Mask

, and 

Gateway

 values.

Press the ▼ button to go to 

DNS

.

Press the ▼ button to go to the first DNS 

entry field. Enter the numbers as above.
Press the 

RETURN

 button on your remote.

Run a Network Test to ensure the product 

has connected to your network (See page 

45).

Wireless Network

You can setup the wireless connection three ways:

Using PBC (WPS)

Using the Auto Network Search function.

Manually.

1.

2.

3.

4.

5.

6.

7.
8.

9.
10.

Network Setting

Internet Protocol Setup  : Auto 

\

IP Address 

:  0   0   0   0  

Subnet Mask 

:  0   0   0   0  

Gateway 

:  0


0


0


0


DNS 

: Auto

DNS Server 

:


0


0


0


0


>

 Move 

"

 Enter 

'

 Return

Network Setting

Internet Protocol Setup  : Manual 

\

IP Address 

:  0   0   0   0  

Subnet Mask 

:  0   0   0   0  

Gateway 

:  0   0   0   0  

DNS 

: Manual

DNS Server 

:  0


0


0


0


>

 Move 

"

 Enter 

'

 Return

Summary of Contents for BD-C8800A

Page 1: ...gine the possibilities Thank you for purchasing this Samsung product To receive a more complete service please register your product at www samsung com register BD HDD Combo user manual BD C8800A BD C8900A ...

Page 2: ...es Subtitles may also be animated scrolled or faded in and out BD LIVE You can use a Blu ray Disc supporting BD LIVE through network connection to enjoy various contents provided by the disc manufacturer BD HDD Combo Features Internet TV You can download various chargeable or free of charge applications through network connection Various internet service and contents will be provided which include...

Page 3: ...BACK NO USER SERVICEABLE PARTS INSIDE REFER SERVICING TO QUALIFIED SERVICE PERSONNEL This symbol indicates important instructions accompanying the product Never use the plug with the fuse cover omitted if the cover is detachable If a replacement fuse cover is required it must be of the same colour as the pin face of the plug Replacement covers are available from your dealer If the fitted plug is n...

Page 4: ...h the cart stand tripod bracket or table specified by the manufacturer or sold with the apparatus When a cart is used use caution when moving the cart apparatus combination to avoid injury from tip over 1 2 3 4 5 6 7 8 9 10 11 12 Unplug this apparatus during lightning storms or when unused for long periods of time Refer all servicing to qualified service personnel Servicing is required when the ap...

Page 5: ...proof protectors or covers Do not use discs printed with label printers available on the market Do not load warped or cracked discs Before connecting other components to this product be sure to turn them all off Do not move the product while a disc is being played as the disc may be scratched or broken or the product s internal parts may be damaged Do not put a flower vase filled with water or any...

Page 6: ...ausea and headaches If you experience any such symptom stop viewing 3D TV remove 3D Active Glasses and rest Watching 3D images for an extended period of time may cause eye strain If you feel eye strain stop viewing 3D TV remove your 3D Active Glasses and rest A responsible adult should frequently check on children who are using the 3D function If there are any reports of tired eyes headaches dizzi...

Page 7: ...ding 12 Blu ray Disc Compatibility 12 Disc Types 13 Region Code 13 Copyright 14 Logos of Discs that can be played 14 Accessories 15 Front Panel 16 Front Panel Display 17 Rear Panel 18 Remote Control 18 Tour of the Remote Control 19 Setting the Remote Control 20 Controllable Tv Codes Connections 21 Connecting to a TV with an Audio Video cables and RF cable 22 Connecting to a TV 22 Case 1 Connecting...

Page 8: ...ss Network Setup 29 Before Starting Plug Play 30 Setting the Menu 30 Channels 31 Channel Settings 31 Channel Manager 33 Channel List 33 Settings 33 Display 37 Audio 39 System 41 Network 45 Language 46 Security 46 General 47 Support Basic Functions 49 Playing a Disc 49 Playback 49 Playback related buttons 49 Disc Structure 49 Using the Disc menu Title menu Popup menu 49 Using the Disc Menu 49 Using...

Page 9: ...usic 54 Buttons on the Remote Control used for Music Playback 54 Playing an Audio CD CD DA MP3 54 AMG function 55 Audio CD CD DA MP3 Screen Elements 55 Repeat an Audio CD CD DA MP3 55 Playlist 56 Playing back a Picture 56 Playing a JPEG 56 Using the TOOLS button 57 Playing back a DivX file 57 Media Play 57 Screen Display 59 Notes on USB connection DTV Functions 62 Display Screen 62 Using the TOOLS...

Page 10: ... Title 67 Copy 67 Copying Videos Music or Photos 68 Ripping from a Audio CD CD DA Network Services 69 Using Internet TV 69 Getting Started with Internet TV 71 Settings 72 Samsung Apps 73 BD LIVE 73 Using the AllShare Function Appendix 75 Troubleshooting 78 Index 79 Specifications 80 Compliance and Compatibility Notice 80 Copy Protection 81 Network Service Disclaimer 82 License ...

Page 11: ...CD RW R DVD RW R BD RE R discs or HDD JPEG G This involves a function available on CD RW R DVD RW R BD RE R discs or HDD DivX MKV MP4 This involves a function available on CD RW R DVD RW R BD RE R discs or HDD NOTE The product may not play certain CD RW R and DVD R due to the disc type or recording conditions If a DVD RW R disc has not been recorded properly in DVD video format it will not be play...

Page 12: ...refer to rest of this user manual for additional information on playback restrictions HDD Recording BD C8800A You can record up to Approx 26 hours of HD video 18 Mbps on the internal 250GB gigabyte hard disk HDD BD C8900A You can record up to Approx 56 hours of HD video 18 Mbps on the internal 500GB gigabyte hard disk HDD Blu ray Disc Compatibility Blu ray Disc is a new and evolving format Accordi...

Page 13: ...d Sony Corporation NOTE Some AVCHD format discs may not play depending on the recording condition AVCHD format discs need to be finalized x v Color offers a wider colour range than normal DVD camcorder discs Some DivX MKV and MP4 format discs may not play depending on the video resolution and frame rate condition Region Code Both the product and the discs are coded by region These regional codes m...

Page 14: ...ce Germany etc Java Accessories Check for the supplied accessories below POWER TV POWER BD HDD TV 1 2 3 4 5 6 7 8 9 DISC MENU TITLE MENU 0 TTX MIX TIME SHIFT TV MUTE TV VOL PROG FULL SCREEN TV SOURCE 1 CH LIST INTERNET GUIDE i MENU REC PAUSE REC INFO TOOLS EXIT RETURN 1 Audio Video cable RF cable for TV Batteries for Remote Control AAA Size User Manual Remote Control ...

Page 15: ...nd closes the disc tray 5 CH BUTTON Selects the desired channel 6 OK BUTTON Selects the currently selected item or confirm the setting 7 REC BUTTON Starts recording 8 STOP BUTTON Stops playback or recording 9 POWER BUTTON Turns the product on and off 10 USB HOST It can be used for software upgrades and MP3 JPEG DivX MKV MP4 playback NOTE If you have any problems please contact a service provider d...

Page 16: ...s are selected 2 CURRENT TIME AND STATUS INDICATOR Displays the play time and the current status 3 REC Indicator Lights in the record mode 4 TIMER Indicator Lights to indicate the timer record mode 5 3D DISC INDICATOR Lights when 3D disc is inserted or played back 6 WIFI INDICATOR Lights when the wireless network is connected a b f d c e ...

Page 17: ... OUT Using an HDMI cable connect this HDMI output terminal to the HDMI input terminal on your TV for the best quality picture or to your Receiver for the best quality sound 5 COMPONENT OUT Connects to equipment having component video input 6 DIGITAL AUDIO OUT OPTICAL Connects to a Receiver 7 VIDEO OUT Connects the input of external equipment using a video cable 8 AUDIO OUT Connects to the audio in...

Page 18: ...ons Press this to select a TV channel To open and close the disc tray Turn the product on and off Press this to use Tools menu Return to the previous menu Press numeric buttons to operate options Press this to enter the disc menu When the button is pressed the button color is toggled Orange colour BD HDD Combo Green colour TV Press to skip backwards or forwards Stops playback or recording Press th...

Page 19: ... directly TV VOL Used to adjust the volume of the television TV MUTE Used to toggle the sound on and off PROG Used to select the desired channel TV SOURCE Used to select an external source connected to the TV 1 2 3 4 In case of Samsung TV below buttons are also compatible with this remote control Button Function MENU Used to move to the TV menu TOOLS Used to display Tools menu Used to move the cur...

Page 20: ...TA TV POWER 06 57 MAGNAVOX TV POWER 40 METZ TV POWER 57 MITSUBISHI TV POWER 06 48 62 65 MIVAR TV POWER 52 77 NEC TV POWER 83 Brand Code NEWSAN TV POWER 68 NOBLEX TV POWER 66 NOKIA TV POWER 74 NORDMENDE TV POWER 72 73 75 PANASONIC TV POWER 53 54 74 75 PHILIPS TV POWER 06 55 56 57 PHONOLA TV POWER 06 56 57 PIONEER TV POWER 58 59 73 74 RADIOLA TV POWER 06 56 RADIOMARELLI TV POWER 57 RCA TV POWER 45 4...

Page 21: ...ds only signals of TV You must connect the Audio Video cables to watch output from your product Noise may be generated if the audio cable is placed too close to the power cable If you want to connect to an Amplifier please refer to the Amplifier connection pages See pages 25 26 The number and position of terminals may vary depending on your TV set Please refer to the user manual of your TV If ther...

Page 22: ...eed to connect an audio cable If the product is connected to your TV in HDMI 720p 1080i 1080p output mode you must use a High speed category2 HDMI cable HDMI outputs only a pure digital signal to the TV If your TV does not support HDCP High bandwidth Digital Content Protection random noise appears on the screen Depending on your TV certain HDMI output resolutions may not work Please refer to the u...

Page 23: ... If you have set the remote control to operate your TV See pages 19 20 press the TV SOURCE button on the remote control and select HDMI DVI as the external source of the TV NOTE HDMI outputs only a pure digital signal to the TV If your TV does not support HDCP High bandwidth Digital Content Protection random noise appears on the screen Depending on your TV certain HDMI output resolutions may not w...

Page 24: ...l to operate your TV See pages 19 20 press the TV SOURCE button on the remote control and select COMPONENT as the external source of the TV NOTE Depending on the manufacturer the component terminals on your TV may be marked R Y B Y Y or Cr Cb Y instead of PB PR Y The number and position of terminals may vary depending on the TV set Please refer to the user manual of your TV You can select from a v...

Page 25: ... 1 Connecting to an Audio System HDMI Supported Amplifier Best Quality Recommended Using an HDMI cable connect the HDMI OUT terminal on the rear of the product to the HDMI IN terminal of your Amplifier Using an HDMI cable connect the HDMI OUT terminal of the Amplifier to the HDMI IN terminal of your TV Turn on the product TV and Amplifier Press the input select button of the Amplifier to select th...

Page 26: ...input 1 2 3 4 Case 3 Connecting to an Audio System Dolby Digital DTS Amplifier Better Quality Using an optical cable connect the DIGITAL AUDIO OUT OPTICAL terminal on the rear of the product to the DIGITAL AUDIO IN OPTICAL terminal of your Amplifier Using the video signal cable s connect the HDMI COMPONENT or VIDEO OUT terminals on the rear of the product to the HDMI COMPONENT or VIDEO IN terminal...

Page 27: ... Cable UTP cable connect the LAN terminal of the product to the LAN terminal of your modem Set the network options See pages 41 45 NOTE Internet access to Samsung s software update server may not be allowed depending on the router you use or the ISP s policy For more information contact your ISP Internet Service Provider For DSL users please use a router to make a network connection For the AllSha...

Page 28: ...ixed for your AP this product will not support a connection in compliance with new Wi Fi certification specifications If your AP supports WPS Wi Fi Protected Setup you can connect to the network via PBC Push Button Configuration or PIN Personal Identification Number WPS will automatically configure the SSID and WPA key in either mode Connection Methods You can setup the wireless network connection...

Page 29: ...See page 34 1 2 3 4 5 Press the buttons to the select the desired Network Settings Wired Wireless or PBC WPS then press the ENTER button See pages 41 45 The message Enjoy your watching will be displayed Press the OK button The broadcasting channel will be displayed NOTE When the product is connected to TV for the first time product will turn on automatically Do not confuse because this is not malf...

Page 30: ...g the software version When the product is connected to the network select Internet TV from the home menu Download desired content from Samsung Apps See page 72 Channels Press the MENU button The home menu will be displayed Press the buttons to select the Channels then press the ENTER button Press the buttons to select the desired submenu then press the ENTER button Press the buttons to select the...

Page 31: ... you set the antenna source type and country as below Antenna source Country Air Denmark Finland Ireland Norway Sweden Netherlands New Zealand Cable Denmark Finland Ireland Norway Sweden 1 2 3 4 Digital Text Disable Enable only New Zealand If the programme broadcasts with digital text this feature is enabled MHEG Multimedia and Hypermedia Information Coding Experts Group An International standard ...

Page 32: ...ton Edit My Channels Select this to edit the channel Lock Select this to lock the channel Timer Viewing Select this to set the Timer Viewing Timer Recording Select this to set the Timer Recording Edit Channel Number Select this to edit the Channel Number If this option is not displayed please refer to the Edit Channel Number on page 31 This option will be displayed except if you set the antenna so...

Page 33: ... Mode 3D Mode Auto The 3D Blu ray Disc is played in 3D mode if your product detects a TV which supports it It is played in 2D mode if your product detects a TV which cannot support it 3D The 3D Blu ray Disc is played in 3D mode at all times If a TV cannot support 3D Blu ray discs the playing screen can be black 2D The 3D Blu ray Disc is played in 2D mode at all times Choose this to view a picture ...

Page 34: ...e this product for switching a 2D content to 3D Blu ray 3D and Blu ray 3D logo are trademarks of Blu ray Disc Association TV Aspect Depending on the type of television you have you may want to adjust the screen setting 16 9 Normal Certain movies 4 3 source will be displayed in 4 3 Pillarbox black bars on sides of picture if 16 9 normal is selected 16 9 Wide You can view the full 16 9 picture on yo...

Page 35: ...nal The number in 1080p 1080i 720p 576p 480p 576i 480i indicates the number of lines of video The i and p indicate interlace and progressive scan respectively Auto It automatically checks and sets the optimal resolution BD Wise Automatically sets the optimal resolution when connected via HDMI to a TV with the BD Wise feature The BD Wise menu item appears only if BD Wise is set to On 1080p Outputs ...

Page 36: ...ill be blank Please wait for 15 seconds and the resolution will be reverted to the previous value automatically If the screen is blank press the MENU button to display home menu Press the STOP button on the front panel of the product for more than 5 seconds with no disc inserted All settings are restored to the factory default Follow the steps on the previous page to access each mode and select th...

Page 37: ... the content Frame Select when pausing a scene with a little action Field Select when pausing a scene with a lot of action HDMI Deep Color Set to output the picture from the HDMI OUT jack with Deep Color or not Deep Color allows more accurate color reproduction with deeper color depth Auto The picture will be output with Deep Color to the connected TV which supports HDMI Deep Color Off The picture...

Page 38: ...es the PCM audio into DTS bitstream Outputs only main feature audio stream so that your AV receiver can decode the audio bitstream You will not hear BONUSVIEW audio and Navigation Sound Effects Blu ray Discs may include three audio streams Main Feature Audio The audio soundtrack of the main feature BONUSVIEW audio Additional soundtrack such as director or actor s commentary Navigation Sound Effect...

Page 39: ...verbal description to the main audio to help the visually impaired On Turns the Audio Description function on Off Turns the Audio Description function off NOTE If you select on you can adjust volume System Plug Play By using Plug Play you can set country clock mode TV aspect and Network Settings etc For more information on the settings refer to the corresponding section in this user manual See pag...

Page 40: ...plays the current device Total Size Displays the total size of the device Storage Available Size Displays the available size of the device Storage HDD Format Press this to format the HDD Checking Device Press this to checking the Device NOTE The available size displayed in the HDD management menu does not include the default space of 20GB The 20GB in the HDD is reserved for the Timeshift feature b...

Page 41: ...Wired Network In the Network Settings menu press the buttons to select Network Settings and then press the ENTER button The Internet Protocol Setup screen appears Press the button then select Auto or Manual and then press the ENTER button 1 2 3 4 5 6 1 2 BD Data Management Enables you to manage the downloaded contents from a Blu ray disc that supports the BD LIVE service You can check the device i...

Page 42: ...Network settings into your product follow these steps On the Internet Protocol Setup screen press the ENTER button Press the buttons to select Manual and then press the ENTER button Press the button to go to the first entry field IP Address Use the number buttons on your remote to enter numbers When done with each field use the button to move successively to the next field You can also use the oth...

Page 43: ...cess Setting Up the Network Connection To set up the wireless connection using Auto Network Search follow these steps In the Network Settings menu press the buttons to select Network Settings and then press the ENTER button The Internet Protocol Setup screen appears Press the buttons to select the Internet Protocol Setup and then press the ENTER button Press the buttons to select Auto or Manual an...

Page 44: ... click the Network icon on the bottom right of the screen In the pop up menu click Status On the dialog that appears click the Support tab On the Support tab click the Details button The Network settings are displayed 9 10 11 12 1 2 3 4 To Enter the Network settings into your product follow these steps On the Internet Protocol Setup screen press the ENTER button Press the buttons to select Manual ...

Page 45: ...nd a request to the server to certify the disc the server uses the transferred data to check if the disc is valid and sends the certificate back to the product The Internet connection may be restricted while you are using BD LIVE contents Language You can select the language you prefer for home menu disc menu etc BD DVD Disc Menu Select the language for the disc menu displays BD DVD Audio Select t...

Page 46: ... to display home menu with no disc inserted Press the STOP button on the front panel of the product for more than 5 seconds All settings will revert to the factory settings NOTE When the factory default settings are restored all the user data stored in the BD data will be deleted 1 2 General Background Change the background theme of the menu screen NOTE When you playing JPEG files you can select t...

Page 47: ... in the product Software is represented as Year Month Day_Version To select By Internet press the ENTER button A popup message will appear if an update is available If you select Yes the BD HDD combo will be turned off and on automatically after completing the firmware upgrade UPDATE will appear on the front display The BD HDD combo will be turned off and on automatically after completing the load...

Page 48: ... Burn a data disc with your CD burning software After disc is finalized insert it in the bd hdd combo Please be careful not to disconnect the power until upgrades are complete The BD HDD combo will be turned off and on automatically after completing the firmware upgrade UPDATE will appear on the front display The BD HDD combo will be turned off and on automatically after completing the loader upgr...

Page 49: ...rding a broadcasting program features such as BonusView BD LIVE and BonusView slide show audio will not be supported If you play a 3D video while recording a broadcasting program the video will be displayed in 2D rather than in 3D and features such as BonusView BD LIVE and BonusView slide show audio will not be supported Using the Disc menu Title menu Popup menu Using the Disc Menu hZ During playb...

Page 50: ...ge as follows HDD BD ROM BD RE R DVD RW R DVD RW R DVD VIDEO 1 2 3 4 5 6 7 1 2 3 4 5 6 7 DivX MKV MP4 1 2 3 1 2 3 1 2 1 2 To return to normal speed playback press the PLAY button NOTE No sound is heard during search mode Skipping Chapters Titles ThzZyx During playback press the SKIP button If you press the SKIP button it moves to the next chapter or title If you press the SKIP button it moves to t...

Page 51: ...or Chapter hzZy Repeat the disc title or chapter Depending on the disc the Repeat function may not be available During playback press the TOOLS button Press the buttons to select Repeat then press the ENTER button Press the buttons to select Chapter or Title then press the ENTER button To return to normal play press the TOOLS button again Press the buttons to select Repeat then press the ENTER but...

Page 52: ...function will not operate Selecting the Audio Language ThzZx During playback press the TOOLS button Press the buttons to select Audio or Sound Setting then press the ENTER button Press the buttons to select the desired audio language NOTE Information about the main feature BONUSVIEW mode will also be displayed if the Blu ray Disc has a BONUSVIEW section Use the button to switch between main featur...

Page 53: ... increase Sharpness Normal Choose this setting for most viewing applications Movie This is the best setting for watching movies User The user can adjust the sharpness and noise reduction contrast brightness and colour respectively 1 2 3 1 2 3 Selecting the Information Tx This function enables you to check the contents information including the name and size etc During playback press the TOOLS butt...

Page 54: ...ss the desired track number The selected track will be played Playing an Audio CD CD DA MP3 Insert an Audio CD CD DA or an MP3 Disc into the disc tray For an Audio CD CD DA the first track will be played automatically For an MP3 disc press the ENTER button to select the Media Play Then press the buttons to select Music then press the ENTER button Press the buttons to select the track you want to p...

Page 55: ...Current track is repeated All Audio CD CD DA MP3 All tracks are repeated Shuffle Audio CD CD DA MP3 The random option plays a disc s track in random order Playlist Insert an Audio CD CD DA or an MP3 Disc into the disc tray For an Audio CD CD DA the first track will be played automatically For an MP3 disc press the ENTER button to select the Media Play Then press the buttons to select Music then pr...

Page 56: ... the TOOLS button Stop Slide Show Select this if you want to stop the slide show Slide Show Speed Select this if you want to adjust the Slide Show speed Slide Show Effect Select this if you want to set the Slide Show Effect Background Music Select this if you want to listen to music while viewing a picture Zoom Select this if you want to enlarge the current picture Enlarged up to 4 times Rotate Se...

Page 57: ... Press the buttons to select the desired Videos Music or Photos then press the ENTER button Press the buttons to select the desired file you want to play then press the ENTER button Screen Display 1 Displays the selected home menu 2 Displays the selected file name and the number of files and pages 3 Nevigation Help Displays remote control buttons available RED A Selects this to change the device m...

Page 58: ... sorts and shows files by latest date HDD only Earliest Date It sorts and shows files by earliest date Artist It sorts the music file by artist in alphabetical Album It sorts the music file by album in alphabetical order Genre It sorts music files by the genre Mood It sorts music files by the mood You can change the music mood information Monthly It sorts and shows photo files by month It sorts on...

Page 59: ...aving mode of the BD product to Off automatically when connected with each other Need to Know List before using Media Play Media Play only supports USB Mass Storage Class MSC devices MSC is a Mass Storage Class Bulk Only Transport device Examples of MSC are Thumb drives Flash Card Readers Both USB HDD and HUB are not supported MSC supports Music Photo and Video files while a PTP device supports Ph...

Page 60: ...0 6 30 8 asf ASF Divx 3 11 4 x 5 1 6 0 1920x1080 6 30 8 MP3 AC3 LPCM ADPCM WMA XviD 1920x1080 6 30 8 H 264 BP MP HP 1920x1080 6 30 25 MPEG4 SP ASP 1920x1080 6 30 8 Motion JPEG 800x600 6 30 8 wmv ASF Window Media Video v9 1920x1080 6 30 25 WMA mp4 MP4 H 264 BP MP HP 1920x1080 6 30 25 MP3 ADPCM AAC MPEG4 SP ASP 1920x1080 6 30 8 XVID 1920x1080 6 30 8 3gp 3GPP H 264 BP MP HP 1920x1080 6 30 25 ADPCM AA...

Page 61: ...264 Level 4 1 Does not support H 264 FMO ASO RS VC1 SP MP AP L4 and AVCHD XVid MPEG4 SP ASP Below 1280x720 60 frames max Above 1280x720 30 frames max Does not support GMC 2 or higher For MJPEG supports Samsung Techwin MJPEG only Music File Support File Extension Container Audio Codec Support Range mp3 MP3 MP3 wma WMA WMA Compliant with WMA version 10 Sampling rates in kHz 8 11 16 22 32 44 1 48 Bit...

Page 62: ...ion You can add a verbal description to the main audio to help the visually impaired Press the TOOLS button while you are viewing a channel Press the buttons to select the Audio Description then press the ENTER button If you select On volume menu will be activated Adjust the audio description volume Selecting the Audio Language Press the TOOLS button while you are viewing a channel Press the butto...

Page 63: ...annel The guide screen will be displayed Guide Screen 1 Displays the channel screen 2 Displays the channel information 3 Displays the current date and time 4 Nevigation Help Displays remote control buttons available RED A To change the View Mode Channel View or Scheduled View YELLOW C It displays channel from now to 24 hours after If you select YELLOW C button GREEN B button will be displayed Pres...

Page 64: ...et Timer Recording or Timer Viewing then press the TOOLS button Press the buttons to select the Timer Recording or Timer Viewing then press the ENTER button Fill the input items using buttons then press the ENTER button Press the ENTER button again If you want to cancel the Timer Recording or Timer Viewing press the buttons to select Scheduled Channels then press the ENTER button Press the buttons...

Page 65: ...ll be not enabled 1 2 3 4 1 2 1 The available size displayed in the HDD management menu does not include the default space of 20GB The 20GB in the HDD is reserved for the Timeshift feature by default Time Shift function This function replays recordings as a live signal When you watching a TV channel press the PLAY or PAUSE button The Time Shift bar is displayed You can use the SKIP and other playb...

Page 66: ...b Preference c Select d Sort Tools XXX 00 00 12 12 Oct 2006 XXX 00 00 12 12 Oct 2006 1 1 Page XXX 00 00 12 12 Oct 2006 XXX 00 00 12 12 Oct 2006 T 4 Recorded TV CNP News HDD b Preference c Select d Sort Tools No Title 00 00 12 12 Oct 2006 Ostosruutu 00 01 56 12 Oct 2006 Ostosruutu 00 01 56 12 Oct 2006 Teräsmieheni 00 00 12 12 Oct 2006 1 1 Page No Title 00 00 12 12 Oct 2006 Ostosruutu 00 01 56 12 Oc...

Page 67: ...n to select Delete Press the buttons to select OK then press the ENTER button Copy Copying Videos Music or Photos Contents HDD DISC AllShare USB DISC USB AllShare HDD HDD DISC USB AllShare Music Supported Supported Supported Photos Supported Supported Supported Videos Supported Supported Supported Disc CD DA CD R CD RW DVD R Finalise DVD RW DVD RW Finalise HDD or USB PTP USB is not available when ...

Page 68: ... d View Devices Enter Please activate Internet TV service to enjoy a variety of Internet Services USB b Preference c Select d Sorting Tools 1xxxx Feat xxxx K Will 2009 Ballad 2xxx In xxxxx 00 03 17 2009 R B TRACK 009 00 03 53 2009 xxxx 1 1 Page H 1 Music k will 1xxxx Feat xxxx mp3 a Change Device B 1 L 1 Copy Move Select Return Selected file s 05 B lud mp3 1 File s 3 5MB Copy Selected Files m80 HD...

Page 69: ...gree to the service terms and conditions before you can use the Internet TV service 1 2 3 When you have agreed on the service agreement the Internet TV service will start being updated It takes several minutes When the update is completed you will see the Internet TV menu screen Internet TV at a Glance 1 Commercial Displays Internet TV Guide product introduction and new application introduction 2 ...

Page 70: ...nnection is unstable the service may be delayed or interrupted Furthermore the product may be turned off automatically If this is the case check the Internet connection and try again The application service may be provided in English only and the contents available may vary depending on the area When using a application service you can not operate FULL SCREEN button on the remote control For more ...

Page 71: ... with no disc inserted Internet TV ID Use this menu to create or delete an account and enter or delete account information You can control your account including contents site s account information This account is only for Internet TV Create Create an account and link it with desired service applications NOTE The account name must be at least 1 character in length but no more than 8 You can regist...

Page 72: ...d fee My page Displays the application list Help If you questions about Internet TV check this section first If none of the tips apply please visit the help website Using the colour buttons with the Samsung Apps RED A Login To log in to the internet service GREEN B Thumbnail View To change the view mode BLUE D Sort by To sort the applications by Featured Most Downloaded Most Recent or Name NOTE Th...

Page 73: ... folder to remove from the shared folders and click the Share Folder Disabled icon To apply the updated sharing state to the server click the Set Change State icon 1 2 3 1 2 3 4 5 To enable the product to locate a PC server click Share from the menu bar Click Set Device Policy and click Accept Click the Set Change State icon and move to the home menu on product To select a device use the RED A or ...

Page 74: ...ant to set folder sharing off 4 Refresh icon Use this if you want to refresh list of folders and files in My Computer 5 Set Change State icon Select a folder to share and don t forget to press this button The updated state will be applied to the server 6 Server Displays the name of the sharing server 7 Shared Folder Displays a list of the shared folders 8 My Computer Displays a list of the folders...

Page 75: ...alid button is pressed The Blu ray Disc DVD s software doesn t support the feature e g angles You ve requested a title or chapter number or search time that is out of range Play mode differs from the Setup Menu selection Some of the functions selected in the Setup Menu may not work properly if the disc is not encoded with the corresponding function The screen ratio cannot be changed The Screen Rat...

Page 76: ... jack of the product Check if your TV supports 576p 480p 720p 1080i 1080p HDMI input resolution Abnormal HDMI output screen If random noise appears on the screen it means that TV does not support HDCP High bandwidth Digital Content Protection PC Share Manager function I can see folders shared through the PC Share Manager but I cannot see the files Since it shows only files corresponding to the Ima...

Page 77: ...ze in BD Data Management See page 41 Please check whether the BD LIVE Internet Connection menu is set to Allow All If all above fails contact the contents provider or update the latest firmware When using the BD LIVE service an error occurs The total size of device must have at least 1GB of free space to accommodate the BD LIVE service You can check the available size in BD Data Management See pag...

Page 78: ...ed Amplifier 25 HDMI Deep Color 37 HDD Management 40 I Internet TV 39 69 72 J JPEG 56 M Movie Frame 24F 37 MP3 54 56 Media Play 57 59 N Network Setup 41 45 O Optimal Resolution 35 36 P Plug Play 29 PCM Downsampling 38 Popup Menu 50 Picture Setting 53 R Region Code 13 Romote Control Sensor 15 Romote Control 18 Resolution 35 36 Repeat 52 55 Recording 65 67 Ripping 68 S Software Upgrade 47 48 Search ...

Page 79: ... DVD Disc 576i 480i Component Video Y 1 0 Vp p 75Ω load PR 0 70 Vp p 75Ω load PB 0 70 Vp p 75Ω load Blu ray Disc 1080i 720p 576p 480p 576i 480i DVD 576p 480p 576i 480i Video Audio HDMI 2D 1080p 1080i 720p 576p 480p 3D 1080p 720p PCM multichannel audio Bitstream audio Audio Output 2 Channel L 1 L R 2 R Digital Audio Output Optical Frequency Response 48 kHz Sampling 4 Hz to 22 kHz 96 kHz Sampling 4 ...

Page 80: ...ble features may be subject to delayed availability some discs bearing the BD ROM BD RE R DVD VIDEO DVD RW R DVD RW R and CD RW R logos may still be non standardized discs some discs may not be played depending on their physical state or recording conditions problems and errors can occur during the creation of Blu ray Disc DVD software and or the manufacture of discs this product operates differen...

Page 81: ...owner or service provider you may not modify copy republish upload post transmit translate sell create derivative works exploit or distribute in any manner or medium any content or services displayed through this device THIRD PARTY CONTENT AND SERVICES ARE PROVIDED AS IS SAMSUNG DOES NOT WARRANT CONTENT OR SERVICES SO PROVIDED EITHER EXPRESSLY OR IMPLIEDLY FOR ANY PURPOSE SAMSUNG EXPRESSLY DISCLAI...

Page 82: ...06 7 280 460 7 283 729 7 286 454 7 304 938 This license is limited to private non commercial use by end user consumers for licensed contents No rights are granted for commercial use The license does not cover any product unit other than this product unit and the license does not extend to any unlicensed product unit or process conforming to ISO IEC 11172 3 or ISO IEC 13818 3 used or sold in combin...

Page 83: ...lly permitted to submit the data To the extent that you the End User provide any information or original works of authorship to be added to Rovi Databases you represent and warrant that you are the sole author of such work s and further hereby assign to Rovi all rights of copyright therein including the right to register the copyright in such work s as part of the Rovi Database THE ROVITECHNOLOGY ...

Page 84: ...NG 902 172 678 www samsung com Sweden 0771 726 7864 SAMSUNG www samsung com U k 0845 SAMSUNG 7267864 www samsung com Eire 0818 717100 www samsung com Area Contact Center Web Site Switzerland 0848 SAMSUNG 7267864 CHF 0 08 min www samsung com ch www samsung com ch_fr French Lithuania 8 800 77777 www samsung com Latvia 8000 7267 www samsung com Estonia 800 7267 www samsung com CIS Russia 8 800 555 55...

Page 85: ...AK68 01977K 00 ...

Reviews: