background image

4

Description

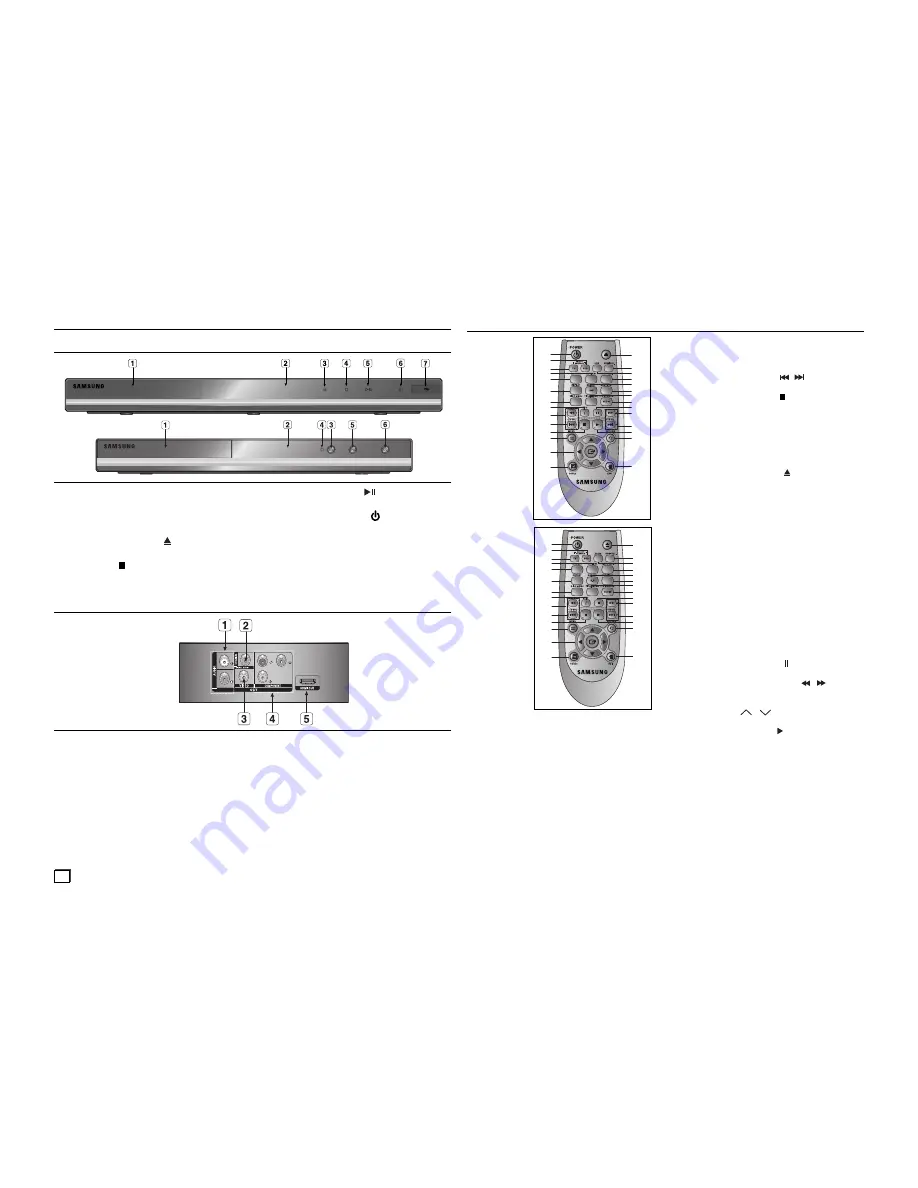
Front Panel Controls

Tour of the Remote Control

1. 

DVD POWER Button


Turns the power on or off.

2. DVD 

Button


Use to operate DVD.

3. TV 

Button


Use to operate a Samsung TV.

4. 

EZ VIEW Button


   The aspect ratio of a picture can easily be 
adjusted according to the screen size of your 
TV (16:9 or 4:3).

5. 

MARKER Button

6. REPEAT 

Button


Allows you to repeat play a title, chapter, 
track, or disc.

7. 

DISC MENU Button


Brings up the Disc menu.

8. INFO 

Button


Used to displays playback info banner.  

9. 

TV VOL (+, -) Buttons

 Control 

volume.

10.  SKIP Buttons (

/

)


Use to skip the title, chapter or track.   

11. STOP 

Button 

(

)

12. MENU 

Button


Brings up the DVD player’s menu.

13. ENTER/

π

/

,

/

®

 Buttons


This button functions as a toggle switch.

14. TOOLS 

Button


Displays the current disc mode. It also lets 
you access the Display function.

15. OPEN/CLOSE 

(

) Button


To open and close the disc tray.

16.  HDMI SEL. Button


HDMI Output resolution setup.

17.  USB Button (DVD-C550 Only)/
 ZOOM 

Button 

 (DVD-C500 

Only)


Enlarges the DVD Picture.

18.  VIDEO SEL. Button


 Changes video output mode

19.  REPEAT A-B Button


Allows you to repeat play a chosen section (A-
B) on a disc.

20.  SUBTITLE Button
21.  TITLE MENU Button 


Brings up the Title menu.

22.  AUDIO/ TV SOURCE Button


Use this button to access various audio functions 
on a disc.  Use this button to select an available 
source on a Samsung TV (TV mode).

23.  PAUSE Button ( )


Pause disc play.

24. SEARCH 

Buttons 

(

/

)


Allow you to search forward/backward through 
a disc.

25. TV 

CH 

(

) Buttons

 Channel 

selection.

26.  PLAY Button ( )


Begins disc play.

27. RETURN 

Button


Returns to a previous menu.

28. EXIT 

Button


Exit the on-screen menu.

Rear Panel

Install Batteries in the Remote 
control

1. 

Open the battery cover on the back of the remote 
control.

2. 

Insert two AAA batteries. Make sure that the 
polarities (+ and -) are aligned correctly.

3. 

Replace the battery cover.

7

1. DISC 

TRAY


Place the disc here.

2. DISPLAY


Operation indicators are displayed here.


3. OPEN/CLOSE 

(

)


  Press to open and close the disc tray.

4. STOP 

( )


Stops disc play.

5. 

PLAY/PAUSE (

)


Begin or pause disc play.

6. STANDBY/ON 

(

)


Turn On/Off the DVD Player.

7. 

USB HOST (DVD-C550 Only)


Connect a digital still camera, MP3 player, 
memory stick, Card reader and other remov-
able storage devices.

1.  AUDIO OUT JACKS

 - 


Use audio cables to connect to the Audio input 

          jacks of  your television or audio/video receiver

2. DIGITAL AUDIO JACKS


- Use either an coaxial digital cable to connect  
  to a compatible Dolby Digital receiver.


- Use either an coaxial digital cable to connect  
  to an A/V Amplifier that contains a Dolby  
  Digital, MPEG2 or DTS decoder.

3.  VIDEO OUT JACK


- Use a video cable to connect to the Video  
  input jack on your television.

4.  COMPONENT VIDEO OUT JACKS


- Use these jacks if you have a TV with   

  Component Video in jacks. These jacks  
 provide P

R

, P

B

 and Y video. 

 - 

If 

P-SCAN is set to “ON” in Video Output of  

  the Setup Menu, progressive scan mode will work.

 - 

If 

I-SCAN is set to “ON” in Video Output of the  

  Setup Menu, interlaced scan mode will work.

5. HDMI OUT JACK


- Use an HDMI cable to connect this jack to the  
  HDMI jack on your television for the best  
 quality picture.


- If an HDMI cable is connected to an HDMI- 
  compatible TV, HDMI will be output automati- 
  cally from the player about 10 seconds later.

DVD-C550

DVD-C500

1
2
3

4
5

6

7
8

9

10

14

11
12

13

23
24

25
26
27

19
20

21
22

18

28

17

15

16

1
2
3

4
5

6

7
8

9

10

14

11
12

13

23
24

25
26
27

19
20

21
22

18

28

17

15

16

DVD-C550

DVD-C500

Summary of Contents for AK68-01861A(01)

Page 1: ...yer User Manual AK68 01861A 01 imagine the possibilities Thank you for purchasing this Samsung product To receive more complete service please register your product at www samsung com global register DVD C500 DVD C550 ...

Page 2: ... user is encouraged to try to correct the interference by one or more of the following measures Reorient or relocate the receiving antenna Increase the separation between the equipment and receiver Connect this equipment into an outlet on a circuit different from that to which the receiver is connected Consult the dealer or an experienced radio TV technician for help This class B digital apparatus...

Page 3: ... Digital Photos on your TV Repeat You can repeat a song or movie simply by press ing the REPEAT button MP3 WMA This unit can play discs created from MP3 WMA files MPEG4 DVD C550 Only This unit can play MPEG4 formats within an avi file HDMI High Definition Multimedia Interface HDMI reduces picture noise by allowing a pure digital video audio signal path from the player to your TV CD Ripping DVD C55...

Page 4: ...enu Rear Panel Install Batteries in the Remote control 1 Open the battery cover on the back of the remote control 2 Insert two AAA batteries Make sure that the polarities and are aligned correctly 3 Replace the battery cover 7 1 DISC TRAY Place the disc here 2 DISPLAY Operation indicators are displayed here 3 OPEN CLOSE Press to open and close the disc tray 4 STOP Stops disc play 5 PLAY PAUSE Begi...

Page 5: ... requires no D A conversion and is a pure digital signal from the player to your TV B Connecting to a TV Progressive Interlace 1 Using Component video cables not included connect the COMPONENT VIDEO OUT jacks on the rear of the DVD player to the COMPONENT IN jacks of your TV 2 Using the audio cables connect the AUDIO red and white OUT jacks on the rear of the DVD player to the AUDIO red and white ...

Page 6: ...twice makes the DVD move to the beginning of the previous chapter When playing a CD if you press the SKIP button it moves to the next track If you press the SKIP button it moves to the beginning of the track Pressing the Skip button twice makes the CD move to the beginning of the previous track Using the Display Function When Playing a DVD MPEG4 1 During play press the TOOLS button on the remote c...

Page 7: ...Z VIEW or π buttons to select the screen size Each time you press the π button the screen size changes For graphics of the screen sizes and the sequence in which the sizes change see the next column 3 Press the EXIT button to exit EZ View If you are using a 16 9 TV For 16 9 aspect ratio discs WIDESCREEN TV SCREEN FIT ZOOM FIT For 4 3 aspect ratio discs Normal Wide SCREEN FIT ZOOM FIT Vertical Fit ...

Page 8: ...r Folder Press the π buttons to select the desired folder and then press ENTER To select the Sub Folder Press the π buttons to select the desired folder and then press ENTER MP3 WMA CD Audio Playback 1 Open the disc tray Place the disc on the tray Close the tray 2 Press the buttons to select a Music folder and then press ENTER Press the π to select a song file and then press ENTER Press π to begin...

Page 9: ...nd DivX Pro File format avi div divx Important The above recommendations cannot be taken as a guarantee that the DVD player will play MP3 recordings or as an assurance of sound quality You should note that certain technologies and methods for MP3 file recording on CD Rs prevent optimal playback of these files on your DVD player degraded sound quality and in some cases inability of the player to re...

Page 10: ...e following buttons Mode Fast Normal Bitrate Press ENTER to change 128kbps 192kbps 128kbps Note To cancel the copying in progress press the ENTER button To return to CDDA screen press the TOOLS button again While the CD is being ripped the player will automatically be in stop mode Ripping process is 2 6 times of normal speed Only Audio CD CD DA discs can be ripped The USB button does not work whil...

Page 11: ...ders in 1 Disc is over 500 only the first JPEG files in 500 folders can be played Navigating the setup menu Using the Setup Menu The Setup menu lets you customize your DVD player by allowing you to select various language prefer ences set up parental level and even adjust the player to the type of television screen you have 1 Press the MENU button on the remote control Press the buttons to select ...

Page 12: ...remote control the OSD to the right will appear Note While watching TV your TV screen will change to the play screen when you press the PLAY but ton of the DVD player If you play a DVD when the TV power is off the TV will power On If you turn the TV off the DVD Player will power off automatically If you change from HDMI to other sources Composite Component etc while playing a DVD disc the DVD Play...

Page 13: ...on the back side of your DVD Player 1 With the unit in Stop mode press the MENU button Press the buttons to select SETTINGS then press the ENTER button 2 Press the π buttons to select SUPPORT then press the or ENTER button 3 Select PRODUCT INFORMATION then press the or ENTER button Reference Problem Action The screen is blocked Press the button on the front panel for more than 5 seconds with no di...

Page 14: ...ing Temperature Range 5 C to 35 C Operating Humidity Range 10 to 75 Video Output Composite Video 1 channel 1 0 Vp p 75 Ω load Component Video Y 1 0 Vp p 75 Ω load Pr 0 70 Vp p 75 Ω load Pb 0 70 Vp p 75 Ω load HDMI 480p 576p 720p 1080p 1080i Audio Output Output terminal RCA Maximum Output Level 2Vrms Frequency Response 20Hz 20kHZ Digital Audio Output Coaxial terminal S PDIF Specifications Memo ...

Page 15: ...Memo ...

Page 16: ...temala 1 800 299 0013 www samsung com latin Jamaica 1 800 234 7267 www samsung com latin Panama 800 7267 www samsung com latin Puerto Rico 1 800 682 3180 www samsung com latin Rep Dominica 1 800 751 2676 www samsung com latin Trinidad Tobago 1 800 SAMSUNG 726 7864 www samsung com latin Venezuela 0 800 100 5303 www samsung com latin Colombia 01 8000112112 www samsung com co Europe Belgium 02 201 24...

Page 17: ... Manuel d utilisation AK68 01861A 01 Un monde de possibilités Merci d avoir choisi Samsung Pour bénéfi cier d un service plus complet enregistrez votre produit sur le site www samsung com global register DVD C500 DVD C550 ...

Page 18: ...t ne plecez jamais de récipients contenant un liquide ex vase dessus FDA Laser Conforme à la norme 21CFR 1040 10 sauf pour les écarts en vertu de l Avis nº 50 relatif aux lasers daté du 24 Juin 2007 ATTENTION CE PRODUIT UTILISE UN FAISCEAU LASER EN OPÉRANT UN CONTRÔLE UN AJUSTEMENT OU TOUTE PROCÉDURE AUTRE QUE CELLES INDIQUÉES DANS CE MANUEL VOUS VOUS EXPOSEZ À DES RADIATIONS DANGEREUSES NE JAMAIS...

Page 19: ...ure dépend des conditions d enregistrement DVD R R CD RW DVD RW RW mode V Il se peut que l unité ne lise pas certains CD R CD RW et DVD R en raison du type de disque ou des conditions d enregistrement PROTECTION CONTRE LA COPIE Nombreux sont les disques DVD protéges contre la copie Ainsi vous ne pouvez connecter votre lecteur DVD que directement à la télévision et non au magnétoscope Si vous le co...

Page 20: ...SUBTITLE 21 Touche TITLE MENU Affiche le menu titres 22 Touche AUDIO TV SOURCE Appuyez sur cette touche pour modifier les options audio Appuyez sur cette touche pour sélectionner une source de téléviseur disponible en mode TV 23 Touche PAUSE Pour suspendre la lecture 24 Touches SEARCH Permet une recherche avant ou arrière 25 Touches TV CH Sélection de lla chaîne 26 Touche PLAY Pour commencer la le...

Page 21: ...elacé 1 À l aide de câbles de composant vidéo non compris raccordez les prises COMPONENT VIDEO OUT situées à l arrière du lecteur DVD aux prises COMPONENT IN de votre téléviseur 2 A l aide des câbles audio raccordez les sorties AUDIO OUT rouge et blanche situées à l arrière du lecteur DVD aux entrées AUDIO IN rouge et blanche de votre téléviseur Allumez le lecteur DVD et le téléviseur 3 Réglez la ...

Page 22: ...ges peuvent changer à chaque mise sous ou hors tension de l appareil Veillez par conséquent à sélectionner la langue d affichage souhaitée Après validation vous pouvez néanmoins la modifi er en appuyant sur le bouton situé en façade de l appareil pendant plus de cinq secondes aucun disque n étant chargé L écran SELECT MENU LANGUAGE SELECTION DE LA LANGUE D AFFICHAGE réapparaît afin que vous puissi...

Page 23: ...puyez sur les touches EZ VIEW ou π pour sélectionner le format de l écran Chaque fois que vous appuyez sur les touches de vue EZ VIEW ou π la taille de l écran est modifiée Pour les graphiques des tailles d écran et les listes des séquences de modification de tailles consultez la colonne suivante 3 Appuyez sur la touche EXIT pour quitter la vue EZ View Connexion à un téléviseur 16 9 Les disques au...

Page 24: ...r Parent ou utilisez les touches π pour sélection ner et appuyez sur ENTER pour accéder au dossier Parent Dossier Homologue Appuyez sur les boutons π pour sélectionner le dossier souhaité puis appuyez sur ENTER Sous Dossier Appuyez sur les boutons π pour sélectionner le dossier souhaité puis appuyez sur ENTER Lecture de MP3 WMA CD Audio 1 Ouvrez le tiroir de disques Placez le disque sur le plateau...

Page 25: ...lace à la piste suivante ou précédente Recherche k ou K Pendant la lecture appuyez sur les touches de la télécommande SEARCH k ou K Recherche avancée ou arrière Vous permet d effectuer une recherche rapide dans un fichier AVI 2X 4X 8X 16X 32X Lecture en vitesse lente Vous permet d effectuer une recherche plus lente dans un fichier AVI 1 2X 1 4X 1 8X 1 16 ZOOM X1 X2 X3 X4Normal dans l ordre N essay...

Page 26: ... ENTER ENTRÉE Le menu Extraction Ripping contient les touches suivantes Mode Rapide Normal Remarque Pour annuler la copie en cours appuyez sur la touche ENTER ENTRÉE Pour revenir à l écran CD audio numérique appuyez à nouveau sur la touche TOOLS En cours d extraction audio le lecteur passe automatiquement en mode de lecture La vitesse étant à 2 6 x de la vitesse normale Seuls les CD audio CD DA pe...

Page 27: ...EG peuvent être lus Changement du menu configuration Utilisation du menu de configuration Ce menu vous permet de personnaliser votre lecteur DVD Grâce à lui vous pouvez choisir une langue parmi les différentes proposées mettre au point le contrôle parental et même ajuster le lecteur au format d écran de votre téléviseur 1 L unité étant en mode Stop arrêt appuyez sur la touche MENU de la télécomman...

Page 28: ...our sélectionner PARAMÉTRES puis appuyez sur ENTER 2 Utilisez les boutons π pour sélectionner SYSTÉME puis appuyez sur ou sur ENTER 3 Appuyez sur les boutons π pour sélectionner l élément souhaité puis appuyez sur le bouton ou ENTER Réglage de l option Anynet HDMI CEC Anynet est une option utilisée pour contrôler l appareil à l aide d une télécommande de téléviseur SAMSUNG en raccordant le lecteur...

Page 29: ...sés à l arrière de votre lecteur DVD 1 L unité étant en mode Stop arrêt appuyez sur la touche MENU de la télécommande Utilisez les boutons pour sélectionner PARAMÉTRES puis appuyez sur ENTER 2 Utilisez les boutons π pour sélectionner ASSISTANCE puis appuyez sur ou sur ENTER 3 Sélectionner INFORMATIONS SUR LE PRODUIT puis appuyez sur le bouton ou ENTER Fiche technique Problèmes Résolution L écran e...

Page 30: ...nnement 5 C to 35 C Humidité ambiante 10 to 75 Sortie Vidéo Vidéo composite 1 canaux 1 0 Vcc impédance de75 Ω Vidéo Composant Y 1 0 Vcc impédance de 75 Ω Pr 0 70 Vcc impédance de 75 Ω Pb 0 70 Vcc impédance de 75 Ω HDMI 480p 576p 720p 1080p 1080i Sortie Audio Borne de sortie RCA Niveau de sortie maximum 2Vrms Résponse en fréquence 20 Hz à 20 kHz Sortie audio numérique Borne coaxiale S PDIF Spécific...

Page 31: ...Memo ...

Page 32: ...tonia 800 7267 www samsung com ee Asia Pacific Australia 1300 362 603 www samsung com au New Zealand 0800 SAMSUNG 0800 726 786 www samsung com nz China 400 810 5858 010 6475 1880 www samsung com cn Hong Kong 3698 4698 www samsung com hk www samsung com hk_en India 3030 8282 1800 110011 1800 3000 8282 www samsung com in Indonesia 0800 112 8888 www samsung com id Japan 0120 327 527 www samsung com jp...

Reviews: