background image

PREP

ARA

TION

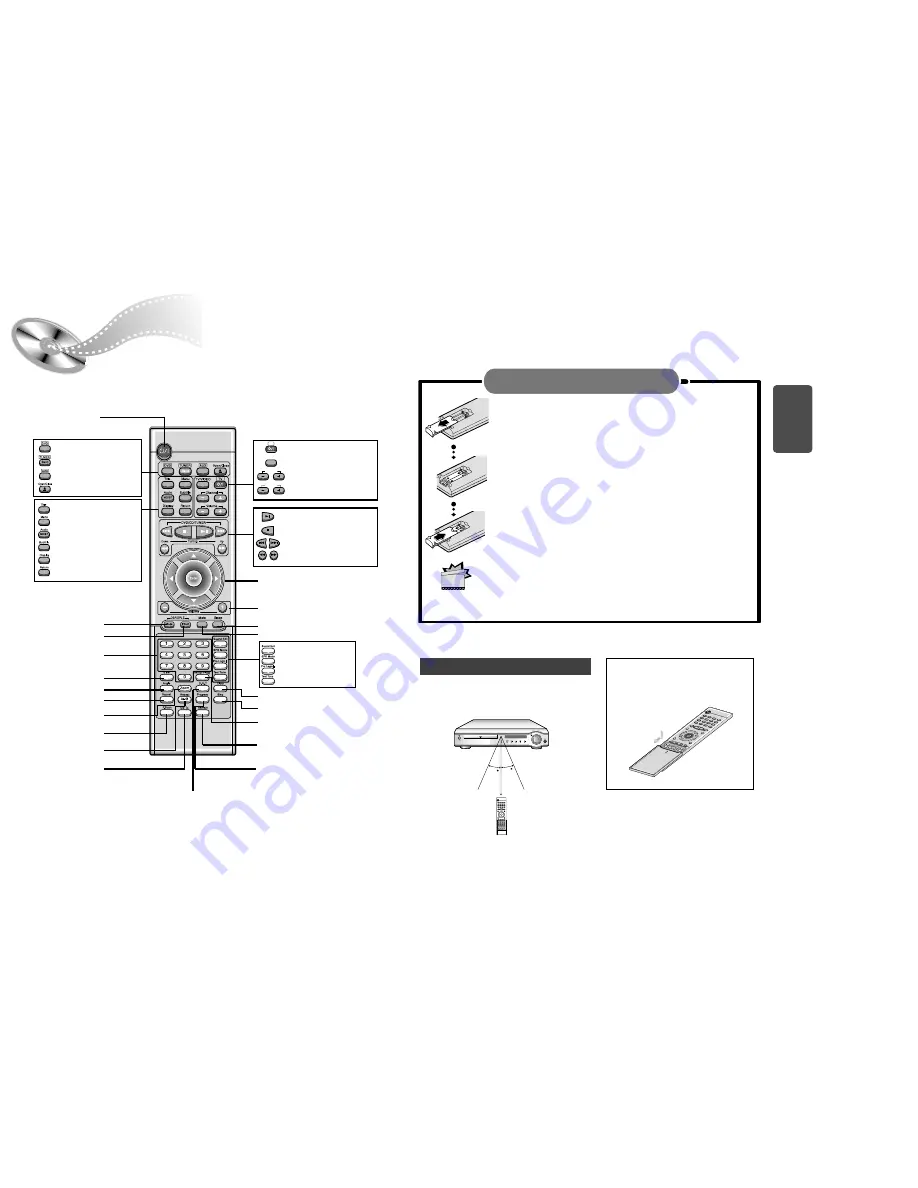
Remote Control Unit

7

8

DVD POWER button

DSP/DPL II Mode button

DSP/DPL II Effect button

Number(0~9) buttons 

Slow button 

Angle button 

Repeat button 

Zoom button

P.Scan button 

Repeat A

B button 

Go To button 

TV Power button 

TV/VIDEO button 

TV Channel Selection button

TV Volume Control button

Volume

TV

Channel

TV/VIDEO

DVD button 

TUNER button 

AUX button 

Open/Close button

Title button 

Menu button 

Audio MO/ST

(mono/stereo) button 

Subtitle button 

Display button 

Return button 

Mute button 

Clear button

Volume Control buttons 

Speaker output volume control

Play/Pause button 

Stop button 

Tuning Preset/CD Skip button

Tuning Up/Down/CD Search button

Sleep button 

Direction/Enter button 

Step button

Setup/P.Scan Adjust  button 

Remain button

Program button

30

30

7~10m

Remove the battery cover on the back of the remote by pressing
down and sliding the cover in the direction of the arrow.

Insert Remote Batteries

Range of Operation of the Remote Control 

1

Insert two 1.5V AAA batteries, paying attention to the correct polarities (+
and –).

2

Replace the battery cover.

3

The remote control can be used up to approximately
23 feet/7 meters in a straight line. It can also be
operated at a horizontal angle of up to 30° from the
remote control sensor.

Follow these precautions to avoid leaking or cracking cells:

• 

Place batteries in the remote control so they match the polarity:(+) to (+)and (–)to (–).

• 

Use the correct type of batteries.Batteries that look similar may differ in voltage.

• 

Always replace both batteries at the same time.

• 

Do not expose batteries to heat or flame.

CAUTION

To open the remote control cover,
push the top of the cover, then slide
downward.

Sound Edit button 
SPK Mode button
Pro Logic II button
Test Tone button

D.R.C button

Summary of Contents for 2.0041112184519e16

Page 1: ...GITAL VIDEO Instruction Manual AH68 01241R SAMSUNG ELECTRONICS CANADA INC HEADQUARTERS 7037 Financial Drive Mississauga Ontario Canada L5N 6R3 TEL 1 905 542 3535 www samsung ca SERVICE DIVISION 7037 Financial Drive Mississauga Ontario Canada L5N 6R3 1 800 SAMSUNG 1 800 726 7864 ...

Page 2: ... the unit CLASS 1 LASER PRODUCT This Compact Disc player is classified as a CLASS 1 LASER product Use of controls adjustments or performance of procedures other than those specified herein may result in hazardous radiation exposure CAUTION INVISIBLE LASER RADIATION WHEN OPEN AND INTERLOCKS DEFEATED AVOID EXPOSURE TO BEAM This symbol indicates that dangerous voltage which can cause electric shock i...

Page 3: ... played on this player If such discs are played a WRONG DISC FORMAT message appears on the TV screen DVD discs purchased abroad may not play on this player If such discs are played a WRONG REGION CODE message appears on the TV screen Do not use the following types of disc PREPARATION CONNECTIONS OPERATION SETUP MISCELLANENOUS RADIO OPERATION Safety Warnings Precautions Description Remote Control U...

Page 4: ...ors External Audio Component Input Connector Video Output Connector Connect the TV s video input jacks VIDEO IN to the VIDEO OUT connector COMPONENT VIDEO OUTPUT INPUT jacks Connect a TV with component video inputs to these jacks TITLE indicator DTS Disc indicator PRO LOGIC indicator PRO LOGIC LINEAR PCM P SCAN DSP TITLE PBC PRGM ST TUNED kHZ MHZ L C R LS LFE S RS D I G I T A L STEREO indicator DS...

Page 5: ...0 30 7 10m Remove the battery cover on the back of the remote by pressing down and sliding the cover in the direction of the arrow Insert Remote Batteries Range of Operation of the Remote Control 1 Insert two 1 5V AAA batteries paying attention to the correct polarities and 2 Replace the battery cover 3 The remote control can be used up to approximately 23 feet 7 meters in a straight line It can a...

Page 6: ...aker Set the front speakers so that their tweeters high range are aligned at about ear level and at a horizontal angle of 45 to the prime listening position Ideally the center speaker should be positioned with its top surface flush with the front speakers However you may place the speaker either on top or near the bottom of your TV set Vibration caused by the center speaker can disrupt the picture...

Page 7: ... surface If reception is poor connect an outdoor antenna Before attaching a 75Ω coaxial cable with a standard type connector disconnect the supplied FM antenna AM MW antenna connection 1 Connect the AM loop antenna supplied to the AM and terminals 2 If reception is poor connect an outdoor single vinyl covered wire to the AM terminal Keep the AM loop antenna connected Connecting the FM and AM MW An...

Page 8: ... then connect the VIDEO OUT jack TV The WAIT message that appears on the display for about 4 5 seconds when turning on the power or selecting a DVD function indicates a stabilization period for optimizing the condition of your DVD player While the message is being displayed other buttons remain inactive When the power is not turned on press down the Stop button on the main unit for over 5 seconds ...

Page 9: ...which a video image is drawn in a series of passes you get an entire image drawn at one time The progressive scanning method is desirable for dealing with moving objects A camera that has the ability to capture moving objects is called a full frame shutter camera Progressive Scan FULL FRAME What is Progressive or Non Interlaced Scanning This function works only on TVs equipped with component video...

Page 10: ...is stored in the memory and STOP is shown on the display When the Play Pause button or Return button is pressed subsequently playback resumes from the position at which it was stopped If the Stop button is pressed a second time the resume play memory function is canceled and STOP is shown on the display When the Play Pause button is pressed playback starts from the beginning Turning the sound off ...

Page 11: ... and high bit rate e g 32Kbps 320Kbps the sound may skip during playback Depending on the recording mode some MP3 CDs cannot be played 20 Turn on your TV when playing back an MP3 disc Operations Using the On Screen Display When the loaded MP3 disc is recognized the following on screen display appears on the TV screen The contents of this on screen display vary according to the disc the way MP3 tra...

Page 12: ...being played The slow playback speed changes and the selections 1 2X 1 4X 1 8X 1 16X and normal play are repeated Checking the Remaining Time REMAIN TIME CHAPTER REMAIN TIME TITLE CHAPTER TIME TITLE TIME REMAIN TIME DISC REMAIN TIME TRACK DISC TIME TRACK TIME Playing Frame by Frame The picture moves forward one frame each time the button is pressed Step Each time the Remain button is pressed Slow ...

Page 13: ... the title of each movie Depending on the disc this function may either not work at all or may work differently Using the Title Menu Repeat playback operation is not possible with version 2 0 VCD discs if PBC is turned on To operate this feature press the MENU button and then select PBC OFF Press the Repeat A B button at the beginning A of the segment you want to review Press the Repeat A B button...

Page 14: ... OFF Audio MO ST Subtitle Press the Audio button Press the Subtitle button If the word INVALID appears on the TV screen while buttons are being operated that operation is not possible with that particular disc Depending on the disc the audio or subtitle language function may not work 26 OFF 1 3 2 3 3 3 To enlarge an image Images can be enlarged 2x and 4x During DVD playback press the Zoom button t...

Page 15: ...o 10 additional tracks appears The selected track number is programmed and the cursor moves to the next number Press the Stop button twice during playback Press the Stop button once when in the Stop mode Press the Open Close button on the main unit The disc tray will open and then close The program will then be deleted To Playback the Tracks in Programmed Order Press the Play Pause button Press ei...

Page 16: ...nction To set up Sleep Each time the button is pressed the selection toggles as follows SLEEP 10 SLEEP 20 SLEEP 30 SLEEP 60 SLEEP 90 SLEEP 120 SLEEP 150 OFF Press the Sleep button The remaining time for the selected Sleep time is displayed on the front panel Pressing the button once again changes the Sleep time from the last setting Sleep Press the Sleep button What is the Sleep function You can s...

Page 17: ... SYSTEM 4 3 LB OFF BITSTREAM OUTPUT DIGITAL TV SCREEN RATING LEVEL Move Setup Exit LANGUAGES SYSTEM 4 3 LB OFF BITSTREAM OUTPUT DIGITAL TV SCREEN RATING LEVEL Move Setup Exit LANGUAGES SYSTEM OFF RATING LEVEL BITSTREAM OUTPUT DIGITAL TV SCREEN Move Setup Exit LANGUAGES SYSTEM 4 3 LB Press the Up Down button to select the desired sub item and then press the Enter button 4 5 From the stop mode press...

Page 18: ...en using speakers NONE Select this when no speakers are installed 5 3 ms 10 6 ms 15 9 ms Df The distance from FRONT SPEAKER Dc The distance from CENTER SPEAKER Ds The distance from SURROUND SPEAKER Setting REAR SURROUND SPEAKERS If the distance of Df is equal to the distance of Ds in the figure set the mode as 0ms Otherwise change the setting according to the table Setting CENTER SPEAKER If the di...

Page 19: ...channel sound tracks of the software encoded with DTS Digital Surround DTS Digital Surround is another discrete 5 1 channel digital audio format available on CD LD and DVD software Compared to Dolby Digital audio compression rate is relatively low This fact allows DTS Digital Surround format to add breadth and depth to the reproduced sounds As a result DTS Digital Surround features natural solid a...

Page 20: ...ubwoofer and Surround Left Right Channels STEREO Left Right and Subwoofer Channels Dolby Pro Logic II decoder Dolby Pro Logic II is a new format for playing multichannel audio signals that offers improvements over conventional Dolby Pro Logic It can be used to decode not only sources recorded in Dolby Surround but also regular stereo sources into five channels front left right center and surround ...

Page 21: ... feeling of a live music club with a low ceiling LIVE CLUB This function works only in the STEREO Mode To increase Effect level Adjusting DSP Sound Parameters You can fine adjust DSP modes more minutely by changing three parameters room liveness and reverberation To increase Effect level The effect level can be set in steps from 1 to 4 EFFECT1 EFFECT2 EFFECT3 OFF DEFAULT Each time the button is pr...

Page 22: ...9 1 2 The selection toggles back and forth between FM and AM each time the Tuner Band button is pressed 3 4 5 6 Remote Control Unit Press the Stop button to select the PRESET mode Then press the button to select a station stored in the preset See the instructions on the next page to preset stations Press the Stop button to select the MANUAL mode on the front panel Then hold in the button to make t...

Page 23: ...eakers Dolby Digital 5 1 Channel Surround Sound is not being reproduced Problem Check Is the TV power turned on Are the video cables properly connected Is it the player in PAUSE mode Is there any dirt on the disc or is the disc damaged It may not be possible to play some DVD discs due to poor manufacture When a dark scene changes to a bright scene during playback the screen may flicker vertically ...

Page 24: ...y If this occurs remove the disc and let the player stand for 1 or 2 hours with the power on Do not allow the discs to become contaminated with dirt Do not load cracked discs or discs that are scratched Do not keep in direct sunlight Keep in a clean Protection jacket Store vertically Keep in a cool ventilated area Disc Type and Protection COMPACT DIGITAL VIDEO V I D E O COMPACT DIGITAL AUDIO Marks...

Page 25: ...n the specified warranty period and the failure is due to improper workmanship or defective material SECA will repair or replace the product at its option All warranty repairs must be performed by a SECA authorized service centre The name and address of the location nearest you can be obtained by calling toll free 1 800 726 7864 or visiting our web site at www samsung ca Labour Parts one 1 year ca...

Reviews: