


30
EB 8140 EN
Servicing
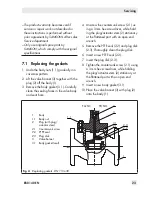
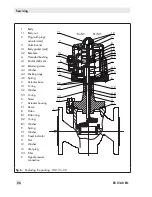
18. Push the threaded bushing (4) into the
actuator base (5). Make sure that the
O-ring (5.3) is correctly seated in the
threaded bushing.
19. Place the bottom slip washer (5.2) on the
valve bonnet (3).
20. Screw the threaded bushing (4) together
with the actuator base (5) over the plug/
actuator stem (2) onto the valve bonnet
(3).
Tighten the threaded bushing only to the
point where the actuator base (5) can
still rotate on the slip washers (5.2).
21. Screw tight the retaining screw (4.2) at
the side to fix the threaded bushing in
place.
22. Slide the washer (8.3) and O-ring (8.2)
onto the plug/actuator stem (2).
23. Place on the piston (8) with piston ring
(8.1) and washer (12).
24. Insert the spring (9) into the piston (8).
25. Tighten the nut (11) intended for fasten-
ing the piston, while holding the plug/
actuator stem (2) stationary at the flat
-
tened part with an open-end wrench.
26. Fasten the travel indicator (10).
27. Put on actuator housing (7) and dome
(7.1) and fasten them tight onto the actu-
ator base (5) by tightening the top
screws (6) gradually in a crisscross pat-
tern.
28. Replace the body gasket (3.1). See sec-
tion 7.1.
29. Place the valve bonnet (3) with plug (2)
onto the body (1).
30. Tighten the body nuts (1.1) gradually in
a crisscross pattern. Observe tightening
torques.
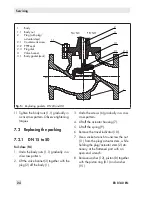
Fail-open (FE/NO)
1. Undo the body nuts (1.1) gradually in a
crisscross pattern.
2.
Lift the valve bonnet (3) together with the
plug (2) off the body (1).
3. Undo the top screws (6) gradually in a
crisscross pattern.
4.
Lift off the dome (7.1) and actuator hous
-
ing (7).
5. Use a socket wrench to unscrew the nut
(11) from the plug/actuator stem, while
holding the plug/actuator stem (2) sta-
tionary at the flattened part with an
open-end wrench.
6. Remove the washer (12), piston (8) and
piston ring (8.1).
7. Remove the O-ring (8.2) and washer
(8.3) from the plug/actuator stem (2).
8.
Lift off the spring (9).
9. Remove the travel indicator (10).
10. Unscrew the retaining screw (4.2) at the
side using a 2 mm hex screwdriver.
11. Unscrew the threaded bushing (4) to-
gether with the actuator base (5) from
the valve bonnet (3) using an open-end
wrench (width across flats 41).
12. Press the threaded bushing (4) out of the
actuator base (5). Replace the slip wash-
ers (5.2) with new ones.
13. Pull the actuator/plug stem (2) down out
of the valve bonnet (3).


