


EB 8140 EN
27
Servicing
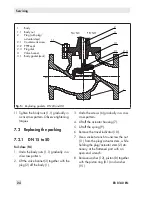
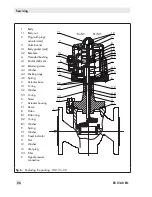
Fail-open (FE)
1. Undo the body nuts (1.1) gradually in a
crisscross pattern.
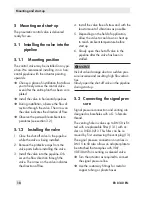
2.
Lift the valve bonnet (3) together with the
plug (2) off the body (1).
3. Undo the screws (6) gradually in a criss-
cross pattern.
4.
Lift off the actuator housing (7).
5. Use a socket wrench to unscrew the nut
(11) from the plug/actuator stem, while
holding the plug/actuator stem (2) sta-
tionary at the flattened part with an
open-end wrench.
6. Remove washer (12), piston (8) together
with the piston ring (8.1) and washer
(9.1).
7. Remove the O-ring (8.2) and washer
(8.3) from the plug/actuator stem (2).
8.
Lift off the spring (9).
9. Remove the travel indicator (10).
10. Unscrew the retaining screw (4.2) at the
side using a 2 mm hex screwdriver.
Unscrew the threaded bushing (4) to-
gether with the actuator base (5) from
the valve bonnet (3) using an open-end
wrench (width across flats 24).
11. Press the threaded bushing (4) out of the
actuator base (5). Replace the slip wash-
ers (5.2) with new ones.
12. Pull the actuator/plug stem (2) down out
of the valve bonnet (3).
13. Pull all the packing parts out of the pack-
ing chamber using a suitable tool. Clean
the packing chamber thoroughly. Renew
the packing.
14. Slide the plug/actuator stem (2) into the
valve bonnet (3).
15. Carefully slide the packing parts over the
plug/actuator stem into the packing
chamber using a suitable tool. Keep the
correct sequence:
−
Spring (4.5)
−
Washer (4.3)
−
V-ring packing (4.4)
16. Place the top slip washer (5.2) into the
actuator base (5).
17. Push the threaded bushing (4) into the
actuator base (5). Make sure that the
O-ring (5.3) is correctly seated in the
threaded bushing.
18. Place the bottom slip washer (5.2) on the
valve bonnet (3).
19. Screw the threaded bushing (4) together
with the actuator base (5) over the plug/
actuator stem (2) onto the valve bonnet
(3).
Tighten the threaded bushing only to the
point where the actuator base (5) can
still rotate on the slip washers (5.2).
20. Screw tight the retaining screw (4.2) at
the side to fix the threaded bushing in
place.
21. Slide the washer (8.3) onto the plug/ac-
tuator stem (2).
22. Place the spring (9) together with the
washer (9.1) onto the actuator base (5).


