background image

2023_03_15-11:00

2

896 854  R. 03/23

 SAMOA Industrial, S.A. · Pol. Ind. Porceyo,  I-14 · Camino del Fontán, 831 · 33392 -  Gijón - Spain · Tel.: +34 985 381 488 · www.samoaindustrial.com

EN

INTRODUCTION

DESCRIPTION

MOUNTING AND INSTALLATION 

•  The control valve is designed to dispense a variety of 

low viscosity fluids and critical fluids that demand a 
high grade of chemical compatibility, among which are 
urea, winshield washer fluid, glycol, antifreeze, distilled 
water, brake fluid, etc.

•  The control valve has a compensated valve that allows 

progressive actuation for better flow control.

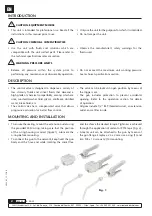
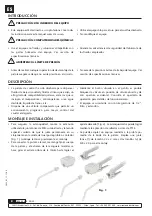
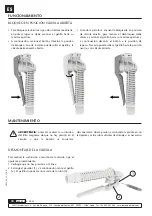
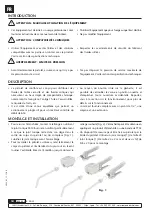
•  To ensure the sealing, mount the extension outlet using 

the provided FKM o-ring, taking care that the position 
of the o-ring housing is correct (figure 1). Lubricate the 
o-ring before mounting.

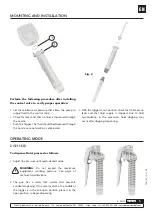
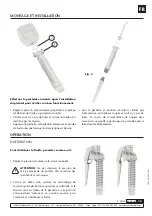
•  To connect the gun to the network, keep fixed the gun 

body and the hose end while rotating the swivel free 

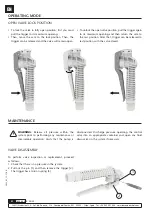
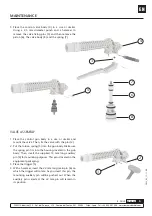
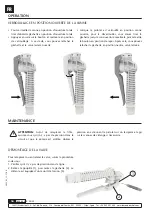
•  The valve can be locked in open position by means of 

the trigger cam.

•  The gun includes protection to prevent accidental 

opening. Refer to the operation section for details 


of operation.

•  All guns include 1/2” BSP threaded swivel, an extension 

outlet and a filter inside.

end to achieve the desired torque. Tightness is achieved 
through the application of sealant or PTFE tape (Fig. 2).

•  A meter unit can be attached to the gun by means of 

the gun flange. Employ a 24 x 2 mm size o-ring (1) and 
two M5 x 14 screws (2) for mounting.

Fig. 1

•  This unit is intended for professional use. Read all the 

instructions in this manual prior to use.

•  Use the unit with fluids and solutions which are 

compatible with the unit wetted parts. Please refer to 
the technical specifications relevant section.

•  Release all pressure within the system prior to 

performing any maintenance or disassembly operation.

CAUTION: EQUIPMENT MISUSE

CAUTION: CHEMICAL COMPATIBILITIES

WARNING: PRESSURE LIMITS

•  Only use the unit for the purposes for which it is intended.
•  Do not tamper the unit.

•  Observe the manufacturer’s safety warnings for the 

fluids used.

•  Do not exceed the maximum unit working pressure. 

See technical specifications section.

Summary of Contents for 186 310

Page 1: ...34 985 381 488 www samoaindustrial com Part No C d R f Art Nr 186 310 MULTIFLUID SPRAY GUN 2 PISTOLA MULTIFLUIDO 8 PISTOLET MULTIFLUIDE 14 MEHRFL SSIGKEITSPISTOLE 20 EN FR ES DE Parts and technical se...

Page 2: ...cam The gun includes protection to prevent accidental opening Refer to the operation section for details of operation All guns include 1 2 BSP threaded swivel an extension outlet and a filter inside...

Page 3: ...each desired value DISPENSED Perform the following procedure after installing the control valve to verify proper operation To dispense fluid proceed as follows Fig 2 1 2 With the trigger at rest posit...

Page 4: ...in to its maximum opening and then return the cam to the rest position After that trigger can be released to rest position with the valve closed MAINTENANCE VALVE DISASSEMBLY To perform valve inspecti...

Page 5: ...1 Place the control gun body in a vise or similar and mount the valve Then fix the valve with the pins 2 2 Put the torsion spring 3 into the gun body Make sure the spring pin fits into the housing lo...

Page 6: ...rial com EN MAINTENANCE 4 3 5 6 FILTER DISASSEMBLY The gun can be provided with a filter optional To check its status or replace it follow the procedure below 1 Remove the U pin 1 2 Pull out the swive...

Page 7: ...eze Distilled water Brake fluid Weight 284 g 0 63 lb TROUBLE SHOOTING PROBLEM CAUSE SOLUTION Slow flow Filter clogged if it is installed optional Clean or replace the filter Pump pressure is low Incre...

Page 8: ...do en el gatillo es posible bloquear la v lvula en posici n de v lvula abierta y de anti apertura accidental Consulte el apartado de operaci n para detalles de funcionamiento El equipo se suministra c...

Page 9: ...ce el siguiente procedimiento una vez instalada la pistola para verificar su correcto funcionamiento Para dispensar el fluido proceda de la siguiente manera Fig 2 1 2 Con el gatillo en posici n de rep...

Page 10: ...para realizar el desbloqueo debe volver a accionar el gatillo hasta su m xima apertura y a continuaci n devolver el bot n a la posici n de reposo Tras esto puede soltar el gatillo hasta la posici n ne...

Page 11: ...un tornillo de banco coloque la v lvula 1 en su alojamiento y f jela con los pasadores 2 2 Coloque el resorte de torsi n 3 en el cuerpo de pistola Observe que la patilla del resorte encaje en el aloja...

Page 12: ...JE DEL FILTRO La pistola puede estar provista de un filtro opcional Para revisar su estado o realizar su sustituci n siga el siguiente procedimiento 1 Retire el pasador con forma de U 1 2 Extraiga la...

Page 13: ...SOLUCI N DE PROBLEMAS SINTOMA POSIBLE CAUSA SOLUCI N Disminuci n de caudal Obstrucci n del filtro si lo incorpora opcional Extraiga filtro para limpieza Presi n de la bomba baja Aumente presi n en la...

Page 14: ...e en position ouverte et d emp cher toute ouverture accidentelle Reportez vous la section sur le fonctionnement pour plus de d tails sur le fonctionnement L unit est fournie compl te avec un pivot de...

Page 15: ...la proc dure suivante apr s l installation du pistolet pour v rifier son bon fonctionnement Pour distribuer le fluide proc dez comme suit Fig 2 1 2 Avec la g chette en position de ralenti v rifiez qu...

Page 16: ...sition vanne ouverte pour le d verrouiller vous devez tirer la g chette jusqu son ouverture maximale puis remettre le bouton en position de repos Apr s cela vous pouvez rel cher la g chette en positio...

Page 17: ...un tau placer la vanne 1 dans son logement et la fixer avec les goupilles 2 2 les broches 2 3 Placer le ressort de torsion 3 dans le corps du pistolet Assurez vous que la goupille de ressort s ins re...

Page 18: ...NTENANCE 4 3 5 6 D MONTAGE DU FILTRE Le pistolet peut tre quip d un filtre en option Pour v rifier son tat ou le remplacer suivez la proc dure ci dessous 1 Retirez la goupille en U 1 2 Retirez la rotu...

Page 19: ...DE PROBL MES SYMPT ME CAUSE POSSIBLE SOLUTION Diminution du d bit Colmatage du filtre s il est install en option Retirer le filtre pour le nettoyer Faible pression de la pompe Augmenter la pression de...

Page 20: ...t ist Abbildung 2 Mittels des am Abzug befindlichen Knopfes ist es m glich das Ventil in der ge ffneten Ventilposition zu blockieren und ein unbeabsichtigtes ffnen zu verhindern Einzelheiten zum Betri...

Page 21: ...das folgende Verfahren durch sobald die Pistole installiert ist um den ordnungsgem en Betrieb zu berpr fen Um Fl ssigkeit abzugeben gehen Sie wie folgt vor Abb 2 1 2 Achten Sie bei Abzugshebel in Ruh...

Page 22: ...nen Ventilposition verriegelt ist m ssen Sie zum Entriegeln den Abzug erneut bis zur maximalen ffnung bet tigen und dann den Knopf in die Ruheposition zur ckbringen Danach k nnen Sie den Abzug bei ges...

Page 23: ...ock einspannen das Ventil 1 in seine Aufnahme einsetzen und mit den Stiften 2 fixieren 2 Legen Sie die Torsionsfeder 3 in den Pistolenk rper Darauf achten dass der Spannstift in das Geh use des Pistol...

Page 24: ...istole kann mit einem Filter optional ausgestattet werden Gehen Sie wie folgt vor um seinen Status zu pr fen oder auszutauschen 1 Entfernen Sie den U f rmigen Stift 1 2 Entfernen Sie die artikulierte...

Page 25: ...BLEM M GLICHE URSACHE L SUNG Abnahme der Durchflussmenge Filterverstopfung falls vorhanden optional Filter zum Reinigen herausnehmen niedriger Pumpendruck Druck in der Pumpe erh hen Unterbricht die Fl...

Page 26: ...12 718903 Kit N Kit N 718900 718902 Kit N Kit N 718901 Part N 369250 For para 186311 For para 186313 Part N 369228 000 1 23 21 2 3 4 20 19 15 16 17 14 13 12 11 10 12 11 9 8 8 9 7 14 18 5 Auxiliary pin...

Page 27: ...69250 23 Stainless Steel 60 Rigid Outlet Extensi n R gida 60 Acero Inoxidable For para 186311 369251 21 Flexible Straight Outlet 1 2 BSP Extensi n Flexible 1 2 BSP For para 186312 KITS DE REMPLACEMENT...

Page 28: ...m s with the EU Directive s 2004 108 EC SAMOA INDUSTRIAL S A Pol Ind Porceyo I 14 Camino del Font n 831 33392 Gij n Espagne d clare que le s produit s 186 310 est sont conforme s au x Directive s de l...

Reviews: