background image


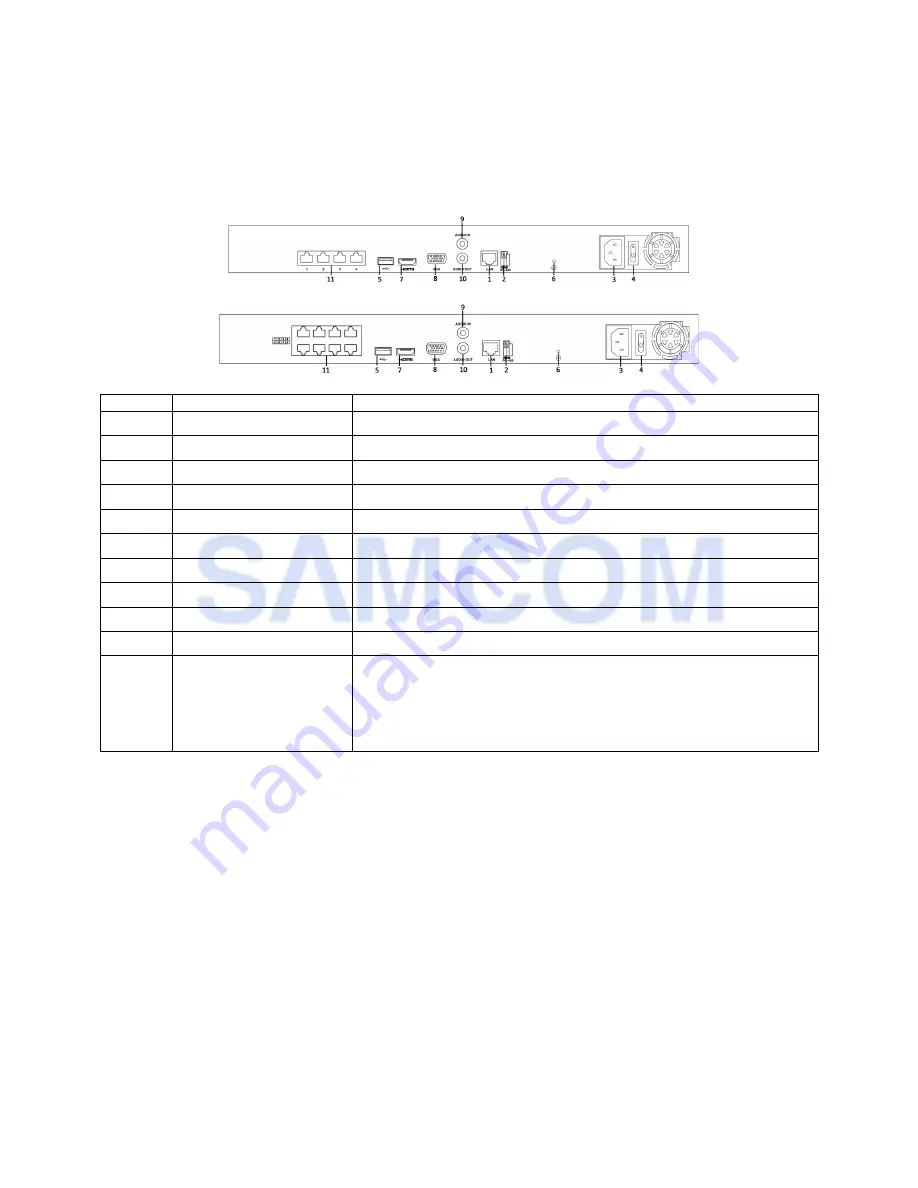
1.3หลังเครื่อง 


No. 

Item 

Description 

LAN Network Interface 

  ช่องต่อ LAN (Local Area Network).


RS-485 Interface 


ช่องต่อพอร์ท RS485


Power Supply 


ช่องต่อ Power Supply


Power Switch 


ปุ่มเปิด/ปิด


USB Interface 

พอร์ท USB


GND 


ช่องต่อ สายดินกันไฟรั่ว


HDMI Interface 

พอร์ทสาย HDMI


VGA Output 


พอร์ทต่อสาย VGA


Audio In 


ช่องเสียบสายAudio Input


10 

Audio Out 


ฃ่องเสียบสาย Audio Output


11 

Network interfaces with 
PoE function 
(for DS-7600NI-SE/P)


ช่องเครือข่ายส าหรับเชื่อมต่อ PPOE Switch 
Figure 1.8 DS-7600NI-V Figure 1.9 DS-7600NI-VP 


Chapter2 Quickstart 

2.1 วิธีเปิด/ปิดเครื่องบันทึก


Purpose:


เพื่อเปิด/ปิดการใช้งานเพื่อประหยัดพลังงานให้กับเครื่อง 

Before you start:


กรุณาตรวจสอบการเชื่อมต่อให้ดี ว่าก าลังไฟเลี้ยงพอดีไม่ขาดไม่เกินหรือเปล่า หากไฟเกินอาจจะท าให้เครื่องเกิดความเสียหายได้ 

เปิด NVR:


Steps:


Summary of Contents for SC-7416H

Page 1: ...SAMCOM H SC 7416H SC7432H NVR User s Quickstart Guide...

Page 2: ...NVR SAMCOM HikVision 7416 7432 02 9296862 66 080 053 8889 NVR SAMCOM Hikvision...

Page 3: ...Controls 15 4 1 Configuring PTZ Settings 15 4 2 Setting PTZ Presets Patrols Patterns 15 4 2 1 Customizing Presets 15 4 2 2 Calling Presets 16 4 3 PTZ Control Toolbar 17 Chapter 5 Record Settings 19 5...

Page 4: ...Settings 32 8 1 Setting Motion Detection Alarm 32 8 2 Setting Sensor Alarm 33 8 3 Detecting Video Loss Alarm 34 8 4 Detecting Video Tampering Alarm 35 Chapter 9 Network Settings 36 9 1 36 9 2 Survilla...

Page 5: ...1 2 3 4 5 6 7 8 NVR...

Page 6: ...o Name Description 1 Power Power Tx Rx TX RX 2 USB Interface Universal Serial Bus USB 1 2 Description of the buttons on the soft keyboard Description Icons Description English Capital English Numbers...

Page 7: ...er Supply 4 Power Switch 5 USB Interface USB 6 GND 7 HDMI Interface HDMI 8 VGA Output VGA 9 Audio In Audio Input 10 Audio Out Audio Output 11 Network interfaces with PoE function for DS 7600NI SE P PP...

Page 8: ...3 1 UPS 2 3 LED Slpash Screen NVR Steps 1 Shutdown Menu Menu Shutdown 2 Shutdown 3 Yes 4 pop up power Rebooting the NVR Reboot Steps 1 Menu Shutdown 2 logout Reboot NVR...

Page 9: ...4 2 2 wizard Wizard Operating the Setup Wizard 1 setup wizard Start wizard when the device starts 2 Next wizard...

Page 10: ...5 3 12345 4 New Admin Password 5 next 6 next...

Page 11: ...6 7 next 8 Init 9 Next Adding IP Camera 10 Search Add...

Page 12: ...7 11 next 12 Copy...

Page 13: ...8 13 ok 2 3 2 3 1 Purpose OPTION 1 Steps 1 live view 2 Add IP Camera Auto Manual Auto...

Page 14: ...9 Manual Steps 1 1 2 Explanation of the icons ICON ICON live view 2 1 Custom Add manual adding ipcamera...

Page 15: ...10 2 3 add OPTION 2 Steps 1 Menu Camera Camera 2 1 3 ok...

Page 16: ...ve view live view Live View Icons live view Alarm 3 2 Operations in Live View Mode In live view mode there are many functions provided The functions are listed below Single Screen Multi screen Multi S...

Page 17: ...id Playback Add IP Camera 3 2 1 Using the Mouse in Live View Name Description Menu Single Screen Multi screen Previous Screen Next Screen Start Stop Auto switch Start Recording Add IP Camera Playback...

Page 18: ...13 PTZ live view...

Page 19: ...14 Realtime Blanaced Fluency...

Page 20: ...s Purpose PTZ PTZ Steps 1 PTZ Menu Camera PTZ 2 Choose the camera for PTZ setting in the Camera dropdown list 3 PTZ 4 apply 4 2 Setting PTZ Presets Patrols Patterns Before you start PTZ 4 2 1 Customiz...

Page 21: ...16 2 3 Save Preset 4 ok 4 2 2 Calling Presets Call preset in the PTZ setting interface Steps 1 ptz Menu Camera PTZ More Settings 2 Call Preset...

Page 22: ...17 3 Call preset in live view mode Steps 1 PTZ 2 3 4 3 PTZ Control Toolbar ptz PTZ Toolbar...

Page 23: ...18 ptz Patrol PTZ Pattern Patrol Patrol...

Page 24: ...19 Chapter 5 Record Settings 5 1 Configuring Recording Parameters Before you start 1 Menu HDD General 2 1 advanced 2 Quota 3 Group Menu Record Parameters 2 1 Record Pre record 10...

Page 25: ...20 5 Post record 10 5 Expired Time Redundant Record Record Audio 2 Apply 3 1 2 3 apply 5 2 Steps 1 Menu Record Schedule 2 1 2 3 Enable Schedule 4 edit...

Page 26: ...21 I II all day III allday IV ok V apply...

Page 27: ...22 apply copy ok...

Page 28: ...23 Chapter 6 6 1 6 1 1 Purpose OPTION 1 quick setting toolbar Note OPTION 2 1 Under multi screen live view mode the recorded files of the top left channel will be played back...

Page 29: ...24 2 Note button operation button operation button operation button operation 30 30 playback...

Page 30: ...25 6 1 2 Purpose Steps 1 Menu Playback 2 6 1 3 Purpose Steps 1 Menu Playback 2 event 3 Alarm Input Motion...

Page 31: ...26 6 2 Auxiliary Functions of Playback 6 2 1 Purpose 6 2 2 Purpose process bar 6 2 3 Steps 1 Digital Zoom 2 16 6 2 4 Purpose 8 4CIF 4 720 2 1080p 1 5...

Page 32: ...27 Chapter 7 Backup 7 1 Backing up Record Files 7 1 1 Quick Export Purpose Steps 1 Video Export Menu Export Normal Quick Export 2 Export Flash Drive External Drive...

Page 33: ...28 3 7 1 2 Purpose USB Steps 1 Menu Export Event 1 Alarm Input 2 2 Search...

Page 34: ...29 3 1 Quick Export 2 Details 4 Export Note refresh USB Hard Disk...

Page 35: ...30 5...

Page 36: ...31 7 1 3 Backing up Video Clips Purpose USB Flash Drive USB Hard Disk Steps 1 Playback 2 Playback 3 playback Note 30 1...

Page 37: ...Alarm Settings 8 1 Setting Motion Detection Alarm Steps 1 Menu Camera Motion Menu Camera Motion 2 Enable Mouse Detection Click button and set alarm response actions 3 Trigger Channel Fullscreen Apply...

Page 38: ...33 5 Click Linkage Action 6 ok 8 2 Setting Sensor Alarms Steps 1 Alarm Config Menu Configuration Alarm Alarm Input Interface 2 Input Alarm Enable Alarm Input 3 1 2 3 Apply...

Page 39: ...34 8 3 Detecting Video Loss Alarm Purpose Steps 1 Menu Camera Video Loss 8 4 Detecting Video Tampering Alarm Purpose...

Page 40: ...35 Steps 1 Menu Camera Video Tampering...

Page 41: ...1 Menu Configuration Network 2 General 3 General Settings NIC Type IPv4 Address IPv4 Gateway MTU and DNS Server DHCP DHCP 4 Apply 9 2 Survillance Setup 9 2 1 DDNS Purpose DDNS Steps 1 Menu Configurati...

Page 42: ...er DynDNS PeanutHull NO IP HiDDNS IPServer Server Address IPServer DynDNS 1 Server Address DynDNS members dyndns org 2 Domain DYNDNS 3 DynDNS PeanutHull PeanutHull NO IP 1 Server Address NO IP 2 No IP...

Page 43: ...38 3 No IP HiDDNS HIDDnS 1 HiDDNS www hik online com 2 Device Domain Name HiDDNS NVR HiDDNS Device Domain Name...

Page 44: ...me Device Name HiDDNS server http www hik online com nvr Note HTTP 80 http www hik online com alias 9 4 Task 2 Access the devices via iVMS4200 iVMS4200 iVMS4200 Nickname Server Address www hik online...

Page 45: ...y 4 Email 5 Enable Server Authentication optional SMTP User Name Password SMTP Server SMTP Server smtp 263xmail com SMTP Port No SMTP Port SMTP Port IP Address 25 Enable SSL optional SSL SMTP server S...

Page 46: ...UPnP Purpose Universal Plug and Play UPnP UPnP WAN Port Mapping Before you start UPnP UPnP Multi Address Ffp Steps 1 Menu Configuration Network 2 UPnP UPnP 3 UPnP 4 Mapping Auto Manual Task1 Auto Auto...

Page 47: ...42 Task2 Manual Steps 1 server port http port RTSP port and https port 2 Apply 3 Refresh...

Reviews: