background image

3-8

Module 4 – 

Wireless HVAC Thermostats

ST898ZB Optima S Thermostat

Section 3

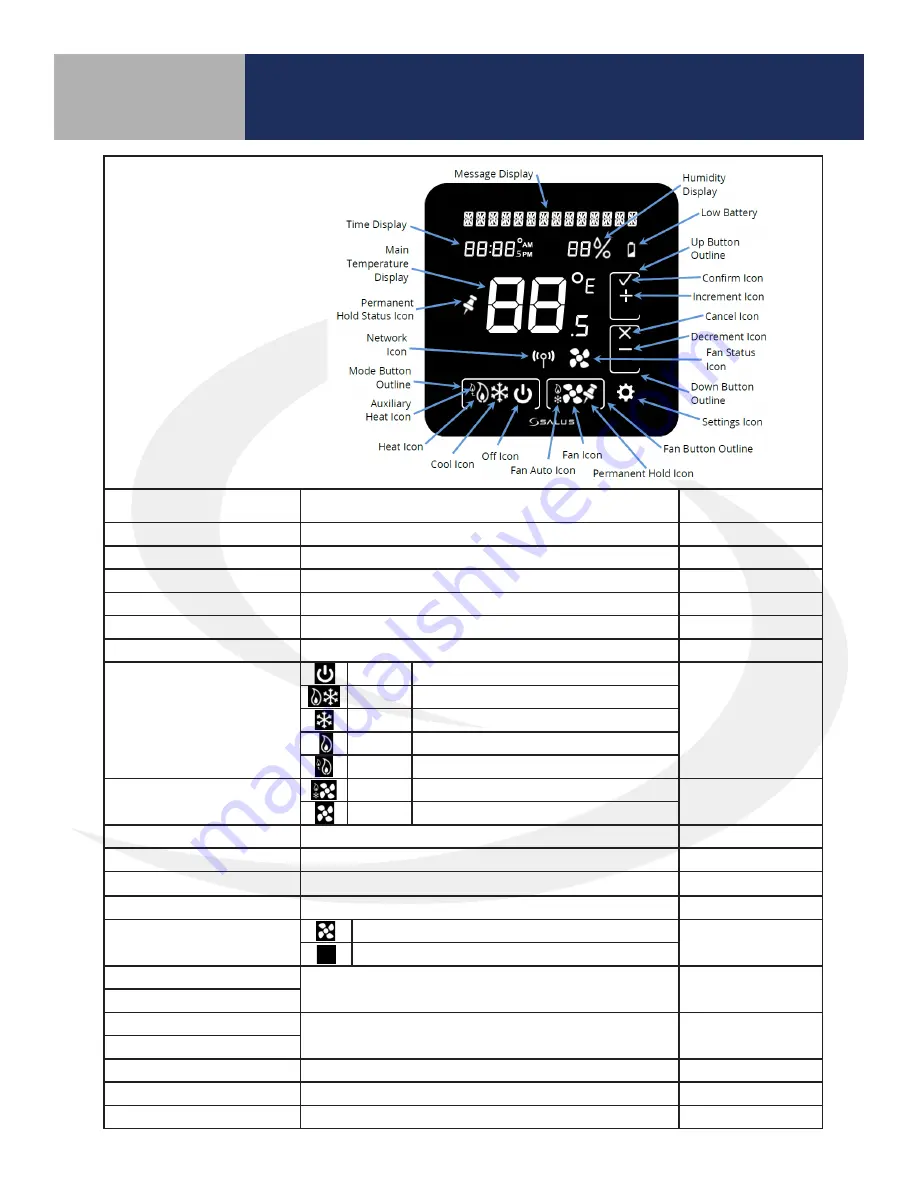
Indicator

Description

Mode

Message Display

Alphanumeric status display

Simple/Full

Time Display

Time in 12- or 24-hour format if provided by the network

Full

Main Temperature Display

Room temperature or setpoint as require

Simple/Full

Permanent Hold Status Icon Visible if Permanent Hold is active

Simple/Full

Network Icon

Visible if Optima S is connected to a Smart Home system

Full

Mode Button Outline

Identifies the boundaries of the Mode button

Full

Mode Icons

Off

System is OFF

Simple/Full

Auto

Heat or Cool as required 

Cool

AC or Cooling Mode

Heat

Furnace or Heating Mode

EmHeat Emergency Heat Mode (Heat Pump Only)

Fan Icons

Auto

Fan is ON while heating or cooling

Simple/Full

On

Fan is always ON

Permanent Hold Icon

Indicates when Permanent Hold is active

Simple/Full

Fan Button Outline

Identifies the boundaries of the Fan button

Full

Settings Icon

Display initial screen for device settings

Simple/Full

Down Button Outline

Identifies the boundaries of the Down button

Full

              Fan Status Icon 

Fan ON

Simple/Full

Fan OFF

Decrement Icon

Select to decrement changes or reject changes

Simple/Full

Cancel Icon

Increment Icon

Select to increment changes or confirm changes

Simple/Full

Confirm Icon

Up Button Icon

Identifies the boundaries of the UP button

Full

Low Battery

Indicates when batteries require replacement

Simple/Full

Humidity

Indicates the room humidity level

Full

Home Screen 

& Controls

Summary of Contents for ST880ZB

Page 1: ...SMC GM WCSG M4 2019 10v1_2019 11 10 Connected Wireless System Guide Module 4 Wireless HVAC Thermostats ...

Page 2: ...Thermostat Included Parts Installation Tools 3 1 Installation Mounting Wiring 3 2 Display Boot Sequence 3 4 Pairing Instructions 3 4 Initial Configuration 3 6 Home Screen Controls 3 8 Operation 3 9 Configuration 3 10 4 Remote Thermostat Operation Parameters Optima Optima S Parameters 4 1 Schedules Status Options 4 2 Setting Up Thermostat Schedules 4 3 Using Status to Control Thermostats 4 5 5 Trou...

Page 3: ...rols Below is a description of several icons used to direct the reader s attention Special Attention Boxes This manual uses special attention icons to alert the reader of important safety concerns information important to reliable operation of the controls or helpful installation setup information Safety Indicates a condition which may cause severe personal injury death or major property damage Im...

Page 4: ...nnection is interrupted or dis connected the HVAC component will continue to operate together Module 4 Wireless HVAC Thermostats Introduction Section 1 By connecting the SG888ZB Gateway to your home network the system is connected to the worldwide web Monitor or adjust your HVAC system from anywhere via the SALUS Smart Home application If the connection to the internet is lost the system continues...

Page 5: ...ower Drill Optional Module 4 Wireless HVAC Thermostats ST880ZB Optima Zigbee Thermostat Section 2 Thermostat with Mounting Plate Trim Plate Screws Anchors Wire Labels AA Alkaline Batteries Optima Thermostat User Manual Optima Thermostat Quick Start Guide Tools Required ...

Page 6: ...Common Return Reserved L System Monitor Y1 Single 1st Stage Cooling Y1 Single 1st Stage Compressor Y2 2nd Stage Cooling Y2 2nd Stage Compressor W1 Single 1st Stage Heating W1 Emergency Heat W2 2nd Stage Heating O B Changeover Valve G Fan Signal G Fan Signal Reserved Reserved Step 2 If replacing an existing thermostat review and record the existing wiring configuration Remove thermostat from the wa...

Page 7: ...e tags wiring schematic and or photograph taken earlier if necessary If the batteries are not installed install them in the Thermostat observing the CORRECT POLARITY Use alkaline batteries low battery sensor is tuned to alkaline batteries DO NOT Mix old and new batteries DO NOT Mix Alkaline Ni Cad Lithium batteries To cover screw holes or paint disturbance from the old thermostat install the Trim ...

Page 8: ...o the desired country Then press MODE to move to HVAC Type When prompted use to toggle the blinking characters to the desired HVAC Type Then press MODE to move on If is selected options will be displayed Use to toggle the reverse valve terminal Press MODE to complete setup If is selected options are displayed Press MODE to complete setup After the initial configuration is complete the Thermostat w...

Page 9: ...on the power to the HVAC System Control Regular Mode Installation Mode Slider Ring Clockwise Increment Value Counter clockwise Decrement Value Clockwise Next Option Counter clockwise Previous Option Previous Decrement Value Previous Option Next Increment Value Next Option Fan Hold Back Select Fan Mode Hold when adjusting temperature Back to Previous Menu Mode Enter Select Operating Mode Select Dis...

Page 10: ...ode Manual Fan Override Auto Fan based on Heat Cool activity On Fan is always On Day of the Week Displays the day of the week M Tu W Th F Sa Su Time Displays the current time in 12 or 24 hour format Fan Indicator Indicates Fan State Fan On No fan indicator is shown when the fan is off Temperature Set Point Displays the target temperature Message Display Displays the thermostat state menu or option...

Page 11: ...or input Step 2 Press and hold the MODE button on the ST880ZB Thermostat for 3 seconds to enter the configuration menu will appear on the screen Step 3 Press the button twice until is displayed Pairing Instructions Module 4 Wireless HVAC Thermostats ST880ZB Optima Zigbee Thermostat Section 2 While the Optima Zigbee Thermostat doesn t need to be installed to be paired with a SG888ZB Universal Gatew...

Page 12: ...e SALUS Smart Home application select the drop down menu from the upper right of the screen and select AllDevices AddNewDevice Step 6 Press Scan Devices After pressing Scan Devices the SALUS Smart Home application scans for devices Step 7 Choose the check box that corresponds to the device to pair ...

Page 13: ...ch device Press Next Step 9 Press Please click here to setup Step 10 Choose from setup options specific to the device Press Complete set up Step 11 Press Finish to complete pairing Module 4 Wireless HVAC Thermostats ST880ZB Optima Zigbee Thermostat Section 2 ...

Page 14: ...ut Press and hold the MODE button for 3 seconds to enter the configuration menu will appear on the screen Step 2 Release and press the MODE button again to adjust the time zone The default is can be changed by pressing or See the time zone chart above for the time zone settings available Press Mode to accept the value and the screen will advance to 12 or 24 hour display format selection Time Date ...

Page 15: ...ter Day andYear are set the DST Daylight Savings Time option is displayed Step 8 Use the buttons to toggle between DST ON and DST OFF Press MODE to confirm Step 1 Press and hold the MODE button on the ST880ZB Thermostat for 3 seconds to enter the configuration menu will appear on the screen Press once to advance to Step 2 Press MODE to enter the SETTINGS Menu using to cycle through COUNTRY HVAC TY...

Page 16: ...to 4 C Calibration offset Value is added to the sensed temperature SPAN 0 5 F to 2 0 F 0 25 C to1 00 C Thermostat dead band ex Setpoint of 70 F with Span of 1 F Temperature will fall to 69 F without activating heat Tempera ture will rise to 71 F without activating cooling Firmware Update After pressing the MODE button to illuminate the screen preparing the ST880ZB for input press hold MODE for 3 s...

Page 17: ...cation Step 4 Press the MODE button to illuminate the screen preparing the ST880ZB for input Then press and hold MODE for 3 seconds When appears on the screen press the button 1 times or the button 4 times to advance to Press MODE is displayed Step 5 Press and the Thermostat will be reset to factory defaults After reset the Optima Thermostat will begin the startup procedure as if it were first pow...

Page 18: ...Section 3 Included Parts 1 Phillips Screwdriver 1 16 Drill Bit Optional Power Drill Optional Thermostat with Mounting Plate Trim Plate Screws Anchors Wire Labels AA Alkaline Batteries Optima S Thermostat User Manual Optima S Thermostat Quick Start Guide Tools Required ...

Page 19: ... Return Y1 Single 1st Stage Cooling Single 1st Stage Compressor Y2 2nd Stage Cooling 2nd Stage Compressor W1AX Single 1st Stage Heating Auxiliary or Emergency Heat W2OB 2nd Stage Heating Changeover Valve G Fan Signal L Reserved System Monitor Step 2 If replacing an existing thermostat review and record the existing wiring configuration Remove thermostat from the wall to expose the wiring terminals...

Page 20: ...rlier if necessary The Optima S Thermostat will prioritize power from the AC connection RC to C If AC power is not available the device will switch to the internal batteries If the batteries are not installed install them in the Thermostat observing the CORRECT POLARITY Use alkaline batteries low battery sensor is tuned to alkaline batteries DO NOT Mix old and new batteries DO NOT Mix Alkaline Ni ...

Page 21: ... firmware and Zigbee code Step 1 Open the SALUS Smart Home application select the drop down menu from the upper right of the screen and select AllDevices AddNewDevice Pairing Instructions After the boot sequence is completed the Optima S will enter pairing mode A 10 minute countdown timer will begin waiting to connect to the network When theThermostat finds a network times out after 10 minutes or ...

Page 22: ...can Devices the SALUS Smart Home application scans for devices Step 3 Choose the check box that corresponds to the device to pair Step 4 Enter a unique descriptive name to identify each device Press Next Step 5 Press Please click here to setup Step 6 Choose from setup options specific to the device Press Complete set up ...

Page 23: ...hermostat is installed USA Canada Then press to advance to EQPT TYP When prompted the following options are available by pressing or Then press to advance to the next option The next option is dependent on the selection chosen If is selected the following options are available by pressing Press to complete setup Heat Pump Heat Pump with Electrical Heat Electric Gas or Oil Heat Fan is controlled by...

Page 24: ... Home Screen The Thermostat is now ready to be attached to the Mounting Plate Align connector pins and retention posts Push the Thermostat onto the Mounting Plate BE SURE that the connector pins are not bent BE SURE that the Thermostat is FULLY SEATED on the Mounting Plate Turn on the power to the HVAC System O B reversing valve terminal energized for cooling O B reversing valve terminal energized...

Page 25: ...ce or Heating Mode EmHeat Emergency Heat Mode Heat Pump Only Fan Icons Auto Fan is ON while heating or cooling Simple Full On Fan is always ON Permanent Hold Icon Indicates when Permanent Hold is active Simple Full Fan Button Outline Identifies the boundaries of the Fan button Full Settings Icon Display initial screen for device settings Simple Full Down Button Outline Identifies the boundaries of...

Page 26: ...t and returns to the Home screen Permanent Hold To hold the temperature at a specifictarget ignoringautomatedchangesfromthe SALUS Smart Home application discussed in Section 4 change the setpoint as shown above and press the Permanent Hold Icon on the Fan Button while the setpoint temperature is displayed on the Main Temperature Display The Permanent Hold Status Icon appears next to the Main Tempe...

Page 27: ...h understanding of the HVAC system 1 Temperature Units US Customary or SI Metric Range F Fahrenheit US Default C Celsius CA Default 2 Display Screen Brightness Level Range 1 to 10 3 Display Mode Full Display Default Shows the network icon humidity button outlines and time display if available 4 Display On Time Duration of screen display with no activity 15 Seconds 10 Seconds Default 5 Seconds Rang...

Page 28: ... controls the circulation fan 11 Reversing Valve Term Function Range O B rev valve terminal energized for cooling O B rev valve terminal energized for heating 12 Clock Format Range 12 Hour Format Note Only available when 24 Hour Format paired to a network Settings Functions Continued Range Heat Pump Furnace AC Gas Oil Electric Default Heat Pump Emergency Heat Functions 13 Identify Mode Press to be...

Page 29: ...me application from your computer or smart device Step 1 Press On the SALUS Smart Home dashboard click the tile that represents the desired thermostat Step 2 When the tile flips choose the device description in the upper left corner Step 3 Choose the setup icon to access parameters Step 4 Scroll down to the parameter list boxes Step 5 Choose a parameter to change and select the desired value Step ...

Page 30: ...S Thermostat The following shows how to change between Schedule the default value and Status Step 1 On the SALUS Smart Home dashboard click the tile that represents the desired thermostat Step 2 When the tile flips choose the device description in the upper left corner Step 3 Scroll down to the Preferences section of the screen Step 4 Select Change to Status and select Yes to change all thermostat...

Page 31: ...at represents the desired thermostat Step 2 When the tile flips choose the device description in the upper left corner Step 3 Scroll down to the Preferences section of the screen Use a similar process to change back to Linked to Schedule Individual thermostats can be set differently if accessed from the menu under Status Schedule Setup Smart Home ...

Page 32: ...e Start Time along with the target set point for both Heating and Cooling Step 7 Choose Add Interval to enter then next temperture change time and set point temperatures Up to 6 intervals can be added for a daily cycle To duplicate a schedule of another thermostat on the network press Duplicate schedule A list of thermostats available to duplicate similar to the above will appear Simply choose the...

Page 33: ...ule is complete Then choose another tab depending on the type of schedule Step 9 Repeat adding intervals for each available tab Step 10 When all desired schedules have been entered press Save Step 1 On the SALUS Smart Home dashboard click menu Step 2 Scroll down to the Status group of menu items Step 3 Choose a status for which to change the temperature values ...

Page 34: ...arameters Section 4 Step 4 Choose Thermostats from the House Check tab Step 5 Choose the desired Thermostat Step 6 Change the Heating and Cooling setpoints to the desired value Step 7 Select Back to return to the menu Step 8 Repeat these steps for each remaining Status ...

Page 35: ...mostat Operation Parameters Section 4 To change current status simply click status on the SALUS Smart Home dashboard Choose your new status from the choices shown The corresponding temperature values and any other automations that are linked to the new status will take affect ...

Page 36: ...at pump check that the O B Configuration under SETTINGS is correct Check that the wiring is correct especially the Y and W wires If used with a Heat Pump check that the O B wire is correct 3 The fan does not turn on Check that the wiring is correct especially the G wire If heating with oil or gas make sure the furnace is working In gas heat mode HG the fan is controlled by the furnace to avoid sup...

Reviews: