


14
USER MAINTENANCE
INSTRUCTIONS
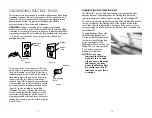
ADJUSTING THE WALKING BELT
The Walkmill's™ Walking Belt has been pre-adjusted at the factory;
however if the Belt begins to slip during use, please follow the following
instructions for adjustment:
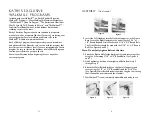
1. Locate Rear Adjusting Bolts.
2. Using the Allen Wrench provided, turn each Bolt equally 1/4 turn
clockwise.
3. Be sure to adjust both sides equally to avoid the Belt from shifting
to one side or the other.
IF THE BELT HAS SHIFTED TOO FAR TO THE RIGHT
1. Turn on the Walkmill™ and set the speed to 2 miles per hour.
2. Turn the Right Adjusting Bolt 1/4 turn clockwise.
3. Wait 20 seconds and if no change, turn Left Adjusting Bolt
1/4 turn counterclockwise.
IF THE BELT HAS SHIFTED TOO FAR TO THE LEFT
1. Turn on the Walkmill™ and set the speed to 2 miles per hour.
2. Turn the Left Adjusting Bolt 1/4 turn clockwise.
3. Wait 20 seconds and if no change, turn Right Adjusting Bolt
1/4 turn counter clockwise.
NOTE: Do not overtighten Walking Belt.
NOTE: Do not make any adjustments to the Walking Belt
with anyone walking on the unit.
ONLY 1/4
TURN AT A
TIME
Clockwise
Counter Clockwise
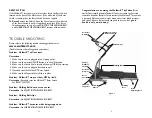
PARTS
1. Safety Clip (P/N 50549)
2. Two 5/16” x 1-1/2" Round Bolts (P/N 50550)
3. Four 5/16” x 3/4" Round Bolts (P/N 50551)
4. Four Circle Washers (P/N 50552)
5. 1/4" x 1-3/4" Round Bolt (P/N 50553)
6. MS Allen Wrench (P/N 50554)
7. 5/16” Nut (P/N 50555)
8. Lubricant (P/N 50556)
9. Water Bottle Bracket (not shown) (P/N 50557)
10. Water Bottle (not shown) (P/N 50558)
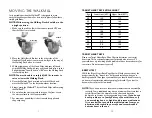
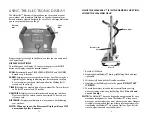
ASSEMBLY
1. Carefully remove Walkmill™ and all parts from carton.
2. Insert Right Handrail into the Handrail Supporter in the Frame
Base. Using the Allen Wrench, secure the Right Handrail to the
unit using the 5/16" x 1-1/2" Round Bolt and Circle Washer, and
5/16” x 3/4" Round Bolt.The Circle Washer should be used with
the 5/16" x 1-1/2” Round Bolt. (See Figures 2 and 3.)
NOTE: Do not fully tighten Bolts at this time.
NOTE: Be sure not to pinch the wire connecting the
Handrail to the Unit.
1.
2.
3.
4.
7.
8.
5.
6.
Figure 2
Figure 3
5


