background image

CARE AND CLEANING

How to Disassemble the Juicer 

8

IMPORTANT

: Before disassembling the Juicer make

sure that the Electronic Control is in the Off position,
the plug has been removed from the wall outlet
and the motor has stopped completely.

1. Remove the Food Pusher from the Feed Tube.

2. Remove the Pulp Container by holding onto 

the Feed Tube and tilting the juicer slightly to
disengage the Safety Foot on the Pulp Container.

3. Remove the Juice Jug.

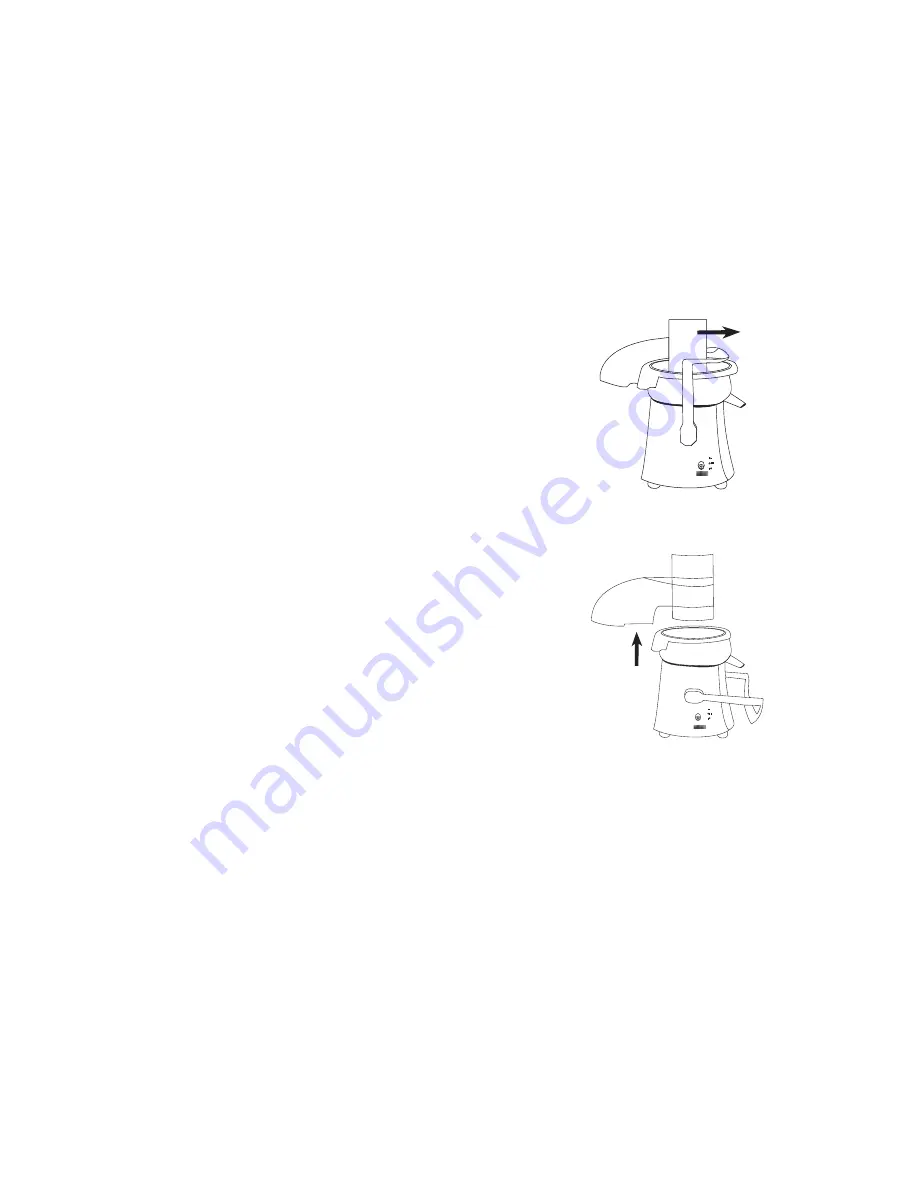
4. Hold the Pulp Chute/Juicer Cover and disengage

the Locking Bar from the grooves on the side
of the Pulp Chute/Juicer Cover. (See Ill. 1)

5. Lift and remove the Pulp Chute/Juicer Cover.

(See Ill. 2)

6. Remove the Stainless Steel Juice Collector

and Strainer Basket by placing one hand under 
the spout and the other under the black plastic
edge opposite the spout and lifting upwards.
The Stainless Steel Strainer Basket can be removed
from the Juice Collector by pushing it up through
the hole in the bottom of the Juice Collector.

NOTE: Be careful when handling the Strainer
Basket as the cutting blades are very sharp.

Ill.1

Ill. 2
Summary of Contents for JE-1013

Page 1: ... Professional juice extractor Instruction Booklet Model JE 1013 ...

Page 2: ...alfunctions or is dropped or damaged in any manner Return appliance to Salton for examination repair or electrical or mechanical adjustment See Warranty 8 The use of accessories or attachments not recommended or sold by Salton may cause fire electric shock or injury 9 Do not use outdoors 10 Do not let cord hang over edge of table or counter or touch hot surfaces 11 Extreme caution must be used whe...

Page 3: ... the wall outlet and disassemble the unit to remove the stuck food 22 Do not place on or near a hot gas or electric burner or in a heated oven 23 Always attach plug to appliance first then plug cord into the wall outlet To disconnect turn any control to OFF then remove plug from wall outlet GROUNDED PLUG To reduce the risk of electric shock this appliance has a grounded plug 2 blades and 1 pin If ...

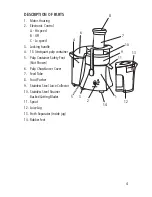
Page 4: ...1 5 litre quart pulp container 5 Pulp Container Safety Foot Not Shown 6 Pulp Chute Juicer Cover 7 Feed Tube 8 Food Pusher 9 Stainless Steel Juice Collector 10 Stainless Steel Strainer Basket Cutting Blades 11 Spout 12 Juice Jug 13 Froth Separator inside jug 14 Rubber feet 4 14 1 2 4 5 6 7 8 9 11 10 12 13 3 ...

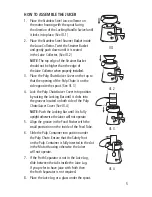
Page 5: ...e Ill 3 4 Lock the Pulp Chute Juicer Cover into position by raising the Locking Bar until it clicks into the grooves located on both side of the Pulp Chute Juicer Cover See Ill 4 NOTE Push the Locking Bar until it is fully upright otherwise the Juicer will not operate 5 Align the groove in the Food Pusher with the small protrusion on the inside of the Feed Tube 6 Slide the Pulp Container into posi...

Page 6: ...tables in the juicer until power is turned on Soft fruit or vegetables such as berries melons cucumber tomatoes etc should be juiced on Lo speed Harder fruit and vegetables such as apples celery carrots etc should be juiced at Hi speed 4 With the motor running place food into the Feed Tube Using the Food Pusher gently guide food down the Feed Tube To Extract the maximum amount of juice always push...

Page 7: ...vocados as they do not contain juice and will clog the juicer Allow the juicer to run for one minute before turning Off to allow any excess juice to be extracted from the pulp A plastic bag can be put in the pulp container for easy clean up Disassemble the Juicer and rinse off the pulp immediately after juicing The Strainer Basket Cutting Blades can be soaked in water to loosen the pulp Then wash ...

Page 8: ...the Juice Jug 4 Hold the Pulp Chute Juicer Cover and disengage the Locking Bar from the grooves on the side of the Pulp Chute Juicer Cover See Ill 1 5 Lift and remove the Pulp Chute Juicer Cover See Ill 2 6 Remove the Stainless Steel Juice Collector and Strainer Basket by placing one hand under the spout and the other under the black plastic edge opposite the spout and lifting upwards The Stainles...

Page 9: ...ainless Steel Strainer Basket Cutting Blades under clean running water Use the cleaning brush included with the Juicer to gently clean away pulp from the filter and cutting blades Rinse under running water Hold the Strainer Basket Cutting Blades up to the light to ensure that the fine mesh holes are not blocked If the holes are blocked soak the Strainer Basket Cutting Blades in hot water to loosen...

Page 10: ... down slowly so that wet pulp does not build up under the Pulp Chute Juicer Cover Choose Hi speed instead of Lo speed Excess pulp building up in filter Alternate soft and hard fruit and vegetables Pulp too wet Use Lo speed Check to be sure that the holes in the mesh filter are not blocked If they are blocked follow 5 in the How to Clean section Juice leaks between the rim of the Juicer and Pulp Ch...

Page 11: ...ce 2 apples 3 carrots 1 stalk celery Alternate juicing apples carrots and celery Serve immediately Vegetable Juice 4 carrots 2 ozs 100 g spinach 1 Small handful of flat leaf parsley 2 stalks celery Alternate juicing above ingredients Serve immediately Fruit Vegetable Cocktail 1 2 pineapple peeled 1 carrot 1 apple 1 stalk celery Process through juicer and serve immediately Peach Pear and Apple Juic...

Page 12: ...ve product should be returned to the original place of purchase within the retailer s stipulated return exchange period If you are unable to have a defective product replaced under warranty by the retailer Toastess International will repair or replace the defective product without charge You may contact us for assistance by mail e mail fax or telephone as listed below This warranty covers normal d...

Reviews: