Salente G4 Manual Download Page 4


Welcome to use 

 
Thanks for choosing Smart Robot Vacuum Cleaner Salente G4! 

It  is  a programming robot vacuum working base on gyroscope sensor. 
Working together through navigation algorithms, it is able to program the 
cleaning path, clean and recharge automatically without manual intervention. 

It has: 


UVC sterilization mode 


Adjustment to the floor surface 


Electronically controlled water tank 2-in-1 


Vacuuming and wet wiping simultaneously 


Central Turbo brush and pair of side brushes 

You can download the mobile APP by smart phone to check the cleaning map 
and running status of the robot in APP in real time, define the cleaning area 
and schedule. You can control the robot remotely. Science and technology 
make life better. 

May you have a nice usage experience! 

Product Introduction 
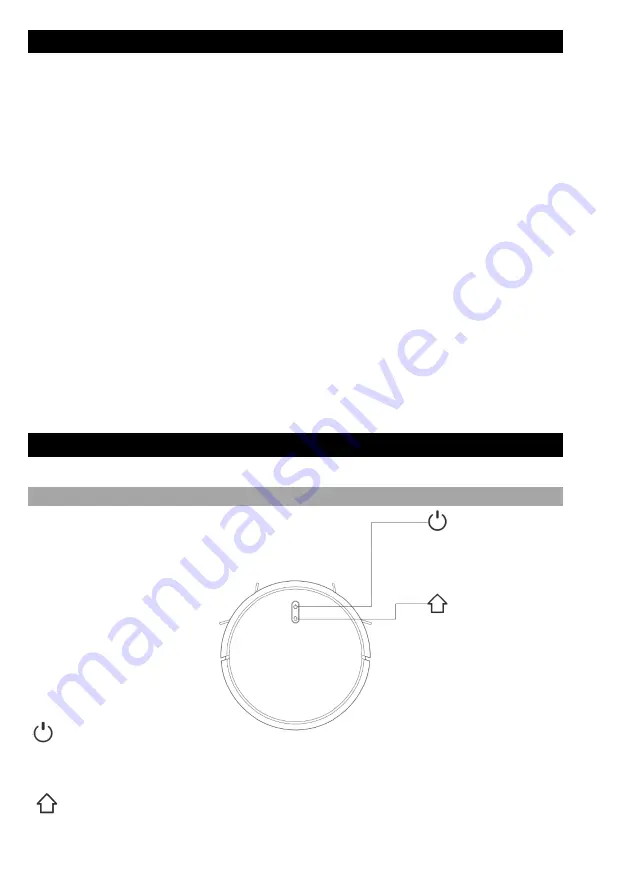


Key Function 


Sweep/ON &OFF 


Short press to start Sweep/Pause 


Long press for 3s for ON/OFF 


Sweep/ON &OFF 


Short press Recharge/Pause 


Long press to start local cleaning 

Summary of Contents for G4

Page 1: ...MANUAL MODEL VERSION DATE G4 l 16 04 2021 EN...

Page 2: ...2...

Page 3: ...mode 14 Remote control instruction 15 Daily Maintenance 16 Rolling brush clean it regularly 16 Side brush clean it regularly 17 Dust box and filter screen clean it regularly 18 Filter screen cleaning...

Page 4: ...trolled water tank 2 in 1 Vacuuming and wet wiping simultaneously Central Turbo brush and pair of side brushes You can download the mobile APP by smart phone to check the cleaning map and running stat...

Page 5: ...r low battery Purple Equipment is not connected to the network Reset WiFi Press two buttons simultaneously for 3s Parts List Charging base HEPA filter sponge filter Adapter Duster cloth 2x 2x Lift sid...

Page 6: ...sion sensor b Infrared recharging sensor c Anti drop sensor d Charging contact e Universal wheel f Side brush g UVC lamp h Driving wheel i Rolling brush j Rolling brush cover buckle Charging Base a Po...

Page 7: ...7 a Catching groove b Cover plate a Wire slot b Power adapter port c Wrapping post Installation 1 Connect power line and feed the excess wire into the slot a b a b c...

Page 8: ...tical to the ground it may be dragged by the host and consequently the charging base may be powered off The charging indicator is normally on when powered on and off when charged 3 Please do not move...

Page 9: ...Long press to switch on the robot Charge the robot on charging base when the power indictor light is normally on Note If the machine cannot be started due to low battery please charge the host on the...

Page 10: ...the mopping cloth flatly to the bottom of water tank 2 in 1 Electric controlled water tank Note please clean the mopping cloth after using to keep it in good cleaning condition Fill the water tank un...

Page 11: ...r sake of safety please be sure to remove the mopping module when it is being charged or left unused Please do not mop the carpet To add water or clean the dust cloth when the machine works please pau...

Page 12: ...t The machine will return to the charging base automatically if the battery level is less than 20 Please clear various wires including power line of charging base on the ground before use so as to avo...

Page 13: ...lly covered manner The machine will return back to the recharging base and charge automatically after cleaning finished a Completed area b Area to be cleaned Fixed point cleaning Long press for 3 seco...

Page 14: ...just the suction power to silent level standard level and high level by mobile APP Adjustment of water flow You can adjust the water flow to low level standard level and high level by mobile level UVC...

Page 15: ...a Auto cleaning start pause b Go forward c Turn left d Adjustment of suction power e Silent mode on off f Edge cleaning g Recharging start pause h Turn right i Find robot j UVC k Spiral cleaning star...

Page 16: ...ss the buckle on the Rolling brush cover to take out the Rolling brush 2 Remove dust outside and inside the Rolling brush using a tiny brush and clean the Rolling brush 3 Reassemble the Rolling brush...

Page 17: ...hair and dirt and reassemble the side brush 3 Make the left side brush L and the right side brush R correspond to L and R on the bottom casing press L and R to reinstall them Note Replace the side br...

Page 18: ...18 Dust box and filter screen clean it regularly 1 Press the button and pull out the dustbin backward 2 Open and clean dustbin...

Page 19: ...naturally then use it after completely dried 4 After dry install it well in sequence filter gauze sponge HEPA a Filter gauze b Button c Filter cover d Sponge e HEPA Note Please wash the filter screen...

Page 20: ...lectric control water tank clean it regularly 1 Remove the mop pour out the water from water tank Electric controlled water tank 2 Clean the mop dry the water tank and mop 2 in 1 Electric controlled w...

Page 21: ...opping sensors at the bottom of the host 3 Infrared avoidance sensor in the front of the host 4 Electric shock protector and charging base shrapnel at the bottom of the host please cut of the power du...

Page 22: ...keep the host charged in daily use If the machine is left unused long please shut down and keep it properly Charge it at least every 3 months to avoid damaging batteries due to excessive discharge Fir...

Page 23: ...ownload the app form Google Play or Apple App store You can access the App by scanning the QR codes above Or search Smart life from app store 2 For new users register a new account For existing users...

Page 24: ...24 3 Open app and press to add device or use the add device button 4 Choose Small Home Appliances Robot vacuum WiFi...

Page 25: ...d On buttons at the same time for at least 3 seconds until the vacuum cleaner starts flashing and emits a voice message WiFi lost please follow the App instruction for reconnection Check that your pho...

Page 26: ...26 7 The application connects to the device automatically When you hear the voice prompt the device will be connected...

Page 27: ...e robot Abnormal noise in use Main brush side brush or wheel may be twined by foreign matters please shut down the robot and remove foreign matters Cleaning ability declines or dust falls out The dust...

Page 28: ...scrub the radar housing on top and restart me from a new location The radar avoidance sensor is dirty or covered Error 8 Please check if the bumper has been blocked in some way The edge or collision...

Page 29: ...ace and furniture top without protective fence Please do not use the product at a temperature of above 40 C or below 0 C or when there are liquids and sticky substances on the ground Please hang cable...

Page 30: ...ages and injuries caused by improper use Battery and Charging Please do not use battery charging base or charger provided by any third parties Please do not dismantle report or refit battery or chargi...

Page 31: ...mited No 5 17 F Strand 50 50 Bonham Strand Sheung Wan Hong Kong 1891486 Model identifier RTX G4 Manufacturer s name commercial registration number and address for AC adapter Shenzhen Nalin Elec Tech C...

Page 32: ...NFORMITY Hereby the company Abacus Electric s r o declares that the SALENTE G4 is in compliance with the requirements of the standards and regulations relevant for the given type of device Find the co...

Reviews: