background image

35

Hi

n

ts

 a

n

d

 T

ip

s

4

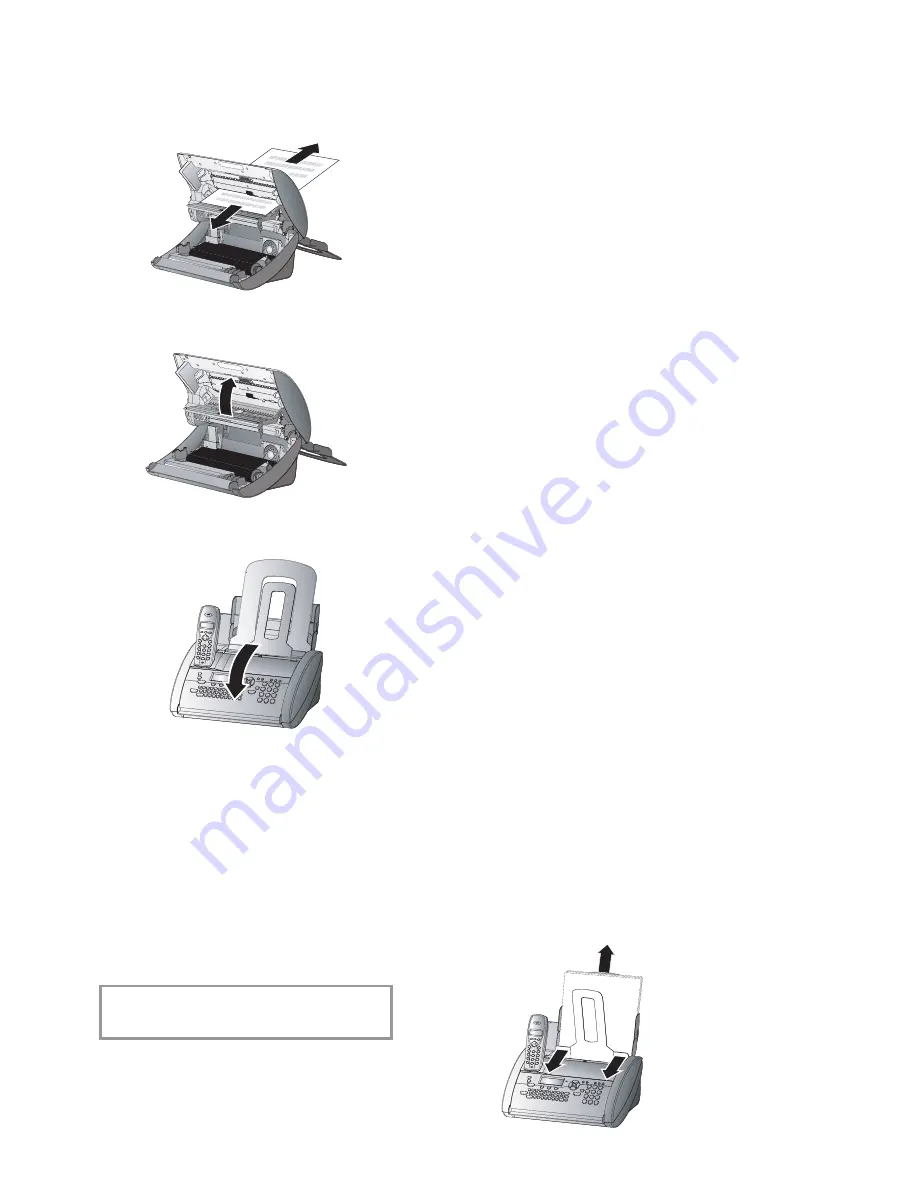
  Carefully remove the document either from 

the front or the back.

5

  Close the scanner cover on the left and right, 

making sure it clicks into place.

6

  Close the panel so that it also clicks into 

place.

7

 Insert 

paper 

(see 

Installation

 / Loading pa-

per).

    Service code

Function 45 Service code is used to delete some 

or all of  the settings you have changed on the fax 
machine since it was supplied from the factory. 

This function enables you to partially or fully 

reconfi gure your device. It is especially helpful if  

you have modifi ed settings but fi nd that your fax 

machine does not respond as expected.

v

 Only use this function when absolutely 

necessary!

If  you are satisfi ed with your changes to the fac-

tory settings you should not use this function.

After deleting some or all of  your custom settings 

please rerun Easy Install.

The following codes are at your disposal:

Code No. 7117

This code erases all your modifi cations to the fac-

tory settings. The fax machine will therefore react 
in exactly the same way as on fi rst installation.

Code No. 7140

This code deletes all the settings and data you 

have entered on your fax machine with the ex-
ception of  the following:

•  received fax messages

•  stored SMS messages

•  stored telephone book numbers

• your name

•  your telephone number

Example for using a service code:

1

  Select function 45 by pressing 

M

45

 and 

OK

 on the fax machine. Enter the service 

code (7117 or 7140). Press 

OK

.

2

 With 

u

 you can select whether you really 

want to delete your settings. Confi rm  with 

OK

. Your fax machine will be reset to its 

original confi guration.

     Care

Before opening the fax machine, make sure that 
you are electrically discharged by e. g. touching 
the metal housing of  a grounded appliance, a 
water pipe or radiator.

Use a soft, fl uff-free cloth. You can also use a special 

cloth for cleaning fax machines (see Delivery Serv-
ice). Never use liquid or gaseous cleaning agents 

(sprays, scouring agents, polishes etc.).  Do not 

allow any moisture to penetrate inside the device.

 Clean the scanner glass

1

  Open the paper feed fl ap and carefully pull 

out the paper. Close the fl ap again.

Summary of Contents for PHONEFAX 39 TDS

Page 1: ...User manual...

Page 2: ...ew SMS messages in the memory not available in all countries b indicates that the answering machine is switched on for devices with built in answering machine indicates silent mode selected Faxes as w...

Page 3: ...rint operating instructions for the most important functions with references to additional help pages press and hold for two seconds to start the automatic installation of your fax machine printout of...

Page 4: ...appears whenever the cord less handset is out of range of the base station or the base station has been disconnected from the power supply Menufunctions on the cordless handset Your cordless handset...

Page 5: ...and error reports 23 Transmission speed 23 Size compression 23 Fax journal 23 Polled reception 23 Send later 24 Copy 24 SMS W 25 SMS settings 25 Disable SMS printing 25 Reading SMS messages 25 Sendin...

Page 6: ...bling damage to the cable or the fax machine Disconnect the fax machine from the mains and telephone line before cleaning the surface of the machine Never use liquid or gaseous cleaning agents sprays...

Page 7: ...cket on the wall Cordless handset Your cordless handset is tted with three re chargeable batteries at the factory If you need to replace the batteries you should replace them with rechargable batterie...

Page 8: ...ut a Plug n Print card If the Plug n Print card is missing or if it is not replaced the mes sage CHANGE CARD appears on the display If the ink lm is nished or if there is no ink lm in the fax machine...

Page 9: ...l roll forward to tension the ink lm Make sure that the ink lm is not creased 5 Break out the new Plug n Print card and insert it in the slot to the left of the ink lm com partments 6 Close the machin...

Page 10: ...you can insert up to 50 sheets of paper 3 The slits in the paper holder must be placed on the cover 4 Insert the document holder in the appropriate opening on the paper re ll ap 5 To prevent several s...

Page 11: ...ss handset However you can only receive SMS messages on one device at any one time Try to disable SMS reception on the additional cordless phone If you cannot do this disable SMS reception on the fax...

Page 12: ...xchange systems are very com mon in large companies ISDN connections are private branch exchanges and are used very often in private households To get a connection from a private branch exchange to th...

Page 13: ...nt of the country code and to enter a space You can enter a maximum of 20 characters 3 Press OK Your name 1 Select function 14 by pressing M 14 and OK on your fax machine 2 Enter your name using the a...

Page 14: ...r fax machine the display shows the current setting for about three seconds 2 Change the volume by pressing u until the desired volume is achieved For the cordless handset 1 Select function 32 by pres...

Page 15: ...00 a m and con rm with OK 3 Enter the time at which you want your fax ma chine to switch automatically to M e g 23 30 for 11 30 p m and con rm with OK Set SM mode Display Possible settings tAM rings 0...

Page 16: ...fax switch see chapter Set SM mode Settings example Answering machine rings 2 FAX RINGS 4 TOTAL RINGS 4 Tips The answering message of your answering ma chine should be shorter than ten seconds Please...

Page 17: ...rdless handset 3 Press the button on your cordless handset to establish the connection Telephone book a on the fax machine The memory in your fax machine can store about 50 names and numbers devices w...

Page 18: ...be displayed Select the entry you want to save using u and con rm with OK 5 The saved entry will appear on the screen Continue as described above until all desired numbers are saved to the group When...

Page 19: ...telephones to the same telephone line see Installation Additional devices However the additional phone must be set to dual tone multi frequency method If your telephone connection requires the pulse d...

Page 20: ...g fax you hear a beep or nothing at all Press 5 Devices without built in answering machine Not possible Devices with built in answering machine Press START Press 5 and hang up You want to forward a ca...

Page 21: ...Insert your documents max 10 sheets loose ly with the printed side to the front into the document feed slot 3 Move the document guide so that it rests on the document In the event of a document jam s...

Page 22: ...Repeat the procedure until you have entered data for max 25 recipients 5 To send the document press START COPY The document will be sent successively to every party entered Broadcasting to a group Alo...

Page 23: ...f the last ten received and transmitted faxes 1 Press M 27 and OK on your fax machine 2 Select with u if and when the fax journal will be printed out immediately or after ten transmissions 3 Con rm yo...

Page 24: ...ephone calls while this function is activated 5 If you remove the inserted document the stand by mode is cancelled Copy You can use your fax machine to make copies of an original Resolution FINE is s...

Page 25: ...recept Con rm with OK The NO for transm and the NO for re cept are needed in order to use SMS services In some countries these numbers may be identical Disable SMS printing 1 Press M 64 and then OK fo...

Page 26: ...M 61 and OK on your fax machine Printing SMS messages 1 Press the SMS button 2 Press u to select PRINT SMS 3 Press OK 4 Use u to select which SMS messages you want to print PRINT ALL PRINT inbox PRIN...

Page 27: ...one device at any one time Try to disable SMS reception on the additional cordless phone If you cannot do this disable SMS reception on the fax machine 1 Press M 45 and OK on your fax machine 2 Enter...

Page 28: ...AUTO mode unlimited re cording time Please note that AUTO mode is not available in all countries 3 Con rm with OK Listening to messages 1 If the PLAY button ashes on your fax ma chine this means that...

Page 29: ...e 8 Press STOP when you have nished The forwarding message will be played back 9 The fax machine is now switched to stand by mode if a message has already been recorded a Press OK b Select with u If y...

Page 30: ...e call your fax machine and wait for the answering machine to play the message 2 Enter the four digit code The outgoing mes sage will be interrupted and you will hear a con rmation tone The new messag...

Page 31: ...en to your messages Overview of commands 1 The message you are just listening to will be repeated 2 Your messages will be played back 3 Move to the next message 6 The current message will be deleted I...

Page 32: ...et on more than one fax machine You can register a cordless handset on up to four fax machines 1 Register your cordless handset automatically on the rst fax machine as described above 2 On the second...

Page 33: ...he cordless handsets registered on the fax machine will then ring for about one minute To cancel the search function press the STOP button on the fax machine or the button on the cordless handset Muti...

Page 34: ...y remove the paper 4 Turn small roll forward to tension the ink lm Make sure that the ink lm is not creased 5 Close the panel so that it also clicks into place 6 Insert paper see Installation Loading...

Page 35: ...fac tory settings The fax machine will therefore react in exactly the same way as on rst installation Code No 7140 This code deletes all the settings and data you have entered on your fax machine wit...

Page 36: ...e The fax cleaner is available through our call centre see Delivery service 3 Close the scanner cover on the left and right making sure it clicks into place Close the panel so that it also clicks into...

Page 37: ...LOOP CURRENT Check the installation of your fax machine When you lift the cordless handset you do not hear the dial tone Connect your telephone cable to the socket on your fax machine identi ed with...

Page 38: ...33 Timer 16 setting the TIMER operating mode U 34 Easylink 20 codes for use with additional telephones 35 Ringer types 14 selection between ten ringer types Others 44 Dialling list 18 print out of st...

Page 39: ...machine SMS storage capacity 30 received messages Noise level on standby 30dBA copying 53dBA Printing method ink lm printer Document feed up to 10 letters 80g m2 Fax switch DAY NIGHT TIMER Dimensions...

Page 40: ...ion Austria GmbH makes no representations or warranties express or implied statutory or otherwise and to such extent all terms and conditions implied by law are hereby excluded This guarantee does not...

Page 41: ...ng the equipment to SAGEM Communication Austria GmbH The repair and delivery costs will be invoiced to the customer The foregoing shall apply unless otherwise agreed in writing with the customer and o...

Page 42: ...42 Appendix...

Page 43: ...43 Appendix...

Page 44: ...44 Appendix...

Page 45: ...olume 14 Ring signal type 14 Search function 33 Speaker volume 14 Switching on and off 33 Correct Telephone book en try on the cordless handset 18 Telephone book entry on the fax machine 17 Creating g...

Page 46: ...aper Fax reception with out paper 22 Load 9 Paper jam 34 Remove 11 Technical data 39 Photo mode Copy 24 Display symbol 2 Image quality 22 Technical data 39 Play back volume 28 Play key 3 Polling Polle...

Page 47: ...answering machine on and off 28 T Technical data 39 Telephone 17 Calling line identi cation 18 Easylink 19 Group 18 Hands free opera tion 18 Making a call 17 Redial 17 Telephone book on the cordless h...

Page 48: ...further information please contact your national technical support centre Initially contact your dealer if problems occur during operation This operation manual has been printed on chlorine free recyc...

Reviews: